
 Hi, the week is over and a fresh Weekday Escape here!
Amajeto turned for inspiration to nature and their brownish apartment feels autumnal indeed. Neat Escape wants you to leave a room without doors or better, without any visible one. New designer Jim-Ar created a large escape game divided into two parts in the best tradition of the genre, not an easy one but definitely entertaining and rewarding.
Have a good time and enjoy!
Amajeto's wants you to escape an apartment which consists of four rooms and collect eight tiles on your way out. To get all the tiles you need to figure out several letters/shapes/digits codes. Can you escape?
The cursor isn't changing, no save button, one ending.
You wake up in Neat Escape's inn and can't leave your room - but you need to check out this morning! On top of that there isn't any door in plain sight...seems that you need to find a secret door or a mechanism which opens it. You should start right now to get any breakfast...and don't worry about the mess you may cause as this room is equipped with selfcleaning spell!
The cursor isn't changing, save button, two endings.
P.S. Let me remind you of Kotorinoshu's excellent game E.X.I.T. II - The Basement. There is also shorter game E.X.I.T. which you find in WE N°155.
Gear
Perfect old school escape game by Jim-Ar keeps you entertained for quite a long time and for patient escapers it's well spent time indeed! You find yourself locked in a dark cell-like room - you may need to turn the monitor brightness up - with several pieces of furniture and some strange devices with (yet) unknown purpose. The only reasonable thing you can do is to carefully explore the room and pay attention to your cursor since some hotspots aren't obvious. Notice, that there is a clue for every puzzle so if you don't have any you just haven't found it...also, the game ends abruptly right after you open the last box...to be continued!
The cursor is changing, no save, one ending.
...you find yourself in the same room which you tried to escape! That's 'cause the game is divided into two parts. Now you hopefully find out what are the fish for and open the glassed niche. And after you escape this room you haven't won yet, you get trapped in another one...there is a long road to freedom ahead full of intricate puzzles!
The cursor is changing, no save, one ending.
We love escape games, and our readers love talking about them and sharing hints! How about you? Let us know what you think, ask for clues, or help out other players in the comments below.


Hint for Amajeto:
Not all doors are locked.
looking forward to these.
In Escape from the Old Inn, I got what I think was probably the "OK ending", but I suspect the alternate ending was the better one. I can't figure out what I should have done differently to get the better ending -- has anyone found it?
The second ending
there isn't any hidden door
and there isn't any hint for that solution
you need the big hammer
and break the wall
in the room with colorful balls scattered around
Gear and Gear II were incredibly enjoyable - hard enough, but smart and really rewarding of patience. Reminded me of some of the classics of ten years ago or so.
i need help with the three digit code in gear I
The three digit code
you need a clue
the clue is in a book together with other clues
the book can be easily overlooked...
it's in the bookcase
it's the rightmost book on the upper shelf
you can use the hint after you open the brown box next to the table lamp
inside the box is a yellow square button
push it - the tv screen changes and you can enter a code of your own choice
according to the hint book, any code you enter is equal to the three digit code
Exactly. Really enjoyed playing them.
Jim-Ar's Gear and Gear II are quite perfect indeed. They contain mostly very clever, logical puzzles and hints. However I failed to find the clue to the four-digit-code in Gear II. Had to consult a walkthrough to discover it's
7482
Can anyone tell me where or what the hint for the code is?
The four digit code
the same here I had to find a help only for this code...
...and I was sorry then
why wasn't I more patient and/or observant?
click all four slots
did you notice anything?
click them again
while is a number in a slot changing two colorful stripes blink
in the first slot blink yellow stripes, then blue, green and red
the hint is in the lower drawer
the table grid of nine colorful squares
yellow = 7, blue = 4, green = 8, red = 2
@chrpa:
You couldn't be more right with your regretfull remark "why wasn't I more patient and/or observant?"... [slightly blushing]
Thank you though!
:-)
In Escape from the Old Inn, I got what I think was probably the "OK ending", but I suspect the alternate ending was the better one
Yes it is! Look in comments, the fourth one gives you directions to it.
Hope the walkthroughs are not too far off.
Late Fall
Exploration
The first screen features a large stairstep of shelves. Two of them have light switches and two of them are locked, and on its right is a picture missing eight tiles.
Stop scraping for clues! The door's already unlocked.
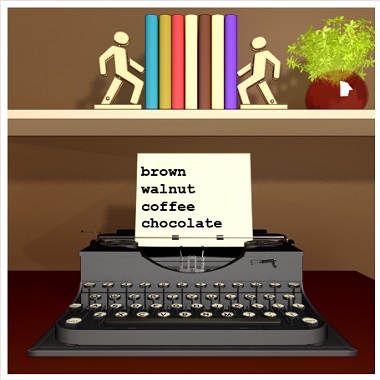
The second screen has a drawing of a tree to the left of a wall shelf with lettered books over a desk which has two locked drawers and a slightly unusual typewriter.
The door here is unlocked too! Onward to the third screen, which has a small window made even smaller by stickers, and a television (powered off) over some letters over four compartments. Two of those are locked, the other two are fake, and there's a leafy clue in the middle.
If you try the door here, you'll find it locked.
1st screen
Let's start by putting the grid clue from
the third screen
into the bottom-left compartment of the first screen:
Click the middle two buttons along each edge:
- B B -

B - - B

B - - B

- B B -
It contains a remote control, a brown square tile and another light switch.
Use the remote on the TV to view a sequence of colored stripes.
Then use the clue from
the TV and books
to unlock the bottom-right compartment on the first screen:
The books that match the colored stripes have labels that spell out
COCOA
It contains a square tile, key and another light switch.
Exploration 2
Unlock the door on the third screen.
The next door forward is locked. There's a locked drawer near the plant pot. Above the couch are three picture frames, and you'll find that
the left one moves when you click its corners.
2nd screen
Clues:
The shelves on the first screen, and the compartments under the TV on the third screen.
For the top drawer:
If you turn on all the lights (and do some deduction based on what's visible on each screen), you find that of the ten compartments there are
1 Red, 2 Yellow, 3 Green, 4 Blue
(2 0 7 6 clicks)
For the bottom drawer:
The drawing has leaves on a stem that looks like an up arrow.
From bottom up, the leaves are on the
LRRLR
Take 2 square tiles.
3rd screen
Clues:
The text under the TV and the green card suits on all four screens.
For the left compartment:
Looking only at the orange letters, you find that they spell out
LELL, which is7737
upside-down.
For the right compartment:
The card suits appear in groups of different sizes:
1 Spade, 2 Diamonds, 3 Hearts, 4 Clubs
Take 2 square tiles.
4th screen
Clues:
Shelves on first screen, typewriter on second screen.
For the drawer:
Each column of shelves has a set of stripes at its bottom.
Match that pattern by clicking the bars
1 3 2 0 times.
For the left picture:
The typewriter tells you to click the
DR DL UL DL UR
corners.
Complete
Go back to the first screen, and put all eight tiles into the picture, and then solve the picture by rotating the tiles until they align.
(Hint: start from the bottom corners and work upwards.)
3 1 1 22 2 1 3
3 2 3 2
1 3 1 2
Bring your key all the way to the last door, and open it to end the game!
Escape from the Old Inn
The new control scheme is less convenient than the usual, but it makes some impressive effects.
Exploration
To use the rotation buttons at the bottom of the screen, click and hold them. It won't work if you click too high or too low.
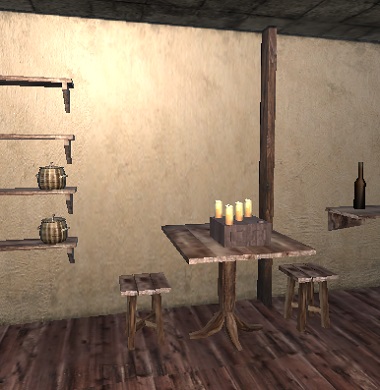
You start off facing shelves with baskets on them. On the right, the box on the table has four unlit candles and room for a fifth.
In the corner of the room is a shelf with a barrel and four glass bottles. The next wall to the right has a bookshelf which you can't do anything with.
The next wall has a window above a pair of vertical grooves on the wall.
Next to that, there's a bed with a clue on it. There are four empty glasses on the right.
At the far end of the wall is another window and two large sacks you can move to find a hammer.
The next wall has an impressive fireplace with only a locked box on the shelf, having four color buttons.
The table in the corner has a box with three colored digit buttons.
Break and burn
Use the hammer to smash the bottles. The third one contains a candle.
Light the candle in the fireplace. To use it correctly you'll need the clue from
the bed.
Use your lit candle to light the top-right and center candles on the table, then place it in the bottom-right slot.
(If you mess up, you can click a lit candle to unlight it.)
Out pops a PUSH button, which releases something in the room.
Colorful
The cups near the bed now emits colorful smoke.
Use that clue to unlock the box above the fireplace:
From short to long, the trails are
Green Blue Yellow Red
(3 2 5 6 clicks)
Take the lever from it.
Use the lever on the grooves under the window, and pull it down.
The bookshelf slides right to reveal a door forward.
Exploration 2
Straight ahead is another door, this one padlocked.
Turn right to find an enclave boarded up.
Turn right to find the doorway back, and then a shelf with two urns, and then shelves with four sacks of something.
Continue turning to find a crate.
Break and pull
Use the hammer to break the urns on the shelf. The right one hides a spanner.
Use the spanner to remove the planks. You find a slider box among some items on the table.
Horizontal
Use the clue from the
wall shelves
to unlock the slider box:
Paying attention to the items on the left and right, you find that the left column matches the shelves in the first room, and the right column matches those in the second room.
L L
L L
R L
R R
You find a large hammer that upgrades your existing one.
Break and math
Use the large hammer to smash the crate, releasing colored balls all over the place.
Not to worry, this surprise ball pit is limited only to one quarter of the room, and you can see it all if you step back.
Use the clue from the balls to unlock the box on the table beside the fireplace:
There are
5 white, 3 orange, 8 blue.
Take the key, and use it to unlock the padlocked door.
Exploration 3
Under a shelf with four ceramic containers is a four-letter box.
Turn right to find a long corridor leading to another locked door.
Turn right to face the door back.
Turn right to find four weighing scales.
Balanced
Use the clue from the scales to unlock the box:
With light < heavy, the scales tell you
A < D, C < A, D < B, C < B
You don't need that last one to figure out that the correct order is
C < A < D < B
Take a key.
Save your game, and open the door for the normal end.
Then load your game from the title and continue for the other ending:
Hint: You can't get this ending before the normal one.
Did you notice something unusual in the normal ending?
There's a diagram on the wall at the top left of the end screen, showing you the way to the kitchen.
In the second room, click the wall opposite where you removed the planks.
The game zooms in on this seemingly empty wall, which is your cue to smash it with the large hammer.
Leave through this hidden door, and enjoy your breakfast!
KK,The slider code you put is wrong.
The actual sliders go:
L L
L L
R R
R L
Just thought i'd let you know.
hope the last 2 are not far off. Thanks again,KK.
Note that Gear I and II are Flash games.
Gear I
Exploration
You start facing a mysterious door without any handle. On the left is a glass panel with a hexagonal hole. The bookshelf on the right has four sections (you don't have to back out to move between them), in which you see that the bottom locked compartment has a lock with four buttons.
Checking the books, you find a hint book hidden at the right end of the top shelf.
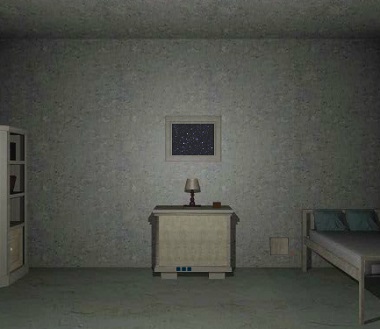
Turn right. A starry picture changes when you push its buttons. The cupboard beneath has a box with a keyhole, and you can zoom in on the bottom of the cupboard to find a screw holding the doors shut, a four-digit lock, and a clue underneath.
Zoom in on the bed, and check out the wooden panel on the left which has a hole in it. The pillows on the bed don't hide anything.
Check under the bed, and you'll find a crab toy near the right side.
Click just under the bed again to find something tied underneath, and what appears to be an X marked on the wall.
Back out, and you should now be facing the next wall. Under the mirror is a long cabinet with a box on it that's missing three shape pieces. The top of the cabinet has a hole that allows you to look at the water in it. In the corner of the room is a pot with a small hole in the top, and from here you can see the tap on the side of the cabinet.
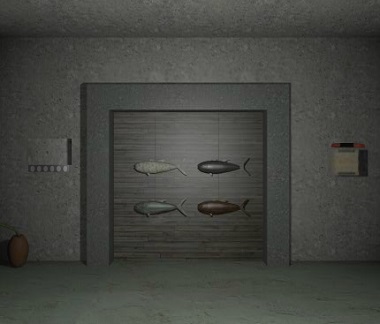
Back out, and you should now be facing a large doorway with fish on it. The top-right fish has a screw on its face. On the left side of the doorway is a panel with six dials. On the right side of the doorway is a wall box with sliders on top and buttons below.
Manual
Use the first clue from the book to unlock the picture:
There's no square button, it's two rectangles stacked together.
DDUDUU
Rectangular outlines appear over the images.
Use that clue to unlock the bookshelf compartment:
The blue green yellow red green blue red objects are the
Jar Fruit Straw Spoon Fruit Jar Spoon
(4 3 2 1 3 4 1)
Inside, there's a tube, two more clues, and two switches.
Roman
Use the roman numeral clues all over the room to unlock the bottom compartment of the wall box:
The number II is light-colored, on the right half of a rectangle, on a dark background.
Match those properties for each segment of the clue under the compartment by clicking the buttons
2 7 6 1 times.
Inside, you find a set of color blocks and two light switches.
Projector
Use the clue from the book to flip all the switches:
Not quite. Turn on all the switches except the right one in the bookshelf.
The top section of the wall box is now lit up.
Use the clue from the color blocks to set the sliders there:
The blocks indicated have 5 4 2 1 3 lines, so click the sliders 4 3 1 0 2 times.
Open the top compartment of the wall box and take the screwdriver handle.
Rubber
Attach the tube to the tap, and the game automatically puts the other end in the pot.
What's that shiny thing?
Placate the crab by
"giving" it the toy
and you get a key.
Use it to unlock the box on the cupboard, which contains an octagonal connector piece and a cross-shaped screwdriver tip.
Blank
The box you just opened is now empty, but
you can push the golden button on the open lid
and doing so makes the picture above change.
From the book, you know that the this puzzle involves the three-digit locks on the picture and cupboard.
You don't actually need two codes, just two of any code. For example:
Enter 111 in each lock.
The left cupboard door is now open, and you can take a square block and view a circled square clue.
Unscrew
Attach both metal pieces to the screwdriver, and use it to unscrew the right cupboard door.
Inside, there's a flat tool and more circled clues.
Also unscrew a bolt from the fish.
Examine the bolt and remove a gold piece from it.
Insert the gold piece into the flat tool. It won't seem to stay down even if you push it. Are we reading the book right?
That number 7 isn't a page number, it's how many times you have to push.
A knife blade pops out.
Cut
Use the knife under the bed to unleash a red handle.
Then use it on the tap to drain it into the pot. The poor crab has been swept onto the floor, but that means you can take the floating capsule.
Open that with the knife to get a dial.
Also, the water in the wall cabinet is gone, and you can look there to find a clue.
Circles
Let's use that clue you saw in the wall cabinet to unlock the panel beside the door:
Each sector has an angle that represents the direction opposite it.
Click the dials
5 0 1 2 3 4 times.
Take a diamond block.
Also insert the dial beside the bed and turn it to find a spinny metal disk with a small round window.
Use the clue from the book to unlock this disk:
As indicated by the hands and letter, you turn right by clicking the left side and vice versa. That's the first direction, and then you alternate after that.
The circles on the book match the patterns visible when the window is L R U D L. In terms of where you have to click:
RRRR LL RRRR LLLLLL.
The whole metal disk pops out.
Don't miss the narrow section above where the disk was, which you can click to pull out a metal plate.
Metal
Place the colored blocks in the metal plate, which releases a branched attachment and a clue.
Replace the screwdriver head with the attachment, and use it on the metal disk to reveal a triangle piece.
Triple
Place all three blocks in the box on the wall cabinet. Now they're buttons you can push!
Use the remaining clues to solve this puzzle.
In the cupboard, the circle around the triangle is largest, followed by the diamond, then the square.
The clue on the metal plate tells you what sizes to push, and that translates to
T D S D T T
(L R C R L L)
Inside the box, you get instructions to continue in Gear II.
Gear II
You've gone a whole game without even touching a gear. Now's your chance!
Exploration
You don't need it.
Just kidding! You start with half a screwdriver in your inventory. You can now look at the door to find some dots.
Turn right. Your cursor doesn't change, and that's because you've already done everything on this screen.
Turn right. Ah yes, there's that box you opened last time. Nothing surprising inside, just a hex wrench.
Turn right. Each of the fish now has a letter on it. You can still zoom in on the left panel, and a weird hole on the side of the door is now a hotspot.
Use the hex wrench to open up the glass panel. The door is locked and the clue is fish.
Comparing the materials of the fish to that of the buttons, you find that the required sequence is
⌟ ⌜⌝⌟ ⌜⌞
The white markings are becoming even weirder, but at least you can pull the lever down to open the door.
Exploration 2
You get a choice between left or right. The right room is completely dark and unusable, so go to the left one, which is also dark but at least you get to zoom in on the light.
While zoomed in on the pair of buttons under the light, you find a scroll tucked away in the bottom right corner.
Black and White
The scroll says something about black and white and a door…
On the glass panel, pull the lever back up to close the door.
Then use the scroll on it.
Hmm, you're looking for two columns of dots having the correct vertical spacing. Those columns must also be horizontally aligned and the correct distance apart.
The entire right half is too widely spaced, so you should look at the left side. If you check every column from the left you'll find the solution easily:
Place the holes over the 3rd and 5th columns.
Open the door again, and then use the scroll clue to turn on the light in the left room.
The dots that change between each pair of consecutive rows are
LRRRLR
That "light" is actually a porthole into a world of fish. Take a key from the inside of the lid.
You can now view the cupboard in this room, which has a fork-shaped piece and a four-button lock.
The right room is now brighter too. In the middle of a long steep ramp is a hole for a lever.
Corners
Use the clue from
the wall panel with six dials
to unlock the cupboard in the left room:
Remember how you worked out that clue in the previous game?
The first dial has an angle that matches the top-left button.
So the arrow beside the buttons represents
⌜⌝⌟ ⌞⌞⌟
The panel slides down and you can pick up a pentagonal piece.
Fishy portal
Put the pentagon piece in the hole on the left of the fish doorway and push.
You can now climb it to find a three-button locked box on top.
Enter the clue from the
fish light/porthole
into the box:
Center Left Right
(2 1 3 clicks)
Take a flat screwdriver tip. The hint under it is optional.
Two gears
You may have figured out (from the white markings) that the fork can be used to remove the lever from the gear panel… when the lever is up and the door locked, which makes it rather useless.
Attach the tip to complete your flathead screwdriver.
Now you can remove the right gear (when the lever is down).
And now you can put the lever up without locking the door, and then use the fork to remove the lever.
The remaining gear does something amazing when you turn it.
Meanwhile, you can enter the right dark room and insert the lever in the ramp to make it stairs. The door at the top has a slider lock, and the clue for it is
that amazing thing. The game won't even let you try if you haven't done it.
1 2 0 3 clicks.
This reveals a keyhole, so use the key to unlock it.
Exploration 3
Wow! All the junk in your inventory is gone, leaving the screwdriver (and its tip) and the gear you removed.
The locked wardrobe is rather boring right now.
Turn right to find three windows above a wall panel that won't stay open. There's a grid of buttons on the left.
Turn right to find a table with a glass of water you can't drink and a plate that hides 5 coins. (If you're curious about these obvious fakes, you can zoom in to read what the coins actually say.) There's also the doorway back but instead of returning you can only permanently close that door to find a puzzle on it.
Turn right to find three picture frames. The left one has a battery on top, while
the middle one tilts when you click its corners.
Drag
You have to drag each piece along its column or row until "enigma" comes out the right side.
Some notation:
I'll number columns (Vertical) from left to right, and rows (Horizontal) from top down, so that the enigma piece is referred to as
h3.I'll use single arrows → to indicate moving a block by one step, and double arrows ⇒ to move them as far as they will go. For the top row / last column there are two pieces but it will be clear which one to move.
Follow the hint by observing which blocks are changed between the pictures.
Start by manipulating v4 upward and h6 to the right:
v6↓ h4→ v4⇑
h4← v6↑ h6⇒
From here, it's easy to get to the second position of the hint:
v3↓ h3→ h1← v4↑
I see no more hints and we're only halfway done. At least the other half isn't too bad.
Now you have some space to maneuver but there's too many blocks in the top right. v4 would have to move, but that means there's too many blocks in the bottom right.
So let's move h4:
h3⇒ v1↓ h1←
v3⇑ h4⇐ v3⇓
Then v4, and we win.
h3⇐ v4⇓
h1⇐ v6↑ h3⇒
If that was too confusing, there's an alternative:
From the starting position, forcefully drag the enigma tile to the right in one swift motion.
This glitches it through the other tiles, instantly clearing the puzzle.
Pick up the enigma tile and examine it to find that it's actually a key.
Unlock the wardrobe to find lots of things.
In the top section: a four-digit lock, a chain attached to nothing in particular, and a panel with a hexagonal bolt.
In the bottom left: one drawer has a coin device, one has a keyhole and one just has a hole.
In the bottom right: there's 5 coins in a pair of shoes with a weird label attached to them.
White and Black
Use the clue from the shoes to unlock the tilty picture:
On the left side, white is below and black on top, while on the right it's the other way around. From top to bottom, the letters on the shoe labels represent
⌞⌟⌝ ⌞⌝ ⌜
The whole picture comes off and becomes a coin clue when you examine it. Take the wrench tip.
Attachments
Replace the screwdriver tip with the wrench tip, and remove the panel in the top right of the wardrobe.
These instructions should be pretty clear…
Put the gear in the hole indicated, then convert the wrench back into a screwdriver and use it to screw in the gear.
Then push the button to make a hook emerge from the right.
Attach the hook to the bottom drawer and open it to find pliers on a grid of colored numbered squares.
Use the pliers to remove the chain.
Grid
Use the clue from the bottom drawer to unlock the button grid near the windows:
The squares 1, 2, 3, 4 appear in the
Bottom, Bottom-right, Top, Bottom-left.
This reveals a hole controlled by two buttons.
You can also use the clue for one more thing:
The four-digit lock. It's not just an ordinary four-digit lock…
Each digit is a different color.
More specifically, while you're changing each digit there is a colored flash as long as your mouse button is held down.
The flashes are yellow, blue, green, red, and the squares of those colors are numbered
7 4 8 2
Take the key, use it to unlock the middle drawer, and take another five coins.
Math
Use the clue from the
back of the picture
to unlock the device in the top drawer (after putting the battery in it).
I'll call the coins copper, silver, gold.
You'll only need the first three lines of the clue, the last one is helpful if you're guessing.
Subtract the first from the third, to get
Copper + Silver = 10
Subtract that from the second:
Copper = 3
Substitute that back into the first and third equations:
Silver = 7, Gold = 9
All good, but that's not the whole puzzle.
You need to insert coins that total 82.
Based on the values you just worked out, all the coins you have add up to 95, so you should leave out 13 worth of coins.
Copper and Gold are divisible by 3 while 13 isn't, so that 13 must include one Silver (7). It can't include two silvers because that would exceed 13. The non-silver part of the 13 would be 6, which must come from 2 coppers.
You'll need to leave one silver and two copper coins behind, which means you insert
5 Gold + 4 Silver + 3 Copper
When it's correct, the machine spits out 2 carabiners.
Letters
Attach the carabiners to the chain, and use it to hold open the panel under the window.
There's only one place this code can be:
The left picture reads
CLUETake a key. This one has an arrow and does some weird things when you click it.
Fitting
Insert the key into the hole to the left and under the window.
Any combination where the key fits will work, so there should be 9 solutions all equally complicated. You might as well be efficient with the key clicks.
Click the key once, the left button 4 times, and the right button 3 times.
The doorway opens and you can escape!
Thanks again KK. the
Slider puzzle in the upstairs room on Gear II was difficult for me to figure out so i had to resort to a video walkthrough.
Other then that it was awesome. Can;t wait to see more walkthroughs from you soon.
Thank you KK for your time, amazing walkthrough . Happy New Year to everyone. Jim
Happy new year, and thank you for the great game!
Update