
 Hi, it's Wednesday and our new games are here!
After lazy afternoon comes Amajeto's slow sunny morning with fresh coffee and something sweet. When you pull yourself together, it's time for a quest! Shigeyuki Kagamura's moon rabbit fall from the sky, poor thing, and now wants back where it belongs. You are supposed to help it and figure out how to fulfill its wish. TomoLaSiDo then locks you in their room with several spitting fish and Ichima Coffeedo does the same, locks you in a room with strange devices and wants you to get them work. For successful escape you are rewarded with edible gift!
Have a good time and enjoy!
Amajeto's living room is as comfortable as the one you escaped last week, only without colorful coctails. There are colorful macarons instead, and many coded cabinets as usual. Cosy atmosphere, comfy armchairs, coffee, macarons - are you leaving or staying here?
The cursor isn't changing, no save button, one ending.
P.S. Do you remember Morning Room by Neutral? It's quite short and not easy, but sweet.
No language barrier. It seems there could be some but nope, and even no guessing. Just be observant and look at the clues carefully. Shigeyuki Kagamura's game has three stages and after you successfuly pass one, the following stage opens (its icon on starting screen activates). You can return - and you have to, in fact - to the previous ones. Will you help the moon rabbit to get home?
The cursor isn't changing, autosave - saves only already passed stages, one ending. The game is at the bottom of the game page.
P.S. Here is another way how to get a rabbit to the Moon: Rabbit's Rocket by Minoto. Another great game about wise rabbits (not the moon ones) and carrots is Hermit Rabi and Wonder Fountain by Robamimi.
TomoLaSiDo chose spitting fish this time. They spit with perfect aim and not just for fun - their hits are hints for puzzles. Four of those live in their tank, but you need more - and suitably, there is a vending machine for fish (living), containing three in total. For escape aren't necessary all three fish, only for perfect ending. Otherwise you have to get six key parts and notice, that changing cursor comes really handy.
The cursor is changing, no save button, one ending.
Ichima Coffeedo's older games (in Adobe Flash) aren't playable anymore, but it seems that devs have started remaking some of them in Unity. They aren't just copying the originals, they are also changing them and the result is very good - clever and intuitive, with good graphics and music. Joy to play and perfect relax. Are you able to get the mystifying mechanisms work and escape?
The cursor isn't changing, autosave, four endings (not very different).
We love escape games, and our readers love talking about them and sharing hints! How about you? Let us know what you think, ask for clues, or help out other players in the comments below.


Thanks for posting these games each week.
I was wondering, you mentioned that older Ichima games are no longer playable. If you try to play the older games, you get a 404 error.
However, I can still play Adobe Flash games from other developers.
Is there a reason that Adobe Flash is no longer desirable by game developers?
In the case of Ichima, some explanation is given on the home page (the message dated 2019.8.1, which I'm too lazy to translate right now).
The obvious reason given is the browser Flash deprecation deadline coming up, but most developers also mention that Flash games developed long ago don't match up to a modern standard. (Personally, I feel that that's mostly untrue for Ichima's older games.) For them, the remake/rework needed to update the games and graphics is too much.
It makes me worry a little about tomoLaSiDo and No1game, who are still regularly posting Flash games in their series even though they've proven capable of similar quality in Unity WebGL and HTML5. Hopefully when 2020 comes they're able to rerelease these games to keep them playable.
Sadly, I think it's already happened with most of Tesshi-e's games, which are gone from the site due to similar flash-based issues.
looking forward to the mew walkthroughs, and thanks ahead of time, KK. you rock :)
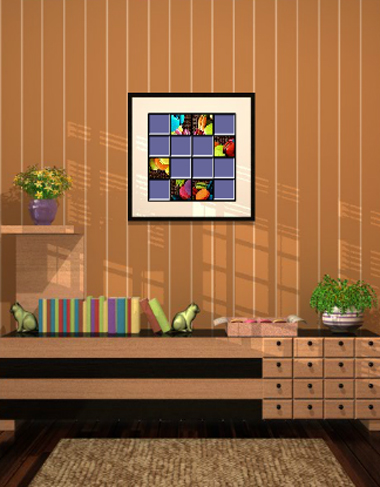
Sunday Morning
If you believe that Sundays should be sweet and that mornings should have macarons, then this is the game for you.
Exploration
The typical picture grid with tiles missing is framed on the wall. Even though there's lots of storage space around it, the only part you can look closer at is the box of macarons beside the potted plant, which is partially covered by a square tile.
Turn right to find four framed pictures of almost-identical hearts made out of macarons, with the only difference being that they're rotated differently, and that the third (upright) one has a purple line on top. Furthermore, you can click the corners of that one to make it tilt. On the table, another square tile rests against a plate with a pile of macarons.
Turn right to face the locked exit door. On the left, a television screen is mounted above a greeting and a comfy chair, and on closer look you find a screw squeezed into the letter O as well as a square tile resting on the open magazine.
Turn right to face some windows with their blinds partially drawn. Under that, a square tile leans on a fruit bowl next to another plate of macarons. Also, there's five tall cabinet compartments, which have a lock with four colored letters, a lock with a grid of buttons and a purple line, a lock with four colored digits, a lock with four small dials, and a lock with four brown bars that extend downwards when clicked.
Rectangles
Use the clue from the windows to unlock the rightmost compartment under them.
The blinds that are most closed are on the left, right, middle left, middle right.
Click the bars (from left to right) 3, 1, 0, 2 times to form the same pattern, then open the compartment to find a square tile.
Variety
Use clues from the macarons in the room to unlock the middle compartment under the windows.
Counting up the macarons of each flavor in the box (16 total) and on the plates (5 per plate), you find that there are 7 yellow, 8 brown, 6 purple and 5 pink.
So enter 7865 into the lock and open the compartment to find another square tile.
Arranged
Use the clue from the box of macarons to unlock the second compartment under the windows.
First, notice that the buttons turn purple when clicked, which suggests that you only need to care about the five purple macarons in the box.
Second, the purple line appears on the left side of the wrapper, which means that the clue has to be rotated.
Taking these two factors into account, you need to push the
P - P -

- - P -

- P - P

- - - -
buttons and then open the compartment to find a remote control and a square tile.
Screen
Use the remote to turn on the TV, which shows a clue with a light gray square and a row of colored dots.
Square
Use the clue from the TV (and somewhere else) to unlock the tilty heart picture.
As the purple line on the picture hints, you need to refer back to that box of macarons.
How does it help you translate colored dots to corners?
Looking in the corners of the box, you find that the macaron in each corner has a different color. For example, purple is in the bottom left corner of the box.
However, that purple line also means you need to rotate the clue, just like before, which means the sequence of buttons starts in the top left instead.
Push the ⌜⌞⌜⌟⌝ buttons, which makes the picture come loose, then flip it over to find a square tile and the number 1. That doesn't seem like enough information…
But you can now flip the other pictures to find numbers on their backs.
Arrows
Use the clue from the heart pictures and their backs to unlock the fourth compartment under the window.
Looking at the pictures numbered from 1 to 4, their heart shapes form arrows pointing DRUL.
So click the buttons 4, 2, 0, 6 times, then open the compartment to find a screwdriver and square tile.
Unscrew
Use the screwdriver on the screw in the letter O under the TV.
This doesn't remove the screw or anything, but you notice some of the letters turning different colors, and when you back out you find that there are a total of four colored letters.
Lit
Use the clue from the lit letters to unlock the leftmost compartment under the window.
The colors which are blue, yellow, red, green spell out the code MING.
Enter that into the lock and open the compartment to find the last square tile.
Complete
Place all 10 square tiles into the picture on the first screen, and solve its (randomized) puzzle by rotating the pieces until they align.
Once you're done, the whole picture slides up to reveal a hidden compartment with a golden key. Use it to unlock the door and escape!
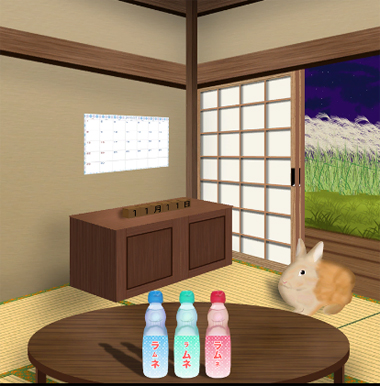
Lost Moon
As usual, the game is in the middle of the page, and you can quickly get there by searching for the あらすじ section and then scrolling down. But not too far, because right under that are the hints and solutions. Yes, that's pretty much a full walkthrough right there on the game page, if you know Japanese!
Anyway, I think the title needs a slightly better translation. お月見 is moon-watching on the Mid-Autumn Festival, and 落し物 is something that has been dropped or left behind. What has the moon lost?
Exploration (Stage 1)
After the super-short intro cutscene, you find yourself in a traditional Japanese room with a fuzzy rabbit blocking the doorway. It sits next to a piece of paper marked September with some pawprints on it.
The left wall has a similar grid printed on a calendar, also opened to the month of September, as well as a set of calendar cubes on the cabinets below. Clearly that's not the correct date (for the middle of autumn), but you can adjust the cubes by clicking them. Also, if you try to click on the cabinet instead of the cubes, you end up looking at the gap in the wall between it and the door.
The round table in the front of the room has three bottles of ramune, with slight differences between their colored labels.
Numeric
Use the clues from the paper beside the rabbit and the wall calendar to adjust the cubes.
Those two clues reference the same grid, which tells you that the date of interest is the 13th of September.
Using either your background knowledge or by referring to the text on the paper, you figure that the month number comes first, before 月.
This means the digits you need to enter are 0913. Do so, and the cabinet opens up to reveal a flashlight and a box with three colored buttons.
Glow
Examine the flashlight and click the switch to turn it on.
Then use it on the gap beside the cabinet to reveal a clue with squares and arrows.
(This clue may not be very clear depending on your screen. Make sure you can see all twelve squares.)
Threes
Use the clue with squares to unlock the box in the cabinet.
(Remember, to view the cabinet you need to click the cubes on top of it.)
The arrows connect four groups of squares, in which the bottom, middle, top, middle squares are smaller.
That matches the character sizes on the red, blue, green, blue bottles, so click the right, left, center, left buttons on the box to open it and find a carrot.
Feed
Give the carrot to the rabbit to end the stage (and click the screen again to continue).
You should now be able to select the second stage.
Exploration (Stage 2)
You're outdoors now, but your path is blocked by a white bunny this time. It stands next to a wooden container and a dish/leaf(?) with four rice balls on it. The glass jar on the right holds a large key, but it has a tiny padlock with pictures of food surrounding its number buttons.
Click the arrow at the bottom of the screen. You're back in the house, but this time it's different! The calendar has new markings on it, the cabinet is locked and needs a key this time, and there's now a box on the table. Even though the box looks like it has four triangular buttons, those triangles actually rotate when clicked.
(To get back to the first screen, just click the doorway.)
Points
Use the clue from the rice balls to unlock the box.
The triangular shapes of the rice balls point up, right, down, up.
So click the second triangle once and the third twice, and the box opens up to reveal lots of food! Oh, it's just stickers.
Decorate
Attach the stickers to the calendar. What now?
Now you can use the clue from the calendar to unlock the glass jar.
Each pair of pictures that surrounds a padlock button appears near each other on the calendar. Furthermore, the top pair appears together on the top row of the calendar, and so on. And there's one more thing to notice…
Looking at the pairs of indicated dates on the calendar, you realize that the dates of each pair are two days apart, with the date in the middle being empty.
Those unmarked dates are 5, 9, 20, 24, 30, so enter that into the padlock to open it and get to the key.
Unlock
Use the key to unlock the cabinet, which contains a mallet.
Hammer
Use the mallet on the wooden container beside the bunny to end the stage.
Exploration (Stage 3)
The same bunny from before now stands in a gap in a stone wall, and clicking it brings up an empty text box. Maybe it doesn't have anything to say?
Click the arrow at the bottom of the screen to return to the path, which has a wooden box with five circular color buttons, as well as a carrot on a chopping board.
(From here, you can click the top end of the path to return to the wall.)
Back out further to reach the room. The calendar has now been replaced with a wheel-shaped food chart, the cabinet now has a lock with food buttons, and the table now has a triangular stack of mochi.
Colors
Use the clue from the table in the room to unlock the box along the path.
To make the circular buttons the same colors as the mochi, you need to click the top button twice (making it blue), the bottom-left button once (red) and the bottom-right button thrice (green).
The box opens up and you find a knife inside.
Slice
Use the knife to cut up the carrot, which disappears except for four slices with notches in them.
Diet
Use the clues from the sliced carrot and the chart on the wall to unlock the cabinet.
The shapes/positions of the missing parts of the carrot slices match those of the quadrants of the chart that have the watermelon, candy, shaved ice and apple.
So click the buttons 2, 3, 1, 4 times, and the cabinet opens up to reveal a large trampoline.
Launch
Give the trampoline to the rabbit to end the game.
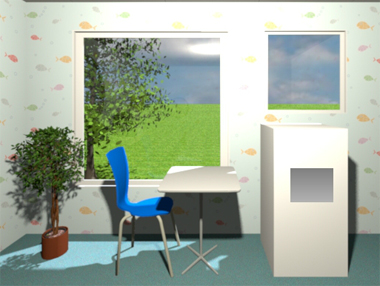
Escape Challenge 88: Room with Teppou-uo
Archerfish (written in Japanese with teppou for "gun" and uo for "fish") hunt their prey using water jets launched from the water surface. Rest assured that you're too big a target for their preferences!
Exploration
The windows on this screen come with several fresh features: they're square in shape, there's two of them with different sizes, and you can see a tall tree just outside. As usual, you look around and find a (capsule with a) key piece on the potted plant and another key piece on the blue chair. As for the large machine on the right, you find that it has three buttons (that don't work) and two lights (that are currently off), as well as a large hole for dispensing something.
Turn left to face yet another window, this one small and circular. Other than the wall box which has a four-digit lock, you also see a table, a box on the table, a ball on the box, a face on the ball, and a key piece beside the face.
You can look under the table, but the only fishy thing here is the wallpaper.
Turn left to face the locked door. There's a target board numbered like a clock but with one of the numbers missing. Checking the chest of drawers under it, you find that the top one has three shape buttons, and the bottom has three circular color buttons.
Turn left to find a long fish tank next to an empty bin. The tank has four fish near the air pump in the bottom right, and at the top left there's a dispenser with some buttons and a blue lamp.
Enter the corridor on the right, which leads to the toilet, where you can sit down, look right, look up and look left to find a drawing. (I had to look this up, but apparently the message on the sign reminds sumo wrestlers not to use nearby pillars for tsuppari training.)
Geometric
Use a clue from the room layout to unlock the top drawer.
The three windows are placed near the corner of the room, and from left to right (across the corner) they form a large circle, large square, small square. (Don't know why the circle is considered large, but it is larger than all the other circles in the room.)
Click the buttons 3, 1, 0 times, then open the drawer to find a key piece.
Rise
Use the clue from the fish tank to activate the device at its top.
The bubbles on the right are (from first to last, or from top to bottom) on the RRLLRL sides, so push those buttons to activate the device.
It dangles an orange ball, which the fish shoot down and then race to eat up.
Spotted
Use the new clue from the fish tank to unlock the wall box.
Watching the fish when they swim back, you find that they have (from left to right) 3, 2, 4, 1 dots on their other (right) sides.
Enter that into the wall box and open it to find a glass bowl with a key piece inside.
You can place the glass bowl in various locations, but it still feels a bit empty.
Fill
Place the glass bowl into the large dispensing machine, and the left (water drop) button lights up.
So push that button to fill the bowl with water. Now the fish button lights up, as well as the three digit buttons at the top right.
But we don't have any three-digit clues.
Stuck
Since logic has failed us, the next best step is pixel-hunting. Specifically, the cursor now changes on a new location that you need to look for.
The gray space in between the two buttons looks mysteriously empty, and you can click on it multiple times to pound on the machine until a fish drops out.
Even though the fish appears separately in your inventory, it will be placed in the bowl whenever you put the bowl down.
Shot
Place the fish bowl on the chest of drawers, and after a while the fish shoots jets of water at the target board.
So use that clue to unlock the bottom drawer.
The parts of the target that the jets of water hit are green, white and blue, but that's not the correct code.
Instead, you'll need to arrange them from biggest to smallest (or from the smallest number to largest), forming white, blue, green.
Click the buttons 0, 2, 1 times, then open the drawer to find the last key piece.
Now you have all the key pieces required to leave, but there's more to do.
Shot, continued
Use the same code for the bottom drawer to dispense another fish.
The white, blue, green numbers appear on the clock face as 1, 3, 4 (even though 1 is invisible, you can deduce that it's blended into the background).
So enter that into the dispenser (after placing the bowl back) and push the fish button to receive another fish.
Spray
Place the bowl beside the sphere with the face, and the fish quickly washes it down and makes a code appear on the box.
So enter that code (900) into the dispenser after placing the bowl in it, and then push the fish button to get a third fish.
Exit
Leave through the door, and the end screen shows how many fish you picked up.
Item list
6 key pieces:
Top left: in top drawer
Top middle: in bottom drawer
Top right: in wall box
Bottom left: on potted plant
Bottom middle: on chair
Bottom right: on long table
3 fish:
From dispenser (by force)
From dispenser (by clock code)
From dispenser (by face code)
And a fish bowl
in the wall box.
Choice 2
The soothing music is suitable for a Sunday morning (or afternoon). So just relax, use the hint system if you need to, and don't stress out about the choice.
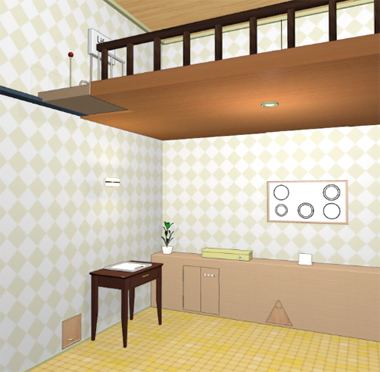
Exploration
You start off facing a bed with some interesting cushions, next to a cupboard holding a spray (red), i.e. a spray bottle filled with red liquid. At the head of the bed is a panel with nine buttons, eight of which have single letters, just above a glass compartment with a key trapped beneath. (If it's not clear, the other thing on the wall is a lamp that doesn't have much effect on this brightly lit room.) On the other side of the bed is a ladder leading upstairs, but its rungs are missing and it has two green triangular buttons on its side. Finally, you also see something on the right that looks like a wardrobe, but it's actually a large wooden wall with a circular compartment in the middle that hides another spray (green).
Turn right to find another side of the wooden wall, this one with a locked door in it. On the right, a small shutter is connected to a door mounted high on the wall, with only a single metal railing leading to it. The wooden button beside the shutter can be held down manually to open the shutter partway, at least until you release the mouse button.
Turn right. The railing ends at the platform upstairs, which you can see but not reach. Under that on the same wall there's a compartment with a spray (yellow) and a table with a drawer that doesn't open and a tray that contains a piece of paper marked with colored dots at its top left corner. As for the far wall, a cupboard door has a lock with three buttons, and the triangular compartment to its right contains a spray (blue). On top of the cupboard, there's a long box with four buttons that cycle between different shapes, a charging dock without anything to charge, and a framed picture above that has five sets of single and double circles.
Dots
Use all four spray bottles on the paper (on the table) to make more dots appear. To help you keep track, the item descriptions will change, and when you're finished a four-digit lock will appear.
Use the clue from the sprayed paper to unlock the four-digit lock.
You need to count how many dots of each color there are, and the dots in the top left tell you which order to put the numbers in. As the hint reminds you, even the sample dots in the corner must be counted.
Since there are 6 red, 5 blue, 3 yellow and 8 green dots in total, enter 6538 into the lock, and push the OK button to pop open the drawer, which has a tablet terminal in it.
(Don't think too much about the word "terminal": it's just a display device.)
Shapes
Let's skip the third hint for now and go to the fourth:
Use clues that you've seen so far to unlock the long box under the framed picture.
Each of the doors that you found the spray bottles in has its handle on a different side, and opens in a different direction. The one that opens upwards is square, the one that opens down is triangular, the one that opens left is oblong rectangular, and the one that opens right is circular.
So click the buttons (clockwise from top) 4, 1, 2, 5 times, then open the box to find a long stick.
Powered
Place the tablet on the dock under the framed picture. Lots of icons appear on the screen, but which one is helpful?
The large green icon on the right matches the pattern on the cushion, so tap it to display a clue with a bent path.
Green
Use the clues from the tablet and green cushion to unlock the ladder.
Since the buttons are green, the dark green triangles on the cushion are the ones you need to look at.
In the direction indicated by the arrow on the tablet (and taking note that the lines on both clues appear on the same side), those triangles appear on the UDUUDDUU sides of the diamonds indicated.
Push those buttons and then the OK button to make the ladder appear.
Exploration 2
Climb the ladder, and you find that the upstairs area is almost empty.
The right wall has a thin screen with circles drawn on it, and you can push the big blue button to drop it through a gap in the floor. This also gives you access to the wall compartment that has a dial with the letter C on it. As for the left wall, you can finally get on the platform with a lever on, but that lever doesn't work. It's wired to a panel labeled Lift that has a red light and a keyhole.
You can't back out off the upstairs area, but you can turn left. The perspective is a bit challenging from this view, but from near to far there's the railing, the ladder down, the top of the thin wooden wall with something shiny balanced on it that turns out to be a red key, and some sort of blue cabinet mounted on vertical rails.
Poke
Use the long stick to reach the key, which lands on the side of the wooden wall that you can't reach. Whoops!
Rings
The framed picture downstairs now has more circles on it, and you can now use that clue to unlock the cupboard beneath.
Each set of concentric circles has a different number of circles, and the sets with 1 to 6 circles appear in the CRLLRC columns. (If it's hard to count them, try comparing the sizes of the smallest circles.)
Click those buttons, then open the cupboard to find an empty plastic bottle and a list of words.
Spell
Use the clue from the word list to unlock the letter panel behind the bed.
One letter is special in each of the words, or should I say two letters?
Each of the words contains exactly one repeated letter, for a total of eight letters that spell out the code
birdcage.Enter that in the panel and open it to gain access to the square key.
Unlock
Use the key to unlock the door in the wooden wall, which opens into the bathroom.
From the close-up views of the sink area, you find the red key from earlier, a sink with a working tap, and a slider panel with letters marked above the sliders. Also, the handle on the right side pulls down the blue cabinet that you saw earlier, and you find it locked with an unusual sign on the left door.
The view of the blue cabinet includes an arrow at the top of the screen, so click it to look up and find a clue on the wall above. (Alternatively, you can climb back up the ladder to look at the clue, which is where the cabinet used to be.)
Dial
As hinted by the various clues you just saw, the dial fits onto the left door of the blue cabinet, and you need the clue on the wall above to unlock it.
Just like on a combination safe, you'll need to alternate turning the dial right and left, stopping as soon as you reach the positions shown. (If you mess up, you'll have to back out and retry.)
From the starting position, click the RLLRRRLL buttons, push OK, then open the blue cabinet to find some choices for your souvenir. Don't worry, you can change your mind any time.
Sliders
Use the clue from the expended spray bottles to unlock the slider panel.
(The bottles appear in your inventory in the order you picked them up. If you're not sure about the colors, read the bottle descriptions.)
The letters above the sliders are the initials of the colors of the spray bottles. From most empty to least (lowest water level to highest), they are green, red, blue, yellow.
So drag or click the R, G, B, Y sliders into the second lowest, lowest, middle, second highest positions, and then push OK to make something happen.
When you have it correct, a chime sounds, your bottles vanish, and some of the tiles near the sink turn dark blue!
Liter
Turn on the tap and fill the bottle in it.
Then use it to hold down the button beside the shutter. This four-digit panel is labeled Exit, so you must be close.
Unlock 2
You still have the red key you picked up, so bring it upstairs to activate the lift.
Now when you get on the panel and pull the lever, you get a short exciting ride to the locked door near the ceiling, which has a clue printed on it.
Leave
Use the clues from the high door and the bathroom tiles to unlock the Exit panel.
Starting with the clue formed by the dark blue tiles, you need to (mentally) remove those in the positions indicated by the door clue.
The remaining tiles form the code 5371, so enter that in the panel to unlock the door.
Ending
Take the lift platform again to end the game. Did you remember to make a choice?
You can leave/turn all buttons off in the bathroom to get a no-gift ending. Or, you can choose:
Fluffy = shaved ice (with fireworks)
Chewy = bubble tea (with maple leaf decorations)
Piping hot = oden (with pumpkin decorations)
If you want another chance, you can just return to the title screen and continue.
Soon after lazy afternoon comes Amajeto’s slow sunny morning with fresh coffee and a thing sweet. When you pull your self with each other, it really is time for a quest! Shigeyuki Kagamura’s moon rabbit fall from the sky UPSers, poor point, and now desires back exactly where it belongs.
Update