
 Welcome back! Since it's Wednesday today, the new Weekday Escape is out!
About elegant Amajeto's living room is safe to say that you get what you expect - and that's quite a lot. Dassyutu leaves you alone in a basement and no need to remark that the door is locked. It's a code what you're looking for, not a key. Neat Escape lets you feel holidayish for a while, and gives you a chance to decide how to leave their dreamy island - quickly, slowly, or otherwise?
Have a good time and enjoy!
Stylish Amajeto's rooms is very well done. All their games are good but this one is much pleasing so as a conservative player I'm getting reconciled with their new layout only after this one. There aren't any innovations, you get what you're used to - collecting tiles, jigsaw puzzle, left-right code etc. Will you escape?
The cursor is not changing, no save button, one ending.
You find yourself locked in Dassyutu's basement room. Surprisingly, it's quite nice, looks like a castle dungeon and it's well kept too - dry, no trace of cobwebs and/or slime. Good place for a club. As usual, ten golden coins are scattered around the room but that's side quest only, and collecting all of them doesn't make any difference in the game. You should click everywhere and on everything as some items aren't well visible and some aren't visible at all - can you find all the clues for all the codes and escape?
The cursor is not changing, save button, one ending.
P.S. Basements' escapes are quite often, like Basement by Nekonote, or The Great Basement Escape by Pastel Games, and also Dassyutu's first Basement Escape.
After a marine accident, luckily not injured, you end up on a beautiful tropical island - white sands, blue skies, palm trees, a waterfall...you know. And few information signs which suggest that the island hasn't been deserted for long. Where has everybody gone? Well, this isn't your concern now, you need to focus on getting away and as Neat Escape's created really elaborated adventure, there are three possibilities, and completely different! Use the save button often.
The cursor is not changing, autosave plus save button, three endings.
The game is available for Android too.
P.S. Here is Sprout. It's not exactly escape from an island, but technically, there IS a desert island at the beginning (and I was looking for pretext to remind everybody about this awesome game).
Escape from Island is the second chapter in Aztec's Jinja series, one of the best adventure series made. Higly recommended!
We love escape games, and our readers love talking about them and sharing hints! How about you? Let us know what you think, ask for clues, or help out other players in the comments below.


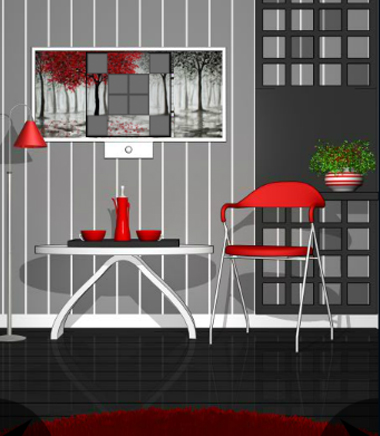
Red and Gray
You've seen rooms based on one color, now get ready for two colors!
Exploration
You start off facing a large painting with square pieces missing. Beneath it, you can zoom in on the table and pick up the teapot to find two white dots drawn on its bottom.
Turn right (the arrows in the corners are a bit harder to see this time), and you find a chair under the window with the word Ready on it. Two small cupboards beneath have striped patterns. The left one has a lock with four buttons forming a diamond shape, and the right one has a lock with a grid of sixteen buttons. On top of the right one, you see a square tile covering red pottery that's slightly more decorative than the other set.
Turn right to face the main door. The small cabinet here contains a square tile and a heart shape with dots. Above that, a painting on the wall tilts when you click it.
Turn right to find a television screen among a set of drawers. Directly under the screen are the words Red in red and Gray in gray, as well as a stack of dice-like cubes on the right. Other than the colors on some of the drawers, you see that the middle one in the left column has a four-digit lock and the fourth one has a two-button lock. The large red drawer to the right has a lock with four symbol buttons.
Two sides
Use the clue from the chair and colored words to unlock the two-button drawer to the left of the TV.
The letters in
READYappear in the LLRLR words.After pushing those buttons, open the drawer to find a square tile and matchstick.
Four points
Use the clue from the fancy red pottery to unlock the left cabinet under the window.
The stripe on each item contains five shaded diamonds, each having a smaller white diamond missing.
Those diamonds appear on the ULRDU corners.
Open the cabinet to find a square tile, a remote control and a piece of paper with some faint outlines on it.
Screen
Use the remote control to turn on the TV. It shows a very simple weather report, but something's a little off about it.
Glitch
Use the clue from the TV to unlock the tilty painting.
The O of Report flickers into a sequence of its corners:
⌜⌝ ⌞⌟ ⌜⌟
Flip the painting over to find a square tile.
Grid
Use a clue from the room to unlock the right cabinet under the window.
The gray parts on the right of the first screen form a grid of squares, with some being darker than others:
G---

--G-

-G--

---G
Open the cabinet to find a square tile and matchbox in front of a star shape marked with a dot.
Dots
Use the clue from the white dots around the room to unlock the red drawer under the TV.
The shapes with dots are:
1: Star shape in gray striped cabinet
2: Circular base of pot
3: Heart shape in cabinet beside door
4: Square face of cube
which gives the code Star Circle Heart Square.
Open it to find a square tile.
Hot
Examine the matchbox and use the matchstick on it.
Wow, that flame really goes out fast.
Use the charred matchstick on the paper to make some lines appear.
Digits
Use the clue from the marked paper to unlock the four-digit drawer to the left of the TV.
The faint lines which aren't covered form the digits 2965.
Take the last square tile.
Complete
Place all eight square tiles into the painting, and now all that's left is a randomized image puzzle in the middle.
After solving it, you get a golden key that you can use to open the door and escape!
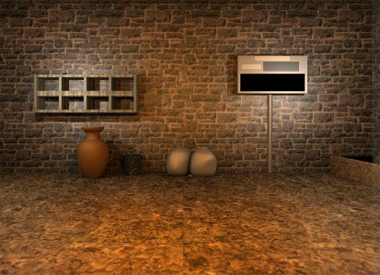
Basement Escape 2
No boring basements! This is a basement for escaping.
Exploration
You start out facing some sturdy double doors with shapes above the four buttons on the lock. Take the stepladder from the right.
Pick up the coin from the floor to the left of the door.
Turn right to find long rows of shelves above a locker with four colored buttons. Before you even look in the shelves, you find some kind of electric board on top, as well as a coin on the locker.
Also check the left side of the locker to find a long brush.
Okay, the shelves. Zooming in on the left 3 columns, you find a set of screws in the top left and a coin in the shelf next to it. The next set of 3 is above the locker, and you find another coin in the top middle of them. And then you can zoom in on the last 6 columns to find a button in the third one and a screwdriver in the last, both on the top row.
Turn right to find more shelves, which hold a coin in the third spot of the bottom row and a key in the last spot. Below that, there's a large pot with a stone cover, and a bucket you can take. Further to the right, there are two sacks on the floor next to what looks like a tin can with a coin inside. which you can shift aside to find a pair of batteries and a hole. You can look in the hole but it's too dark to see. Even further to the right of the sacks, there's an unusual device with light and dark rectangles.
Pick up the hammer from the top of the shelf.
Pick up the coin to the left of the pot.
Pick up the coin on top of the big device.
And click the sacks again to find a hook.
Turn right. There's a stone trough which stretches the entire length of the wall. Clicking around it, you find a dirty green panel on the left, a coin in the left end, a four-digit clue in its middle, and a stick at its right end near a box which lets you type a password. There's also a grate in the wall that's too high to reach, and a gray rectangular panel under it.
(You should now have 9 out of 10 coins.)
Climb
Place the stepladder in front of the grate over the trough.
Now you can reach the grate and panel, which require a four-digit code.
Digits
Enter the code from the front of the trough into the panel above.
2231
The grate opens up and you can climb in to find something, but somehow you can't reach it.
Reach
Examine the stick and click it. If you don't have the hook, screwdriver and screws, the game will tell you so.
Otherwise, you'll combine them to attach the hook to the end of the stick.
Use the improved stick to retrieve the faucet handle from inside the grate.
Wipe
Use the brush to clean up the stained panel beside the trough, which reveals a slightly confusing clue.
Word
Enter the password (not case sensitive) from the panel you just cleaned in the box at the end of the trough.
BLUE
The box opens up/vanishes to reveal a tap without a handle.
Tap
Place the faucet handle onto the rest of the tap.
Water flows out of the wall and dislodges a box with a four-arrow lock.
Electronic
Place the electric board and then the button into the (black area of the) wall device to the right of the sacks. This makes four arrows appear in the dark gray area.
Directions
Enter the clue from the wall device into the box you're holding.
→ → ← ←
You get a flashlight.
Vision
Place the batteries in the flashlight.
Then enter the hole in the wall beside the sacks and use it there. Unfortunately, whatever it is you're looking for is covered in dust.
Cleanse
Use the hammer to smash the cover on the pot, and fill the bucket in it. (When you examine the bucket, its text should now say "bucket of water".)
No idea why you need this particular water source, but it is right next to where you found the bucket.
Use the water on the dusty rock, which vanishes, leaving a clue with four colored squares on the ground.
Also click the center of the screen to pick up a coin from the darkness.
Colors
Enter the color code from the hole in the wall into the locker beneath the long shelves.
Red Green Green Yellow
(3rd, 2nd, 2nd, 4th from the left)
Take the crowbar.
Crack
Look around for a place to use the bar.
The wall to the right of the locker now has a crack in it!
So break it with the crowbar to get a treasure chest.
Unlock
Use the key on the treasure chest to get a note with a grid of rectangles/squares, some of them numbered.
Grid
That grid on the note reminds you of a place in the room. Where have you seen it?
The eight squares in the grid correspond to the eight compartments in the short shelves above the pot.
Before you can proceed, you need to check the left side of those shelves to find a circular marking.
Use the crowbar in the compartments corresponding to the numbered squares to break the back wall. Some of them have shape clues.
Then use those clues to unlock the main door and end the game. (You may wish to save first if you haven't collected every coin.)
The compartments corresponding to the numbers 1, 2, 3, 4 have shapes:
Square Triangle Star Circle
And you're out!
Coin list
On left of door
On locker (under shelves)
In long shelves (top row, 2nd from left)
In long shelves (top row, 5th from left)
In short shelves (bottom row, 3rd from left)
In tin can on floor next to sacks
On left of pot
On electronic device
In left end of trough
In hole in wall.
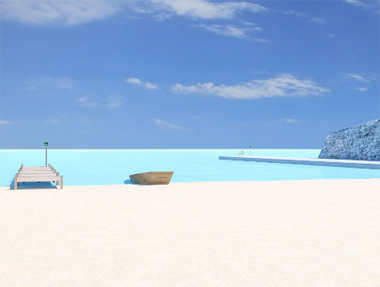
Deserted Island
One of the worst situations to escape from is being stranded on a deserted island. But all is not as it seems.
Exploration
You're facing a pleasant view of the sea. Zooming in on the wooden pier to the left, you find a sign about swimming followed by a sign about boating, and the water at the end has some shrimp in it. To the right, a boat is broken in its bow, and it holds a red box with a padlock. Even further to the right, a path leads up to a fishing point (marked by a sign), complete with a chair and a stand for the fishing rod.
Click under the stern (nearest to you) to find the name of the boat.
Turn left to find some boulders. You can zoom in on a particularly bright one on the right to find a dark spot on it. There's also red and yellow signs telling you to dig the ground beneath, but something is in the way, and clicking it confirms that it's a rather stubborn cat.
While looking at the signs, click between the boulders on the left to find a matchbox.
Turn left. Beyond the neatly trimmed hedges, you see a waterfall on the left and a wooden house on the right. (If you turn around here, you'll return to the starting view.)
Walking to the waterfall, you find a bench beside it on the right, which is actually a long wooden box placed on three barrels. The box is latched shut and secured with a screw.
Back out and walk to the house. Its front door is locked, but you easily take the yellow key from the mailbox.
Use the key to unlock the house. Behind its table and chairs, there's a locker with some colored buttons (hopefully not deadly) and some white stripes on its handle, as well as a wall box with a photo of the boat and a six-letter lock.
As you turn around to face the door, you see a shelf which has a three-digit box and a picture frame showing a colored radiation warning. The frame has white stripes on its corners, and you can flip it over to find a compartment secured with screws. Above the shelf, there's more green signs that look similar to the ones before.You can also take the board/nail/hammer combination from the floor.
Ending 1
Save your game, then backtrack to the shore and use the tools to fix the boat.
That was an easy escape! Not really, because you get exhausted and it's a Bad Ending.
Three digits
Okay, let's avoid doing that. Instead, use the clue from the green activity signs to unlock the box on the shelf in the house.
Each sign on the shore has a digit hidden in it, which you can find by comparing them with the matching signs in the house.
Boating: 3 in the water
Fishing: 1 on the hook
Swimming: 7 in the arm
Enter 317 in the lock.
Open the box to find a scoop (shovel).
Three colors
Use the other clue from the shelf to unlock the locker.
The radiation warning on the locker is inverted from that on the shelf, as you can tell from the position of the blades and the triple white stripe on the handle (that appears on the bottom-right corner of the clue).
So the correct colors are:
Green(3)
Red(5) Blue(1)
which you can click the buttons that many times to set.
Take the fishing rod.
Name
Use the clue from the boat to unlock the wall box in the house.
The name on the stern is AMANDA.
Take the screwdriver.
Unscrew
Use the screwdriver to unscrew the compartment at the back of the picture frame on the shelf. Inside, you find a key.
Use the screwdriver to unscrew the box that forms the bench beside the waterfall.
Inside, you find a fishing net.
Unlock (silver)
Use the key to unlock the box on the boat, and take a fish hook that the game translates as "needle".
Catch
Use the net to catch a shrimp from the wooden pier.
Attach the hook and shrimp to the line of the fishing rod.
At the fishing spot, use the rod on the stand. After a short wait, you manage to haul in a fish.
Move
Use the fish to lure the cat out of the way.
Then use the shovel to dig into the ground there and find a stick of dynamite.
Remove
Place the dynamite in the hole in the boulder, then use the matchbox to light it.
Boom! Walk through the passage you just opened to reach a broken bridge.
Repair / Exploration 2
(This locks you out of the first ending.)
Use the board (and nails and hammer) to repair the bridge.
At the end of the fixed bridge, you find a picnic table with a bright-colored umbrella you can take, signs pointing left and right, and a box with triangular buttons pointing left and right.
Let's start left. This path leads to a very large house with a locked front door and a chalkboard sign. Wait, is this really going to be your home?
Anyway, back out and take the right path. This much plainer-looking white painted house also has a locked front door.
Shelter
Take the umbrella back to the waterfall and use it to pass through safely (i.e. without getting wet). Inside the box, you find a blue key and a clue with triangles.
Ending 2
Remember to save your game, then use the blue key to unlock the door of the large house.
You did it! The whole house is yours and you no longer have to escape!
Directional
Use the triangle clue to unlock the box on the picnic table.
Click the LLLLRR buttons.
Take the utility knife from it.
Unlock (blue)
(This locks you out of the previous ending.)
Use the blue key to unlock the door of the house on the right.
It seems that this room is only used for storage. There are crates in the middle and barrels you can move along the back wall, which reveals a clue in the far left corner. The double door at the back has a three-digit lock beside it with some symbol clues. The right wall has a whitish stone block attached to a rope, and a similar rope pulls up a mirror covering the window on the left wall.
Cut
The view in the mirror when you pull it down confirms that it's attached to the stone block.
So cut the rope on the block, and you hear the mirror drop down.
Since you still have the knife, use it to cut the cloth off the umbrella.
Clarify
Use the cloth to wipe the window you just uncovered, revealing a set of six symbols.
Then use the remaining clues from the room to unlock the double doors.
The ampersand, square, circle symbols appear in the same positions as the digits 5, 6, 3 in the corner clue.
However, that code doesn't seem to work. What's missing?
The line on top of 6 doesn't match anything else in the game, but it's supposed to be an underline, which means that 6 needs to be rotated to become a 9.
Enter 593 in the lock.
All that's left is to open them.
Ending 3
The exit leads into a dock with a much more fancy boat in it.
There's just nothing like ending your escape with a delicious dinner!
Update