
 The new Weekday Escape is here and it's retro and overall green!
This week we are going green - all games are by no1Game (except the bonuses) and they are fun!
Standard no1game's games are whimsical and a bit weird, often with some pixel hunt and sneakily hidden areas, but their goal is always the same - to find ten green escape-men. Games vary though, sometimes is the style different and sometimes they seem like created in collaboratin with some other designer - like the first one in this selection. Other two are typical, a little on easy side, and their not-so-popular features reduced.
Bonus game for this WE is by mad0 - charming, beautiful, and very atmospheric.
Have a good time and enjoy!
Forget about basic 2D graphic, this is polished 3D style like in early Robamimi's or Neutral's rooms (however, little green guys are flat). You find yourself in an apartment, what isn't surprising as you are moving here today - central heating work, electricity, water and gas are on, some furniture is here too - everything is fine, only the door is locked...and the fridge is empty, so you must get out somehow, as hunger threatens you - or find someone who would help you...
The cursor is changing, no save button, one ending.
P.S. - Previous game Find the Escape-Men 169: Desktop in WE N°103 is escape from a desktop with very clever puzzles!
Typical game by no1Game, if you ask me - crazy nonsensical story, hunting ten escape men high and low, sneaky hot spots and if stuck, trying everything on everything, like in old adventure games. There are not many items, fortunately. Oh, and clicking everywhere, of course.
Group of green men frightened athletes before sporting event and you have to get rid of them (green men, not athletes) - but first you have to catch them!
The cursor is not changing, no save button, one ending.
This is a sequel to Find the Escape Men 43: EM-taro released many years ago...now you arrived at the Island of Demons to fight them and defeat them, or precisely, exterminate them. It's not so difficult as you would say! Just find ten green men, solve few puzzles, not very complicated and that's it. Good observation is important, and prevents annoying pixel hunt.
You have to find a way how to infiltrate demons, they shouldn't recognize you - but I have to say that they are a bit dumb and can be tricked easily...can you do that and escape in one piece?
The cursor is not changing, no save button, one ending.
The one and only game by mad0 was optimized for Firefox and Chrome; but I didn't get through in Firefox - one puzzle is hopelessly broken. In Chrome it works fine, luckily, so we can play it and enjoy its unique atmosphere and charm - not many games are so well balanced; graphics design, pleasant music, clever puzzles and art (real art - posters of "small giants" are here) altogether create excellent game!
You are locked in a small and cosy room, and the key from exit door is hidden somewhere there - you have to find some items and solve few puzzles to get it...what you need to know unless you understand French is that green = vert and blue = bleu. Now go and play - it's a pleasure!
The cursor is changing (not always!), save button, one ending.
Notice: I strongly recommend to play this game in Google Chrome!
While looking for previous game I found this one purely by chance and I really liked it. It's a short game, a beginning of longer game which never came, without clear instructions and with quite a lot of pixel hunt - that doesn't seem very inviting, right? The game definitely isn't for everybody - but its strange beauty and dreamy world worth visiting.
We love escape games, and our readers love talking about them and sharing hints! How about you? Let us know what you think, ask for clues, or help out other players in the comments below.


Small room is amazing and filled with extra puzzles like sliding blocks. Loved this game
It's all about pixel-hunting this week, apparently.
(A little change in format: I won't be numbering the Escape-Men in the walkthrough text, but I will still highlight in bold when you can pick them up.)
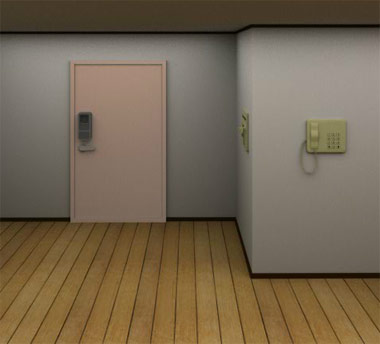
Find the Escape-Men 170: High-Rise Dream Apartment
You finally got your dream apartment, and of course it comes with an escape game involving hidden escape-men.
Exploration
You start off facing a door with an unusual lock above its doorknob. To the right is a thermostat panel for the floor heater which is currently set to off (and low). There's also a phone on the wall.
Turn right to face a table with a deck of cards laid out on it, where some cards seem to be strewn (or dealt?) around. Four of the cards are face up. Behind the table, there's a bright red couch with two cushions on, but nothing behind them. So you check a little more carefully…
Push down the seat of the couch behind the left (pink) cushion to find an Escape-Man.
Click the left side of the couch to find Sign Language Monthly hidden behind.
Click the corners of the tablecloth to find digits on them.
Turn right to face the windows. The left window has curtains drawn, and a green window-washer who moves higher each time you shut and open the curtains. The right window has its curtain drawn, and something gleams in the distance when you stare at it.
Check the floor to find an Escape-Man stuck there.
Turn right to face the kitchen. The plant on the left has four leaves which are unusually shaped and darker than the others. Check the fridge, which is empty except for a large ice block in the freezer compartment which has an Escape-Man frozen in it. Then look on top of the fridge to find a note with the concierge number, but not in any usual format. There's a (working) sink and stove on the right, and you can open the left door below them to find a pair of binoculars and an empty kettle. Turning over the binoculars, you find an Escape-Man there.
Warm
Turn on the floor heater and set it to the warmest setting. The Escape-Man below the windows gets so hot he turns red and pops off the floor.
Hot
Place the kettle in the sink and fill it, then place it on the (right) stove and wait for it to boil.
Which of course means it will boil once you turn around to face the couch. Pick up the kettle of boiling water.
Now place the ice block in the sink and pour the boiling water over it to get the Escape-Man inside.
Then empty the kettle in the sink, and an Escape-Man appears from the drain.
Ajar
Open and shut the curtains until the gondola is as high up as possible. Where's the cleaner now?
While zoomed in on that window, click the top of the screen to look at the top window, which the Escape-Man is leaning through.
Afar
In the other (right) window, use your binoculars on the sparkle.
It's a flying caped Escape-Man in the distance! How do you reach him?
Use the sign language guide to call the Escape-Man over.
Face
Use the clue from the cards to unlock the plant.
Click the (heart, diamond, spade, club)-shaped leaves 4, 3, 2, 2 times. (The clicks on each leaf must be consecutive. If you mess this up, leave the screen and try again.)
An Escape-Man falls from the heart-shaped leaf.
Value
Use the clues from the cards and note to dial the concierge.
The first six digits would be 012334, and the remainder of the clue points to 40×22=880.
So dial
0123 34 880in the phone.An Escape-Man answers your call for help with "I'll be there right away!", so pick him up from that screen.
Six
Use the clue from the tablecloth to find the last Escape-Man.
The digits 1, 2, 3, 4, 5, 6 occur on the LRLRRL corners of the tablecloth.
So click the corners of the tablecloth in that order. (You should only click six times. If you mess up, change screens and retry.)
The Escape-Man appears on the left tablecloth corner.
Escape-Men
The chime tells you that you found all 10 Escape-Men:
In couch
On underside of binoculars.
Under windows
In ice block
Hidden in sink
From top window
At right window
From potted plant
From phone call
Under tablecloth
But checking your inventory, you find only a single Escape-Man instead of ten. What's so special about this one?
Use the binoculars on him to zoom in on his hand, which has a rather large fingerprint pattern on it.
Then use him on the door to scan his fingerprint and escape!
Find the Escape-Men 175: 2016 Olympict Gymnastics
Something has been disturbing the Olympict gymnasts, and it's up to you, a committee member, to find it.
Exploration
You start off facing the exit to the arena, but of course it's irresponsible for you to leave right now. You can shut the doors to find a poster for coffee.
Open and shut them a few more times, and an Escape-Man appears on the left door.
Stare at the coffee poster, and an Escape-Man peeks out from the coffee cup.
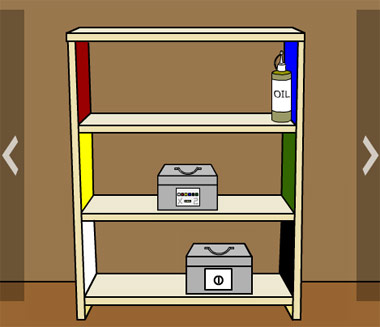
Turn right to face some shelves colored on both the left and right sides. Pick up the oil bottle from the top shelf, then look at the six-color box on the middle shelf and the locked box on the bottom shelf.
You can look around both the left and right sides of the shelf to find nothing, but you can also look beneath the shelves to find a grabber.
Turn right to find a gymnast on parallel bars. Of course, all the gymnasts here are green Escape-Men.
Turn right again to find another man who seems to be doing cartwheels. You can click the green patch nearest to you to zoom in on it.
But only the right side of it has the (outline of) an Escape-Man.
Turn right to find another man spinning around a horizontal bar, right again to find another man on a pommel horse, and then right again to find a man on the still rings.
Turn right again to find a springboard which you can stand on, but how do you use it?
Height
While standing on the springboard, hold down the mouse until the power bar appears, then release at the correct time.
You will be able to grab the Escape-Man from the air only if you're at full power.
Interference
Use the grabber to tickle the Escape-Man on the rings and the Escape-Man on the parallel bars.
Also use the oil to get the Escape-Man off his pommel horse.
Release
Also use the poster on the gymnast swinging on the horizontal bar.
He's lost in the air, so turn around the entire arena until the Escape-Man falls back down.
Look in the hole he created to find a key in it.
The key opens the locked box on the bottom shelf. Take the Escape-Man from inside.
Colors
Use the clue from the shelves to unlock the other safe.
In the order of the arrow on the safe, the colors on the shelf sides are red, blue, green, yellow, white, black.
But what about the cross?
The cross and arrow together spell out X2, so you need to repeat the code.
Push the 246315246315 buttons on the safe, then open it and take the banana from inside.
Appealing
Mmm, just think of all that potassium. You swiftly peel and eat the banana, leaving the peel behind.
Place the peel on the track, causing the last Escape-Man to slip.
Escape-Men
The chime indicates that you have all ten Escape-Men:
On arena exit door
On coffee poster
On tumbling track (?)
Above springboard
Man on rings
Man on parallel bars
Man on pommel
Man on horizontal bar
In locked box
Man on track
(Examine them again.) Now you've got them all tied up!
It turns out the Escape-Men were scaring off the real athletes.
And the Republic of EM isn't even real! Oh well, looks like they've escaped.
Find the Escape-Men 179: EM-taro 2
EM-taro is on the way to solve some puzzles and slay some demons!
Exploration 1
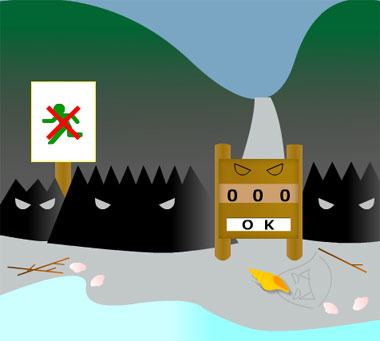
This seashore has some scary spikes around a three-digit gate, and a sign saying with a cross over an Escape-Man (yes, you can pick it up). A demon drawing on the ground has a seashell attached to it.
Gate
Use the clue from the spikes to unlock the gate.
There are 3, 8, 4 spikes in each set, so enter that in the gate to unlock it.
As it opens, you find some lines on the back.
Exploration 2
Continuing up the path, you arrive at a grass patch with three trees connected by their branches, with colored squares on their trunks and a leaf at the top left. On the ground, there are directions to each demon. As you're looking at the clues, an Escape-Man pops up on the island in the background.
Click the trees six times until an Escape-Man falls from the leaves.
Go left, where a fish is grilling over a fire. You can see your own reflection in the pond. There's a small crack in the mountain on the left.
Go right twice to find a red house with a three-color lock over the door, and a rock with three shapes carved in it.
Go right once more to a screen with rags hanging outside a house with the demon right outside! He gets mad and pushes you back.
Colors
Use the clue from the carved rock to unlock the red house.
The cross is on the first screen (red cross on sign) and the triangle is on the second screen (yellow triangle demon nose).
However, there are three squares on the tree trunks, each a different color. Which color is correct?
The trees form an amidakuji puzzle, which you can solve by following the trunk down from the leaf and crossing over each branch to another trunk when possible. This makes you end up at the blue square.
So enter red, blue, yellow (2, 3, 1 clicks), then open the door to the house.
But before you enter, there's one more thing to check.
The buttons cycle through more colors, one of which being a familiar shade of green.
Click the last button until it's green. It has an Escape-Man on it!
Exploration 3
A note with a flame symbol rests on the table. On the back wall, there's a picture which moves when you click its corners. To the left, there's a grid of square buttons in the wall that turn from red to white. Take the mask from the right wall.
Peek under the table to find an Escape-Demon.
Disguise
Go to the pond, and use both the mask and seashell on your reflection to wear them.
Now the demon doesn't hate you. Examine the rags outside his house, and flip over their corners to find an Escape-Man hiding in the lower-left rag.
Striped
Use the clue from the rags and gate to unlock the picture in the red house.
The
/\|-|/\lines occur on the LL LR UL UR UL LL LR rags.So click the ⌞⌟ ⌜⌝ ⌜⌞⌟ corners of the picture to unlock it. The picture drops down to reveal a red key with demon horns.
Then click the picture again to lift it back up and find an Escape-Man on the back.
Unlock
Use the red key on the demon's hut to open it and find his club.
Opening
Use the club on the crack in the mountain to find a red button behind.
So push the button to slide the other mountain aside, revealing a doorway with a small crack beside.
Use the club to smash the smaller crack and get an Escape-Man.
Entering the doorway, you find a large feast just laid out on the floor. The path ahead is blocked by a gate, and the slot in it has a familiar shape.
Access
Remove the seashell from your ear (using the reflection in the pond), then place the seashell in the slot.
Now you can climb the stairs to the other demon's room, where you see some grids on the walls. He's guarding a chest, and swiftly throws you out.
Grid
Use the clues from the grids you (briefly) saw to unlock the grid puzzle in the red house.
The left grid has light squares in the
-W-

W--

W-W
positions, so click those buttons to get a saw.
The right grid has light squares in the
--W

WW-

-W-
positions, so click those buttons to get a slab with a familiar shape.
Sawn
Use the saw to remove the horn from the Escape-Demon.
Flipping it over, you find that it is now an Escape-Man.
Permitted
Replace the seashell with the slab, and wear it again.
Now you have access to the demon's room and the chest he was guarding.
Roast
Place the note on the campfire, and three symbols appear on it.
So use that clue to unlock the three-digit chest.
The feast has five chicken drumsticks, four fish and seven bottles of wine.
But if you count the fish grilling outside, there's a total of 5 fish.
So enter 557 in the chest to unlock it. It's filled with gold coins!
Search through the gold coins by clicking it repeatedly. After 7 clicks, an Escape-Man appears.
Fragile
The back wall of the demon's room rattles when you knock on it. Perhaps there's something behind?
Smash it with the club. Doesn't seem to work, but keep smashing.
The club splits in two and falls to the floor, releasing the Escape-Man within.
Escape-Men
The chime indicates that you have all ten Escape-Men:
On Keep Out sign
On background island
In tree canopy
On color button
In hanging rag
On back of picture
Behind small crack
Converted Escape-Demon
In treasure chest
From broken club
(Examine the Escape-Men again.) Click the Escape-Men, who assemble to form an EM Club.
Use it on the wall again to break a hole in it. So you find the big red demon, defeat him, and escape the island!
That settles the Escape-Men, now for the French bonuses!
I tried the game in Firefox and the puzzles were doable, but it was far from smooth. Chrome is definitely the browser you want to use for this.
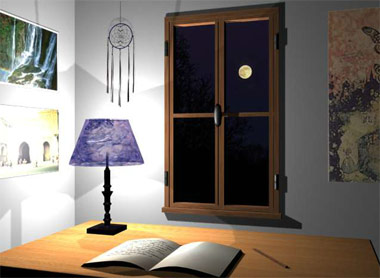
Escape n°1 - Small Room
The ukulele accompaniment will soothe any nerves you get from pixel-hunting.
(In addition to the volume control and save options, there are also buttons in the upper-right that link you to the French/English version of the game.)
Exploration
(Exploration proceeds clockwise around the room.)
Daylight filters in through the curtains onto a desk with some blank papers and a folded paper model that's made for Helene, as written on the bottom. You can also remove the chair from the desk to access its currently locked drawer.
To the right of the desk, there's some paper butterfly cutouts stuck to the wall, and you can pick up the lower-right paper butterfly there. Look in the bin to find a crumpled paper ball which unfolds to a note with letters on it.
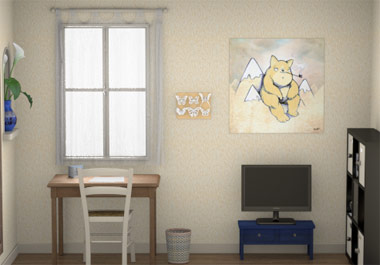
On the right side of this wall, there's a painting by Elbi above a television which is turned off placed on a blue console table with two locked drawers.
Next to the television (and on the next wall) there's a set of pigeonholes. The ones in the corners are locked: the upper-left one with a four-letter lock next to a butterfly symbol, the upper-right one with a four-symbol lock next to a duck drawing, the lower-left one with a four-digit lock next to some artistic brushstrokes, and the lower-right one with a six-color lock, the colored buttons labeled with the French initials of their colors, above a drawing of a pencil with a frog head.
The other pigeonholes contain: travel books which sandwich a card with digits and "words", a teapot with a key inside, a glass panel with no clear opening mechanism, a decorative plate with no interactable features, and a turquoise frog which you can flip over to find digits on the bottom.
There's a small round table with a doll in a yellow and orange dress.
On the wall above, there's another Elbi painting with a horned giant.
The wall adjacent to that has another Elbi painting above a couch. The couch has a blanket that hides a boy doll in overalls, and a cushion that appears to have nothing beneath.
But of course the cushion hides a yellow color pencil in the crack.
Click the left side of the sofa to find a blue safe with a green knob (a Vert & Bleu safe, literally).
This safe is also visible on the screen when you're directly facing the couch.
Click the right edge of the sofa to find a key stuck behind it, just out of reach.
The exit door to this room is locked, of course.
The left side of the last wall has a conspicuously labeled box of secrets, with four shaped holes in its top.
The cupboard next to it is locked and needs a key.
Finally, there's a vase of flowers which look almost perfectly ordinary.
But it has an extra stem next to the right flower stalk. Pick up the green rod.
Pointed
Use the rod to retrieve the key behind the sofa.
Two keys
The two keys you have look almost identical, and that's because they unlock the drawers beneath the TV.
Take the remote control from the left drawer and the doll in a pink dress from the right drawer.
TV
Use the remote on the TV, which shows a scrambled image of ducks waddling from left to right.
(This puzzle is randomized.)
As a general guide, place all the tiles with feet and shadows on the bottom row, and those with heads on the top. Then arrange the tiles in each row according to when they become completely empty.
Once done, the image changes so the ducks hold signs with symbols, and the signs they hold are reproduced below the TV so you can easily read them.
Signs
Use the clue from the TV to unlock the top-right pigeonhole.
The ducks on TV hold signs with star, hourglass, triangle, double circle symbols, so click the buttons D2 U3 U1 D1 times.
The door pops open and you can take the slider puzzle and a key.
(There's also something else here; let's ignore it until later.)
Rush Hour
Examine the slider puzzle, and solve it by dragging the pieces to get the red puzzle piece out.
If you get stuck, there's a reset button and a help button at the top right. The help is in French (but you can copy it into Google Translate if you're curious), and the three options below it return to the puzzle, show the solution, and skip the puzzle entirely.
Once you have the red piece, you can turn it over to find three digits on the base.
Another unlock
Use the key you just got to unlock the desk drawer. Inside, there's an incomplete set of color pencils and a transparency with some lines on it.
Winged
The four-letter safe (upper-left pigeonhole) has a butterfly symbol, and we have a paper butterfly. How do we get four letters from it?
The butterfly fits perfectly on the note to leave only four letters visible, but if you try that code on the four-letter safe it doesn't work.
The transparency adds the missing bits of three of the four letters.
With both the transparency and butterfly used on the paper, you can now read out the correct code: EORX.
Enter that in the safe to unlock it and find a green doll.
Note: the examine function doesn't seem to work properly for the green doll. If you find yourself stuck without the ability to change views, examine some other item.
Secrets
You now have all four dolls, so place them in the secret box.
(You can check each doll (except for the green one) to see which holes they fit, but it's a lot easier to just use trial-and-error.)
Back out once, and now you can see a key in the secret box.
Another unlock?
Use the key from the secret box to unlock the cupboard. Only the right door opens, and the left one seems to be stuck shut.
Surely there's a way to unlock the left cupboard door. Examine the cupboard more closely.
Or perhaps less closely, as you won't find the mechanism if you're zoomed in.
While facing the cupboard and not zoomed in on any shelf, click the shelf directly under the wineglasses to find the hook that holds the door shut. Now you can release it.
The cupboard has a checkered tablecloth(?) and an empty jug on the top shelf, towels of different colors in two stacks and a box of sugar cubes on the second shelf, an orange color pencil among the dishware on the middle shelf, a box of cutlery (but no knives) on the fourth shelf, and a cardboard box of magazines and a safe with a three-digit padlock on the bottom shelf.
Three digits
The padlock needs a three-digit code. Where did you see it?
It's on the bottom of the red piece.
Enter 623 in the padlock to remove it. Take the turquoise color pencil from the box.
Green and Blue
Use the clue from the green and blue towels in the cupboard to unlock the safe.
From top to bottom, the green towels occur in the LLRRRLR stacks.
So turn the green knob in the LLRRRLR directions (total of seven clicks), and the safe opens up. Take the blue color pencil from inside.
Rainbow
Now that you have all 4 missing color pencils, use them to complete the pencil set in the desk drawer.
Each pencil is marked with its French color name and a digit.
Use the clue from the frog and pencils to unlock the lower-right pigeonhole.
The pencils numbered 1 to 6 have colors with French initials RVBOTJ.
Hence the digits on the bottom of the frog (165 312 446) correspond to RJTBRVOOJ.
Push those buttons on the safe to unlock it and find a jar of candy. Yum.
Four digits
Use a clue from the card with digits (and the room) to unlock the four-digit safe (lower-left pigeonhole).
First, those symbols on the safe are mirror images of each other, but they look familiar. Where have you seen them?
The symbols on the safe are the horns of the painting on the same wall as the pigeonholes, but upside-down.
Speaking of inversion, if you read the card upside-down then each of the letters looks like one of the digits on the card.
Were there letters on the painting?
ELBI, written upside-down, looks like 1873.
Enter that in the safe to open it. Inside, there's a package tied tightly shut with string.
Hidden
You may have noticed by now that the top hinge of each of the corner pigeonhole doors has a letter on it. Yes, this includes the top-right pigeonhole where the hinge is hidden.
What do the letters spell?
They spell HELENE, the name written on the bottom of the paper model.
So click the ⌜⌟⌝⌟ ⌞⌟ pigeonholes (which have those letters on their hinges), and the middle one opens up.
The ornamental box inside it is unlocked and contains a pair of scissors.
Cut
Use the scissors to untie the box in the lower-left compartment. It contains the last key.
So use that key on the door to escape!
Small room froze after solving
tv, block puzzle and getting green doll
Which browser you use? I experienced similar problem when using Firefox.
In case you're wondering how old this game is (2005?), I found only one other mention of this game online, and that review itself is over a decade old. Amazing stuff!
Samare / rêve d'ombre
The title screen translates to "Shadow Dream". Before you play (Jouer), you might want to open up the hints (aide) in French, which I won't translate, or read the description (presentation, credits, contact).
Seek out the light, and don't get lost in the shadows!
Intro
An open diary page reads:
"I've been getting the same dream for a while now. Or rather, the same beginning of a dream, because I wake up immediately each time. But today, I shopped for dreamcatchers. I want to know what happens afterward."
You look up from the diary and turn out the light.
The dream starts with you looking at your shadow, walking into a small building where five dreamcatchers hang over a pond.
Empty the pond and click it to move on.
The music turns intense as you walk towards a hill with steep sides and a flat top, where the game starts.
Exploration
Before you start running around, you should know about the five dreamcatchers at the bottom of the screen. Clicking a dreamcatcher adds a star and records your current position, and you can click it again to bring up the saved position, then pass through (teleport), back out (cancel) or remove the recorded position.
Almost every interesting spot in this game is a pixel-hunt, so I'll omit spoiler tags and put them all in the next spoiler. However, you can spot all of them with keen eyes or the use of your Tab key.
Here's a basic map:
32B

41-

-A-
However, the navigation at position 4 is
341

-C-
More on this later.
You start off facing a stairway into the hill (at 1, facing A). It's too dark inside to do anything. As you turn around and away from the hill, you find that you'll have to walk out of the shade. There's so many rocks here!
Walk directly away from the hill, and turn right to find a hole in the ground (B) with a ladder leading down. At the bottom, you spot something sparkling: 3 stars made of mineral that fit in the inventory at the upper-left. Climb back up toward the starry sky.
Turn left twice (away from the hole) until you find a familiar indentation in the ground. One rock on the right seems unusually tall, and it has a I marked in chalk on it.
Turn right to find a rock marked with a squiggly 2 (or ➰) in the distance, and another marked with II in the foreground.
Turn right to find a rock marked with a 0 in the foreground, and another marked with a 6 on the right side.
Turn right to find a rock marked with a V.
Go forward towards the hill by clicking the left side of the screen. Before you climb up the ledge, turn right to find a rock marked with three lines meeting at their ends, or an arrow pointing towards you.
Climb up the ledge to face a blank wall (C). Turn around to look over at the ground. If you click a certain area of ground in the distance, an inlay appears.
(Note about the position marked 4: entering 4 from either 3 or 1 makes you face the ledge, and then you can turn left or right once to face 1 or 3. If you turn around (either direction twice), you get a dead end instead. Climbing down from the ledge also makes you face this dead end.)
Marker
Go down and place the stars on (some of) the marked rocks, then climb back up the ledge.
Each time you return to the ledge, the stars you placed will be glowing on the ground, and their positions will be automatically marked on the inlaid diagram when you open it.
Since there are seven rocks in total, you want to make at least three round-trips to place stars on all of them. (Remember, each rock can only be accessed from a certain position and angle.)
Eventually, you get all seven rocks marked on the minimap. What now?
Formation
The arrangement of the marked rocks looks familiar. Where else have you seen it?
The rock arrangement matches the constellation you saw while climbing from the hole.
So use that clue to place the three stars in the correct positions.
Separating the constellation into groups of (from left to right) 2, 4, 1 stars, the three stars of the constellation which are brighter than the others are in the 2nd, 2nd, 1st from the top of their respective groups.
This corresponds to the rocks marked V, II and (arrow).
So go down, pick all your stars up, and place them on those rocks.
When you climb up the ledge again, you'll find that the previously blank wall at the top is now glowing.
(And if you turn around, you see why: all the stars are glowing extra bright!)
So click the glowing area to open up the hidden compartment and find a blue tumbler.
Filled
You still don't have a light source, and all you have is the tumbler. Is there some way you can store light in it?
Go back to the empty pond (on the same screen as the rock marked I), and place the tumbler there.
The music switches back to something more calm as you take a seat in front of the pond. What are you waiting for? What are you looking for?
Click the rock just in front of the pond. You stack the stones on the sunward side, focusing the light into a beam which fills the pond.
Click the pond to zoom out, then the tumbler to grab it and zoom back in, and then click once more to drink the light.
Now a being of light, you can return to the stairs, losing your dreamcatchers and inventory in the process.
You climb up into a room that's empty except for a trapdoor in the ceiling and a grabbing pole on the side.
So click the pole to hook it onto the trapdoor, then open the trapdoor and climb up.
And that's it, you beat the game! (Or what's supposed to be the first level of it.)
thanks kk! i saw everything but those final few letters! frustrating that i was *this close* to finishing it!!
Update