

 Hi! The Weekday Escape is here and this week we are going retro again!
From not-so-retro Funkyland's cute sweet shop and their Mr. Frog you escape to Miyabure's room. Watercolor art and music create pleasant atmosphere here, and the place is peaceful enough to concentrate on puzzles. Hottategoya's room is very peaceful too - seems you are imprisoned in solitary confinement. After successful prison break you get stuck in Naoki Nakashima's bathroom without any special equipment - toothbrushes and a soap are your tools!
Have a good time and enjoy!
Clinkclink! Welcome in Funkyland's ice cream parlor! The small shop seems closed and nobody's here, but everything is ready for opening. Jolly jazzy music is on, ice cream containers full, and parasol tables and stools outside arranged nicely. If only you could go out...Mr. Frog behind the window without handle surely has something for you...can you get out and enjoy sunny day at a beach with yummy ice cream?
The cursor is not changing, save button, one ending.
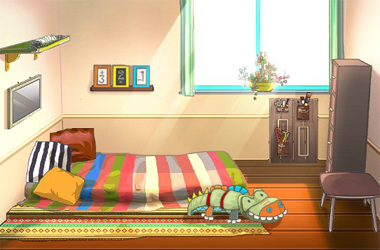
The door in colorful Miyabure's room is missing a doorknob, and you are trapped inside with a toothy plush crocodile. There are several locked drawers, and one of them might contain the desired doorknob - but which one? You need to open all of them to find it out, and figure out several codes from cunning hints. Very cunning, some of them. Can you escape?
The cursor is not changing, save button, one ending.
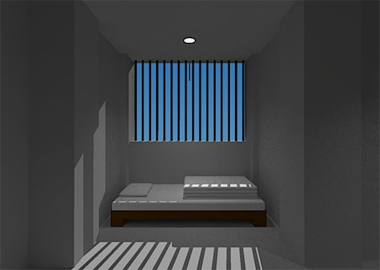
You are imprisoned in Hottategoya's cell which is quite cosy and spacey, with own writing desk, own lavatory and very clean. Just thick window bars remind you of where you are. It's not clear how did you get there (no door) and how are you supposed to get away from here - well maybe the point is that you aren't...but you can do it! There are some puzzles waiting for you to solve, will you break out?
The cursor is not changing, no save button, one ending.
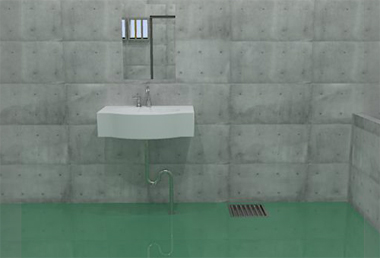
Many years ago were posted enjoyable Dona Room and Dona Room 2 by Naoki Nakashima. Now, fourteen years later, you can finally finish the serie! The small bathroom where you are locked up needs careful examination as items necessary for escape are well hidden, sometimes at unexpected places, and catching the right pixel may take an effort. Click everywhere twice to be sure and be observant of your surroundings. Knowledge of Japanese language isn't required.
The cursor is not changing, no save button, one ending.
P.S. Here is the last one, Dona Room 4. It's for extremely brave escapists only. A good one, but really difficult.
We love escape games, and our readers love talking about them and sharing hints! How about you? Let us know what you think, ask for clues, or help out other players in the comments below.


Prison Cell Walkthrough-lite
Cabinet with three drawers on top
Use the clue from the bathroom for how to open and close the drawers
Dangling thing outside window
use the pole from the cabinet with three drawers on top
Drawer with line buttons
use pole to get pack of cigarettes from under bed, barcode is the clue
Hard to find panels
wall to right of the desk with a chair has a panel
click around the FACE picture, there's a combo lock thing
FACE?
look in the end of your hollow pole, no, the other end
make numbers by putting things together
6806
In the ice cream shop can we do anything behind the counter but look at the ice cream tubs and the related puzzle?
Is that puzzle tied to the car parking numbers?
EclecticPlatypus, you can turn around and look at other parts in the room.
In particular, you can look to your right and click on the up/down arrows on the wall above the counter
I didn't understand the walkthrough lite to "prison cell" perhaps a full step by step would work better. cant wait for the other walkthroughs too. and not sure why the first game has the same screenshot as the "end of year" puzzle from last month. oh well.
The game wasn't all that hard, except for the bits I put in the comment. It's less of a walk through and more of a "okay, I've clicked on all the obvious stuff, and nothing's happening" helper.
Already found that one, but thank you.
I've got
binoculars, handles, and a green P card
in inventory
Anyone else totally stuck in the ice cream shop after the chairs puzzle
those handles are for the frog's window
Ice cream parlor
Pie chart clue
it's exactly what you think
2143
but that OK button is picky
Clue from the case
You've
scooped the icecream
and found a bunch of symbols and don't have a puzzle? Look outside.
specifically under the yellow umbrella
only 5 entries?
only 5 symbols, 1 is a star
This game frustrated me for hours when I first played it!
Escape the Ice Cream Parlor
As is usual in this series, the parlor is currently closed but you'll be opening it while you escape. (Reminder: the + in the top right opens the menu where you'll find mute options, but take note that the Back button there returns you to the title screen.)
Exploration
The window on the first screen faces a parking area with a view of the beach and sea in the background. The colorful seats in front of the counter have different heights, and you take a look at the flowers on the right to find that the pot hides a pair of compact binoculars. On the left, you find a mirror above the sink, and the mirror tilts when you click its corners (and lights up some lamps beneath).
Turn right to face the front door, which also has a beach view behind the road! On the left, you see a small cupboard with bins, with the left side of the cupboard tied shut. On the wall above that, there's a small device with up and down buttons.
Turn right to face the ice cream counter. Clicking it makes you walk around the freezer to the back, where you see a small five-digit lock on the case. Hmm, there's only four colored rectangles above the digits. On the left side next to the cash register, there's a window with a frog outside, but you can't seem to open it.
Turn right to find padlocked doors leading to the patio. To its left there's a display labeled Ice Cream, with different-sized ice cream cones on green platforms. Further to the left, there's a poster also labelled Ice Cream and displaying a pie chart, and the green box on the short table beneath has a three-digit lock.
Vertical
Notice that the wall device with two buttons has its row of lights turn different colors when you press the buttons, which is a hint for where to find its clue.
The colors (and total number) of the lights match those of the chairs. Since the 1st, 4th and 6th chairs from the left are higher than the others, you need to push the UDDUDU buttons.
This opens the device so you can take a pair of door handles.
Pair
Place the handles on the window beside the cashier, and open it.
The frog's eating a fake ice cream with a spoon, and its pedestal has four rectangular holes with hooks. To the right, you see a picture with an arrow pointing to a hot-air balloon.
Taking a closer look at the spoon, you flip it over to find a screw on the handle.
Float
While looking out the front door, you see the hot-air balloon indicated on the frog's picture, but it's too far away for you to see any details.
Let's test out these binoculars! First, you'll need to examine them to find the catch at the back (or is that the front?). After opening it up, you find a P card between the objective lenses.
Point the binoculars at the balloon to find a three-digit code printed on it.
Three digits
Enter the code from the balloon (396) into the box beneath the pie chart poster, and open it to find a screwdriver.
Unscrew
Unscrew the back of the spoon. The handle comes off to reveal a key tip!
So use the spoon-key to unlock the padlock and gain access to the patio.
Exploration 2
Outside, you see some tables with umbrellas.
The left one has a fake ice cream cone as well as an unusual framed glass panel with an arrow resting on one of the chairs.
The middle one has a very flat box locked with what appears to be an arrow sliced into parts, but when you try the buttons out you find that they show different symbols.
The right table doesn't seem to have anything special, but you somehow enjoy the shade of its pink umbrella. The wider camera angle also lets you click the top of the wall to look over it, for another view of parked cars.
Path
Use the clue from the glass panel outside to unlock the mirror over the sink.
The bent arrow on the panel indicates the corners you need to click: ⌟ ⌞⌜⌝⌟ ⌜
Do so, and the mirror flips open. In the hidden compartment behind it, you find an ice cream scoop.
Numbered
You've now seen four cars, and their colors match those on the freezer lock. So how do you get five digits out of them?
Point the binoculars at the cars, and you'll see that each has a numbered parking coupon.
The blue, red, yellow, green cars have the numbers 2 8 17 4, so enter that in the lock, then unlock and open the case.
There's a lot of different flavors, but you also spot an E card among the left four tubs of ice cream.
Assortment
You can't decide which flavor to eat, so just use the scoop to sample each tub.
It turns out that every single tub has decorative sprinkles in the ice cream! Use that clue to unlock the box on the middle table outside.
Hint: The arrow doesn't indicate any specific decorations. All fifteen of them matter.
Counting the decorations, you find that each picture occurs a different number of times in total.
From rarest to most common, they are: star, note, butterfly, flower, heart.
Click the buttons 3, 5, 4, 2, 1 times, and open the box to find the N card.
Survey
Place the ice cream cone into the empty column of the Ice Cream display.
You can now click the columns to raise them, so use the clue from the pie chart to set them properly.
The obvious (for me) answer to this one doesn't work, so here are two explanations for the code:
The sectors, from smallest to largest, are labeled with 3, 1, 4, 2 cones, so the smallest to largest cones on the display should be the 3rd, 1st, 4th, 2nd from the bottom.
The sectors, from smallest to largest, are labeled with 3, 1, 4, 2 cones, so the highest to lowest cones on the display should be the 3rd, 1st, 4th, 2nd smallest ones.
Either way, you need to click the columns (from left to right) 1, 0, 3, 2 times. The OK button pops open to reveal a small pair of scissors!
Unbind
Use the scissors to cut free the cupboard beside the front door, and open it to find a stepladder.
Elevate
No, you won't be hopping over any walls in this one. Instead, use the stepladder on the right/pink table, and climb up to find an O card atop its umbrella.
Letters
All four cards fit on the frog pedestal, so you just need to fit them in the right order.
Place the cards to spell OPEN, and the fake ice cream in his hand opens up to reveal the shop key.
Use that key to unlock the front door and escape!
In My House Escape 2, can someone explain how the
circles under the chain
puzzle works? I thought it was going to be
654
but it was
653
instead and I got lucky.
ohhhhhhh, wow, I got really lucky.
My House Escape 2
Your protagonist (who's been working for a year) has some trouble finding his papers. It's up to the Ussa the rabbit to help him before he's late!
Exploration
Sunlight filters in from the window onto the futon, which has a cute plush crocodile as well as some cushions that hide a folded note (visible only if you lift up both the last two cushions). Unfolding the note, you find a hook inside as well as a clue with a grid of thick and thin lines.
On the left wall, you see a shelf with a chain neatly tied together on top, as well as a mirror you can remove from its wall hooks.
On the back wall, you see a shelf with three colorful picture frames showing mathematical symbols, as well as an organizer consisting of 3 cans with items hung on a wooden pallet.
Behind the middle picture frames, you find a black panel.
Click the right edge of the screen to take a closer look at the filing cabinet and short table next to it. All four drawers of the cabinet are locked. The top drawer lock has two green buttons, the second one has three digit dials marked with different shapes, the third one has three unmarked digit dials, and the bottom one has four unmarked digit dials.
Turn right to face the door, which is missing its doorknob. There's a hanging tapestry over a table with a locked three-digit drawer, and you notice a small marking on the wall beside with a plus sign and a rectangle.
(You can click the bottom of the screen to face the window again.)
Shapes
Use the clues from the crocodile cushion and picture frames to unlock the second cabinet drawer.
Counting the spines on the crocodile's back gives you a total of 4 triangles, 3 squares and 3 circles.
Matching the colors on the frames with those of the spines, you find that the triangle count should be doubled, the squares reduced by 1 and the circles increased by 3.
This gives you the final numbers 8 2 6, so enter that in the drawer to unlock it. Inside, you find a hook.
Black
The clue beside the door suggests that you extract a number from the black panel. How do you do so?
Hold the black panel up to the window, and the sunlight reveals a colorful clue with rectangles and dots.
Tricolor
Use the clue from the tapestry to unlock the drawer beneath.
Read each colored column from top down tells you which buttons (up or down) to press on each colored digit. Since the actual order of buttons doesn't matter, you can just count them:
Green: 3 down, 4 up (total 1 up)
Yellow: 2 down, 5 up (total 3 up)
Maroon: 5 down, 2 up (total 3 down)
So this clue gives the digits 1 3 7, but you need to use the black panel clue too, by adding 2 to maroon and 1 to yellow.
The final code is 149. Open the drawer to find a tall empty can.
Two points
On the note, you see two slightly different spots at the top of the grid. There's only one thing that looks like that grid here.
The pallet appears horizontally when you examine it. In this orientation, the wooden boards match the thick lines, and the stringers beneath match the thin lines.
Looking at the two points indicated at the top, you find small holes in the side of the pallet. What can you do with them?
Attach the hooks to those two holes, and then hang the pallet on the wall where you found the mirror. As you do so, another folded note falls out, and it has green dots marked on.
Two buttons
Use the clue from the new note to unlock the top drawer.
Reading from top down, the green dots appear on the LRRLRL sides (of the note), so push those buttons and open the drawer to find a pair of scissors.
Snip
Use the scissors you just found to cut the tape around the chains, letting them dangle past the hung pallet. (For some reason, you had to go get another pair of scissors even though you had one in a can!)
The chains extend off the bottom of the screen, and hovering there reveals a new arrow that lets you look at a rectangular wire frame hanging from them. Within the frame are mounted five circles divided by lines.
Digits
Use the clue from the pallet to unlock the third drawer.
The chains divide the space around the rectangles into three digits: 653.
So enter that into the drawer to find another empty can.
Collection
You now have all five cans, and you realize that you can place them on the shelf. (Notice that the rectangles on the pallet precisely fit the lengths of the cans, but the pallet is now mounted under the shelf instead.)
However, the cans won't stay on unless you place them in the correct order. Look around for a clue to find that order.
Notice that the positions of the cans on the shelf roughly match those of the circles on the wire frame, so that the frame displays a top-down view of the shelf. Each circle is divided by a different number of lines, from 1 to 5.
For clarity, I'll label the cans in your inventory by the letters A to E. This is also the order that they appear on the shelf, with A on the left and E on the right.
The circles divided by 1, 2, 3, 4, 5 lines correspond to the C, A, E, B, D cans, so place them on the shelf in that order. The cans now stay on, so what's next?
Viewpoint
Turn back to the filing cabinet and place the mirror on the short table beside. Taking a close look, you notice that the chalk markings on the cans align to form a four-digit code.
Enter that code (3469) into the bottom drawer, then open it to find an envelope with the precious document (apparently a processing form for new employees) and the missing doorknob.
Ending
Place the doorknob on the door. Or rather, the rabbit manages to place the doorknob on the door.
Yes, you're the protagonist now. Take the document off the rabbit's hands, and open the door to leave!
I'm not going to translate the end text. Just enjoy the credits and the view.
At the end, the rabbit sits down to enjoy the sakura blossoms. Is he still blushing, or is that just the sake?
Click him so he can have a nap.
Dona Room 3 has an issue
I checked a video walk through and a text walk through. In the video a light bulb appeared in the inventory. In the text it said to flush a photo down the toilet and a light bulb appears in the inventory. The video did not show this.
I found the photo and flushed it down the toilet but no light bulb appears in my inventory.
Did this happen to anyone else?
Also, the numbers change for the puzzle for each game.
@4red3s That's why we need more precise walkthroughs! Pulling up the Wayback Machine, the author's hint for the item you're finding is
Turn to the side of where business is done, and don't overlook something with matching colors.
You can find
the lightbulb on the same screen as another number clue:
while looking at the painted downward triangle clue over the basket, it's at the bottom edge of the screen.
Let's warm up with something easy. For this walkthrough, I've chosen a different solution order from the first comment.
Escape from the Prison Cell in the Sky
I know this looks like a prison cell you'd find anywhere else, but the title is right: you're in a soaring tower.
Exploration
You start off facing a bed with a tall pile of folded blankets. Just outside the bars, you see something small on a ring hanging from the ceiling.
You can look under the bed, but whatever's underneath is too far to reach.
Turn right to face a desk with several drawers. The middle drawer is unlocked and empty, but the top one has a keyhole and the bottom one has three buttons with vertical lines.
The wall on the right hides a bolted panel.
Turn right to face a cupboard with three empty drawers and a locked cupboard door with no obvious lock.
Turn right to face a narrow doorway and a simple color printout of the word FACE taped to the wall.
It's only taped on both sides, so lift it from the bottom to find a safe with a keypad.
Enter the bathroom. Looking around, you find that the only interesting area is the clue printed over the sink, which has six rows of rectangles connected along their top edges.
Triple
Use the clue above the sink to unlock the cupboard.
From top to bottom, the rows of rectangles tell you which drawers should be open after each click, from which you can deduce that you need to click the RLCRLL drawers.
Do so, and you hear a click indicating that the cupboard door is now unlocked. Open it to find a then open the cupboard door to find a hollow pole.
Hollow
Check the end of the pole to find a note with some colorful shapes.
Digital
Use the clues from the printout and note to unlock the keypad safe.
The colored shapes and letters don't exactly align, but you can still combine them to form the digits 6806. Enter that in the safe and open it to find some kind of orange adaptor.
Long
Use the pole to retrieve the keyring outside the bars.
Also use the pole to retrieve the cigarette box under the bed.
Unlock
Use the key you picked up to unlock the top drawer, then open it and take a spanner.
Unbolt
Use the spanner on the bolted panel. There's a shallow round hole in the wall with a deeper hexagonal indentation in the middle.
Bars
Use the clue from the box to unlock the bottom drawer.
Reading the barcode in the direction of the arrow, you find that the bars appear in groups of 1 2 1 2 3 3 2 1.
Click the matching buttons on the drawer, then open it to find a crank handle.
Squared
The end of the crank is shaped into a square, which means it fits into one end of the adaptor.
The other end of the adaptor is shaped into a hexagon, which means it fits into the hidden wall hole.
Turn the crank a few times. What did that do?
Exit
The wall to the left of the cupboard opens up, and you find a ladder leading down. Click on it to end the game!
And now the hard one. This series is so complex that I cannot guarantee that this walkthrough is complete.
Dona Room 3
Which is much simpler than the Japanese title:
(right now) Not Yet Common Escape Game: Great Escape from the Bathroom!
Some general hints to level the playing field for players new to the series:
Some hotspots are really small, placed at the edges of the screen, and visible/usable only from the correct view.
Some are even hidden behind the inventory panel.
Some puzzle clues, and therefore solutions, are randomized. Do you have your pen and paper ready?
Some actions in the game are just for fun, so have fun.
Last time / Intro
(The game doesn't include any recap so here's a really short one.)
Last time, you fixed part of a kitchen, did a few things to a rat, and finally got a note explaining why you did all of it. But that's old news, and all that matters is your mom's reminder to brush your teeth.
"I woke up in an unfamiliar room."
It's a story with a not-yet-common setting like that.
Click where you want, collect items and use them by dragging and dropping, that kind of not-yet-common operation.
However! This room is a bathroom, and the mirror cabinet had an unfamiliar lock.
With a prepared twist like that, the not-yet-common escape game finally began.
Exploration
(Change screens using the hand icons that appear in the corners.)
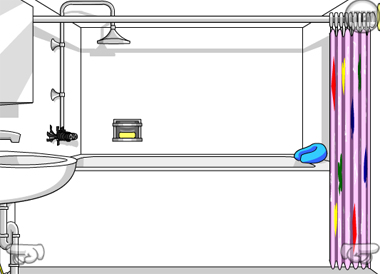
After clicking Start on the title screen, you're thrown right into the action facing the bathtub. Before you get in, notice the blue cushion on the edge of the tub, and the shower curtains that can be closed to reveal some kind of clue about playing cards.
Pick up the yellow toothbrush at the lower left. While the curtains are closed, you also see a pink toothbrush along the right wall.
Enter the bathtub, and you face the shower which has its taps taped shut. Somehow you're taller than the shower head, and you see a clue in green painted on its top. You also see a bar of soap on a tray, and closer look at the tray reveals that it has a screw loose. Finally, you see that the drain is plugged with something that's not rubber, and it's marked with a red H.
Back out and turn right. There's a light switch, a lamp on the wall, a door with a keypad lock and a shape clue, and a grab bar.
Turn right. There's a lot of things on this screen, but all of them are on the next screen which has even more things. [takes a deep breath]
Turn right to face a toilet bowl, medicine cabinet and sink. As mentioned, the cabinet does have a lock with four wheels controlling the colors of four Hs. The sink is missing its hot water tap, but is otherwise completely normal. Towards the left, there's another lamp on the wall and a woven basket on the floor with a picture inside. You can look at the top of the toilet bowl, which has a working alarm clock on it, as well as the lid you can open and the bidet that doesn't really work. While looking at the lid you see the lamp on the counter with another green clue. Finally, you can look in the corner beside the toilet to find that the a water tube has been cut, and the bidet has been unplugged. The other wire runs to a blue lamp (which also doesn't work) clipped to the shelf, and the toilet paper holder under the shelf doesn't seem to have any.
That's not all! There are three more things to pixel-hunt here:
Open the water tank (with the alarm clock on it). While there's nothing interesting inside, you find a light blue toothbrush sticking out from behind.
While looking at the basket, close the inventory screen if you have it open, and you'll find a red marking at the top left that you can click to view properly.
On this view with the red triangle, you find a light bulb at the bottom of the screen along the right edge of the toilet.
Stuck
Ha, you can't even get the fake drain plug out.
Turn on the sink (with the only working tap) and put the soap in the water.
Now that it's foaming, rub the soap all over the hot water tap, and slide it out.
Temperature
Fix the sink with the hot water tap, then leave just the hot water running for a bit.
The steam slowly reveals words written on the mirror. Wait, are those really words?
Words
Yes! When combined with the letters (all H) that the arrows point to, the words on the mirror spell Hour, Hot, Heart and High. Now you just have to figure out what colors those are. (Watch out, some of the colors may look similar.)
Looking around, you find the required colors from the hour hand on the alarm clock, the hot water tap of the sink, the heart suits on the shower curtain and the high pressure marking on the bidet knob.
Turn the Hs green, red, yellow, blue by clicking their wheels 4, 0, 2, 6 times, then click on the latch to release it.
Open the cabinet to find a photo, a tube of toothpaste and a green toothbrush.
(If you're wondering about that cute shirt in the photo: the katakana beside the large H read "leave me alone".)
Also pick up the thin metal object on top of the open cabinet, which turns out to be a dentist's mirror.
Arithmetic
You can now make the cabinet match the picture you found in the basket, by placing the toothbrushes correctly.
The green marks on the brushes and the numbers that remain uncovered form a mathematical sum you can work out.
No, I'm not working it out for you because this clue is randomized. All I can offer is a reminder that if you see two negatives, they make a positive.
Once you're done, write your answer down somewhere and label it with a ◼ so you can find it later.
Bent
Remember the red triangle clue just above the basket? It points to a corner that you can't look into.
…until just now. Pull out the mirror to get a (reflected) view of the hidden number, and write that down!
Narrow
Use the toothpaste tube to unscrew the soap tray. As it partially falls off, you find a razor hidden behind.
Rain
Use the razor to cut free the shower taps. Nice, both taps are working!
Turn on either tap, then click the bottom of the shower head to find that water only comes out of certain holes. Once you've identified the digit that appears, write it down.
Rear
Plug in the bidet and try to turn it on. When you open the toilet lid you find that you get no spray out of the nozzle, which is good because you can easily read the clue painted there. You don't have to use the clue right now, so I'll come back to it later.
Light
Plug in the light bulb you found beside the basket into the blue lamp beside the toilet. You can only do this from the top-down view; click the lamp in any other view to get there.
The light bulb disappears from your inventory and you hear a sound effect, but you won't see anything change until you turn off the other lights.
Hit the light switch beside the door to make the room dark, and you'll see the lamp shine across the room onto the bathtub.
If you close the shower curtains first, the beam lands on one of its numbers. Write it down!
Code
It's time to use what you've seen to unlock the door. (No guessing! Even the correct combination won't work if you haven't viewed the required clues.)
Each shape above the keypad corresponds to a digit in its code, which can be found as follows:
Square = value of the toothbrush formula in the medicine cabinet
Star = highlighted number on shower curtain
Circle = sum of the digits for both triangles:
(Up Triangle = water pattern from bottom of showerhead)
(Down Triangle = mirrored digit behind toilet)
Enter that in the keypad and unlock the door…
It's just a closet with some cleaning supplies! Inside the pail, you find a folded letter. Click and hold on the letter (and not its shadow) to read it.
"Your clumsy dad locked this by accident even after saying it was dangerous. It's not an exit!
Since you seem to have forgotten I'll write it down again, but the bathroom you're in right now is in the basement.
Mom
P.S. There's an important conversation, so please wait in the living room."
(Optional) Leave?
Now you should finally know how to escape. But before that, maybe you think the photo you're holding looks ugly.
If you want to get rid of the photo, open the toilet lid and take the photo out, and you'll drop it into the toilet when you let go. You can even flush it away afterwards!
Exit
There's only one other place an exit can be, and it's hinted by the letter.
To get from the basement back into the house, you need to climb up, so look up at the ceiling and you should see a trapdoor. (If that doesn't work, try looking at the letter again.)
Pull the handle down! A ladder drops from the ceiling, and the room fades away into white and then into the end screen.
Congratulations on clearing the game!
You enjoyed playing the not-yet-common escape game, right?
Please look forward to the next game "Last Escape".
You bofubofu-ed the inflatable pillow: _ times
You opened and closed the curtains: _ times
You flushed the toilet without going: _ times
Total water usage: _ ℓ
(and then some credits)
The picture on the end screen is just the photo if you escaped with it (or never picked it up), the photo in the toilet if you left it there, and the photo in the sewers if you dropped it and flushed.
Update