
Escape from the Room Surrounded by Bookshelves 2

![]() Back in January we featured an escape by a relative newcomer, Dghgbakufu. It wasn't the toughest or most original room escape out there, but it was a prime example of the logical flow from one puzzle to the next that makes a really good escape game. Hottategoya is back with a new offering, Escape from the Room Surrounded by Bookshelves 2, and despite the rather clunky name has produced another fine room escape perfect for the mid-week break that is Weekday Escape!
Back in January we featured an escape by a relative newcomer, Dghgbakufu. It wasn't the toughest or most original room escape out there, but it was a prime example of the logical flow from one puzzle to the next that makes a really good escape game. Hottategoya is back with a new offering, Escape from the Room Surrounded by Bookshelves 2, and despite the rather clunky name has produced another fine room escape perfect for the mid-week break that is Weekday Escape!
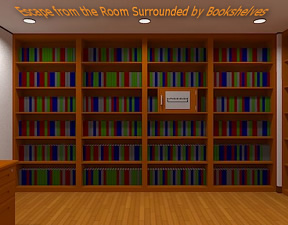 The first offering by Dghgbakufu that we featured, Escape from a Building without Windows, was a light but logical escaping confection dealing with solving your way into a lot of doors that all looked the same, and through the rooms behind the doors offering some enjoyable puzzles. Escape from the Room Surrounded by Bookshelves 2, however, is your classic basic one-room escape. Move around using the bars at the sides of the screen, pick up random but useful objects that some kind soul has left lying around, solve a few tricky puzzles (some color based) and voila, you are out of the room! Of course, those of us who love books might not be in such a hurry to get out. After all, how often are you locked into a room with that much potential entertainment?
Escape from the Room Surrounded by Bookshelves 2 is a pretty stripped down experience. There's no music (and therefore no mute control), no save feature, no changing cursor, and only one way out of the space. On the other hand there is a very large and very friendly "about item" button that makes for easy inventory control. Despite the lack of a changing cursor there's really not that much pixel hunting, either.
So has Dghgbakufu progressed from Escape from a Building without Windows? Despite the stripped down interface and fairly simple graphics, the answer is yes. There are more puzzles, and they are a bit tougher than the first go round. The designer has also forgone using quite so many colors in the color puzzles, eliminating that problem in Escape from a Building without Windows of trying to tell the orange from the yellow (which also looked orange) which caused a few problems in one of the puzzles. The controls could still stand improving and the puzzles could be a little tougher, but Escape from the Room Surrounded by Bookshelves is a step in the right direction from a talented new game designer. Enjoy escaping and look forward to good things to come.


Walkthrough Guide
(Please allow page to fully load for spoiler tags to be functional.)
I felt like writing an unnecessarily extended hint-through:
Hint Through
1. The desk
You start out facing a desk, with a paper on its surface, items in the two drawers you can open, and a locked drawer.
The paper has a drawing indicating two columns of six boxes along the left and right edges, and a small box in the middle.
The middle drawer has a book with red markings and "358" printed on its spine.
The lower drawer has a locked box that accepts six digits.
Are you sure that's everything on this screen?
Is there something in the trash can?
Huh, apparently not. What kind of escape game is this, anyhow?
Wait, there's something behind the desk to the left. Oh good, pixel-hunting -- it's a good old-fashioned escape game after all.
The something is a second book, with green markings and "164" on its spine.
Now are you sure that's everything on this screen?
Yes, me too.
2. The cabinet wall (turn right)
This wall is lined with bookshelves, with a closed cabinet in the middle of the third column of shelves.
To open the cabinet, it looks like you have to set six boxes to some sort of color sequence, involving red, blue, green, and white.
Do those colors remind you of anything around here?
Yes, the books, obviously. Good, just checking that we're on the same page. Did I seriously just say that?
All the information you need to solve this puzzle is on this screen.
Facing this direction, I mean. The information is actually available for any of the three possible levels of zooming in.
The arrows on the cabinet suggest a repeating pattern.
Starting and ending with red.
Do any repeating patterns starting and ending with red jump out at you?
On the same column of bookshelves as the cabinet?
Set the six boxes to green-white-blue-white-green-blue.
A screwdriver!
3. The picture frame wall (turn right again)
Does the layout of this view remind you of anything?
Maybe the picture on the desk?
The circles on the picture point out the two features of interest on this screen.
Clicking on the left column of shelves, third from the top, gives a closeup of a gap in the row of books, with what looks like electrical contacts visible in the back.
Do either of the books you have fit in the slot?
Oh well, it was worth a shot.
Back to the main view, clicking on the right column of shelves, third from the top, gives a closeup of three gray buttons on a set of three gray books.
There's also the picture frame in the middle.
It's giving you the standard letter A=1 ... Z=26 letter/number code.
Wait, is there something else of interest to be seen when you're zoomed in on the frame?
Screws!
Removing the frame gives you a third book, with blue markings and "+219" on the spine.
4. The bookshelf wall (right once more)
Nothing much to be seen here.
There doesn't even seem to be anywhere you can click to zoom in.
Must be here for a reason, though.
Do any visual patterns stand out?
In the third column of shelves?
There's a wide block of gray books on each shelf.
It's in different positions on different shelves.
There are three different positions -- towards the left, towards the right, and in the center.
Do gray things with three positions remind you of anything?
Like the gray buttons on the previous wall?
5. The safe
Go back to the picture-frame wall, to the buttons on the right-hand shelf.
Push them in order according to the clue on the fourth wall.
Center, center, right, left, center, left.
A panel opens! An alcove is revealed with a safe.
The safe looks like it takes a three-digit code.
Above the safe is a blank space, with two stacks of colored boxes to left and right, and a line underneath.
Those colors are familiar by now, huh?
Like the spines of the three books gathering dust in your inventory?
What would happen if you put the books horizontally in the blank space, matching the colored boxes?
You'd have this equation:
358
164
+219
----
The safe is where the sum of those three numbers would go.
Punch 741 into the keypad.
A key!
6. Keys and keys
Only one place to use a key!
Namely, the top right drawer of the desk.
It's another book!
With Post-It tabs marking four key pages!
Can't seem to open the book, though.
Oh wait, those are metal contacts. Right.
Insert the book into the space in the bookshelf to the left of the picture frame.
Another alcove! With a door! Requiring a KEY!
Clicking on the handle doesn't give you a closeup with a number pad or anything. Huh.
Hey, there's that box still sitting in the inventory.
It takes six digits.
And we haven't done anything with the code in the picture frame yet.
The code translates letters into two-digit numbers.
Where could we find three letters to translate into six digits?
Possibly written in big green letters on the door.
K=11, E=05, Y=25.
Enter 110525 into the box.
A flounder!
Sorry, typo. A key!
Key goes in door, click to open, click to leave.
Out!
Posted by: Justin |
March 23, 2011 1:47 AM
|
March 23, 2011 1:47 AM
Escape from the Room Surrounded by Bookshelves 2 Walkthrough
General Information
Remember to examine any inventory item you pick up in close up, there may be additional clues.
There will be directions for the color blind.
Good luck!
Exploration
You begin the game facing a desk. Click on the top of the desk for a close up.
There's a drawing here, of something surrounded by two bookcases. Notice the third shelf from the top is indicated in both the left and right bookcases.
Back up, then click on the left side of the desk to see behind it.
Behind the desk you will see a book with a green spine and the number 164 on it. Take the book and click on the right side of the screen to back up.
Click on the drawers on the right side of the desk for a close up.
Open the larger, bottom drawer and you will find a wooden box with a six digit code on it. Take the box.
Back up once and then click on the middle drawer. Inside is a book with a red spine and the number 358 on it. Take the book and back up.
The top drawer is locked, so back up again until you are seeing the desk in the long view.
Turn right.
This is a wall with four bookcases. On the third from the left bookcase is what looks like a small door, click on it twice for a close up.
Looks like we need a color code to open this door. Back up twice.
Turn right.
You are now facing a wall with a picture on it, with bookcases on either side. Looks like the picture on the desk, doesn't it?
Click on the picture for a close up.
Looks like a simple substitution code, from A = 01 to Z = 26. Also, the picture appears to be screwed to the wall.
Back up.
Since this looks like the picture on the desk, there should be something on the third shelf down from the top on each bookcase.
Click on the third shelf from the top on the left bookcase for a close up. Looks like there is a gap between the books where something needs to be inserted. Something with four plugs. Back up.
Click on the third shelf from the top on the right bookcase. Looks like a lock with three gray buttons. No clue what to do here, so back up.
Turn right.
Another wall with four bookcases. Does one of those bookcases look different somehow?
Turn right and you are facing the desk again. Time to solve some puzzles!
The Color Code Safe
From the desk turn right once to the wall with the four bookcases and the door with the color code.
Click on the door twice for a close up.
Looks like the code starts with red. The arrows would seem to indicate that this might be a repeating pattern.
Look closely at the books above the door. Find the red book, and look at the pattern of colors. There is a red book, then green, gray, blue, gray, green, then blue. Then there is a red book and the pattern starts again.
This is the pattern for the safe.
The buttons should be, from left to right, red, green, gray, blue, gray, green, blue.
For the color blind: The first button is already red. Click the second button twice, don't click the third button (it is already gray), The fourth button three times, don't click the fifth button (already gray), the sixth button twice, and the seventh button three times.
If you enter the correct color sequence you will hear a click and the buttons will go back to gray.
Click on the handle of the door to open it and take the screwdriver.
Back up twice.
The Three Gray Buttons Code
Turn right to face the wall with the picture.
Turn right again to face the wall with the four bookcases.
One of these things is not like the other, one of these things just doesn't belong...
Notice the third from the left bookcase. There are a lot more gray books in that one, most of the gray books clumped together in clusters of six.
Can you see the pattern?
The clumps of gray books are either in the middle of the shelves, or to the left or right.
Looking at the shelves from the top to the bottom, the clusters are: middle, middle, right, left, middle, left.
Turn left to face the wall with the picture.
Click on the right bookcase, the one with the three gray buttons for a close up.
You need to click the buttons in the pattern indicated by the gray books on the four bookcase wall.
Middle, middle, right, left, middle, left.
If you enter the code correctly the entire case will slide away, revealing an alcove with another code lock.
Click on the code lock twice for a close up.
We see two bars of color, each red, green, and blue (from top to bottom).
We also see a number keypad on the door.
Back up twice to the long view of the picture on the wall.
The Alphabet Picture
You should still be facing the wall with the Alphabet code picture on it.
Click on the picture for a close up.
Use the screwdriver on the screws holding the picture down.
Once the screws are gone click on the picture to remove it.
Congratulations, you have found the third book. This one is blue, and has +219 on the spine.
Back up.
The Right Alcove Code Lock
Now that you have all three books, notice that they correspond to the colors on the lock in that right alcove, red, green, and blue.
You can now use those books (and the numbers on them) to solve the code lock.
Place the numbers in three rows, red on top, then green, then blue.
The hint is with the blue number, a plus sign.
This looks like an addition problem.
Add the numbers together (358 + 164 + 219 = 741).
741 is the code.
Click on the code lock in the right alcove three times for a close up of the number pad.
Enter the code you got from the three books, then click the "ok" button.
If you got it correct, you will hear a click.
Click on the handle of the safe to open it and you will find a gold key.
Back up three times.
Is that the key to get out?
Sadly, no.
The Locked Desk Drawer
Turn right (or left) twice to face the desk.
Click on the desk drawers for a close up, then use the gold key to open the locked top drawer.
Take the object from inside the drawer. Looks like something with four plugs.
Back up.
The Gap in the Books
Turn left (or right) twice to face the wall with the alphabet picture.
Now click on the left bookcase, on the third shelf from the top.
Notice the gap in-between the books? See that it needs something with four plugs?
Luckily you just grabbed something with four plugs from the locked drawer in the desk.
Insert the gray item with the four plugs into the gap.
Now the left bookcase will slide away, revealing the door out.
Getting Out
Click on the door in the left alcove for a close up.
Notice the word "key" on the door.
There is an arrow from the word "key" pointing to the keyhole on the door.
Is that trying to tell us that we need a key to get out? Duh!
Wait, maybe it's another hint.
Do we have anything in our inventory that hasn't been used yet?
Oh yeah, the wooden box with the six digit code.
Could the key be in there?
Remember the alphabet picture on the wall?
It assigned a number to each letter of the alphabet, from A = 01 to Z = 26.
Perhaps if we used the word "key"?
K = 11, E = 05, and Y = 25.
Therefore the code for the box is 110525.
Once you figure out the code, pull up the box from your inventory.
Enter the six digit code into the box.
Click on the top of the box to open it.
Take the silver key.
Click on the door in the left alcove for a close up.
Use the silver key on the door to unlock it.
Click on the door to open it and click again to escape.
Posted by: grinnyp |
March 23, 2011 1:53 AM
|
March 23, 2011 1:53 AM