

![]() Ready to scratch your hidden object itch? Hidden Expedition: Amazon has arrived! Along with the Mystery Case Files series, the Hidden Expedition games are some of the best-known titles in the hidden object genre. And for good reason. Hidden Expedition: Amazon has extraordinarily high production values, interesting gameplay that tweaks the familiar formula in very subtle ways, and plenty of crowded scenes to scrutinize.
Ready to scratch your hidden object itch? Hidden Expedition: Amazon has arrived! Along with the Mystery Case Files series, the Hidden Expedition games are some of the best-known titles in the hidden object genre. And for good reason. Hidden Expedition: Amazon has extraordinarily high production values, interesting gameplay that tweaks the familiar formula in very subtle ways, and plenty of crowded scenes to scrutinize.
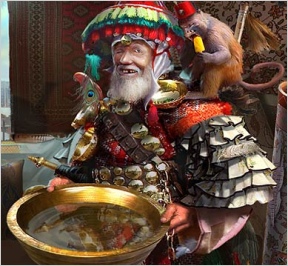
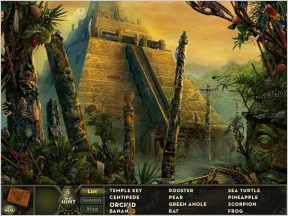 Hidden Expedition: Amazon drops you right into object hunting from the start and the story gradually unfolds as you play. Professor Mandible has gone missing while journeying through the Amazon jungle. You must follow clues left in his wake to piece together the mystery behind his disappearance and find the elusive Beetle Temple. Each area is littered with dozens items cleverly hidden amongst the scenery. Read the list at the bottom of the screen, then try and find those objects in the picture above. An optional hint system helps you if you get stuck, but otherwise its just you, your eyes, and the pixels.
Instead of just straight-up object finding, Hidden Expedition: Amazon takes a page from the Azada handbook and throws a little adventure flavor into the mix. Each location you travel to features a number of areas you can travel between. Certain items will be added to your inventory in these areas and will need to be carried to other scenes to complete puzzles and find all of the objects. Areas of the screen and items in your list that require your inventory will be shown in blue.
The most useful new feature in Hidden Expedition: Amazon is the item silhouette images that appear when clicking on objects in your list. This shows you a shadowed outline of the item you're searching for, taking every ounce of ambiguity out of the object hunt and allowing you to focus on relevant items. For example, if the list says "pizza", should you look for a round disc or just a slice? Click the item, look at the silhouette, and thank the developers for including such a wonderful feature in a hidden object game.
 Analysis: As far as hidden object games go, you'll be hard-pressed to find anything more impressive than Hidden Expedition: Amazon. The game features a solid object hunting experience with an unobtrusive storyline told as you play, cutting out any lengthy cutscenes and annoying interludes. Mini-games play a small but fun part of the game, and the overall design strikes that difficult balance of making the game easy to play without removing the difficulty. And most of the annoyances some casual gamers experience in hidden object games have been taken care of in this game.
Several small features found in most hidden object games have been left out or made obsolete in Hidden Expedition: Amazon, the most notable of which are click penalties and a timer. Instead of docking points or time for multiple miss-clicks, all that happens in Amazon is your cursor vanishes for a few seconds. Just enough incentive to hold back on the mouse button, but not enough to invoke frustration or that sinking feeling of failure.
Although some of the animations in Hidden Expedition: Amazon have slight traces of graininess around their edges, the presentation is otherwise gorgeous on all fronts. SomaTone Interactive Audio was responsible for the custom soundtrack, working with a live orchestra in Berlin, Germany, and the results are nothing short of spectacular. Take a minute to soak in the music and appreciate the labor and care that went into scoring the game.
Everything about Hidden Expedition: Amazon is almost perfectly crafted for an extraordinary hidden object experience. Tricky puzzles that make you think without sending you to the strategy guide, smartly hidden items that aren't covered to make them practically invisible, and an interface that works with you, not against. Hidden Expedition: Amazon is easily one of the best hidden object games around!
![]() Windows:
Windows:
Download the demo
Get the full version
![]() Mac OS X:
Mac OS X:
Download the demo
Get the full version


I think the Big Fish Games downloader program limits the speed at which you can download. It's still pretty fast, but I'm used to just going zzziiip it's done.
I wouldn't hate them so much if it weren't for that. DOWNLOAD FASTER. DOWNLOAD FASTER.
No comment on this game because IT'S STILL DOWNLOADING. HURRY UP.
This is a pretty big release for them, and the slowness you're experiencing is likely due to thousands of others downloading at the same time.
Also, 167MB is pretty large for a game, so there's that, too.
The snakes are getting on my nerves! How do I get them to the coloured lines without using my hints and once there, what kind of metronome speed suits them? I racked my brains.
There is a problem in one of levels. I got really stuck :/ When I open a new location the whole scene is just a white screen. I can see only the toolbar (MAP, INVENTORY, LIST). What is the problem? Do I have some damaged files or there is something to find?
BigFish won't load for me
Is the site experiencing server problems or something?
I tried with both IE and FF,
probably overloaded with thousands of people trying to download this game
Is the bigfishgames server down for anyone else? I've been trying for an hour to no avail. I'm dying to play the game! Hope it's not just my computer...
I didn't have any trouble downloading. I am stuck on the bars for the gas machine. I have hit solve andthe bars go into place but then nothing happens. What do I do now?
I'm stuck at the level where you have a gas can, light bulb and bolt cutters.
My cursor turns blue over the row boat (which as a television in it, rope, etc.) - but none of the items in my inventory (gas can, light bulb, bolt cutters) seems to do anything when placed over the boat.
In the other two available rooms, the cursor does not turn blue anywhere so I'm at a loss as to where I might use the other inventory objects.
Anyone have an idea? Thank you!
-R.
Use bolt cutters on door with lock, cursor turns blue when run over door. Pour gas into funnel. Put light bulb in broken socket. You need oars for the rowboat. Do other stuff first ... I think that leads to the oars if I remember correctly. Happy Gaming, this is an awsome game.
Madame Fate is my all time favorite hidden object game but this is running a very close second.
I have a broken crystal ball thing in my inventory, need to get a heart and a ring in one map, and a slingshot in the other. Cannot work out how to finish this level at all, starting to think there's a glitch.
Sadly, I can't seem to download this at all. Maybe it is simply that it is so busy. I'll try in a few days.
@Lizzie Callaghan:
First of all you need to get the correct instruments in place - put the accordion on the left, the purple/blue instrument in the middle and the drum on the right. The accordion and drum have coloured bands on them which should correspond with the colour of the maracca of the snake they are in front of. Next up, hit each instrument until the snake has risen so that the top of its head is at the line with the colour of its maracca. Once this is done, change the speed of the metronome. When I did it, it worked at about 2/3 of the full speed, but if this doesn;t work just try out all the possible speed - there aren't that many, and you just change it by clicking the button at the bottom. At the right speed, the snakes will sway in time and will disappear back into their pots.
Help, I too am stuck on the boat level. I have the gas can,light bulb,and wire cutters. I have tried all of them all over the boat and nothing happens. I can't seem to get strategy button to work.
Thanks,
Finessa
@RandomEsq:
You need to go back to the first room of this 'scene', whch contains the 'Clean Socks' box and two small buildings/trailers. You'll be able to use your bolt cutters on the lock to the red building, and doing so will open up a new room for you to select, where if you do the puzzle correctly you will gain some oars, which are the items you need to use on the boat.
hi could someone please help, I'm stuck on the level with the cogs and no matter what i try the smallest cog will not fit, i think i must be doing something wrong.please help as I'm pulling my hair out
@Finessa - Please also see the message for RandomEsq. I didn't see your message before I posted the answer, so didn't include your name.
@tina:
Are you in the area where you need to put 4 gears onto pegs, with one already having been put on at the bottom right? If so, the smallest one might not be fitting because you might be putting the gears on in the wrong order. With the 4 gears you have, try putting them on in the following order, working left to right where 1 is the largest gear and 4 the smallest:
3, 2, 4, 1
I'm stuck with the monkeys and the gems. I've tried to treat it as a connect four by weighting monkeys, and it's still no go. Something that's obvious to all others is eluding me. Please help.
I just got to enter the bettle temple and all i got was a white room... i could see everything else on the screen but nothing on the search part...what do i need to do to continue
@kitpie13:
The goal of this is to make the highlighted row appear the same as the row shown in the bottom-left hand corner (or, on the third level, two rows). To achieve this, you need to click the arrows to move the gems one move in the direction clicked, just for that row. You can use the monkeys to alter the height of each column of gems so that when you move the gems with the arrows, you get the right colours in the right places - you can even weigh them down enough to remove them entirely from the movement system. It's hard to give you instructions on exactly what to do since the pattern is random each time, but if you follow these instructions you should have more luck.
If you're gonna copy, copy from the best. I see elements of Riven and Amerzone all over this game. That's why I bought it a few days ago. I wasn't expecting that 3-part lights out/etc. puzzle though. Tough as nails. I like the designs and the humor.
Now I can't wait for Ravenhurst 2.
I too am stuck on the snakes, i read the previous comment on placing the instruments on the stools, but I don't even know where the instruments are located, they didn't appear in the inventory and I they aren't in either of the search levels. Sorry if the answer is completely obvious but it is currently alluding me.
I am stuck putting the bars on the generator to get all of the lightbulbs lit. I'm sure I'm just being thick, but I can't seem to get the right pattern. Anyone?
Thanks!
Generator Bars hint. When you set up the bars, be sure each end is connected to a different color (blue and gold). Then be sure you haven't put the ends of one bar on the same one as the ends of the other.
To Tim:
I have completed this game and never got a white room like that. Something's amiss! Can you back up and do the rooms over again?
Hi, can anyone help me with the room that has you look for the butterfly, frog, dragonfly, etc. I have found all of the animals and written down the symbols that come up when you click on them, have made the beetles legs move, made the "pie" pieces shake, lit up the skulls eye glow, just can't figure out what this room wants !! Been at it several times today, can't move forward. THANKS !!
LOL just figured it out ~ wouldn't you know..... :-)
I am having the same problem with the room with the butterfly, dragonfly, etc. How did you finish this section?????
Where is the fish symbol? I have spent hours looking for it. I assumed it would be on the screen with the frog since all of the others had 2 symbols to a screen but I can't find it.
The whale is on the last map screen on the left hand side on the rock wall, forget if it's above a cave?? After you light up the animals, a symbol appears above them and you can change this symbol by clicking on it. You need to change the symbols above the animals until the "pie" piece on the last screen changes to color. When all the pieces are lit up, you can proceed. I won't go further here so you can try the rest on your own ;-)
@TIM
The white screen is a bug in the game. You need to write bigfish to get an update of the game, otherwise you wont be able to solve the problem.
Greetings, Kayleigh
I have got to the snakes but am at a loss as to where to find the 3 instruments...can anyone help?? I have tried starting the level again, but cannot for the life of me see them. Thanks
@Scott Glasgow:
That's pretty odd, since for me the instruments simply appeared in the Inventory. Haveyou tried going to the menu and selecting Restart Level? You might lose a little progress, but hopefully the instrument will appear next time. If not, you could try ocntacing Big Fish Games, since this might be another bug.
@Nanci:
Although mbolly suggests just changing the symbols until they are correct, there is a definite way to do it. You need to check the shape of the 'wedge' of the pie containing the animal, and then go back and change the animal's shape to represent this. For example, the animal at the bottom of the circle (a fish) needs to have its symbol changed to an upwards pointing ~equilateral triangle, and the animals on the left need theirs changed to right-angled triangles pointing right - the bottom animal should have the bottom half of a triangle, and the top one a top half.
@staci:
As mbolly says, the fish is the only snaimal in its room. The room it is in, hoever, needs to be unlocked, so try getting all other objects and then it is above an archway on the left.
Nanci. Thanks for that information. This is what makes this game so great - figuring out the real way to solve these puzzles. After finishing the game, I went back to the monkey puzzle close to the beginning, and I'm still trying to figure out what's necessary to get it. Any thoughts?
HELP!! I am stuck on the puzzle with the stone statue and the note that says "you can find scratches on more that one face" What do I do?
Thanks!
Where do you get the gascan & the bars from. I don't remember seeing them.
Great Game, but needs direction. I am stuck in gear room . where are the gears?? Whats with the red bird and symbols?
@iggy:
You need to make the statue look like the ones either side of it. When you move a facial feature into the correct place (using the 'button'-like objects below it), the orb of the statue which it matches will glow blue for a short time. Do this so that each thing makes the orb glow blue for the same statue, and then repeat for the other one - you need to make the big statue look like both of the other ones, one at a time.
What's the deal with the gears? I've tried over and over but I cannot put the gears in the right place.
I have a game bug for Amazon. It is a complete white page at the INSIDE TEMPLE-BLACK CAT-CRATE page. It is the one after u use the key to open the temple. No picture, just a white page. I updated my video card driver & still nothing but a white page. Does anyone have a suggestion? I have uninstalled the game & reinstalled, also. I need help!! It is a great game, I don't want to just give up on it yet. Thanks
Linda
Can someone PLEASE help me out and tell me how to catch that gopher??? I can find everything else and the cursor glows blue when i hover over the hole but how do i get the gopher????
@Linda: This is a bug with your copy of the game, and it has happened to a few other people too. Try sending an email to Big Fish Games, because they are the only people who an really help fix it for you.
Hi. Help, please. I'm having trouble with the two stone statues. The two jigsaw type puzzles have been completed, but nothing happens. Am I missing something?
To LittleMissR:
About the gopher -
There is a bag of gopher food on one of the other puzzles in that set. Once you find the gopher food, it goes to your inventory. You can then use it to reveal the gopher you're looking for.
I too am unable to see the musical instruments to make the snakes sway. They are not in the inventory and I have re-started the level twice. Don't how to proceed. Any suggestions please?
Did anyone find out about the white screen Inside the Temple Black-Crate?
I am stuck on the one with the lights. I have a plank in my inventory but it will not do anything. I think I have to get fuel but I don't know how. Please help.
I have complted the gear room and am at the end of that section. I have have reache the room with the silhouettes of the bird,dragonfly, shark, frog and snake. I went back to the other parts of the puzzle and located all the silhouettes in other sections. The snake part lit up on the final puzzle but none of the others. Anyone got any help?
I am also stuck on how to get the musical instruments in the snake level. I have redone the level 5 times and cannot get them... any ideas?
I am stuck in a cavern with the pulley on the rope that goes across. the other piece in inventory stays above the inventory space and I can't catch it. anybody know what this about?
I have made it to the three rooms leading to the professor. I have a ring in invintory. I still have to find an arrow, and a heart. I used a hint to find out where they both are, but cannot figure out how to access them.
I have found all the items in the list and the pages of the journal, but it is not going to the next level. What should I do?
Hi, Lindsay,
the snake do need their right instruments. From left to right you need the accordeon, that thing that looks like a little back pipe and at the right side the drum.
When you have done this, you will see, that the snakes do kind of bellydance ;). Now click on the instruments and bring each snake up to the colored line at the wall, that fits with the wall of the maraca it is waving with.
When you have this, click on the metrom a few times, till you see, that they move exactly in the same rythm.
Leave them for a few seconds and then they will dissapear and the game goes on.
Greetings, Kayleigh
Mary Lou,
can you tell please, which side of the journal it is? That would make help easier :)
Thanks and Greetings, Kayleigh
@ Savannah,
did you restart the level or the game?
If 'just' the level, than you will be maybe surprised to see, that the instruments are there, when you close and reopen the game.
If this didnt help at all, ask bigfish for the updated version. That fixed the problem with the white screen and maybe also with the instruments.
Greetings, Kayleigh
Hi Joy,
do you alreay have the lever also? You need it to go on. You will find it on the left side on a small blue tree.
Go back to the second location and place the lever on the slot, that is on the left side of the door.
When you pull the lever, you will see the crowbar.
Now go back to the third location. There is a foot of man, that has been eaten by a plant.Place the crowbar there.
Now you go to the fourth location. Place the ring in the small statue, located on the lower left side. The will open.
The heart has the same blue color as the inside of the well, its located on the left side. Click it and the scene will end.
Greetings, Kayleigh
Hi JIguest,
over or under the shapes you see symbols.
Click this symbols, till you have for every shape the triangle that is equal to the position of the animal at the door. When ever you have the right triangle, the animal in the door will light up, like your snake.
Greetings, Kayleigh
Hi Ladybug,
I had the same and it seems, its another bug.
All you can do, is be patient and try by always going back to inventory and click it exactly under the place, where the handle shows in the scene. When I did so, I suddenly had the handle at my cursor and was able to go on. (But I tried it around 10 times, before it worked out)
Greetings, Kayleigh
@ Shirley,
the white screen is a bug and will be fixed, when you install an update you get, when you write bigfish a mail because of this.
Greetings, Kayleigh
the gas can (its red) is in the cave, left upper side of the scene. It is inside the trunk of the car
Go to the lightmashine and fill the gas inside by clicking on the funnel.
Press on the red buttons and some wooden pieces will show up at the bottom.
I wont go on here, but just feel free to ask, when you cant figure out the puzzle then.
Greetings, Kayleigh
sorry, last comment was for KIM
I've just gotten to the bit with the professor that Joy and Kayleigh were referring to, but I'm stuck in a different way. I can't for the life of me figure out how to get the ring or the slingshot!
I have the crystal ball (only thing in my inventory), but I can't do anything with it. I try to place it on the table, get the horrible 'you're a failure' buzzer noise.
I've run my cursor over every inch of the maps, all of them, and nothing shows up blue except the table and the area where you get the ring.
I found this version of the Hidden Expedition series to be utterly non-immersive. I played for a few levels, hoping the game would inform me why I should care at all about the Beetle Temple, but no dice.
HE: Titanic had the excitement of pretending to explore something lost, a place where people had died, a scene of great historical import as well as romance and grandeur. HE: Everest had the excitement of racing to the top and doing something few people get to try, let alone accomplish. In both games, I felt involved and could lose myself. This one was different. I won't be buying it.
I need some help with the train car/light bulb machine place.
In this chapter I get two places on my map - the site with the two train cars (log page 14) and a ravine site with a river and a big bird (log page 15).
At the ravine site I got a light bulb and a wire cutter which I took back to the train cars to cut the chain on the door. I also got a plank at the train car site. This opened a third location, the machine with all the light bulbs, the oars etc.
My problem is:
- In which of these two locations should I find the gas can this machine needs? Where is it? Should there be a third map site open? (Somebody mentioned the gas can being in a cave or in the trunk of a car.) Is a location with a cave (and a boat to use the oars in) missing from my map? (Should there be a log page 16 site too?)
Hi JIGuest,
hm...there is a location with a boat, in the back you see the entrance of a cave. Maybe my explaining wasnt that good and its the ravine place, you talk about.
Look at the left side of this location and there is a car in which trunk you will find the gas canister.
Hope, that helped
Greetings, Kayleigh
Hi Morigale,
maybe Im wrong, but it seems, you have only been once in the puzzle room, but you have to go back and do a second puzzle. When you solve this, a new location will be opened. When there is nothing left to do, a third puzzle will be offered to you in the puzzle room.
If this does not solve your problem, then please let me know and I will try to write this locations down more detailed
Greetings, Kayleigh
Can anybody tell me, how to do that with the spoiler? I know, that I saw an explaining about this on the old site, but now I cant find it anymore and of course it would make more sense to use it.
Thanks, Kayleigh
Kayleigh: I had opened all the puzzle rooms. It turned out that the bit I was missing was a tiny, tiny little blue clicky space in the first opened room.
The game was great fun. I really liked Professor Mandible's journal entries, and I actually got far more into this game than I did for Titanic. I've never cared for historical things, but sci-fi, fantasy, weird things, I'm all over those.
At one point I broke the game for a moment - I was doing a puzzle and right clicked twice, which made the game decide to throw me a stage forward and remove my mouse cursor. I had to ctrl-alt-delete to fix it, but the game was fine when I opened it again and I didn't lose anything. And it didn't happen again even when I tried to do it!
Hi, Morigale,
glad you made it :)).
I think, the developers should have said, that this one is diffrent to the first two expeditions. That have been pure HO with a few mini-games. Well done, of course, dont get me wrong.
HE-Amazonas is a Hidden object game with ambitious and mindbinding puzzles in the style of Madame Fate. Not for everyone the right choice of course. But it should have been said clearly. On the other hand: Therefore they give you the demotime. You can see, if you like the kind of game or not.
For me, HE-Amazonas is the much better game. HO-games with minigames inside I find in one or the other quality on every corner.Creative and challenging HO-Scene paired with intelligent puzzles are much more rare.
Greetings, Kayleigh
Hi Kayleigh
Thanks for the advice re: swaying snakes. I did as you suggested and it WORKED.
Many thanks
Savannah
Kayleigh, to use spoilers you need to wrap whatever you say in spoiler tags. For example, <spoiler>this would come up in spoiler tags</spoiler>
Hi fatnickc,
funny, now that you say it, I can see the explainings also.
From now on, I will use spoilers :)))
Thanks for your support :)
Greetings, Kayleigh
Has anyone else had frame rate issues with this game? I can't play it at all due to choppy-ness. I have never had such a problem with any casual game.
It seems like this release was poorly optimized or something. Hopefully the next Mystery Case Files doesn't do the same thing, even though all my other games work fine.
Looking for a way to leave the mini puzzle that is made up of pie shaped slices of a stone wall with animals. I have found all the animals on the other maps, but need to know the next step in order to move on. Any ideas? Thanks!
Help, I am stuck on a puzzle at the level where you have to find gears... I can't solve the puzzle, I have found all the animals, it seems I have clicked on everything but nothing happens...
Danielle
I guess I'm really thick-headed. I still can't get through the light bulb puzzle. HELP! THX.
To Houston:
About the light bulb puzzle - This was posted by iggy a couple of days ago. Maybe it will help you.
Generator Bars hint. When you set up the bars, be sure each end is connected to a different color (blue and gold). Then be sure you haven't put the ends of one bar on the same one as the ends of the other.
I am stuck at the level with the steam and the pipes how do I solve this?
Hi Bunkport,
please look at my answer 18 posts over your from June 23, 2008 3:50 AM.
Go back to the rooms where you found the other animals.
Greetings, Kayleigh
Hi Guest, about the steam and pipes puzzle
there are diffrent solutions to solve this, I think, but I will try to explain how I did it.
On the left side, next to the wheel, you have little pipes. When you connect one of this tiles with another pipetile, you will see a green point, that you can click, to turn the pipe in diffrent directions
First use 5 of this little pipes to find your way down - There is a fixed part on the board with two green triangles. Clicking on this triangles will move that pipe to one or the other side. Connect this part with the pipes
Now you use 1 pipe, direction up and connect it with the fixed part with the two halfcircles. Clicking on the halfcircles will move this pipe also.
Use 1 pipe, direction down, connect it with the one with the triangle-pipe
Use 3 pipes down, connect it with the triangle pipe
Now use 9 pipes, direction up. At the stones you have to go left, no way to come through this. Connect your pipe with the fixed one with halfcircles (the pipe has to be small, if you click on the circles, you will see what I mean).
Now go four down and connect the last one with the main heater.
Turn the wheel.
There are pipes left, that gives me the idea, that there is more than one way. Hope, that my explaining was understandable and will help you. Its a little trying out, but it works :)
Greetings, Kayleigh
@ Danielle
I dont know exactly where you need help.
When it is with the animals, you found: Did you click the right buttons, so the animals where highlighted and the door opens? If not, than please read my post from June 23, 2008 3:50 AM. You have to go back to the rooms, where you found the animals.
If it is the gearpuzzle, you cant solve, than is it, because you are missing gears or the puzzle it self?
When the door wasnt the problem, than please let me know and I will give you a detailed description of the gear puzzle.
Greetings, Kayleigh
@ Houston,
if the explaining from iggy is not enough, see here, how to place them
From right to left:
the smallest one (2 poles long) goes on the first two poles
the longest one (6 poles long) goes from pole 3 to pole 8
the 3 pole long one goes from pole 4 to pole 6
the 5 pole long one goes from pole 5 to pole 9
the 4 pole long one goes from pole 7 to pole 10
They have to be placed one over each other
Greetings, Kayleigh
Kayleigh, I'm pretty sure that the puzzle is randomly generated for each game, so your instructions won't be applicable to Houston.
And I'm pretty sure that the same is also true of the water puzzle, for which yuo gave instructions above (just in case anybody has tried them and got stuck!).
Hi fatnickc,
for the generator puzzle: As far as I know, its not. I gave this advice on other sides also and it worked out for every one.
The steam machine has more ways then only this one, but it is a way, that worked out also for other people.
But thanks for your suggestion and please let me know, if it does not work out for someone.
Greetings, Kayleigh
I am stuck on the animal pie pieces. They are all lite except the fish I can't find the fish. Can someone help with this.
Please help!
I just passed the round with all the circles (All In!) on the board, after the steam room. I am now trying to get the (blue) crowbar that is in the cave with the man sitting it and I don't have any tools.
Diane
I have a gazing ball and do not know what to do with it. I need to get to the slingshot and do not know how. I figured out the crow bar but nothing after that, what am I doing wrong. I did all the circles with the lights and finished them but after I got the Prof out I am stuck. HELP!!!
@ Sue
The fish is in the 4th location
Greetings, Kayleigh
Hi Diane,
You have to do the circle puzzle three times.
As you have the snowball, you have to go to the second location, the one that tells you about the crowbar. Place the snow globe on the blue flower that is on the lower left side.
The snow globe will capture the light of the flower and will automatically go into inventory.
Now go back to the third scene and place the completed snow globe on the right side of the altar. A hidden compartment will open up under the altar and the slingshot will appear.
Now you have to go back to the first scene and there will be a third circle puzzle to complete.
After solving this, a fourth location will open.
Hope, that helps :)
Greetings, Kayleigh
Hi, Dore,
please read my answer for Diane, the one right above.
Greetings, Kayleigh
Thank you so much! I'm sure I'll be back!
Diane
I hope I did this right, I did the puzzle three times in a row, got the crowbar, and everything, have the level still, but went back to the circle puzzle and its blank? Also I can't proceed to anything else.
Hi Diane,
With the crowbar, you have to go back to the third location and use it on the foot of that man that is eaten by the plant.
Now go back to the 4TH scene, the one with the giant spider, use the ring on the small statue that is on the lower left side of the scene. The well opens and you will find a heart. Click on it and the scene ends
Make sure, that you have all pieces of the journal (there is no piece at the last location, where you have to use the crowbar).
If you have done that all and the game still doesnt end, then try to restart the game (not the level). If that does not help, you can try it with restarting the level, but that means, you have to play it all again and maybe you ll be stucked at the same place.
If this is so, you have no other possibility to write Bigfish - support.
Greetings, Kayleigh
I'm stuck doing the 3rd circles and can't get to the crowbar! Help please!
Ok...so I put the 4 gears on their pegs in the order that was previously discussed and nothing happened...is something suppose to happen? Also, I found all of the animals except for the whale, and I'm guessing that something is suppose to happen, opening another room which probably has the whale in it...lol. Help please! :)
I am also stuck on the 3rd circles puzzle that has the 4 spaces to place the balls and can't get to the crowbar either. Anyone who can help me, it would be appreciated. Thanks
ok...I figured out the gears and the pie pieces...jeez are we suppose to be mind readers or just geniuses?
I used the bolt cutters to break the lock, but can't open the door. Where is the gas can??
What do I do with the plank. I've tried everything, wheres that gas can??
OK I have everything done with gas,light bulb, cutters, and oars. Now what happens I put the oars where it was blue and I'm stuck and don't know what to do. Help plz
Hi Linda,
when you have done everything, a new location should have opened, when you go back to make.
Make sure, that you have all journal pieces.
When this does not help or you are stucked with the next puzzle, please let me know.
Greetings, Kayleigh
Can anyone please help me? I'm stuck on the level where I need to find a crowbar, highlighted in blue... using hints is no help, I just get a blue flash around the entry of a cavern.
I cannot find the crowbar. I noticed in the postings that I should have a lever...I do not. Please help! I have the snow crystal ball. Also, where is the slingshot?
Posted on Aug 1.....I found the crowbar and sling shot. Re-read some of the postings....THX.
@Nick
You have to do the circle puzzle three times.
As you have the snowball, you have to go to the second location, the one that tells you about the crowbar. Place the snow globe on the blue flower that is on the lower left side.
The snow globe will capture the light of the flower and will automatically go into inventory.
Now go back to the third scene and place the completed snow globe on the right side of the altar. A hidden compartment will open up under the altar and the slingshot will appear.
Now you have to go back to the first scene and there will be a third circle puzzle to complete.
After solving this, a fourth location will open.
I am stuck in a cavern with gems. have all the gems and a part of map. where do i go from here. please help
@Sandy
Look at the screenshot for the right places of the gems
Click here
# Once you place the rocks in the right place a rope will fall down from the left side of the screen.
# Pull on the chord and you'll notice that the gems will light up in a certain pattern. You must duplicate the correct pattern 4 times in order to beat this puzzle.
# Each time you play, one more sequence will be added.
# If you're correct, pull on the chord to get your next sequence.
# If you're wrong, you'll hear a light buzzing sound, pull the chord again to get a new set of sequences.
# Once you're done the rock will crumble and the scroll with a map will be inside with the location of the beetle temple.
Greetings
it's me again with the next problem... i managed to get to the fourth location but i just can't find a place for the crowbar...
@ Nick
plese have a look, if this screenshot already is enough help
Look here to see crowbar location
If not, please let me know and I'll be glad to help you
Greetings, Kayleigh
Help, please! I have been totally mystified with most of the mini games so far, with no instructions or knowing what they are about at all, but I had managed to skip through them using the solve button, til now. I am at the one with steam pipes, and the solve button has them all connected, but nothing else happens. I have the crowbar and the other thing in the inventory but have no idea where to put them, the wheel won't turn.. I am stuck. I love hidden object games but do not like the mini games that you have no clue how to do and have no bypass button, therefore ending the game, without help. ERG!
@Susannah
You have to go to the location with the Stonehead now.
There, on the right side of the stone head is where the handle belongs
Greetings, Kayleigh
Hi All,
I have solved the steam pipes and I have the handle but when I look at my inventory list it's above the inventory list and I can't click on it so that I can use it on the pump. Any suggestions??? Please???
I have gotten to the place where you are to find a blue crowbar. The statue and a crutch as well as the two blue cattails turn blue with the cursor but there is no crowbar. I started the game from scratch and the same thing happened. I also don't understand why there was nothing attached to the pulley ropes. The maps at the stage I am only shows the puzzle with all the lights lit. What am I doing wrong? I redid it because I thought I forgot something along the way but it came out the same both times. How do I get the crowbar and interact with the blue cattails?
Hello,
Can anyone help me, i need to put fuel in the can, and i have one woodstick left? Can not play more because i have to do above first. It is in a early state of the game.
Thanks Natas
The Netherlands
i am stuck with the cobras wath do i do to pass the level
@Carole
Click the metronome in right down corner a few times, till it the hand is showing "1 o'clock
That makes the snakes moving in the same rhythm
Now give the snakes the right instruments
Oswald gets the akkordeon
Fabiano gets the funny purple thing
Ringo plays the drums
You have to click the instruments now, to bring the snakes in the right position
The correct position is the colored line at the wall behind the snakes
5 clicks for Oswald to bring him up to the yellow line
4 clicks for Fabianos instrument to make him reach the green line
6 clicks for Ringo, which needs to come up to the red line
What a moment, till the snakes finished their dance
Click the glass eye to move on
Greetings, Kayleigh
for any one having trouble with the pump handle
put pump handle (crowbar looking thing) onto pump on the other side of the lava flow next to the head, this will let out a stream of water and stop the lava flow
Okay. I have tried to put the gears in the right place in the gear puzzle for over a week and I'm about to abandon this game. I can't find anyone's answer or spoiler either. I assume I'm to make the beetle's lights light up but I haven't made a single one light up yet!!! HELP!!!!
cbflute
Gears
I must admit that I found this puzzle just about as frustrating as many others in this game - minimal instructions and no acknowledgement when you have done something correct. Having said that, once you have placed your gears you have to turn the device that is just below the beetle in a circular motion by clicking and dragging.
Thank you jan.jan! Brother! I've been just CLICKING on it!!!!!!!!
ok i am stuck on the part where you have to get the ring from the spider. done that now i have to get the heart and i have no idea how to get it. i read you have to put it on a statue but which statue? please help. tahnks nikki
Hi,
Please help! I've read through all of the comments and haven't seen anything about this problem.
I found all the gears but couldn't get them on so that they would work. I went to another screen and when I came back, one of the gears was gone.
I've been back to each place where i got a gear and there's nothing there.
Am I doing something wrong or is this a glitch?
Thanks for all of your help.....
Robin
Hidden Expedition: Amazon Walkthrough
Office, Study, Golden Mask
Office
Look for all white written items in your list
The two golden keys (actually this are golden-blue squares) you will find in the lower left corner of the world map and at the book stack on the chair, right side
To get the key for the desk, you need the scissors, which you will find left next to the desk on a crate
Click inventory, get the scissors and click with it the patch on the backpart of the red chairs
With the key you open the left desk drawer. You will find the passport
Click the pigeon in the window, after you got this tip
Read the letter
Click in your map at the next location, which is open now
Study
Look for all white written items in your list
Use the toiletbrush from your inventory with the fish tank
When it is clean grab out the golden key
The second one you will find left upper shelf and the third right next to the door, below the light switch
After finding all white written objects in your list move on to the next location in the map bar
Golden Mask
You see symbols on the golden keys, you collected before
Now drag this keys to the mask side with the same symbols
If you see the symbols on the keys right side, the key belongs to the right side. Same for left
Look at the screenshot for the right positions, please
Now click away the papers at the wall both sides to make them fall down
You will see symbols, equal to the once on the mask
In the same order, you see the symbols on the paper, you now have to click them on the mask
Right paper for right side of the mask, left paper for left side of the mask. Left side: Go from left to right, doesen't matter in which row the symbols are standing. Start with the symbol at the bottom, because its all left
Right side: Follow the rows from left to ride (1. first row, 2. second row….)
Please have a look at the screenshot for the right order
When you have done it right, the eyes start to glow and the mouth opens
Press the red button and you will move on. There is a scene following, where you just have to look for items
Screenshot Mask, Part 1
Screenshot Mask, Part 2
Market Place, Gopher, Livingroom, 20 Coins
Market place
Find all items from your list. You have to collect the first time a journal page
You will find it left, next to a stack of cloth. It will be shown this one time by a blinking circle
Gopher
Find all the white written items on your list
The journal page is at the left side down, next to the cross
You wont be able to find the gopher, you first need some food for it
When you found it, come back to this scene and click the gopher food at the hole on the ground in the middle
The gopher will come out and you can click it
Move on to the next location on your list
Living Room
Find all objects from your list
The journal page you will find on the top right side of the scene,inside the broken wall
This is where you get the gopher food to coax the gopher out of its hole. It will be located on the lower right side of the scene
If you get the gopher right now or when you finished the scene is up to you and makes no differences
20 Coins
Find all coins
Please see screenshot for the location of the coins
Screenshot 20 Coins
Desert/Living Room/Snake Puzzle/20 Breads
Desert
Find all items from your list
Don't forget the journal page - you will find it, down right at the wheel, it's a scroll
Living room
The journalpage is in the back, in the middle of the bookshelf
To get the blooming flower, use the watering can, standing on the table in the middle of the scene and click it at the dry plant in the back on the bookshelf
Don't forget to grab the flower after
The key is located on top of the chair, right beside the spider
Use it to open the lock at the door right side in the back
Look at your map, a new location is avaible now
Snake Puzzle
Click the metronome in right down corner a few times, till it the hand is showing "1 o'clock
That makes the snakes moving in the same rhythm
Now give the snakes the right instruments
Oswald gets the akkordeon
Fabiano gets the funny purple thing
Ringo plays the drums
You have to click the instruments now, to bring the snakes in the right position
The correct position is the colored line at the wall behind the snakes
5 clicks for Oswald to bring him up to the yellow line
4 clicks for Fabianos instrument to make him reach the green line
6 clicks for Ringo, which needs to come up to the red line
What a moment, till the snakes finished their dance
Click the glass eye to move on
Screenshot 20 Breads
Find 20 Breads
Please look screenshot for all positions
Please see screenshot for the location of the coins
Screenshot 20 Breads
Plane, Dschungle/Hut (feed dog)
Plane
Get the journal page, located lower left side between rollerskate and olive on the floor
Find all items from your list
Dschungle
The journal page you will find on the right side, on top of the jeep
Grab the steak, that is on the wheel barrow
Find all the items from your list
Hut
The journal page you will find on the upper right side of the roof
Give the steak to the dog in front of the hut
It wil automatically change into a bowl of dog food
Don't forget to click the bowl, to make it dissapear from your list
River, Bridge, 20 Reptiles
River
Pick up the Journal piece that blends into the front part of the boat
Take the gold key that is in the lower left side of the scene
Place the key on the large idol that is in the back of the scene
The mouth will open, revealing the medallion
Don't forget to click the medallion
Bridge
The journal page you will find left on the horizontal tree
Find all items from your list to move on
20 Reptiles
Find 20 Reptiles, for the right location please have a look at the screenshot
Screenshot 20 Reptiles
The Monkeys, Find 20 monkeys, Tent(Cooked fish, Fish on line), Ship (cork, mouse), 20 Flowers
Plane
Your goal is to arrange the tiles that are on the wall in order to match the pattern that is on the small rock on the left side
The solutions are random in this game, so this can just be an explanation, not a solution
The right pattern has to be shown on the glowing blue line. Use the small blue arrows that are on each side of the wall to move gems to the best pattern possible
Use the monkeys to bring gems down
Each monkey will do a different job
The smallest one will bring one gem down one space
The white monkey will bring down two gems two spaces
The black monekey will bring down the gems three spaces
You can use two monekey's on one hook, to bring down the gems, if needed
Use the monkeys to bring down certain tiles and use then the small blue arrows on the side in order to manipulate the tiles to fall where you want them to go
If you do it right, the gate at the bottom of the big monkey will open a little
Once you move some tiles around, move the monkeys out and place them where they need to go in order to get the 2 lines just right. You have to do this three times
When you can't do it, than click the hint. You will see a paper and when you click it, the puzzle will be solved for you
20 Monkeys
Find the monkeys in the scene
For all positions please have a look at the screenshot
Screenshot 20 Monkeys
Tent
The journal page is inside the tent on the bottom left
The fishing rod you will find exactly in the middle of the tent
Click the fishing rod on the water and wait till you get a fish
The fire wood you will find right, next to the tent
The matches are located at the lower part of the scene in the middle
Get the fish out of your inventory and put it in the cauldron
Get the cooked fish out of the cauldron
Find the other objects from your list
The Ship
The journal page is located in the left lower corner
Get the corksrew right side over the water
Click it at the cork in the wooden plank, at the left side, in the middle
When you have the cork, the mouse will come out of the hole
Don't forget to click it
20 Flowers
Find 20 flowers, please have a look at the screenshot for all locations
Screenshot 20 Flowers
The red train, Waterfall, Cave, Oar Machine
Train
You will find the journal page at the left side on the left edge of the scene
The plank you will get by clicking it with the hammer (lower left side)
Find all items from your list and move on
Waterfall
The journal page is in the middle in the grass
Get the bolt cutter, right side under the Danger Bridge Out" sign
Pick up the lightbulb, upper left side of the waterfall
Place the plank from your inventory on the left side above the pencil sharpener
With this, you unlock a new location in your map
When you found all items from your list, go to the cave
Cave
The journal page you will find left side, down in the water, right side to the boat
The gas can is in the trunk of the car. When found all items, go back to the train
Use the bolt cutter at the chain lock at the red railway carriage
A puzzle opens
Oar Machine (Train Puzzle)
Place the bulb from your inventory where you see the broken one
Drag the fuel can to the funnel at the right side
Now you will see different sized bars
Your goal is it to place them vertical at the vertical bars of the machine to make all the bulb glow
One bar always has to end at one blue and one golden vertical bar
No vertical bar can be used twice
All vertical bars have to be use once
There are different solutions possible, please have a look at the screenshot to see mine
When all bulbs glow, you will see oars on the upper part of the machine
Grab them and go back to the cave
Screenshot Oar Machine
Click the oars onto the boat left side and go to the new location which just opened
Diamond puzzle, In front of the temple, Temple stairs, Tree (bee hive)
Find 10 Diamonds
2 of the diamonds are hidden
Click left onto the leaves in the middle. One will move up and you can pick up the diamond
Click the stone, shimmering orange, in front of the large stone with the holes. It will move and you can pick up a diamond
For all locations of the diamonds please see screenshot
Screenshot Diamonds, Part 1
The diamonds have to go into the holes of the large stone
A part of a sheme, where the diamonds have to be placed, you will see in the lower right corner
For the rest you have to try out
When you are done, a rope is falling down on the left side
See the screenshot for the right positions
Screenshot Diamonds, Part 2
Click the rope - you will see a few diamond highlighed
Click the diamonds in the same order as shown
When you have been right, click the rope again for the next sequence. You have to do it four times
When you made it, the stone will open and you will find a map for the way to the beetle temple
In front of the temple
The journal page is at the lower left side
Left above the branch you will find the bananas
Temple stairs (bee hive)
The journal page is located at the right side at the tree
Give the monkey the bananas from your inventory and it will dissapear
Now you can grab the bee hive
Temple key, temple door, inside temple (bell, black cat), 20 frogs
Temple Key
Get the journal that is on the lower left side of the screen
The temple key you will find lower left side between two totems
The temple key you will find right side between the leaves, will go into your inventory
Temple Door
The journal page your will find left next to the door
Get the key out of the inventory and click it at the door
In your map a new location is open now
Inside the Temple
The journal page is at the wall at the upper right side
Click with the hammer on the big crate at the left side. You will find the black cat
As soon as you clicked the cat, you will see the bell at the left wall
20 Frogs
Find all frogs, for the positions please have a look at the screenshot
Screenshot 20 Frogs
Inside the Temple, Part 2
The journal page you will find on the floor left side
Beetle puzzle, Temple faces Puzzle 1, 2, 3
Beetle puzzle
Your goal is it to get the green beetles to the right and the purple one to the left
A beetle which do has space will go one space ahead or back, when you click it
When you click a beetle, which is able to click over one beetle of another color, it will do so
As you can go backwards, other then usally in this kind of puzzle, its not to hard
Temple face, Parts 1, 2 and 3
Temple Face 1
Find all the symbols and place them in the empty spaces above the face
One is in the middle of the forehead, the others show half a circle under the face
Have a look at the screenshot, when you need help about the positions
Screenshot Face Puzzle 1
Temple face Part 2
There are some symbols indented into the stone face
Your goal is to find the pieces that match the indentations of the face on the outer walls
Once you find the correct symbols, click on them in order to rotate them. Once they are in the right position the pieces will lock into place and the matching symbol on the face will light up
Rotate them until they are facing the same way as the symbols on the face
Once all pieces have been rotated correctly, the mouth will open and you will move on to the next puzzle
Screenshot Face Puzzle 2
Temple face Part 3
In this puzzle the goal is to match the facial expressions of the statues that are on each side of the large stone face
You have to finish first one face, then the other
It doesn't matter, which one you do first. Seen from left to right
The first pillar opens and closes the mouth (for the right statue it has to be open, at the left side it has to be closed)
The second pillar changes the structure of the cheeks (left with, right without scratches)
The third pillar changes the positions of the eyes (complete open for the right side, complete closed for the left side)
The fourth pillar changes the ears (left without, right with earring)
The fifth pillar changes the symbol on the forehead (left triangle, right crescent)
When you matched the expressions of the statue right, the amulett on its chest will glow blue
After you are ready with both statues, the face dissapears and you will have a new location on your map
Screenshot Face Puzzle 3
Underwater
Underwater: Take the journal page that is on the lower left side of the scene)
Underwater temple: Grab the journal page that is by the left side of the steps to the temple)
Underwater door:Pick up the journal page that is on the lower left side of the scene)
Underwater puzzle
The goal here is to open the gold locks
Once you open the locks it will release the latches that are blocking the spinning mechanisms for the statue
You need to be very fast and precise in order to open these locks. You have to start with the locks at the bottom first since the mechanism needs to go downwards
Click on the bottom gold pieces and immediately after click on the smaller buttons on top
You have to repeat these steps until all locks are positioned correctly
Please look at the screenshots for the correct order
Screenshot Underwater Puzzle
Once all the locks are open you have to spin parts of the statue around, until it looks right
Please look a the screenshot for the correct picture
Screenshot Underwater Puzzle, Part2
When it is done you have to spin those three tumblers at the bottom of the statue, until the picture resembles an octopus
When everything is correct, the beetle in the statue's hand will start glowing
Click on the glowing beetle and it will open up, revealing a gold coin
Click on the gold coin to end this puzzle
In front of the temple
Place the gem from your inventory at the hole above the door
The door opens and you can pick up the journal page from the floor
A new location opens on your map
Inside the temple
The journal page you will find in the middle of the scene on a stone picture
Grab the lighter complete right at the side and lit the lantern under the ceiling
Click the lantern again to make it dissapear from your list
Cave (Gear 4), in front of the wall, Gear 2, courtyard, Gear puzzle 1, Animal Puzzle, Gear puzzle 2
Cave (Gear 4)
The journal page you will find in the lower right corner, under the mushrooms
Get the weights with the hook, which are a little bit left above the journal page
Grab the gear, that is half hidden by the mushrooms
On top in the middle of the arch, you see a dragonfly and a square above it
Click the square and you will see the dragonfly turning blue. Above it a symbol is showing now. At the left down end of the arch, you see a bird with a square above it. Click it and the bird will be colored red and a symbol shows up above it
Look for all other items from your list, execpt the blue written gear
Go to the THIRD location on your map
In front of the wall
The journal page you will find under the tree on the left side
Get the gear, that's half hidden behind the canon
In the lower left corner you see a butterfly with a square next to it
Click it. The butterfly will turn yellow and a symbol shows up next to it
The blue elements in this level are random, but have one in common: They are only to see, when the wall is away
Find all the white written items from your list
Grab the key, which is at the upper right side next to the stone eye
Go back to the cave (location 1 on your map)
Click the key from your inventory in the key hole in the right upper corner and you will find the gear No 4
Go to the second location on your map
Gear
The journal page lays on the round table in the middle of the scene
Click the weights from your inventory at the hook, which is hanging down from the ceiling in the back
Now you can grab the gear left next to it
At the right side, a little in the back, you see a little arch and above it a frog
Click the frog, it changes its color to green and a symbol shows up above it
When you found all other items from your list, go back to location 3 on your map, where you are still missing the blue written items
Gear Puzzle 1
In the lower right you see a gear and empty spaces for other gears
Place the gears at the right places and click the silver lever
When the gears are placed right, all gears will move and the wall will open
For the right position of the gears please have a look at the screenshot
Screenshot Gear Puzzle 1Right next to the lever is a snake. Click it and it will turn pink and a symbol will show up above the snake
When the wall is open, a new locations opens on your map
Now look for your missing items
They will be all at the place, you couldn't see before, because of the wall
Go to the fourth location on your list
Courtyard
Get the journal page, that is at the bottom left side, in the mouth of the stone animal head, close to the door
Left above you see a Dolphin
Click it and it will turn light pink and a symbol will show up above
Find all items from your list
Go to your map and choose the last location on it
Animal Puzzle
You see a big wall with pictures of all the animals, you already saw in the last locations
It might be, that one of the is already highlighted
Your goal is it, to go back and change the symbols above or next to the animals in the correct position
Click at the symbol above or next to the animal and you see, that they do change
Find a triangle or another symbol with this kind of pike
The pike has to point in the direction of where the animal is located at the door
So for example the dolphin needs a symbol with the peak showing to the top, the dragonfly a symbol with a pike down
When you choosed the right symbol, the animal at the wall will be highlighted
If there already has been an animal highlighted, when you entered the location the first time, you do not have to change this one again
For all positions please have a look at the screenshots
Screenshot Animal Puzzle
Screenshot Bird and Dragonfly
Screenshot Dolphin
Screenshot Frog
Screenshot Snake and ButterflyWhen all animal symbols are highlighted click the stone on the right, the one with the spots on it
The wall will open and show a second Gear Puzzle
Gear Puzzle 2
In the left and right upper corner you see two keys
Grab the keys and place them in the fitting space lower left and right, outside the puzzle board
The left key goes to the right, the right one to the left
The stones will dissapear and you will get gears
Click them to get them into your inventory
Now you have to place them at the right place
Please see screenshot for the right positions
Screenshot Gear Puzzle 2
When all gears are at the right position, click the lever left side, hold the mousebutton and turn the lever till the wall is complete open
Cave (cup of tea), Volcano, Volcano Mouth, Pipe Puzzle, Volcano-Stone Head
Cave (cup of tea)
The journal piece is located on the lower right side, in front of the large wheel
Click on the teapot that is on the top right side of the scene
Place the teapot in the silver goblet that is on the lower left side of the scene and it will fill with green tea
Click the goblet to get it off your list
Vulcano
The journal page is located on the brigde, right side
Vulcano Mouth
Click on the journal piece that sits on the left side of the ground, it blends in with the dirt
Click on the silver pulley that is on the floor, next to the chest
Pipe Puzzle
You will recognize this kind of puzzle from a lot of other minigames, but this one has an additional twist
Your goal is to connect the pipes without leaving any ends open but you have to manually arrange the pipes
The parts, you place your self are on the top left side
All parts can be manipulated: The one you place yourself by clicking the green spot in the middle
The parts, which are allready in the field can be also manipulated, not in the position but in the length (or you shorten them)
When you think, you have done it well, than turn the wheel by clicking on it
If you see water dropping out somewhere, you need to fix that part
Turn the handle, once all pipes work without leaking
Steam will come out of the pipe on the top, right side
A pump handle will automatically go into your inventory
There are different possible ways to solve the puzzle, an example is shown in the screenshot
Screenshot Pipe Puzzle
For some solutions you will not need all pipe parts. That's ok, as long as it is working, you have done nothing wrong
Go to the fourth location on your map
Vulcano Stone Head
The journal page you will find in the back, left side in front of the cave entry
The pulley has to go at the rope, upper right side
The pump handle belongs right side, next to the stone head
Click it after you placed it and water is pouring out the mouth of the stone head
Find all items from your list
Imprisoned Emerald, Circle Puzzle 1, Crowbar, Circle Puzzle 2, Slingshot, Circle Puzzle 3, Heart and Ring, 20 Atztec Treasures
Imprisoned Emerald
The journal page is located lower right side, above the wooden trunk. Left above it, you will find a crowbar
Open the trunk in the lower left corner with the crowbar to find the imprisoned emerald
Circle Puzzle 1
The solution for this puzzle is random
Your goal is it to let all red spots at the outside glow, by placing the right stones in the middle
Just play around and see, which stones light with spots
When you can't solve it, you can click hints to get the puzzle solved for you
When you solved it, you will have your map back and a new location opened
Crowbar
The journal page is right below the fountain
Find all items from your list
You will recognize, that you can't find the crowbar neither something else, you might could use
You will have to come back later
Go back to the first location, you will see another circle puzzle
Circle Puzzle 2
The puzzle is random, so there is no solution, just an explanation possible
Your goal is, to have the same colored lights in each row
Which color it has to be, you will see at the little colored spot on top of each row
Every stone will move the colored parts for a special amount of moves
The first stone one step, the second two steps and so on
The second row of stones moves the middle parts
The third row of stones moves the inner parts
Each field has to be filled out
Start with the first row, as it only one and like this, you see exactly where the colors go to
Take care about the direction. Some stone move the parts clockwise, others against the clock
When you can't solve it, you can click hints to get the puzzle solved for youAfter you solved it new location opens on your map
Slingshot
The journal page is located in the lower right side of the stairs
Get the broken snow globe, right side of the altar
When you found all items from your list, go back to the second location on your list
Get the snow globe out of your inventory and click it on the blue shining flower, left side
The globe will be filled up with power and goes automatically back into your inventory
Go back to the third location on your map and place the globe on the right side of the altar
Below the altar a secret compartment will open and you can get out the sling shot
Go back to the first location, there is a third circle puzzle to solve
Circle Puzzle 3
There is a piece of paper in the back that tells you you have to complete 4 phases of this game to win it
This is basically a matching game
Look in the middle of the circle and you will see 4 slots and 4 gold lights underneath each slot
The gold lights will flash underneath each spot
If you look on the circle, there are 2 sets of rings, an outside ring and an inside ring
Your goal is to match the pattern of the inside ring with the outside ring
Pay attention to the patterns when each gold bar is under a slot
Some will light up every light on the outer ring in a flashing motion
Others will light up half the screen at a time
Another pattern will light up one light at a time going around the circle
Each mushroom that you place on the slots will create a different pattern on the inside ring (the ring closest to the center of the circle)
That is only true when the gold bar is underneath that mushroom
In other words, the pattern will show up on the inside ring when you place the mushroom on the slot that has the gold bar of lights
Place a mushroom on each slot and watch the patterns that occur
Once you place a mushroom on a slot, watch the gold bar underneath
If it's a match then you will have to do another one in order to progress in the level
If it's not a match then you will have to start again
You basically have to do this 4 times in order to pass the level
Once you've solved that puzzle a 4TH location will open up
When you can't solve it, you can click hints to get the puzzle solved for you
Heart and Ring
There is no journal page to find
Get the sling shot from your inventory and click the ring, that is below the giant spider
It will fall down. Pick it up to get it into your inventory
Left in the bush is a lever, grab it
Look for all items from your list
When you found all, go back to the location where you still have to find the crowbar
Place the lever next to the stone statue in the back
Click the lever once and it will move, get the crowbar. Now go back to the third location on your map
You'll see the foot of a man that's been eaten by a plant
Take the crowbar and place it on his foot
Go to the fourth location
Get the ring out of your inventory and click it at the little statue in the lower left corner
The middle of the fountain in the middle opens and you will find the heart in the left half of the fountain (it has nearly the same color as the inside of the fountain
20 Aztec Treasures
Find the 20 Aztec Treasures
For the location of all please have a look at the screenshot
Screenshot 20 Aztec Treasures
Final
Puzzle
To activate the puzzle, click first beetle and the spider
Both wooden walls go down and you see in each a puzzle piece
Now find the other 10 parts in the scene and fill the fields with it
The puzzle pieces can be turned with rightclick
For the solution please have a look at the screenshot
Screenshot Puzzle Part 1
Screenshot Puzzle Part
When you are done, the statue's eyes turn into blue and stay open
Now click again the beetle and the spider
The wooden walls go up
In the round spaces you can see symbols, same on the wooden circle
By clicking in the middle you can change the symbols on the wooden circle
Click till the wooden circle shows the same symbol as the spaces
Now click the wooden circle with the left mouse button, hold it and move the circle till its circles are exactly under the ones of the spaces
Please have a look at the screenshot, to see how it has to look
Screenshot Puzzle Part 3
When you are done, the statue's eyes turn into blue and stay open
When you have done it with both, you will be brought to the next scene
Shilouettes
In this scene you have to find the things, shown in bar as shilouettes
Every time, you click will fill up the bottle
When you are done, the door opens and you will come into a forrest
Click the bottle and let the magic start
THE END
Thanks so much to Kayleigh for the walkthrough :D
I just wanted to comment on how beautiful the music is. No one seemed to mention it.
I too am having the same trouble with the disappearing gears. I have gone back to all of the spots where the gears were originally and they aren't there anymore. Just two in the inventory and no key there either. Do we have to start the game over...no one has told us how to get them back! AAAAAAAAAHHHHHHHHHHHHH!!! I am now a BALD HEADED CAJUN WOMAN!!!
I cannot save my progress through the Amazon game. Is this not possible?
I am stuck in the light bulb room. Have read the comments and don't see where the gas can should have been added to my inventory... and how to get this machine to go.
Gas can
Normally the game saves automatically, so you might have an issue with your version, try to install it new or ask for technical help of the customer support of the page, you purchased the game.
About the gas can
When you are at the location with the waterfall, you have to place the wooden plank, you found at the train-location, at the right side of the scene - there is a wooden sign standing. This will open a new location in your map bar, where you will find the gas can
Greetings, Kayleigh
i am at the area where u make the oar but i cant find the area where the boat is and i cant find the where gas is supposed to be . i know where to put it but not where to find it.
Donna - gas can
Place the wooden board from your inventory at the waterfall location at the place, right side, where you see the wooden sign, To do so, you will open up a new location in your "map - inventory"
Greetings, Kayleigh
I have the same problem as Dee. I got to the blue cattails and I need a crowbar. It is supposed to be around the sitting statue. I cannot find it, and I have started over twice. I keep staring , but cant find it. Any help?
Penalties - does anyone know how we get penalties on the score? How do we avoid them?
MattCalled -
You get penalties when you hit too many wrong clicks. Rapidly clicking around the scenery without actually hitting any of the listed objects can cause penalties.
I did the 3 tunnels where after each one you were brought back to the circle platform to do a puzzle, but the last time I have nothing but an empty platform. I hit the hint button and I also hit my mouse all over but nothing happens. Is there something I'm missing? Please help so I can finish. I did read some of the other people's comments and questions and it appears that I'm supposed to meet up with the Professor?
I am stuck on the first part of the game where you have to find the blooming flower and stuff like that. There are two locations on the map-the one with the cows, and the one inside a room. When I find all of the objects it says continue to a different location, usually it has the button that says "continue your journey" but for some reason it doesnt. I don't know what to do because I've found all the objects and I can't go to a different place. Please help me!!!
P.S. I've tried restarting the level several times, and even restarting the whole game with a different name.
Tasha and Amanda -
Have you guys checked the walkthrough? It may have the answers you seek.
I think I am almost through with the last page, I have found the 20 Aztec treasures, and can't find the dumbell on the last screen, I also don't know what to do with the blank wheel puzzle on the same pages. is that the end of the game.
Help! I have solved the gear puzzle but can't seem to get the wall to open. I turn the handle and it will move in one direction for a bit and then turn the other way. Clicking and holding does nothing, I just have to click and sometimes it will do something. Am I doing something wrong?
Hi
I am having trouble with the 20 Aztec treasures. I can find 19. Unfortunately the screenshot illustrating this episode is from a German version and shows the location of work tool, not treasures.
Any ideas? Thanks!
How do I get that gopher to come out of his hole? I have tried everything.........
Gopher
Did you try the walkthrough on top of these comments? I'm sure, you will find help there :)
Greetings, Kayleigh
Help, I'm stuck at the snake level. there's no musical instrument for me to place on top of the stool. Where to obtain those instruments?
I am stuck in the steam room no other doors are open. I have pliers in inventory.
I have the iPod version and I am stuck on level 8. I've collected everything on the lists,and the journal pages, but when I put the key in the statue, it opens but won't let me get the medallion. Why?
ditto on the level 8 statue/key/medallion issue on iPhone version. very sad. is it a glitch? or is there more that must be done in order to retrieve the medallion?
cheers!
I have the same issue although i have an iPad; and have not seen a response yet..."I have the iPod version and I am stuck on level 8. I've collected everything on the lists,and the journal pages, but when I put the key in the statue, it opens but won't let me get the medallion. Why?
Posted by: Monica | April 25, 2010 4:44 PM
Thank you for your help
Hi Laura5,
I'm also playing the iPad version, but I did not have the same problem you're having. The medallion popped into my inventory as soon as I touched it.
Have you tried quitting and relaunching the game? Also try rebooting your iPad. Sometimes applications can get wonky if you don't reboot your device after installation.
Other than that, just make sure you're touching the medallion with your finger to select it.
And after all that, if you still can't continue, then you should contact Big Fish customer support. They are extremely helpful, and they support every game they release.
Hi Kayleigh,
Thank you for your help but I'm still stuck on the light bulb machine level.
I have the light bulb and the wood and I have gone back the to ravine site to look for the cave on the LHS to find the truck/car thing - only I don't have a tuck/car thing there in the cave to find the oil can in.
I have restarted the level 3 times and still no luck = (
ta muchly
NeedsHelp!
I used the key to open the totem but nothing happens when I try to take the medallion.
Hey I'm playing the game on my iPhone and I'm stuck on the level with the gopher. I've found everything, including the gopher, and I have a key in my pack... But now that I've found everything, I thought I would be taken to another level, but I just get the option of the 2 screens on this level... Is this a bug in my game, or am I supposed to do something with the key?
hello.
i got stuck at the temple.
i got in the temple opened the door and at the next place i cant seen anything cuz its just plain white...
I am stuck at the monkeys. I can get past the first when and door opens a little. I can't make the next pattern because some colors are not available to put in the pattern. Help
ok on the last part of the game solved the puzzle and the doors opened now i am in the forest with the bettles on the trees what do i do now the center glows but i have no idea what to do please help
I am at the level with the ring and blue heart. I cannot get the slingshot and or the next area the blue heart and the ring away from spider. can someone please help here??
Thanks, Kayleigh, for posting this walkthrough. I found after a while I really didn't need much help as I got the rhythm of the puzzles. However, I finally got stuck at the pipes, checked your walkthrough, then checked the screenshot and yours is very different from mine! I'm using the iPad version and mine has stones in set spots as does your screen shot, but they are not in the same places. Also the half-moon and triangle symbol pipes are very different as well. Help!
Thanks, Debbi
Okay, I officially HATE the mini puzzles! Lol who puts a puzzle on where the solution is random AND there is no "solve" button?? I figured out the pipe puzzle on my own since your screen shows a different configuration, but I'm stuck at the circle colored lights! Honestly, while I'm in no hurry to finish the game, I also don't want to play this one puzzle forever either. Neither do I want to just stop here because I can't solve it! Do you realize just how many configurations make up this "random" solution? Can someone just say, step by step, what mushroom to place where and in what order, please? I even tried another site's screenshot of their win and it didn't work! Big fish should have added a "solve" button!
[Hi LadyWriter, there is a "solve" button for the mini-puzzles, it's the "Hint" button. When pressed during a mini-puzzle, the game will 'solve' the current puzzle for you and take you to the next step automatically. So be sure you collect the beetles in each of the hidden object scenes. :) I hope that helps. -Jay]
I'm stuck on the chapter 20 puzzle. Nothing on my bag, only large stone statue with 3 items that look like they should be moved. Each glow when I pressed hint but that's it. Nothing in the journal pages that I see either. Help!
Ok done the circle, but how do I find the crowbar in the next one. Ate the bugs, used up hints, and only get the blue arrow around the entrance of where the statue is and close surrounds. But nothing I do, can I find a crowbar- Two glowing flowers, but no ways can I retrieve the crowbar Help Please thanks JRT
JRT -
According to the walkthrough above the comments, you aren't suppose to find it the first time, so you need to go back and play Circle Puzzle 1 again.
If you get stuck again, you might want to check the walkthrough.
Have given up on steam pipes puzzle and hit skip. Now I have a screen which says great, hold onto that handle, and everything is locked, can't go to list to get handle, cant get out of screen....Just totally frozen. Have closed computer several times and gone back in and arrive at the same screen. Help please.
Cindy Gresham -
From scanning the other comments, it appears others had a problem with the handle, so you may want to contact tech support wherever you purchased the game.
Update