
Dream Chronicles 2
Platform: Mac, Windows
![]() When I learned that a sequel to Dream Chronicles was being released, I was elated. The original is such a beautiful blend of puzzles, adventure, object finding and Myst-like environments. Now, Dream Chronicles 2: The Eternal Maze is out and continues where the first game left off. You play Faye, a mortal woman whose fairy husband has been kidnapped and daughter imprisoned by Lilith, the Queen of Fairies. By solving a series of puzzles you can reach Fidget and awaken Lyra, but the Queen is always one step ahead!
When I learned that a sequel to Dream Chronicles was being released, I was elated. The original is such a beautiful blend of puzzles, adventure, object finding and Myst-like environments. Now, Dream Chronicles 2: The Eternal Maze is out and continues where the first game left off. You play Faye, a mortal woman whose fairy husband has been kidnapped and daughter imprisoned by Lilith, the Queen of Fairies. By solving a series of puzzles you can reach Fidget and awaken Lyra, but the Queen is always one step ahead!
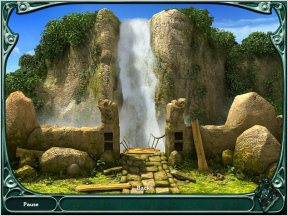 Dream Chronicles 2 plays out like a cross between a hidden object game and a point-and-click adventure. Each area has a number of items scattered amongst the scenery, and it's your job to locate objects and use them to solve puzzles. The artwork is impeccable — beautiful, immersive, and extremely good at hiding that last item you desperately need to get to the next level.
The gameplay in The Eternal Maze is a little more involved than the original. Whereas in the first Dream Chronicles you would solve one scene and then move on to the next level, in Dream Chronicles 2 you may need to move between different scenes in order to progress. Each level becomes more complex as you advance through the game, and how you solve the puzzles will vary greatly. Dream Jewels, previously a mere bonus for high scores, now have a function, as collecting them and solving their puzzles reveals hints for completing levels, so it's worth collecting as many as you can.
 Analysis: It's hard not to be captivated by the setting and artwork in Dream Chronicles, and the second installment doesn't disappoint. The overall layout is essentially the same, but the addition of more complex puzzles and useful Dream Jewels scattered around the levels adds a new layer to the experience. However, whereas the first game featured strong and witty dialogue, Dream Chronicles 2 is not only flatter, it's grammatically sloppy — ok in a quick 'n' silly Newgrounds shooter, but really inadequate in a game where care in writing was a strength.
One of the criticisms of the first Dream Chronicles was that it was a bit too quick and easy to play, especially for point-and-click enthusiasts who drive the success of games like Azada. Dream Chronicles 2 improves upon this to a certain degree with multi-stage puzzles as well as more environments to explore.
New to Dream Chronicles? Read our review of the first game in the series.
Does Faye reach Fidget and Lyra? Is Lyra the Chosen Child of the Fairy Kingdom? You'll have to play Dream Chronicles 2: The Eternal Maze to find out!
![]() Windows:
Windows:
Download the demo
Get the full version
![]() Mac OS X:
Mac OS X:
Download the demo
Get the full version


Walkthrough Guide
(Please allow page to fully load for spoiler tags to be functional.)
We've completed a walkthrough guide, complete with images to help you through...
https://jayisgames.com/archives/2008/02/dream_chronicles_2_walkthrough.php
Posted by: Jay |
February 16, 2008 8:15 PM
|
February 16, 2008 8:15 PM
Dream Chronicles 2 Walkthrough Part 1:
Ok, here's my first attempt at a walkthrough. I've finished the game and now I'm going back to check locations for this thing.
Start:
1.
Click the bump in the center of the room. A pillar rises.
2.
You need a heavy object to smash the glass. In the back right of the room there's a hammer.
3.
Smash the glass and take the book.
4.
A symbol has appeared on the right hand wall. Click it. You're free!
Dream Gems here:
None
Tree of Truth:
1.
You need to find the animals. They move from game to game, but here are some places to get you started:
Lizard:
Check on the walls.
Turtle:
Look around the roots.
Butterfly:
Check the tree trunk.
Bird:
Check in the left-hand branches or on the right-hand wall.
Squirrel:
Look in the right-hand branches or on the left-hand wall.
2.
Place the animals in their spots on the tree.
3.
You have all the bark pieces you need, you just have to position them. Difficult to do in text, but from left to right on the trunk, the pieces are (vaguely shaped like): T, U, O, C, I, 6 (the 6 and the C are backwards)
Dream Gems:
5. 3 on the ground, 1 on the roots, 1 on the front head of the left wall.
Dream Jewel:
Abalonia, in the right hand side of the roots.
Complete Abalonia Jewel:
"Outside the prison walls lies the place where the fairies originated."
Magic Waters:
1.
Right hand wall -- The goal of the wall puzzles is to recreate the shape by moving the pieces. For this one, try starting with the empty center and then the corners. The pieces change color when correctly positioned.
2.
Left hand wall -- Again, make shapes. In case you missed it, the top is a figure-eight, the bottom right is a square, and the bottom left is a diamond. (Remember how the diamond looks; it'll come in handy later.) The pieces change color when correctly positioned.
3.
Cross the stones. Except for the ones nearest each wall, they appear in pairs. Click order: Near wall. Right. Left. Right. Left. Right. RIGHT - or the one that looks further away. Near wall.
4.
Far door. Bit of a changeup here; instead of picking up stones, clicking on one changes the ones touching it, but NOT the one you clicked on. They only have two states, right and wrong. Start in a corner and work your way around as the Jewel hint advises. (I believe this puzzle changes game to game. If I play through more times and find that's not so, I'll post a click-by-click solution.)
Dream Gems:
6 on the front stones
Dream Jewel:
Casseopea. Front left center between the flat stone and the water.
The Ancient Place
The Henge
1.
Pick up 4 round rocks. Place them in the stones with holes on either side of the doors.
2.
Pick up 8 square stones. 4 will be blank, 4 marked.
3.
Also grab the mold from the ground near the right-hand side of the center door - it's a darker patch.
4.
Use the marked stones to open the left hand door by placing them in the square holes matching the figure.
Gems:
1 by front stone, 1 by the left-most hole stone, 1 by the right-most hole stone, 1 by the left door.
Casseopea:
"Fairies do not want the mortal world to know about their secret ways of life."
Press
1.
Get the wheels - one on the left rail, one under it.
2.
Get the handle behind the press (can be a bit hard to see, click around the base of the press).
3.
While you're here, grab the 2 boards - one in the bushes on the left, one on the right leaning against a rock.
4.
Attach the wheels to the machine on either side of the big stone.
5.
Attach the handle to the machine at the semi-circle by the base.
6.
Place the mold in the top part of the press, and a stone in the hole. Click the handle, then take the marked stone from the press. Repeat for all stones.
7.
Go back to the henge and use your new stones to open the right-hand door.
Gems:
2 on the rail, 1 on the left-hand large stone, 1 on the large stone in the right-hand background, 1 on the large stone inside the rail.
Jewel:
Osiris. Inside the rail on the left side near the press base.
Crystal Print Machine:
1.
Bars -- 1 on the right under the rail in front of the stone. 1 behind the left rail between the supports at the base of the tree.
Circle -- in the right bushes, near the big rock
Ball support -- left, on the rock
Ball -- behind the rail support in the left-center
2.
Also grab the 3 metal pieces in the foreground and the hammer leaning against the machine.
3.
Place the 2 bars, then the circle, then the ball support, and finally the ball.
4.
The handle will appear. Take it and place it on the machine.
5.
Turn the handle. You can't miss getting it correct - something happens. Place the three pieces of metal in the machine in turn.
6.
Back to the henge!
Gems:
1 on the left rail, 1 on the left stone near the tree, 1 on the center of the path near the machine, 1 on the flat rock on the far right.
Henge again
1.
Use the hammer(s) on all the rectangular stones.
2.
Collect the square pieces - you should have 12.
3.
Take the left door to the press.
Press
1.
Place a mold and a stone, then turn the handle. The molds will vanish when you've made enough of those pieces, so don't worry about it. Just print stones until your molds are gone. You should have 8 printed stones and 4 blank ones at the end.
2.
Back to the Henge -- use your printed stones to open the center door.
Bridge
1.
Take the boards. 1 by the walk, 1 leaning on right wall, 1 behind left rocks.
2.
Grab the mold - on the left between 2 small rocks.
3.
Betcha know what to do now, right? Take the mold to the crystal machine and engrave it, then go stamp the stones in the press.
4.
Place the stamped stones in a diamond shape (remember the one from the wall in the water room?)
5.
Place your 5 boards in the walkway.
Gems:
1 on left wall, 1 in the left grass by the rocks, 1 in the right grass by the patch of small rocks, 1 on the right carved stone by the bridge walk, 1 on the far right between the stone and the edge of the screen
Osiris:
"Merrow is an inventor who left the fairy realm and so lost his powers."
Door
Jewel:
Nereus, on the floor by the door.
Keys:
1.
Bridge, left of the right-hand rocks.
2.
Henge, left hand side of screen.
3.
Crystal, near right support of rail inside rail.
4.
Press, in the knot on the tree on the left
Place the keys, then turn them to correct positions. W turns all 4; E turns W, N, E; S turns S and E; N turns itself. The goal is a diamond shape -- all arrows pointing out. It takes some fiddling; I'll work on a specific click-through.
On to the next chapter!!
Posted by: LS |
February 16, 2008 9:16 PM
|
February 16, 2008 9:16 PM
Dream Chronicles 2 Walkthrough Part 2:
Maze:
1.
Forward. Get paper. Left, forward. Right, forward. Get paper. Forward, right, forward. Get paper. You now have a map.
2. Got map?
Now that you have a map, enough of the step-by-step. Your map has 5 dead ends on it. We'll call them Start, 1 (bottom left), 2 (bottom center), 3 (bottom right), and 4 (top right).
3.
At 1, there's a stone key. Grab it. Note the barrel along the way.
4.
Head for 2, use the stone key along the way.
5.
At 2, another barrel.
6.
Head for 3. A barrel in the center top corner.
7.
Just before the next corner -- a key like the ones you used on the door to get here. Grab it.
8.
Turn corner - another barrel!
9.
Next corner, a hammer! Grab it and go smash barrels.
10.
You should now have: 4 keys, 1 hammer, and have picked up a dream gem from the barrel near 1. Head back towards 3.
11.
Grab the key along the way to 3, and smash the final barrel at 3.
12.
Go to 4, place the keys in the door.
13.
The click sequence should be W, N, E, E.
Gems:
Barrel near 1, barrel at 3, floor 1 space right of hammer, last floor before exit.
Mortal Realm
Garden
1.
Crowbar at the base of the fountain.
2.
Lift the hatch.
3.
Match colors in pairs. They are, left to right, top to bottom: Red, Orange, Pink, Purple. Orange, Purple, Red, Pink.
4.
Take the key from the pathway leading to the house.
5.
Go LEFT into the other building.
Gems:
1 front left corner of walk, 1 center basin of fountain, 1 right walk curve, 1 on the wall by the switch, 1 right front base of fountain.
Waterwheel
1.
Get dome-shaped 'plate' from right floor.
2.
Attach to end of rope.
3.
In the garden on the right-hand side of the screen there's a rock you can grab. Bring it in here and put it in the dish.
4.
Go out into the garden, hit the switch, then unlock the house and go in.
Gems:
1 left floor front, 1 left of the wheel on the crate, 1 at the top of the stairs.
Nereus:
"If Fidget becomes her husband, Lilith will have total control over the dreams of mortals."
House, downstairs:
1.
Get record from behind upper painting.
2.
Get key from floor near the books by the stairs up.
3.
Click switch box on right wall.
4.
Create path from left to right by turning pieces.
5.
Go upstairs.
Gems:
1 on stairs down, 1 by door on the left, 1 by the wall on the right, 1 on the floor in the front
Upstairs:
1.
Get record by door.
2.
Get key in fireplace.
3.
Get key from stack of books in the sun.
4.
Close in on gramophone.
Gems:
1 by door, 1 in fireplace, 1 between boxes on the mantlepiece
Jewel:
Apollo, on floor by door.
Shelves
1.
Take the record from behind the books center shelf right.
2.
Take the key from under the gramophone on the table.
Gramophone parts:
on the floor by the shelves, on the floor downstairs, on the floor by the waterwheel.
Hexes:
1.
outside, base of the fountain.
2.
downstairs, near stairs going down.
3.
downstairs, near books on stair landing.
4.
upstairs, near sunlit platform.
5.
upstairs, in the shadow of the gramophone.
6.
shelves, on the floor under the handle.
7.
shelves, in the center where the middle shelves meet.
8.
shelves, top shelf on the far right between the two boxes.
9.
shelves, in the box on the bottom right.
3.
Assemble the gramophone - stand, bell, needle. Put the hexes in place.
4.
Place a record on the gramophone and play it. Match the sound to the hex picturing it. Most of them are pretty obvious. The hexes are, left to right:
Cow, Fire, Frog. Lightning, Ocean, Rain. Bird, Cat, Horse. (yes, that's a horse. I know, it doesn't look like one unless you squint.)
5.
Take the key. Go downstairs.
6.
Downstairs change the switches to power the lab -- bottom point on the box.
7.
Use the key on the lab door, enter.
Gems:
Top shelf: left between boxes, center on right shelf. Middle shelf: by globe, by skeleton, by teeth of skull. Bottom shelf: by crystal at far left, on far right. Floor: center. In 3 of the boxes.
Apollo:
"Fairies control natural forces but they must follow rules set by the Fairy Lord."
Lab:
1.
Get container from floor.
2.
Get candle from shelf over plant.
3.
Get bottle from bottom shelf, left side.
4.
Talk to plant.
a.
You are the fairy...
b.
I'm Faye...
c.
I would...
d.
Of course...
5.
Take match.
6.
Firewood is in the garden:
1.
on the left path
2.
behind the fountain on the left
3.
in the fountain
4.
in the garden on the right, by the border. (this is the hardest to see, I find. It's about level with the fountain.)
7.
Put firewood in the fireplace, light with match.
8.
Talk to plant.
a.
Let me know...
b.
Of course...
c.
I'll go get it...
9.
Upstairs, top shelf left. (you don't need to change the switches, by the way. Just go upstairs.)
10.
Put the liquid in the bumpy glass container on the counter.
11.
Use bottle on yellow liquid.
12.
Put liquid in spiral flask on counter.
13.
Put earthenware container under flask.
14.
Light candle from fire.
15.
Put candle under flask.
16.
Use bottle on green liquid.
17.
Talk to plant. Use bottle.
a.
Lilith...
b.
Yes, even if...
c.
Then let's go!
d.
I understand.
Gems:
1 on floor left corner, 1 floor right corner, 2 on fireplace, 1 on right counter, 1 right hand bottom shelf, 1 left shelves 3rd one up. 2 in plant close-up.
Jewel:
Frey, on floor.
Next Chapter!
Posted by: LS |
February 16, 2008 10:39 PM
|
February 16, 2008 10:39 PM
Dream Chronicles 2 Walkthrough Part 3:
Docks
1.
Take harpoon from left side of screen.
2.
Take brush from behind rope.
3.
Take oars at the right end of the boat.
4.
Take oarlock at the end of the dock.
5.
Get wood:
1.
behind left barrel
2.
in front of left barrel in the shadow
3.
on top of right barrel under net
4.
in barrel on side (use harpoon)
5.
in other barrel on side (use harpoon)
6.
put boards in place - 2 in back, 3 in front, oarlocks in front.
7.
dip brush in resin (blue bucket, right side)
8.
use resin on boat.
9.
push boat into water (click on boat)
10.
use oars on boat
Gems:
by rope, between barrel and resin, end of dock, front left screen, on left barrel.
Outside Tower
1.
You need to collect the round stones.
2.
There are 7 here: 2 on the left path, 1 on the stairs, 1 in the center, 3 on the right path.
3.
Take the right fork of the path.
Gems:
left path by the stones, base of stairs, near the path split, right path center, rocks on right.
Tree
Stones:
1 on the left by the door, 1 on the right between the roots
Gems:
right side in the grass, right side at the base of the tree, center screen between the doors, center on top of the roots, left by the base of the tree.
Frey:
"The Fairy Lord went out on one of his quests, but never returned.."
Tower
Stones:
2 on the stairs, 1 on the right-hand base of the arch.
1.
Click the buttons at the top of the stairs (the triangles in the railings)
2.
Put the clouds and trees into the left-hand ring, the suns and flowers into the right-hand ring. (the full sun belongs on the left with the clouds.)
3.
Ring Puzzles: The goal is to match things across the circle. On the left you're matching seasons and weather. On the right flowers facing the sun. Both sides work in sequence -- that is, if you find where summer is, fall will be next to it, winter next to that, etc. Stones turn blue when correctly placed.
Still need a hint?
The top sun points straight down. Summer tree is in the west position.
Gems:
at the left base, on the left-hand rocks in shadow, on the stairs, on the right base on rocks, on the right base in the shadow.
Jewel:
Mery, on the left-hand rocks
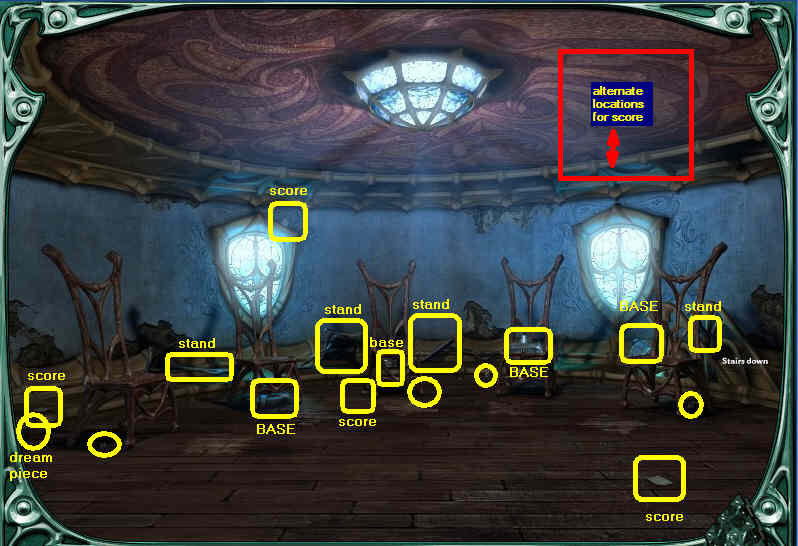
In the Tower
1.
Find the pipes:
1.
center back leaning
2.
center front on floor
3.
center back in shadow of support
4.
right hand side leaning against wall
5.
right hand side on the floor under the leaning one
6.
left leaning against the wall
7.
left behind the organ
2.
Place the pipes. Singleton goes in the center top, four short ones in the short bank, two long ones in the long bank.
3.
Play the organ. Unfortunately there is no shortcut; the patterns change every game. Just take notes and try to be patient.
Gems:
center under the corner of the 2nd step, center of the near floor, center of the rear floor, right near the decorative woodwork, left in the shadow of the organ, 2nd floor top of stairs. 3 on the floor of the organ. 1 on the left of the keys. 1 by the top of the keys on the right. 1 on the wide arched molding, 1 on the narrow arched molding.
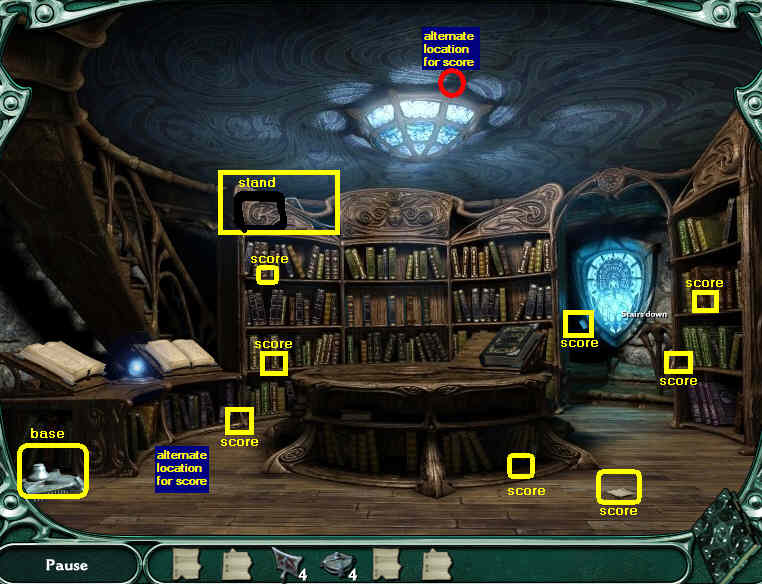
Library
1.
read the book on the table.
2.
find the missing books -- there are 2, they move every game, they will always be in the library so just keep looking.
3.
place the 2 books on the stands on the left.
4.
gather up the books now lying about. You should get 10 of them.
5.
match the books to the shelves with empty spaces.
a.
5 books are opposites, 5 books are alike and go together on the empty shelf in the middle.
b.
Night - sun; Light - darkness; Peace - war; Myth - history; Fire - water; 3 "fairy books", Fairy Lord book, book of dark magic -- center shelf.
6.
move crystal ball over by two books on stands.
Gems:
1 by door, 1 in base of table right side, 1 on table, 1 of left table, 1 at base of left table.
Mery:
"The Dream Librarian seeks for someone to replace the Fairy Lord."
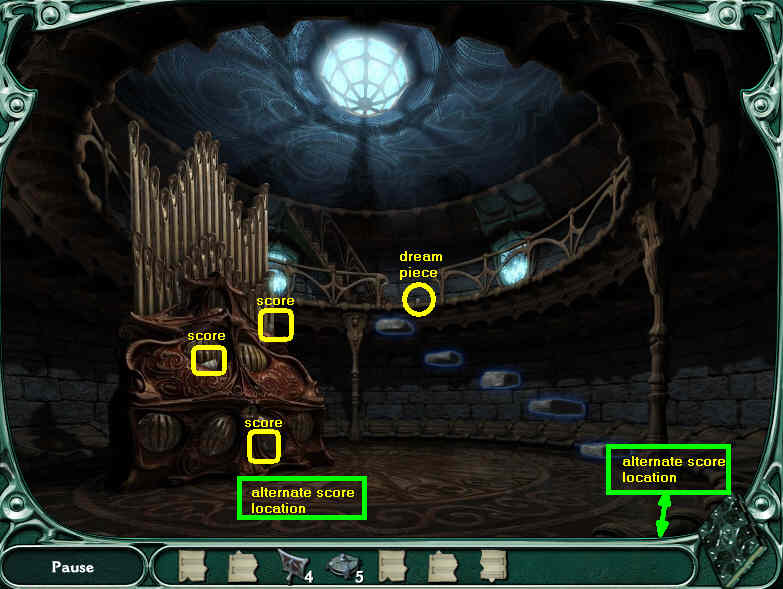
Music Room
IMPORTANT: assemble the stands first. If you fill your inventory with music sheets before you have the stands together, you will be STUCK and have to restart the level. Which means playing the organ again.
1.
Assemble the music stands. There's a base and a top in the library, and one of the tops is very well hidden behind a chair on the right.
2.
Gather up the sheets of music -- there are 15 in total. Here's the really bad news: they move.
Here's a list of everywhere I've found them so far:
Organ Room:
1.
in the left hand top round on the front of the organ.
2.
in the right center round on the front of the organ.
3.
on the floor in front of the organ (2 of them)
4.
by the right-hand pillar on the floor
5.
in the left shadow of the organ
6.
in the pipe bank on the right side
Library
1.
tucked into the bottom of the window
2.
tucked into the light
3.
left hand floor
4.
right hand floor
5.
tucked into the following book sections:
Weather, Biography, Self-Help, Undersea, History, War
Music Room
1.
tucked into the left window
2.
tucked in the ceiling over the right window
3.
behind the left-most chair
4.
on the floor in the center of the room
Sorry about that.
3.
Match the music to the pieces on the stands. You'll hear a tone when you get one right. The shape of the notes can help.
4.
In the library, click on the left-hand book on the stands. Click the shadowed-out instruments, and match them to the correct descriptions. Take note of the names. (In case you're wondering, we didn't do this before we left the library in order to reduce the clutter in the music room and make it easier to find things up there.)
5.
Go upstairs to the music room; there will now be instruments laying around. Check the stands to see what instrument goes where; put that instrument on the chair.
6.
Listen to the pretty song, then go upstairs.
Gems:
left hand side, under the left chair, by the 2nd chair from the right, under the right chair
Chess Room
1.
Collect the pieces.
1.
2 white pawns in the library
2.
a black queen by the right-hand chair in the music room, and a black pawn well-hidden at the base of the music stand of the next to right-most chair.
3.
all the others are in the chess room:
a black bishop, knight, and pawn under the right chair
a white room behind the right chair, on the stairs (hunt carefully)
a black pawn on the right chair
a black bishop, white pawn, rook, and knight by the left chair
4.
Put the pieces back together. Play the game.
5.
Once again, no shortcuts. The game stays at 4 squares for a very long time, though, so it doesn't get tooooo hard.
Gems:
by black square of chessboard on the right, on the right hand floor, on the right hand floor behind the chair, in the back center between headless pawns, on the left floor by the chair leg
Jewel:
Chloris, center floor.
Armor Room
1.
The knights must be assembled bottom-up; that is, feet, legs, torso, etc. The right knight is missing the least, the left the most, so you may want to work right-to-left.
2.
The armor is nicely color-coded for you: gold, gold and silver, engraved silver, plain metal, rusted.
3.
All the gold pieces are in this room. Gold-and-silver needs a shoulder from the library. Silver needs a sword, shoulder (and arm?) from down in the library and music room. Plain needs a leg from the library and a sword from the chess room.
(Note: pieces may change; haven't tested extensively. But there have never been any in the organ room, and there's always been 4 in the library, 2 in the music room, and 1 in the chess room.)
4.
There's a leg in the pot in the armor room.
Gems:
under window, center floor left
Top Floor
1.
Click bed.
2.
Jump out window.
Gems:
left leg of bed, left floor in darkness, floor where the blanket points, floor between the front legs, right leg of bed, under window
Chloris:
"The new Fairy Lord must have a mix of both fairy and mortal blood."
End game to come!
Posted by: LS |
February 17, 2008 12:59 AM
|
February 17, 2008 12:59 AM
Dream Chronicles 2 Walkthrough Part 4: End Game
Tree
1.
Click the tree windows - there are 6, two you can see and 4 with their backs to you.
2.
Get the roundish crystals from the windows.
3.
Place each crystal into the window which matches its color.
4.
When all the windows are a solid color, a door will open. Click on it.
Gems: NEW gems.
base of left tree, on the stone(root?) at the left, in the right background at the base of the deep forest, in the far right in the grass.
In the Tree
1.
Click the left door.
2.
Turn the gems the correct color. You have a hint for this if you completed the Chloris Jewel. If you didn't, I hope you were paying attention to those windows... You can go back upstairs.
3.
The order is, from the top going clockwise: red, blue, yellow, green, purple, black.
Gems:
center of the floor, right wall, bottom of the stairs, on the stairs, at Fidget's knee, behind the bear, on the left wall.
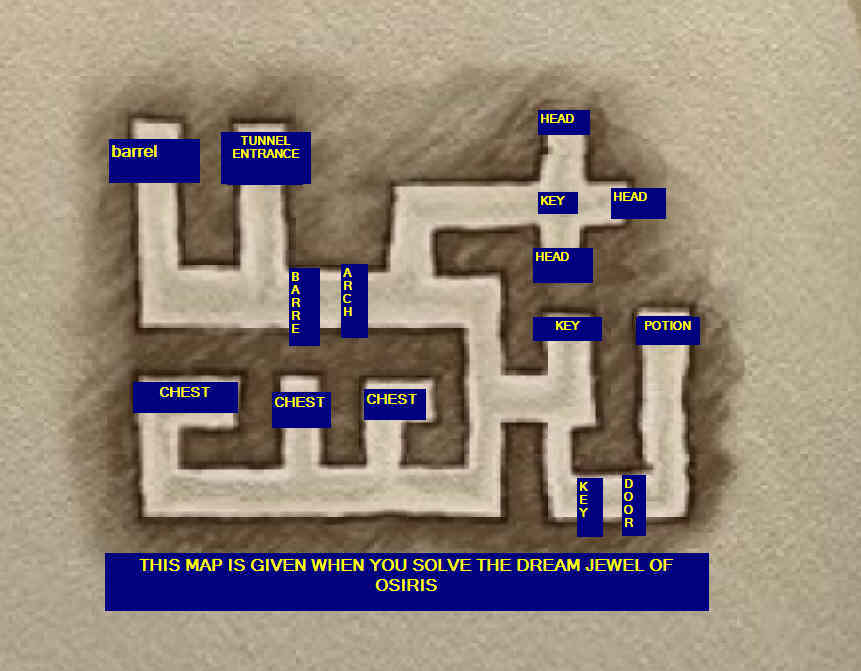
In the Maze
You should have a map for this if you finished the Osiris gem.
If you have the map:
a)
there's a key in each of the three halls on the right.
b)
there's a chest in each of the three bottom left halls.
c)
the gems go in the cross-like corridors at upper right.
d)
the potion is in the dead-end at lower right
e)
the start/exit is the 2nd hall at upper left
If you DON'T have the map:
The maze is entirely solvable by the left- or right-hand rule, although you'll do a lot of backtracking. (the hand rule simply means you keep that hand on a wall all the time. So if you're using the right-hand rule, you'll take every right-hand turning and ignore all the lefts. The left-hand rule is probably *slightly* more efficient in this maze.)
The maze is also pretty easy to map.
Here's an attempt at directions:
1.
Go to the end of the corridor. Turn left.
2.
Go down the corridor, take your first left. There will be an immediate right. Go straight until you come to a 4-way intersection.
3.
There should be a key on the ground here. Take it. Note the sculptures; we'll come back here. Go back the way you came (only non-dead-end)
4.
When you get a choice of left or right, turn left, and immediately the path turns right.
5.
Take your next left, go on until the path turns left.
6.
Take the key at the dead end.
7.
Turn around, take your first left. The path turns left and there's a blocking door. Take the key on the groun. We'll come back here later.
8.
Turn around, take a left at the intersection.
9.
Take another left.
10.
The corridor turns right and you're looking down a long hall with several rights turns. Take the first right.
11.
Open the chest at the dead end. Turn around, take a right, take another right. Repeat this step. :) Open the last chest.
12.
You should have opened three chests now. Turn around, the corridor goes left. Go all the way to the end of it. It turns left. Go to the end again.
13.
It bends left; take an immediate right. It bends right. You should now come to the four-way with the faces again.
14.
Place the gems in the basins. Order doesn't seem to matter; color does but as far as I can tell it's trial-and-error. When you place the last one, you'll get a stone key.
15.
Take the long hall back, turn left at the intersection. Take the first left and a quick right. The corridor bends left and you're back at the door. Use the stone key.
16.
At the end of the hall is the potion.
17.
The way back out is: left, right, left, 2nd right.
18.
Pour the potion on Fidget.
Congratulations!!
If you collected all 8 Jewels and finished them, you'll get an extra cut-scene at the end.
Posted by: LS |
February 17, 2008 1:41 AM
|
February 17, 2008 1:41 AM