
 Hi, the latest Weekday Escape just arrived!
The wave of cats themed games continues - Amajeto wants you to feed a cat and expel it out of its basket this way, and Kii wants you to do basically the same; take a cat away from the exit door somehow. Then you find yourself locked in Flash 512's castle dungeon, and then you continue in a long and complicated escape from the atmospheric Smart Code's underground with quite demanding puzzles - but rewarding too.
Have a good time and enjoy!
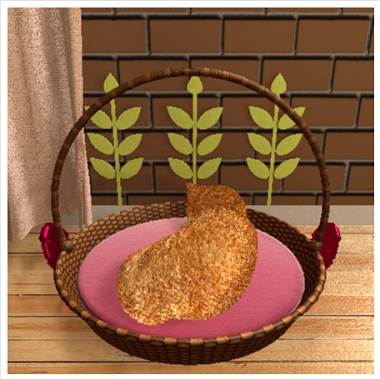
That loaf of bread like thing in the latest Amajeto's game is a peacefully sleeping cat. After you open all cabinets and drawers in the apartment you realise that you haven't found yet the most important item, the key from the exit door. Must be in the kitten's basket...but how to get the cat out of it? Its bowls are empty though...
The cursor isn't changing, no save button, one ending.
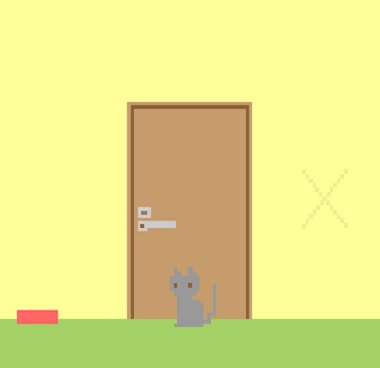
Short and charming game by Kii wants you to distract the cat guarding the door - it sits in front of it and wildly meows on any attempt to open. If only you had a yarn ball or a mouse in your pocket! Or some food! Well it's time to get into the drawers and safe and check what's inside...
The cursor isn't changing, no save button, one ending.
Underground Castle Escape
After some pause, Flash 512 returns! Luckily for players, developers switched to Unity (thumbnails of their previous games in Flash Player you find under the gamescreen, they are still playable) but the way how to use items haven't changed - remember, you need to click and drag to use it.
You find yourself locked in a dungeon crammed with strange devices and collector objects from different time periods, and puzzles, of course. Can you escape?
The cursor isn't changing, autosave, one ending.
We wait for the next part of Smart Code's series from May and it's here! The long wait was worth it - this chapter is much bigger than previous installments (Chapter 1 in WE N°248 and Chapter 2 in WE N°257) and much harder, too...some puzzles are tough indeed. For deeper experience and diving into the atmosphere you might want to start from the Chapter 1.
The ending suggests that continuation is ahead, hopefully long. Very well. More chapters of such an excellent game, please!
The cursor isn't changing, autosave, one ending.
The game is available for Android and iOS too.
We love escape games, and our readers love talking about them and sharing hints! How about you? Let us know what you think, ask for clues, or help out other players in the comments below.


Under ground castle escape fairly simple but very glitchy. If you find yourself in a tricky situation, try exiting the game and going back in. That helped me in most instances, except one, where I had to consult a walkthrough as the game didn't give me a reward for an action, which I needed to proceed in the game.
Even with all the options turned down, Underground Castle Escape made the fans on my computer really roar. I opted not to continue. A lot of Unity games seem to do that.
I couldn't figure out a setting in the game that would eliminate all the floating stuff in the air. I suspect that constant animation has something to do with the fans ramping-up so badly.
Last week I needed to look at a walkthrough on every game except the two bonus games, but on Child Alien I could only get one ending.
This week I finished the first three games on my own. In Laqueus I dislike the navigation and find the room so depressing I'm quitting in the second room.
Cat Room
I'm going to organize these by room.
First Room
The cabinets are ordered left to right.
First Cabinet
This puzzle has a 4x4 grid of squares that cycle between black and white when clicked.
Hint: The solution is in the second room.
The solution is the clock face. When you click it, it displays the following pattern:
X O O X
O X X O
X O O X
X O O X
X = Black
Inside this cabinet is a pink square and the TV remote.
Second Cabinet
This puzzle has four squares that cycle from 0-9 when clicked.
Hint: The solution for this puzzle is in the first room.
The solution is above the cat's basket.
ELLI can be rotated to show the solution: 1773.
Inside this cabinet is a pink square and the brass key, which can be used to open the first door.
Third Cabinet
This puzzle has four squares that cycle through the letters A, C, E, G, I, K, L, O, R, T, U, and X when clicked.
The solution for this puzzle is in the third room.
The solution is in the sentence "one Cat jUst leads To anothEr" above the cat bed.
CUTE
Inside this cabinet is a pink square.
Fourth Cabinet
This puzzle has two buttons, one on top of the other.
The solution for this puzzle is in the last room.
The solution for this puzzle is on the cat feeder.
Up Down Down Down Down Up
In this cabinet is a pink square.
Second Room
This puzzle has four bars that expand from one to four squares tall when clicked.
Hint: The solution for this puzzle is in the first room.
The solution is to the right of the cat's basket.
The two corn decorations to the right of the basket show the solution.
From left to right, the four bars should be 2 squares high, 4 squares high, 3 squares high, and 1 square high.
Inside this cabinet is a pink square and the silver key, which can be used to open the second door.
Third Room
Left Cabinet
This puzzle has four dials that stop at eight points around the circle.
Hint: The solution for this puzzle is in the first room.
The solution for this puzzle is on the TV.
The NEWS shows the solution. The dials should face up, right, left, and down.
This cabinet has a pink square in it.
Right Cabinet
The key to this cabinet is in the fourth room.
Hint: The key to this cabinet is behind the picture puzzle.
Inside this cabinet is cat food
Cat Picture
This puzzle is a blue picture of a cat with one yellow and one blue eye whose corners move.
Hint: The solution for this puzzle is in the first room.
The solution for this puzzle is on the TV.
When you click on the TV, the O of "SHOP" flickers, showing the order to click the picture: top left, bottom left, bottom right, top right, and bottom right.
Behind the picture is a pink square.
Fourth Room
Refrigerator
This puzzle has four squares which cycle through yellow, orange, pink, purple, blue, green, brown, and grey when clicked.
Hint: The solution for this puzzle is in the second room.
The solution is in the knitting basket below the couch.
There is one green ball of yarn, two pink balls, three yellow balls, and four blue balls.
Inside the refrigerator is a bottle of water.
Cat Feeder
Simply put the water and cat food in here to feed the kitty!
Pink Squares Locations
1.
In the first room, next to the cat's basket.
2.
In the first room, in the first cabinet.
3.
In the first room, in the second cabinet.
4.
In the first room, in the third cabinet.
5.
In the first room, in the fourth cabinet.
6.
In the second room, in the cabinet.
7.
In the third room, in the left cabinet.
8.
In the third room, behind the cat picture.
The final key is below the cat in her basket!
My Room
This one is pretty straightforward, given how simple the game is.
1.
Turn left. Open the bottom drawer of the cabinet, and pick up the paper. Back up.
2.
Click on the trash can, and pick up the blue plus sign. Back up.
3.
Turn left. Click on the gray square, and use the paper on the grid to get a clue. Back up.
4.
Turn left. Pick up the hammer from the flowerbed, and use the blue plus sign on the brown square. Take the eraser.
5.
Turn right. Use the hammer on the vase, and take the silver key.
6.
Turn right. Click on the desk, and use the eraser on the book to get another clue. Back up.
7.
Use the silver key the middle drawer of the cabinet, and take the knife. Back up.
8.
Click on the top drawer of the cabinet, and use a clue to unlock it.
This clue is from the gray square.
TEA
Take the matches. Back up.
9.
Turn right, and use the knife on the X on the wall. Use the matches on the candle to get yet another clue.
10.
Turn left or right twice. Click on the red box in the lower half of the shelf, and use clues to open it.
The clues here are from the book and the candle.
3 2 5 0
Take the screwdriver. Back up.
11.
Click on the gray square, and use the screwdriver to open it. Take the gold key. Back up.
12.
Turn left. Use the gold key on the safe. Take the cat food.
13.
Turn left. Use the cat food on the cat's bowl. Click on the door.
Congratulations! You've escaped!
Thanks for the information keep sharing such informative post keep suggesting such post.
TargetPayandBenefits Login
finished underground castle escape just now! didn't have to reload at all, but my computer fan did start up pretty much immediately
keep in mind the quality can be changed, though it seems to mainly effect the lighting
it's very pretty but overall didn't involve much actual puzzling. very much "find a piece, find where it goes". no clue had to be thought on any harder than that either
hope the rest of the walkthroughs get here soon.
The Chinese page for this game mentions that there's an alternate version with "free-movement" controls:
Drag to rotate view
Click to interact, or pick up an item
Double-click to walk, or zoom in on an item
Click while walking to stop
Drag item from inventory to use
Underground Castle Escape
As mentioned above, the graphics option won't stop this game from chewing up your CPU, but you can use it to make the lighting more moody.
Interface notes
Note that the hotspots for most of the statues are the pedestals under them. The back button appears near the right side of the screen.
You can rotate items while examining them. To use items, you need to drag them onto the correct spots.
Sometimes items will get stuck while you're dragging them. Use the menu to exit game and then continue.
Exploration
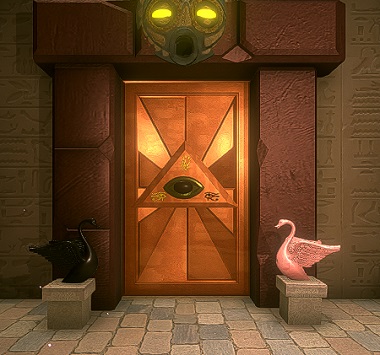
This arched doorway appears to have one eye missing out of 3. Of the two swan figurines in front of it, one has a coin and the other has a heart-shaped hole. While looking at the right one, you may notice another clue:
The base of the right pillar has a number on it.
Turn right. On the left, there's a golden bird figurine missing one wing. The middle of this wall has a diamond (octahedral)-shaped thing on a platform with a plus-shaped hole, at the top of stairs flanked by a safe with a hole and a tall empty vase that moves aside when clicked to reveal a ballerina figurine.
Turn right. There's a moai head with an unusual pattern on its base. A device with circles is on the left, and a partially melted candle on the right. The vase here has a key in it. You also see a dark-colored metal panel on the floor, and
a paper clue beside the flames on the left.
Turn right. On the left is a cabinet with a small animal-shaped hole. The cupboard in the middle has drawers that you can open when you click on them, but they're all empty except for one that's locked. On top of it, there's four blocky figurines, and above that is a shiny flowery panel that slides up to reveal a panel with a circle missing from it.
To the right of that is a white statue that's missing something to hold. Further to the right is a safe. The only thing you can interact with is nine switches.
Keys and pieces and a code
Use the key to unlock the top-left drawer, which contains a matchbox.
Examine the matchbox and click it to strike a match, then use the lit match on the candle to light it.
This makes a white key appear in the plate.
This key has a plus-shaped cross-section, so use it in the platform under the diamond, and turn it to make a golden heart piece appear.
Place the heart piece into the pink swan, which slides aside to reveal an unusually modern spanner.
Use the spanner to remove the bolts on each corner of the floor panel, which reveals a spoked piece.
Place the piece in the (hole in the) safe and enter the code
on a pillar
512
then click the piece again to unlock the safe and find a ring.
More pieces
Place the ring in the device to the left of the moai head, which activates to reveal an animal piece.
Place this animal piece in the stand beside the drawers, which opens up to reveal a hexagon piece.
Examining the hexagon piece, you find that it must fit in the moai head.
Use it there and turn it to spin the head around, revealing a four-digit lock.
Round and Square
Place the coin (actually a button) in the panel above the drawers, and use the clue from
the paper on the floor
(you can lower the graphics option to make the clue more readable)
to push buttons correctly:
The symbols on the paper are the heads of the
Turtle Dragon Tiger Phoenix Turtle
(DLRUD)
Inside, you find another ballerina figurine and a grid of lamps.
Use the clue from the grid of lamps to unlock the safe:
Flip the five switches in the middle column and middle row.
Take the golden wing from it.
Place the wing on the bird statue to make a trident fall out.
Then give the trident to the left blocky figure to make numbers appear.
Enter that code
6937
into the moai head to reveal a stick.
Ending
Place the stick on the white figure beside the drawers, which opens up to reveal an eye.
Place the eye into the gateway, which opens up for you to enter another room.
Place the ballerina figurines on the pedestals in this room. The game will only accept it one way: the white one on the left and the yellowish one on the right.
(Or if you're super impatient, you can bypass this obstacle by clicking the edge of the door in just the right spot!)
The final doorway opens, and you can leave.
Thanks KK. can;t wait for the last one.
Laqueus Escape: Chapter 3
This game seems quite graphics-intensive too, but that doesn't hurt the depth of the puzzles!
Entry
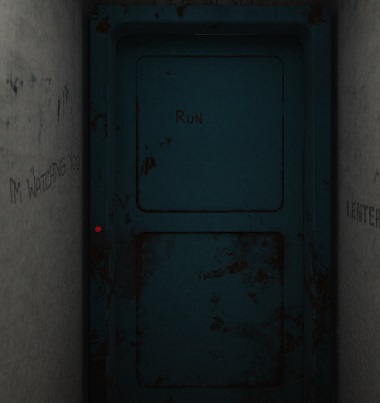
You start off in a corridor filled with mysterious messages, as well as an namecard which you can flip over to find a fun fact. The only thing you can get from here is
a card on top of the "where I come from" door.
When you're ready, push the blinking light by the "key to salvation" door.
Exploration
Let's start with the pillar in the middle. Once you click it to zoom in, the camera controls flip to let you examine each of its sides. There's a large round panel with a small hole, two buttons to rotate and a dial.
Turn "right" (which means you move right around the pillar). The next face has three locked panels and a keypad. The next has a screen (turned off) and two slots. The next has three dials with red markings under a triangle button that doesn't do anything.
Turn back a bit and click the door to your right. It's the door you entered from, and "it will not open again".
Let's go clockwise around the room from the door. There's a small first-aid kit on the floor with a spray bottle of spider killer. That's not a good sign…
The far corner of this wall has a bookshelf. You can zoom in on each book, as well as an iron cube on the bottom-left one and what seems to be a broken vial of bat juice on the orange one.
Switch over to the other corner with the table. There's a scale on the table which appears to be stuck, but that's only because
of the magnet attached to the underside of the table.
In the near corner is a cupboard, which holds a surprise. Okay you guessed it, it's a spider.
After you've defeated the spider by spraying it, look in the cabinet to find more books. The green one has a card sticking out of it.
The door you came in was locked, so there's got to be another exit somewhere. Maybe the other side of the room?
Zoom in on the pillar and rotate until that door comes into view. It also has a blinking button but that one doesn't work.
Holes
Let's deal with the front of the pillar. As you may have figured out from the markings:
The dial is a "disk selector" which controls which disk to rotate.
The disk that's immediately visible is Ⅰ, and the ones behind it are Ⅱ and Ⅲ.
It isn't just enough to align the holes in the disks — there's something behind that you need to find.
Set the dial to Ⅰ, and click the left button until the hole in the first disk lies in the eight-o'clock position.
Then set the dial to Ⅱ and click the left button until the hole in the second disk also lies in that position. These two holes should be perfectly aligned.
Then set the dial to Ⅲ and click the left button until the last hole also aligns.
Push the red light that's now visible. What did that do?
One of the sectors on the triangle face is now different.
It's the bottom-right one.
Go back and push that same red light 3 more times until that sector is covered by the triangle button.
Two codes
You'll need clues from
the books and the namecard.
For the middle pillar compartment:
A.V. has a number (on his namecard!) and the marks on the compartment tell you to do some math with it.
Work out 2258−701−315 to get
1242
Enter that in the keypad to open it and find another red button.
For the bottom pillar compartment:
The green, blue, red, orange, yellow books have lines on their spines that fit together (remember that the text must be upright when you read it) to form the code
5 8 4
Inside, you find a circuit board.
The red button controls the top sector on the triangle face, so push it thrice.
Programming
Zoom in on the screen on the pillar, and put the circuit board into the top slot, which lets you watch a short bit of retro gameplay without winning anything.
Pull the board out and look at it again. You'll notice lights on the circuit board arranged in 8 pairs of buttons.
And your character does 8 moves before stalling (U R U L D D R U).
It shouldn't be too hard to change these into a different set of 8 moves…
Each of the pairs controls one of your 8 moves.
To get the card, turn all the lights in the left column green, and click the bottom 5 lights of the right column once:
U 1 1

R 1 0

U 1 1

U 1 1

R 1 0

R 1 0

U 1 1

R 1 0
To get the target, use the same pattern but turn the second-bottom light of the left column red instead:
U 1 1

R 1 0

U 1 1

U 1 1

R 1 0

R 1 0

D 0 1

R 1 0
You get a card, but the target doesn't seem to do anything…
That target controls the bottom-left sector on the triangle face. Pull out the circuit board and put it in again to rotate that sector once more.
Upwards
Now that the triangle button completely covers all the sectors, you can push it. The pillar peels away to reveal a smaller pillar with new puzzles!
There's an up triangle button that we don't want to push yet, as well as a row of 8 "buttons" on top and a small square button in the bottom left. While zoomed in on the button, you can rotate the view to find another window next to it, with a yellow-and-black symbol visible there.
You'll also see some long grooved holes in the floor.
Turn right to view three numbered disks next to a 0. The game won't even let you guess this one.
Turn right to find a panel with squares and rectangles drawn on it.
Turn right to find a panel with a grid of symbols, and four buttons on the left.
Striped
Use the clue from
the floor under the triangle button
to set the eight buttons near the triangle button:
Using the stripes as a guide, you find that the holes are directly under the
1st 4th 6th 8th
buttons. Push those to pull them out.
Push the triangle button, and the game informs you that it's correct. The top compartment (in the original pillar) is now open, and you can take a cuboid from it.
Windowed
Push the triangle button again. For the puzzle with the grid of symbols, you'll need the
cube, cuboid and magnet.
You get the clue by
using those items on the square area under the triangle button.
Note down the symbol that initially appears. This is the 1st symbol.
Place the cube in that square area to make the 2nd symbol appear.
Remove the cube using the magnet, and then place the cuboid in. This is the 3rd symbol.
Then push the cuboid even further using the cube. This is the 4th symbol.
Replicate the symbols on the grid panel. I'll label the buttons (from top to bottom)
U ⬆️, D ⬇️, + 🔃, N ➡️.
1st symbol: U++
2nd symbol: ND+
3rd symbol: NDD+++
4th symbol: NUU+
The pillar spits out your cube and cuboid, as well as the symbol piece. Turning the piece over, you find red and blue squares opposite the symbols.
Attach the magnet to those red and blue squares, and the piece opens up to reveal a spanner.
Long and short
Use the spanner to remove the panel with the rectangle drawings. It falls to the floor, revealing another drawing with a + mark.
Use clues from
those two drawings, the cube and cuboid, and the scale
to unlock the puzzle with the three disks:
The cube weighs 225 grams and the cuboid 325.
The first drawing has 5 squares and 4 rectangles.
The second drawing has 6 squares and 3 rectangles.
Together, this represents a total of
(5+6)×225 + (4+3)×325
= 2475 + 2275
= 4750
Exit
That huge shaking comes from the door behind. Push the blinking button there to open it up and end the game!
Thanks again KK.
Update