
 Hi, another week is over and time for playing here!
Amajeto's apartment is cosy indeed but you just want out of there and spend some time on fresh air - and that's easily realizable wish. With Pixel Kobo, on the journey around the world, you get to a nice park this time. With Gatamari (they're back!) you need to open ten doors and on top of that manage to pull a sword from a rock. And Neat Escape delivered satisfying and classical escape with two endings and an edible reward at the end.
Have a good time and enjoy!
It's a peaceful evening in Amajeto's apartment and you suddenly find out that you're locked inside a sitting room and can't get even to a bedroom or kitchen! It's obviously time for hints, solving puzzles and collecting tiles. You need eight. Can you escape?
The cursor isn't changing, no save button, one ending.
Pixel Kobo released another chapter from their series (the previous you find in WE N°263) in a completely new format. You have a lot of clicking ahead since it's not clear which spots are active and there are plenty of promising areas, and two ending. Remember, sometimes you need to fail to succeed at the end...
The cursor isn't changing, autosave, two endings. You don't need to understand any Japanese.
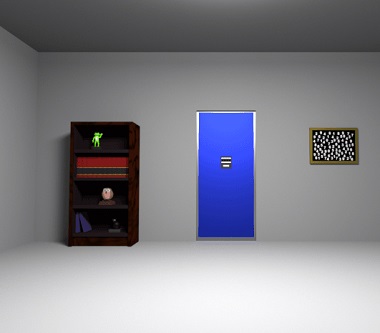
Game 001: PAS5W0RDS EXTRA 10
Gatamari is not dead (and still fascinated by Arthurian stories). Good! Their older games are still available - although not for long - so if you haven't played them yet (and have time) now is the right moment to try them. They are among the best in the genre if not the absolute top.
Now we've got a new game which is based on a common scheme "open several doors to escape" and in this case, it's just ten doors. Not many but some may keep you stuck for a few moments. Can you open all of them?
The cursor isn't changing, autosave, one ending.
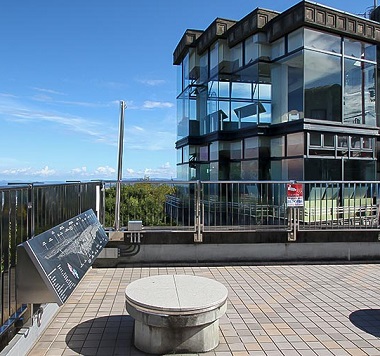
Nice Neat Escape's escape starts on a rooftop of an office building in the city. It's lovely morning and offices are yet closed, you arrived too early, and so decided to take a rest on a bench. After a short nap you realize that the exit door is locked...what now? Well, the escape starts, of course. There are two ways how to get out of there and depends where you use the blue key. Both ends worth playing but only one is rewarded with a tasty lunch.
The cursor isn't changing, autosave + save button, two endings.
We love escape games, and our readers love talking about them and sharing hints! How about you? Let us know what you think, ask for clues, or help out other players in the comments below.


Reoda: Chapter 8 is *extremely* frustrating. It's nothing but blind clicking and getting zero results. I'm stuck on the opening scene and can't go anywhere. There's a stairway that looks promising but, no matter how much, or where, I click on it, I can't go down it.
From the staircase,
Try clicking on the car park in the distance
I'm stuck on room 7 of Passwords. I somehow managed to
get a clue from the clock
but I can't do it again.
I am totally missing the logic of Passwords.
Can someone please explain room 5? The one with the stars and photos with numbers and people holding up fingers.
I finally consulted a walk through and it still didn't make sense.
Now stuck in room 6. It makes even less sense.
Passwords - I'm done with that thing.
Just in case you are sensitive to hints, tips, or asking for help comments. Click no further.
I finally figured out that you hold the up button down and something moves on the other side of the room. Pressing the down button resets the thing.
WHERE is the hint that tells you how long??? If you hold it till the sound stops the blue screen is black. I tried to count six "sounds?" but it sounds like a heart beat and I tried to count bump bump as one sound or is it bump one, bump two etc. I keep losing count.
Not having fun with this one.
Room #7
the clock is a real nuisance
I managed to get it work in my first play and now can't
you should click and drag the clock knob as I remember
the sequence from my notebook: lr-ur-ul-lr-ll-lr-ur. ur=upper right, ul=upper left, lr=lower right, ll=lower left
really Gatamari...
Room #5
look closely at the pictures and numbers on them
on the 1st one a boy makes one point of a star with one hand
on the 3rd one a girl makes two points of a star with both hands
on the 2nd one three kids make a five point star, a boy and girl make four points with both hands and a boy makes the 5th point with one hand only
what is the minimum of persons required to make a particular star?
the first star has fifteen points so you need seven persons using both hands and one using one hand only
the password is 825
Room #6
the green pillar on the left is a pipe full of water
the upper arrow button on the black pillar lets the water out
the lower one fills up the pipe again
your goal isn't to empty the pipe completely
you need to let off some water to see a surface
hold the upper button, let out approx. 6 waves and back off - maybe you need to try more times to get it right
oh look a penguin!
he's cold!
...and the password is COLD
Wouldn't the code be 825 then? For the first 15 star you said you needed 7 people with two hands, plus 1 more with one hand =8 people min.
sorry, above comment was for Room #5
Yep you're right I've already edited it. Thanks!
can;t wait for these.
Two days ago kktkkr posted four new walktroughs below Weekday Escape N°269. Just saying. Could be easily missed.
yes but there is 270 271 and 272 that do not have wakthroughs and this one now so thats like 4 weeks or so not counted for.
You know, you could try writing walkthroughs once in a while instead of complaining that nobody else is.
i dont know how to. and i'm not complaining as stated in a board here several months ago, i have autism. Aspergers. i can;t play games unless walkthroughs are provided. I'm sorry if my autism is upsetting people.
What about it don't you know how to do? The spoiler tags? Organizing the information? Giving progressive clues?
Amajeto's games all have video walkthroughs. I've posted two walkthroughs this week. So 3 of the 4 games in 271 and 2 of the 4 games in 272 have walkthroughs. If you've finished all of those, try searching for walkthroughs on YouTube. You might find someone there who makes good walkthroughs and then you can search for the games you already have walkthroughs for.
ceecee, I can do spoilers, but i canlt wrote one without me doing the game and as i said i canlt play without one. Video walkthroughs are too fast for me. i have to keep pausing rewinding replaying etc. it;s easier with a text one. but oh well :(
YouTube has a feature you might find helpful, then. Click on the gear icon on the video and change the "playback speed." You can make it play as slowly as a quarter of the normal speed. HTH
HTH? anyway i prefer to read the clues. it;s easier for me.
Escape from the Rooftop
Exploration
For this part, I'm circling to the right.
Skyline Scene
Zoom in on the white things. They're solar panels, but two are missing.
Back out and look at the bench. The smaller box has blue/green arrow buttons. The larger one has two stars and colored number dials (red, yellow, blue, green).
Climbing Wall Scene
The box on the bench needs a 5-letter code. Above it are some colored spots. Zooming in reveals them to be handholds/footholds for climbing, but the bottom ones are missing.
To the left of the bench is a panel covering a niche with a toolbox behind chicken wire. Above that are a six signs facing away from you, too high to reach.
On the right is a locked compartment, but you can't get too close because an exposed wire (leading offscreen to the right) is shooting sparks.
Front Door Scene
The panel on the left conceals a big black screen. The front door of the building is locked.
To the right of the door is an alcove with a solar panel.
On the right are two panels with conduits connecting them to other things. The right one needs a key, but the left one opens.
Following the conduits, you discover the screen is controlled by the left panel from the same scene, but it needs the solar panels. The right panel is connected to the compartment from the last scene with the exposed wire.
Two-Bench Scene
There's steam coming out of some pipes between the benches. The left bench has a tablet you can't look at and a wooden box underneath it.
Open the box to get parts (for a climbing wall).
The right bench has a tablet you can use with two stars at the top and a box with colored buttons and one star.
You can also pick up the iron pipe between the front legs.
Two Stars
The box with two stars needs 4 digits: red, yellow, blue, green. The tablet also has two stars.
Drag each of the horizontal bars so the colors are lined up to get each of those numbers. Colorblind help, maybe: drag them all as far right as you can to get the leftmost number, then drag each one over by one number. Repeat to get the numbers in this order: green, red, blue, yellow. If that's not much help:
6037
Get a bolt cutter.
Arrows
Make sure you have the iron pipe (from under the right bench on the scene with two benches) and look at the smaller box from the skyline scene. It has four bluish green arrows.
Use the pipe to turn the six signs from the climbing wall scene. Note the direction of the arrow and the colored corners.
Following the arrow, the bluish green corners are pointing: left, down, left, up, down, right.
Open the box to get a silver key.
Up High
Get the parts (handholds/footholds) from the wooden box under the left bench of the two-bench scene and install them under the ones already on the tall wall (climbing wall scene.) No tools are necessary. Climb to get a paper with a one-star clue.
One Star
You just got the one-star clue and the one-star box is on the right bench from the 2-bench scene. Look at the buttons on that box. Colorblind help: The bottom right button is blue, the two above the blue one are red, the two to the left of the blue one are green, and the last four (the upper left corner) are yellow. The clue is BGGYYYRY.
The number of arrows of each color matches the number of buttons of that color on the box.
You need to push each button once and each button in the sequence must be touching the last one you pushed.
The correct sequence starts with the blue button (bottom right) and spirals in clockwise.
Open the box to get a red key.
Tools
Use the bolt cutter from the two-star box to cut the chicken wire (climbing wall scene) and get the toolbox.
Two Keys
The silver key (from the top of the climbing wall) opens the toolbox, which contains a wiring repair kit. The red key opens the rightmost panel on the front door scene. There's an open/close button and an unspecific error message. What happens when you click the button?
Closing it cuts off power through the black conduit that's shooting sparks to the left. With the power off, it's safe to approach but locked.
After using the red key, click the button once so it's "closed." Repair the broken section of wire, then go back to the control and switch it to "open." Now you can open the compartment under the repaired wire to get a second solar panel.
Notice that there's another locked compartment inside.
Energy
Install the two solar panels on the skyline scene. (Again, no tools are needed.) What did that do?
On the front door scene, the two panels connected by many silver conduits are powered by the solar panels. Open the panel to the right of the door and push the "power on" button, then open the panel to the left of the door. Now there are letters on the display.
Click all the letters, and all but four of them will fall off, revealing a clue for a word.
S -> U -> N x2 -> Y = SUNNY
Use this clue in the last box (climbing wall scene) to get a blue key.
Save your game if you want to see both endings. At the end screen, hit "title" and then "load game" to try the other way.
Obvious End
Use the key in the door to enter the building.
Extra End
Use the key in the hidden compartment behind where you found the second solar panel (climbing wall scene). Push the red button and see what's changed.
There's no longer steam coming out from the pipes in the two-bench scene. Step over them and cut the wires in front of the pipes (with your wire cutter) to get to an exit door. Too bad it's locked.
Turn left and check under the right cone to get an access card and use it on the card reader above to open the door in this scene.
Exploration 2
You're in a storage room. In front of you at the top of the wall is a compartment you can't reach, but under it there's a wooden frame for steps. Among the boxes (on either side) are two laptops with letter-number correspondences. Notice that the numbers are white and the letters are yellow.
Now you need some wood to make the steps, so back all the way out to the roof and look.
On the climbing wall scene, look where you found the toolbox and cut away the rest of the chicken wire (2 clicks) to get the boards.
Build the steps (no tools needed) and see that you need a 4-digit number in white.
The access card has yellow letters on it (LT), so look at both computers to get the number code:
3923
Open this cabinet to get a yellow key,
which opens the door with the exit sign above it.
Ack! Thought I clicked "Preview." Looks OK, though.
HTH=hope that helps.
thanks ceecee. hope the other 3 are not far off
The other 3 aren't coming. I only write walkthroughs when I find it enjoyable, and it's not an activity that stays enjoyable no matter how long I spend doing it. I can also only write walkthroughs for games I've finished, and I don't intend to finish all of them.
And before you ask anyone else, please consider a few things:
1. There may not be as many people here who have gotten to the end of all the games as you think. You're not the only one here who hasn't posted a walkthrough because they don't know how to finish the game.
2. We're not all necessarily playing every single game. Sometimes I get stuck really early and quit a game I might eventually be able to figure out because it just wasn't enough fun to try. Sometimes I skip a game because I haven't had success with any of that developer's games lately and I only want to spend so much time on escape games that week. Sometimes a game doesn't load for some reason, and troubleshooting is such a fun vacuum for me that I don't even try to fix it.
3. Writing walkthroughs is work. It takes me an hour or two to write one. How long do you spend on each game? How much time and energy would you be willing to spend on walkthroughs if you were the one doing it? Answering specific questions is usually a much smaller task. If you post exactly where you're stuck (and which game you're playing), you run the risk of never getting an answer, but there's also a chance you'll get a quick answer because it doesn't require much of somebody else's time.
4. In a couple of months, Flash games will all break even more than they're already broken. So walkthroughs for Flash games will only help the people who are here right now, and probably some of them have stopped using Flash altogether like their browsers have been bugging them to do all year. So the amount of work it takes to write a walkthrough is the same, but the payoff is a lot smaller.
ok, ell i hope someone does some soon,
Thanks for all the hints and walkthroughs. I find myself using them more often.
I think there's a glitch on Night at Home. There is a 4 x 4 grid in the bedroom that didn't open for me even though I solved it correctly.
I tried several different things, but a walkthrough confirmed I was right the first time. I kept trying it, then suddenly it worked. The upper left and lower right squares are gray, and the 4 black squares go diagonally from lower left to upper right.
On the Gatamari game I had to resort to a walkthrough on Door #2, and I still don't understand how that answer was derived. Can anyone please explain that one?
I needed help on door #5, and on Door #7 the
button on the clock is so touchy the walkthrough clicked on it 10 times before it worked. I clicked on it more than 20 times before I gave up.
On Escape from the Rooftop, I needed a small hint to get the 2nd ending.
On Reoda I was able to see several scenes and clues, but I couldn't get get any farther.
Room 2 took me a while.
The clue behind the cupboards shows you a transformation. What do you do to the left picture to get the right?
Mirror the side that's white-on-black and ignore the other half.
So the code is KMX.
Hello Ceecee, you are 100% right on the fact that writing walkthroughs is a time consuming. Only the passion and the desire of helping/sharing clues with the community can be some of the motivations so for that thank you so much for your recent good walkthroughs. You really help a lot all the players who need some help to achieve the escape games so again thanks for that.
About the scheduled death of Flash, most of the games in regular WE are now in html5 or unity so they should be playable during a long time.
Game 001 Walkthrough
Room 1
Under the owl on the bookshelf you will find the item: paper
Open the paper out by double clicking it in your inventory.
Place the paper on the picture frame on the wall
Follow the arrows and this becomes the code for the door
Door code 2963
Room 2
The three cabinets on the left are a clue to do something with the picture frame on the right
How does the left cabinet picture -> become -> the right cabinet picture?
The black half is mirrored
Mirror the black halves of the pictures in the picture frame on the right.
Door code: KMX
Room 3
4 Areas of interest
Books on shelf, Door code, Figurines on counter top, Markings on the right side of the counter top.
The size of the markings on the counter top can be used in conjunction with the general size of the figurines.
Elephant = big, Fish = Small, Frog = medium
Use the markings code to click the books on the bookshelf in the code order
Medium - Small - Large - Large - Small - Medium
Frog - Fish - Elephant x2 - Fish - Frog
The bookshelf has moved to reveal the door code
Door code: 945
Room 4
Find the digital thermometer in the fridge
Look under the cactus plant in the left room
Note the temperature in the cactus room
Multiply the temperature of the cactus room by the clue under the cactus
36.6 X 20 = Door code
Door code: 732
You must collect the thermometer before the door code will work
Room 5
Note the number of points of each of the golden shapes on the wall
The left portrait and right portrait on the bed head are clues to how many people are needed to make the shape in the centre photo
The centre photo of 3 people shows the minimum number of people required to make a 5 pointed star using only a maximum of 2 hands each person
How many people would be required to make the shapes on the wall?
Door code is how many people for each shape on the wall
Door code: 825
Room 6
Left pipe is full of water
Right pipe has no water
Make the pipes hold an equal amount of water
Up button moves water from the left to the right pipe
Down button resets the pipes to the original amounts
Hold the up button to actually make water move from the left to the right
The up button stops functioning if you release it close to the right amount, but not quite right. Press the down button to reset the pipes.
The door code is revealed in the left pipe window once you've transferred the correct amount of water
Hold the up button for 6 glugs in total. You may hear a seventh glug after you release the button
Door code: C O L D
Room 7
Important areas: Clock - Desk drawer - Gold panel on the wall
Open the desk drawer
Look right up the back of the drawer
You'll see a faint glowing area shining down onto the drawer.
Go to the clock and "Click and pull the red knob downwards"
The right spot to "pull the knob" was actually below the knob a bit. It's really buggy and annoying to find it. Remember to click and drag down a bit too. Once you pull it down, the area the knob now sits is about where you need to click and drag down to activate it.
Pulling the clock knob makes the hands move 7 times
Note the area between the hour and minute hands at each position. Or note the hands themselves. Hour = up or down, Minute = left or right
Clock code = Up Left - Down L - D Right - U L - U R - U L - D R
Back to the desk drawer glowy bit.
What could you put into the drawer to enable you to see above the drawer, on the inside of the desk?
A mirror
Mirror the code you got by observing the clock
Clock code mirrored = D R - U R - U L - D R - D L - D R - U L
Take the mirror and place into the opened desk drawer for the door code
It's a mirror and the code is upside down, so flip the image
Door code: 367
Room 8
Collect the crossword from the desk top
TEA + ICE = Door code
Count the number of times each letter in TEA and ICE appear in the crossword and substitute that into the equation
574 + 327 = Door Code
Door Code = 901
Room 9
Note code already on the middle door = 418
Enter middle door code on the left door
Check the left door code now and note it down.
754
Enter the left door code on the right door = 754
Note the code now on the right door
Enter the new right door code on the middle door
621
Make sure you are in the view where you can see all 3 doors. Look at the silver frames
The silver frames form the last door code
Enter the silver frame door code on the middle door
Door code: 839
Room 10
Note the circular panel on the wall and the five red buttons
Look at the hieroglyphs on the tablet on the left
Can you see a pattern similar to the red buttons on the wall panel?
Click the buttons the wall panel in the order of dark circle to light circle
Button order = Left - Bottom Right - Right - Bottom Left - Top
Click the sword
Click and hold the white up arrow button
Click and hold the yellow up arrow button
Click and hold the red up arrow button
Inspect the flowers
the number of petals of each flower forms the door code
Door code = 765
Completed, thats the end.
Thanks to all the hints that have been posted previously.
I really hate that damned clock. And room 2.
Probably should've spoilered the spoilers so it didnt take up all the room on the comments...
Don't worry about that :-) it's ok
still looking forward to the rest of these
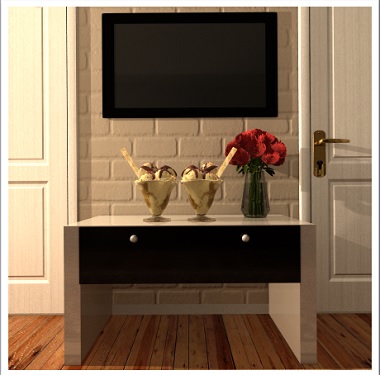
Night at Home
Are you left at home or right at home?
Exploration
By now, you shouldn't be surprised by the lack of left and right arrows. However, there are three locked doors on this screen.
At eye level, you can zoom in on a TV and a picture missing eight tiles.
Under the TV, a table with two locked drawers has two golden circle areas and a slot in its top.
Columns
Use the clue from
the lamp
to unlock the right drawer:
Match the triangular pattern under the lampshade by clicking the bars
3 2 1 0 times.
Take a pink square tile and a key.
Exploration 2
Then use that key to unlock the left door, which leads to the bedroom.
The framed pictures shift upward slightly, except for the middle one which shifts when you click its corners.
On the right, a digital clock seems to be malfunctioning, and clicking doesn't make it any better. It rests on two small compartments, the left empty and the right locked.
On the left, a chest of drawers has three locked and one empty.
Dice
Use the clue from the digital clock to unlock the bottom-left drawer:
The dot pattern is a lot easier to read if you remember that they appear along the edges of the clock digits.
The digits have
2 4 6 2 dots.
Take another square tile and key.
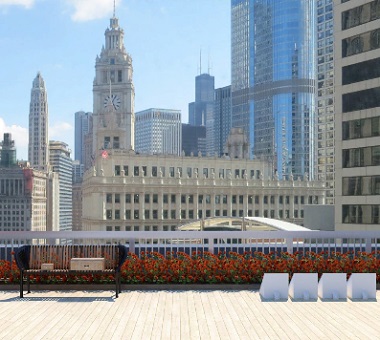
Exploration 3
Use this key to unlock the second door of the first room.
It's a kitchen with a locked glass door to the balcony. The wall shelf has a note full of salad ingredients attached to colorful jars.
Under that, the fridge is locked and the oven has a tasty surprise you can find by opening it and turning the dial.
Two buttons / four letters
Use the clues from the kitchen to unlock the two remaining drawers in the bedroom.
For the four-letter drawer:
The initials of the salad ingredients spell out
LOCK
For the two-button drawer:
The wheat drawing in the oven has (from top down) brown spikelets on the
LRRLL
Take 2 square tiles and a remote control.
Screen / Ice cream
Use the remote on the TV to view a clue.
Actually, that screen has two clues!
For the kitchen fridge:
The capitalized letters in the clue are numbers upside-down.
If you invert the clue, those digits then appear in the order
3177
Take a square tile and the ice cream above it, then use the ice cream
on the circles under the TV
to get another square tile.
For the shifty picture:
Match the colors on the TV to those on the sugar jars to get the sequence of corners
⌜⌝ ⌞⌟ ⌜
While that picture is down, click the ones beside it to find more clues.
Grid
Use the clues from the framed pictures to unlock the compartment near the digital clock:
Combine both clues into one grid. Click once for gray, twice for black.
1 0 0 2

0 0 2 0

0 2 0 0

2 0 0 1
Take a square tile and key.
Exploration 4
Use the key to unlock the door in the kitchen.
It's a familiar-looking balcony, but this time the clue is very obvious in the form of floating glowing letters on the left.
Spell / Complete
Use the clues from the glowing letters to unlock the left drawer under the TV:
The blue, red, yellow, green letters spell out
HINT
Take the square tile.
Place all eight square tiles into the picture beside the door, and-
Hang on a moment, whoever just rang the doorbell! We have to solve a picture puzzle by rotating the pieces until they align.
3 1 1 2
2 2 1 3
3 2 3 2
1 3 1 2
Take the key and use it to open the door!
Reoda: Chapter 8
Chapter-08: Bizan
I can't say that this game is free of bugs, but at least the loading isn't one of them.
Intro story
We left off last time with a hidden message from Dr. Reoda.
Surprisingly, he talks about his hometown of Tokushima, the famous landscape and cuisine, the dance and festival, and the best view from the top of Mount Bizan.
The night view might not be million-dollar, maybe just a hundred. You might even find some forgotten treasure…
(This intro story embeds Google Maps to show you the layout of the place. In-game, the mountain top is much more compact.)
After taking the ropeway to the peak, you find lots of locks, one of which is just marked REODA.
Tika points out that if you have a lock, what you need is a key.
Exploration
This tall building in front of you is actually a kaleidoscope, but you can't use it in the game. Look behind it at some locks, then at the floor under the locks, then click the panel there to reveal some kind of unlock parts.
Turn right for a view of the city, right again, and right once more.
Now you can back out and turn left to take a path down some winding stairs.
You arrive at a gazebo with a gazebo sign. It looks like both the sign and the tile under it are hiding something.
The gazebo has a mysterious hole on the floor, nothing on the left and right, and in the ceiling resides a ridiculous amount of spiders.
Back out and turn left to face statues of a man and dog. The man looks left and right when you examine his face.
Click to view the back of the statues. On the floor is a map of Europe.
Turn right from there to view an artwork titled Missing Part. Make sure you don't miss out zooming on the title.
Once you've explored every single screen without any progress, make your way back to the starting screen, where the game mercifully offers you a way out.
Interlude
While you puzzle over all the locked panels and useless spots, you come to the possibility that there might not be any treasure and the doctor just wanted you to visit. But then you would have come all the way and faced all those spiders for nothing!
Speaking of, those spiders are certainly the weirdest part about this place, so you'll have to check that out again. After some yelling from Tika, you go and buy some instant spider spray.
(Click the big button at the bottom of the story to proceed.)
Retry
You start part 2 with the spider spray in your inventory.
Return to the gazebo, look up, click, and click the spray to use it.
Only one spider left! I guess that's fine.
Move the ceiling switch to OPEN, then open the floor panel under the gazebo sign, and turn the knob there.
Foreign
Now you can examine
the floor behind the statues
to find
a panel under Portugal with two letters on its underside.
You can use your item there, but what does that clue mean?
Click the Missing Part panel to open it and find the key.
Then use that key on the REODA lock to reveal a chip.
Ending
It's an expansion chip for your sunglasses!
Tika deduces that it might help you find treasure in that hundred-dollar night view. It certainly wouldn't be visible in this bright light!
While you wait for sunset, it's time for some tourism, finally. And some Tokushima ramen.
At night through the enhanced glasses, a circled H glows under some letters, and you instantly put it together — it's time to revisit that southern island.
Nothing much to add about PAS5W0RDS except that clock:
Make sure you drag downwards quickly. The drag should work as long as you start near the red handle.
Escape from the Rooftop
This might not be the best rooftop to get locked in, with all those safety hazards and incessant birdsong. At least you can deal with the noise by right-clicking the browser tab and muting the game.
Exploration
The bench on the left has two locked boxes, one small and one big. On the right, two solar panels are missing out of four.
Turn right. Above a bench with a five-letter box, there are some rock climbing handholds attached to the wall. The left side has diamond-shaped steel panels above a panel with a toolbox trapped behind some chicken wire. The right side has sparks flying from a wire above a box.
Turn right to face the locked doorway out. Two large metal panels are connected by a set of wires, and the right one tells you that the missing solar panels are causing an error. Beside that, there's yet another metal panel which is locked.
To the right of the door is an opening in the wall with a solar panel in it.
Turn right. Whoa, that's a lot of steam between the two benches! The left bench has a tablet you can't use and a huge wooden crate with colorful parts in it. The right bench has a tablet with a colorful puzzle, a small box with colorful buttons, and an iron pipe on the ground under those.
High
You'll need the iron pipe and the rock climbing grips.
Place the holds onto the wall above the five-letter box, and climb up to find a piece of paper with colored arrows on it.
Also use the iron pipe to flip over the diamond-shaped panels. Each has colored corners around a white background with a black line.
Use the clue from the diamond panels to unlock the left box on the starting screen:
In the direction of the black path, the light blue tips appear on the
LDLUDR
of their plates.
Take a metal key.
Colors
You'll need the star clues.
For the nine-button box:
The paper tells you to click the colored buttons in a certain sequence. But there are two green arrows and two green buttons, so which comes first?
There's only one path that connects adjacent buttons and has the correct colors:
567

498

321
Take a red key.
For the four-digit box on the starting screen:
The tablet is divided into five stripes that can be dragged left and right. You can align the colors by dragging them all the way to either end.
Green: 7
Red: 6
Blue: 3
Yellow: 0
Enter the code
6037
Take the bolt cutters.
Cut / Unlock
Use the cutters to cut the chicken wire under the diamond plates, and take the toolbox from it.
Unlock the toolbox with the metal key to find a full wiring repair kit.
Also unlock the rightmost panel on the screen with the exit door to find a display that lets you close something.
Spark
The sparking section of wire (beside the rock-climbing area) is now safe to repair with the kit.
After doing so, go back and set the status display to Open, and now you can open the compartment under the wire you just fixed to find a solar panel in front of another locked panel.
Place both solar panels where they're missing from the starting screen.
Now you can open the other metal panel on the right of the door and turn the power on.
This unlocks the big panel on the left, which displays a huge grid of letters.
Alphabet soup
You can get a clue from the letter grid by
clicking the letters to drop them.
Use that to unlock the five-letter box:
SUNNY
Take a blue key.
Save your game, and proceed to the normal end:
Unlock the exit door. You're rewarded with the company lunch!
Load your game, and continue onward:
Unlock the panel to the right of the rock-climbing wall, and push the big red button there.
That hissing sound tells you the huge wall of steam is gone. In its place is a fence of wires.
Cut them with the bolt cutters. The path ends at a locked emergency escape, but you can also turn left to find a door for authorized personnel only.
There's a card sensor beside that door, and indeed you find a card key under the right orange cone.
Use it on the sensor to open the door. In between crates on the shelves you see two laptops with number clues for each half of the alphabet. There's a lock panel high on the wall and some kind of wooden racks beneath it.
Get some wooden boards from
cutting away the rest of the chicken wire under the diamond plates
and use them on
the wooden racks in the last room
to reach the locked panel, and use the clues from
the laptops and card
to unlock it:
The numbers under L and T form the code
3923
Take the yellow key from inside, and unlock the escape door to leave!
Your reward is… taking the long, winding and not even scenic path out of the building.
Thanks KK for the walkthroughs KK as usual. I'm stuck on Raoda though.
after i get the point where i can give up or whatever it us, even after selecting, the part about being called ir getting a Spider Spray, etc, doesn;t happen.
Please help.
The second half of that walkthrough happens after
some storyline in Japanese that has "Part 2" indicated at the end.
Click the Game Play button on that page and the title screen that shows up (after more loading) should also read Part 2.
that never happened KK. usually Reoda games are cool but this one only goes so far for me.
It feels kind of cheaty but there's one more thing you can try:
Here's a direct link to the second half.
Actually i figured it out KK but i think i'm stuck towards the end.
it says i can take a key under that plate behond the statues. there is no key and all it does is place the part in my inventory in the hole. i'm confused.
Update