
 Hi and welcome, the new Weekday Escape is here!
The Amajeto's bar where you find yourself locked feels familiar and no wonder - you were trapped in a similar one several times. You always easily escaped it so far, and this week isn't an exception! Then you get into interesting Akatsuki no Yado's room full of good puzzles and even more puzzles contains the ship (literally) in a remarkable game by Aurel Bílý and Eido Volta. In Rinnogogo's game each solved problem reveals the next piece of melancholic story from the past which may help in understanding the present.
Have a good time and enjoy!
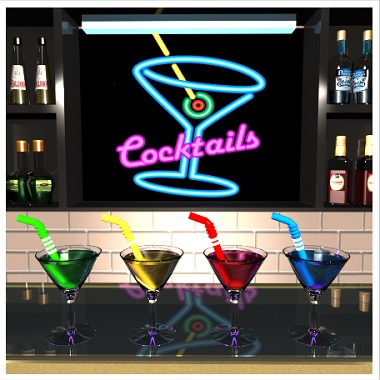
That's not for the first time when Amajeto locked you in a coctail bar, right? This bar seems a bit strange as after you enter the place you need to overcome two doors to be able to buy a drink. Not many customers are prepared for such a quest...but we, escapers, we are! You are supposed to find eight tiles as usual to get the key from exit door...the bar is cosy and inviting though...
The cursor isn't changing, no save button, one ending.

We met Akatsuki no Yado twice this year, and their new game, the third one, is clever and intuitive again. You can safely ignore any text in Japanese language and concentrate on solving puzzles only. Hints and clues are clear, the graphics as well, no pixel hunting and no overcomplicated puzzles. If you stay in the room, don't blame the game.
The cursor isn't changing, no save button, one ending. No language barrier.
H.M.S. Relentless Puzzler
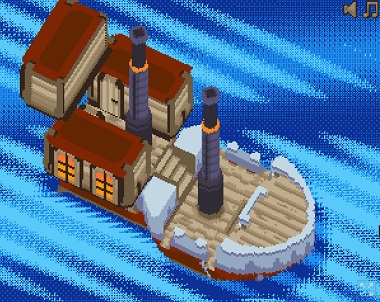
The ship-themed puzzle game by Aurel Bílý and Eido Volta (music) was made for Alakajam! and though it's one scene game only, getting through keeps you entertained for a good while. The ship peacefully sailing not very peaceful ocean is a whole set of puzzles! Watch the cursor closely as it indicates where and what can be done, and notice that you can turn the ship by clicking the the cursor at the edges of the screen (left, right, top and bottom). Haunting music and retro pixel-art graphics make the game unique and very enjoyable!
The cursor is changing, no save, one ending.
One day you get a letter from your own past. Let's not question how it comes that you don't remember writing it - I thought that such letters usually send future selfs - and look at it. Ten years ago you wrote to yourself to go to grandma's (really nice) house and find something very important. Yes, it's Rinnogogo's latest game and besides beautiful art, clever and interesting puzzles, and a pleasant tune, you get an emotional story, too, as usual.
The cursor isn't changing, autosave, one ending.
We love escape games, and our readers love talking about them and sharing hints! How about you? Let us know what you think, ask for clues, or help out other players in the comments below.


looking forward to these. i hope someone can write some walkthroughs for the past few weeks of games.
I'm working on it, but I'm stuck on Great Burnet
with a book, a key, and a door that the key won't open.
The hint system also seems to be broken.
Also, the picture for Rotation is actually from Wildflower Quest two weeks ago.
Rotation
Almost everything is just out in the open, so I'll go straight to solving puzzles. (The sign behind the slot machine doesn't tell you anything you can't guess, but it shows off the owner's awesome tape collection.)
Combination Safe
The buttons are (left to right) red, green, and blue and control matching dials (going out from the center). The clue isn't far away.
The clock has a blue hand on 3, a green hand on 7, and a red hand on 10. So put the dials (starting at the left button and center dial) should be 10:00, 7:00, 3:00. Get a plus driver (a phillips head screwdriver).
DICE
The locker with a die on the front needs a combination of die faces. The clue is the word "DICE" and the die one scene to the left.
The arrows at the bottom let you turn the die and the side button flips it over, and as you move it, the lettered die in the corner changes, too.
Manipulate it until you find the sides that correspond to the letters: D=5, I=6, C=4, E=2. Enter the code to get a red panel.
Pie Charts
Clearly the locker with the pie chart needs the clue from the computer (zoom in).
[yellow down] [yellow up]
[blue up] [magenta down]
Get an orange panel.
Briefcase
The clue is a rainbow gradient going from red to purple.
The painting looks like that. Enter EOLE and get a blue panel.
Unscrew
Remove the panel from the wall with the gold-framed painting and push the button.
The painting rotates and the coin falls behind the sofa. Grab it, obviously.
No-Armed Bandit
Put the coin in the coin slot (more of a button that says COIN on it), then use the three buttons to stop the reels. If you get the combination wrong, it spits the coin back out at the bottom so you can try again and again with the same coin. If only real slot machines worked that way.
The sign behind the machine tells you you want to get all 7's, but you probably guessed that from the "777" right above the reels. When you get it right, a key comes out.
Unlock
We're clearly not done, so that key can't be for the door.
Open the chest to get a green panel.
Four Panels
You need the panels from the lockers, briefcase, and chest. What can you do with four colored squares?
Put them in the rotating color thingie by the door and the wall screen turns on. It needs a four-digit password and the clue is a math problem with a lot of pictures.
Last Code
If you've done everything else, you should be able to decode the whole clue and math your way out of the room.
square
The four panels of the square are:
blue red
yellow green
Rotate the 4-color panel to match.
SIX
two rectangles
The rectangles are [green/red] and [yellow/blue]. If you turn the 4-color panel the right way, these happen to right next to each other, but the clue says you should interpret them separately.
X and 15
rainbow
The clue on the briefcase went red to purple, but this one goes purple to red.
Make sure the painting is rotated that way; now it says 3703.
JP
This one threw me for a bit. Where are the letters J and P?
They're both in the word JACKPOT, but they're not matched to numbers there. But somewhere there was a clue that matched letters to numbers.
The die on top of the safe.
J=3 and P=1, so JP=31.
Math and Out
So now the clue reads:
SIX X 15 + 3703 - 31
Obviously, SIX is just the number 6. X could be 10, but we don't really need another number there, so it must be a times sign. Well-placed zeroes make the mental math pretty straightforward, if you're into doing your own math.
6 x 15 + 3703 - 31 = 90 + 3703 - 31 = 3793 - 31 = 3762
And the only thing left to do is walk out the door.
Thanks CeeCee. That was awesome. Can;t wait for the others.
Hope more walkthroughs are on it's way.
Happy Hour
Back again at the cocktail bar with neon lights?
Exploration / Two buttons
The first screen has two doors. You can't turn left or right, but clicking the left door will let you see two framed pictures next to it.
The counter along the wall has a screen next to a card reader, and some salt shakers next to a purple square tile.
The small table in front has two colored buttons.
Use the clue from
the cocktail glass lights on the wall
to unlock the table:
Blue Pink Pink Pink Blue
(LRRRL)
Take the key and use it to unlock the door ahead.
Exploration 2 / Four shapes
This screen has four seats facing the wall, each set the same way except for the number, the cocktail card, and the cocktail glasses. Beside the door, there's a picture missing eight square tiles.
The right wall has flowery lights next to a box with four shape buttons.
Use the clue from
the cocktail glasses in the second room
to unlock the wall box:
From 1 to 4:
Diamond Heart Circle Star
Take the key and use it to unlock the door ahead.
Exploration 3
You've finally reached the bar!
On the left wall are four framed pictures. Flip over the top right one to find four numbers.
There are four locked compartments to the left of the neon sign.
The bar has four glasses of colored cocktails and straws.
On the right are four more compartments, but only three of them are locked — the bottom-right one hides a square tile.
Left compartments
Clues:
The cocktail glasses in the third room, the cocktail name cards and flower lights in the second room, and the salt shakers in the first room.
Top left:
The initials of the cocktails spell out
GLAS
Top right:
In the third room, the cocktail straws with 1 to 4 stripes are
Yellow Red Blue Green
(0 1 3 4 clicks)
Bottom left:
In the first room, the salt shakers are filled to different levels. Click the white bars
3 1 0 2 times.
Bottom right:
From smallest to largest, the flowers have pink petals on their
D L R U
(4 6 2 0 clicks)
You get a total of 3 square tiles and a smart card.
Swipe / Right compartments
Use the card in the reader in the first room, which shows you a colorful picture of people dancing.
After you've memorized that clue, use it together with the clues
on the card and the framed pictures
to unlock the remaining compartments.
Top left:
The card has a grid of gray and yellow. You'll need to click every square, twice for gray and once for yellow:
2 2 2 2

1 1 2 1

1 2 1 1

2 2 2 2
Top right:
The dancing figures are
Green Yellow Red Green Blue
(1st 3rd 2nd 1st 4th buttons)
Bottom left:
The framed picture in the first room tells you to look at certain corners of the framed picture clue in the third room.
That gives you the code
3568
You get the remaining 3 square tiles.
Complete
Place all 8 square tiles into the picture in the second room, which activates a puzzle where you need to rotate the tiles until they align.
3 1 1 22 2 1 3
3 2 3 2
1 3 1 2
Take the key and use it to unlock the exit door.
H.M.S. Relentless Puzzler
The sea may be calm, but this game is ready to toss unfair puzzles at you. Are you sufficiently relentless?
Exploration
(Read the controls below the game. Note that almost all puzzles have a natural "front" side, and I'll name left and right according to that rather than by port and starboard.)
This boat looks dangerously close to the water, and are those two smokestacks even in the right place?
There are three cabins, one of which appears to be almost floating. You can rotate the view to find that the middle one has three windows without lights.
Use the changing cursor to verify that the first puzzle has to do with…
Lights on
Click each of the dark windows to turn them on.
Now the cabin flips around to show some orange squares you can zoom in on. You'll also notice that the windows on the sides are now dark.
Orange squares
You'll need to light up all four side windows in a specific order:
The clue represents a top-down view of the ship, with each group of squares representing a window.
Click the front-left, rear-right, front-right, rear-left windows.
The middle cabin flips back around. Its windows are off again, and there's something extra!
Arrows
That silver thing is a slider. Dragging it left or right makes the other cabins move.
With that slider all the way to the left, the right cabin rises and reveals another slider. Drag that one out.
(This lights up one of the windows.)
Then drag the middle slider all the way to the right, and do the same for the left side of the ship.
Drag the slider on the middle cabin to the middle position.
All the cabins adjust back to their original positions.
Arrows 2
Use the changing cursor to find out where you can interact:
The doors on the side cabins. When you knock on a door, the slider on the other cabin jerks inward and then creeps back out.
If you get a slider all the way in, it lights up the nearest windows for a while.
That's right, this is a timed puzzle. It takes at least 9 clicks to move a slider all the way in, and about 4 seconds for it to slide back out.
Click a door until get a slider all the way in, then quickly rotate the view until the other door is visible, and click it as fast as you can.
When you get it correct, the cabins arrange themselves to all face the same way.
Lights out
Clicking each of the seven windows toggles a certain combination of three of them. How do you get all the lights on?
Labeling the windows 123 across the top and 4567 on the bottom row, the combinations are:
127, 257, 236, 124, 457, 246, 157.
From this, it's easy to see that you need to click 3 once, and you don't need to click 6.
That leaves five of them, which should make it easy to guess… but let's do it a bit slower anyway:
The remaining combinations are
127 257 --- 124 457 --- 157
and you need them to make 1457 (because 2 is already hit once by switch 3).
Since each click activates an odd number of lights, you need to hit an even number of them out of these five. Either two clicks or four.
As it turns out, four clicks won't work. (Clicking all five gives you 125, which differs from our target by 247, which is not one of the options.)
And with two clicks, you can't toggle a light thrice, so each of 1, 4, 5, 7 has to be switched exactly once, so light 2 needs to be switched twice.
Since both clicks need to include 2, and lights 4 and 5 can't be missed out, the combination required here is 257+124 (windows 2 and 4).
At the end of all that, the solution (starting from all lights off) is to click the windows 2, 3, 4.
In words: click the rightmost two windows on the top row, and the leftmost windows on the bottom row.
The cabins fold away leaving two columns.
Follower
The two columns are stacks of buttons. Can you figure out what they do?
The buttons on the right don't even light up, but pushing them makes the bottom-right one flash again.
The buttons on the left light up and make different sounds, and pushing the bottom-left one makes the game do something a bit more complex.
This is a memory game!
The sequence isn't randomized, so if you have trouble memorizing it to copy onto the left stack, here's the solution:
Number the buttons from 1 (bottom) to 4 (top).
1
13
132
1324
The right stack shifts down and starts another round. I'm sure you'll manage.
2
21
214
2143
21431
Another shift!
By now you should realize that you need the sound effects to proceed. A good musical ear will help.
4
44
4421
44213
442131
4421312
And once more!
4
41
412
4122
41223
412231
The cabins return to their original positions, but the windows are on the corners now.
Corners
The clue here is the tall smokestack. Let's label the windows (clockwise around the ship from the chimney) 1 to 4.
Notice the tiny vertical slots in the chimney? When you rotate to look directly at a window, all the visible slots are vertically aligned. There are four such alignments.
From bottom to top, click the windows that are visible on each slot:
132413
A new chimney rises.
234114
And then the middle cabin slides onto it.
Exciting
Each of the cabin windows can be dragged to different vertical positions. How do you know which positions are correct?
Listen for a higher-pitched sound. In the correct spot, it will sound like a latch.
If you drag slowly, you find that there are a total of seven vertical positions available, three above and three below the original position.
Drag the left window 1 step up, the middle window 2 steps up, and the right window 3 steps down.
This triggers the ending:
The cabin launches into the sea.
You win!
The HMS one, i don;t understad how to move around. Can someone help?
For HMS Relentless Puzzler: Click and hold on the edges of the screen to rotate the camera.
Great Burnet
Exploration
You start off facing a table with a rabbit figurine and a red five-digit box on the armchair. There's a bookshelf too high up to reach.
Enter the corridor which ends in a locked door. There's a stool secured to the wall with a screw.
Back out to the starting screen, and turn right. There's a doll below and to the right of the round window, and the red flowers on the left rest on a table with a locked drawer.
Turn right to face doors opening onto a garden with colorful birds flying around. You also see a basin on the floor with leaves floating in the water.
First puzzles
💡 red box
Use the clue from the
round window
to unlock the red box on the armchair:
The lines on the window are the roman numerals
1 5 2 3 1
Take a screwdriver from the box.
Use the screwdriver to remove the stool from the corridor.
💡 green book
Then place the stool under the bookshelf, which lets you take the green book from it.
The book is full of instructions, but there's only one of them you can do right now:
💡 Otafuku
Find the figurine beneath the round window and tap the top of her head 5 times.
This opens a panel with colored triangle buttons.
💡 Triangular button
Use the clue from
the birds in the garden
to unlock the triangle button panel:
The birds fly in the order:
Yellow left, Pink up-left, Blue right.
Push those three buttons.
You get a wooden panel with colored leaves.
💡 leaf memo
The leaf memo has numbers on the back of it. Use its clue to do something to the basin of leaves:
Matching the numbers to leaves, the order of colors is
Red Yellow Red Purple Green Purple.
( ⌞⌜⌞⌟⌝⌟ )
The leaves vanish and are replaced by a key.
Unlock
Use the key to unlock the drawer under the flowers.
Inside, there's a trumpet.
Continue searching the drawer to find a white square tile.
💡 rap (Trumpet)
The book tells you to use the trumpet on the rabbit, who gives you another key.
Then use that key to unlock the corridor door.
Exploration 2
The bed on the floor has a lamp above that you can turn on to show a clue with a clock and numbers. The framed picture has some colored buttons beneath.
Turn left. On the table is a cup of bitter tea. The wall clock has buttons instead of numbers. Along the right wall, you see a panel with four shape buttons, an apple with an S written on its back, and a purple panel that divides a square area into four smaller parts.
Turn left. There's a cow standing next to the rug. The cupboard on the left has its handles padlocked together. The couch has cushions you can lift, but there's nothing behind them. And the framed picture above the bed shows a circle divided into four colored quadrants.
Turn left to face the doorway out. The painted folding screen has a very realistic peach you can take.
Click the edge of that folding screen to look behind it. There's a demon mask (?) on the wall, and you can move the potted plant to reveal a rope.
If you leave the room, you'll find that the garden door now has a four-digit lock, and you can take a green L-shaped tile from it.
More puzzles
💡 button on the (clock)
Use the clue from the lit bed to unlock the clock. Don't overthink it!
It's 24-hour time, with 0 and 12 on top.
So 23, 15, 9, 18, 4, 20 are in the
11, 3, 9, 6, 4, 8 o'clock positions.
You get a key out of it.
Use that key on the padlock on the cupboard, which contains some marble busts, a box with fourteen buttons, and three colored blocks.
💡 cabinet
You don't need a clue for the button box in the cabinet! But you do need to know
where to find ◯ in those numbers.
Spell the numbers out:
fOur

zerO

twO

One
From top to bottom, push the 2nd, 4th, 3rd, 1st buttons.
You get some sugar.
💡 Matcha
Taking the sugar makes milk appear next to the cow.
As instructed by the book, add the sugar and milk to the tea.
After enjoying your matcha latte, you get a square tile.
💡 lower cabinet
Use the clue from the couch cushions to unlock the blocks in the cabinet.
The red cushion covers the green one, which rests on the brown one.
So click the blocks (from back to front)
0
2
1
times.
A yellow rectangle tile appears.
Collector
💡 black shelf
You should now have all four square tiles, but you can refer to the hint if you're missing any.
Place them into the panel to the right of the apples, which reveals another triangle button panel.
💡 triangular button
Use the clue from the carved statues to unlock the new panel.
There's a golden arrow above the statues, telling you to read them from right to left.
The statues (from right to left) face
R U L D
This reveals a small door with a knife behind, but it slams back down when released.
Opening
💡 door closes
Above that door, there's a small ring. Use the rope there, then use the padlock on the door to hold it up.
Take the knife.
💡 peach
Use the knife to cut the peach, releasing a boy. As the hint confirms, he's Momotaro.
So use him on the demon mask, which falls off and reveals a passage forward.
Exploration 3
You see a drawing of a potted plant on the wall. It includes four circular quadrant buttons which change colors. Beside it is a bicycle with an O on its front wheel, and a floor panel with six rectangle buttons.
Click the corridor behind the bicycle. Beside this new locked door, the plant pot has something hanging from it.
Back out and turn around. You find a blue visor hanging on the right wall, as well as an alarm clock on the left shelf.
Two puzzles
💡 button on the floor, flower button.
You have two puzzles to work on! Clues:
The clock, and the circle framed picture.
For the flower drawing with four buttons:
Matching the quadrant picture to the quadrant buttons, you find that the buttons are:
Top: Blue (1)
Right: Yellow (2)
Left: Purple (3)
Bottom: Pink (4)
A shovel appears.
For the floor panel:
Each of the clock hands represents a number, and those numbers make sense when considered along with the floor panel.
As the hint says, the time on the clock is 13:26:45.
(Which looks wrong to me, but it has to be that for the next step to work.)
Matching that to the floor panel, each button represents a different digit, and you have to push them from 1 to 6.
So push the
1st, 3rd, 2nd, 5th, 6th, 4th
buttons.
Under it, you find some dirt.
Use the shovel on the dirt to dig up a small can with holes in it.
Exit
💡 garden
The letters throughout the game appear on different colored backgrounds, which form the clue for the cosmos painting:
Green C (hanging from plant behind bicycle)
Blue M (visor on wall)
Yellow O (bicycle wheel)
Red S (apple)
The letter in
cosmosrepresent the colorsGreen Yellow Red Blue Yellow Red
(3 2 1 4 2 1)
Take the key and use it to unlock the door to the (other?) garden.
This garden has a path of stepping stones, as well as a pond with a fish swimming. Use both clues to unlock the panel with four shape buttons:
Following the direction of the fish (top to bottom), the stones on the path are
Right square
Right circle
Left circle
Left square
Right circle
Right square
Left square
(⌟⌝ ⌜⌞⌝⌟ ⌞)
You get a flat piece with three pegs sticking out.
Attach that piece to the can, then click to open it. Some cookies fall out along with a note!
💡 notes and cookies
Place the cookies onto the note. This leaves just four numbers connected by arrows.
Enter that code into the double doors:
8439
which open into the forest once more.
Click the floating envelope to end the game.
Thanks KK. loved it. Can't wait for more.
Update