
 Hi, it's Wednesday again! Wecome to the new Weekday Escape!
Amajeto invited you again to their Hotel and locked you up in a room which you're supposed to escape. Enjoyable adventure by IcyOak then awaits you - you're supposed to get a gift for your girlfriend. If successful, you may take her out to a lake. Another Selfdefiant's adventurous flight from the wilderness follows, and the last comes Masa with an excellent game! Really well-done in all aspects, and much fun.
Have a good time and enjoy!
The cursor isn't changing, no save button, one ending.

IcyOakcreated for us a cute adventure game in a classical style. Your goal is to collect a wildflowers bouquet for your sweetheart, and on your quest to a romantic evening overcome obstacles in the form of a fierce cat, a fierce dog, a fierce bee swarm, a fierce not specific animal with red eyes and not so fierce baker. The reward worth the effort!
The cursor isn't changing, no save, one ending.
The game is available for Android too.
P.S. Two years ago you you needed to escape a fierce animal with red eyes too! See in WE N°197.
Woodland Hills Escape
Selfdefiant left you stranded in the wilds of Woodland Hills without a mobile phone, or a map, or a compass or even some food. Clearly you need to find your way out of there before the night falls. The weather is fine and the local fauna friendly so no stress...you'll be back in civilisation soon.
The cursor isn't changing, autosave, one ending.
Masalocked you in a space museum. Don't be angry with them because of that - the museum is neat and educational with all those interactive devices - but most of all, you have ahead of you perfect escape game with clever and intuitive puzzles, clear and clean graphics, uncluttered interior, and quite long one, too. Make a cup of tea or coffee, sit down comfortably and enjoy one of the best recent escape games!
The cursor isn't changing, autosave, one ending.
The game is available for Android and iOS too.
We love escape games, and our readers love talking about them and sharing hints! How about you? Let us know what you think, ask for clues, or help out other players in the comments below.


Where is everyone? What a lovely bunch of games, thank you! I loved them all, especially Space Museum escaoe.
Hi! Here and playing! Completed Amajeto's Hotel escape and the Space Museum escape. About to start IcyOak Wildflower Quest. Great set of games - as usual. THANK YOU!
I tried to play Space Museum Escape in Fire Fox and Microsoft Edge. All I get is a black square, no game.
Never mind...
I believe that it is something wrong on my end. I get the same black square on Wildflower Quest.
Looks my gaming days are about over.
Never mind again...
Wildflower Quest just suddenly poofed into existence. I guess it just takes a long time to load.
looking forward to these.
Both Wildflower Quest and Space Museum Escape are in Unity and they both load slowly and in a peculiar way. For quite a long time there's a black screen only without a loading bar and then abruptly the game starts.
You can try Wildflower Quest now. There is their own walktrough in the upper part of gamesecreen in the middle. I think it's good.
chrpa, thanks for mentioning the text walkthrough,. there were a few times i was lost so i had to resort to a video walkthrough but overall cool game. I hope the rest are coming soon.
yay! flash games are working for me again!
woodland hills was pretty easy but not a bad game! lots of little details
now to check out space museum...
got it! hint for space museum escape: every time you use a key, make sure to look around the room again!
Space Museum Escape
You may need to have seen clues for their codes to work. You also can't click on puzzles you've already solved; this should make it easier to find what you're looking for toward the end. All my clues will read left to right, top to bottom.
Exploration (Red)
I'll call the starting place SCENE 1.
The space suit has a DIAL CLUE. Next to it is a little pedestal with a keyhole in the middle. Zoom in on the Earth/moon model. There's a hexagonal hole next to it and PAPER CLUE 1 taped to the Earth.
The three safes need: four colors, colored symbols, dial positions.
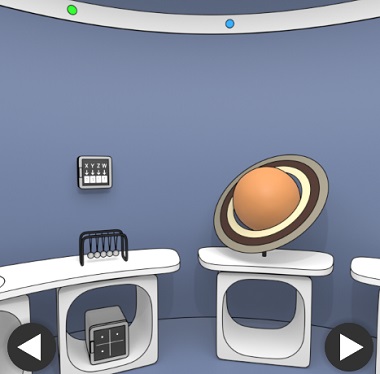
Turn right. This is SCENE 2.
There's a Newton's cradle (the hanging iron balls) and a Saturn model. The two safes need: numbers for XYZW, patterns around dots.
Turn right to SCENE 3.
There's a big lightbulb missing a switch and a hole with an N. The two safes need: sizes for colored circles, a sequence of W/S/E.
Turn right to SCENE 4.
There's an exit sign above a window (with a door on the other side; later there will be Roman numerals) and a circular panel with a narrow slit. You can see the back of a moon rover and climb its ladder to see an antenna bolted onto it.
Turn right to SCENE 5.
You can climb the moon rover from this view, too, but you can also open the door with a moon code and zoom in on the robotic arm, which is holding binoculars (that you can't get) in front of a safe that needs a 4-digit code. Above the arm is a Roman numeral I, and there's another safe that's too high to reach.
A note on the room and the game's progression:
You may also have noticed colored dots along the top of the room in the first three scenes and the exit sign in the next. Take another look at the keyhole pedestal in scene 1. The slate blue ring is open at the top by the red dot, and the slate blue wall of the room opens up under the red dot. You're in a circular room surrounded by a ring-shaped room. The alcove with the space suit, and the band around the top of the room with the colored dots and exit sign are part of this other room. When you use a key in the pedestal, the ring rotates, moving a new alcove with a new keyhole pedestal into place and changing what's outside the window. All the keys in the game go in the same place, so I won't tell you every time. Every time the room turns, there's a different color above the alcove; that's what the color headings below refer to.
Dial Safe
Scene 1 has a safe and a clue to open it.
The dials on the space suit are labeled "ONE TWO THREE" mirrored, so mirror the positions of the dials:
SW, NE, S
Get a compass stand.
Rings
In scene 3 there's a safe with ivory, gray, sepia, and brown circles that you can make smaller. Look for circles of these colors.
The Saturn model. Starting at the outermost ring and ending on the planet, the colors are gray, brown, ivory, sepia. So the order on the safe should be small ring, large ring, solid circle, medium ring.
Get a compas needle.
Compass
Now you have two pieces of a compass.
Combine them and put them in the hole in scene 3 (or put them together in the hole). The needle moves between north and other directions.
Direction Code
You have a sequence of directions. Where can you use it?
The safe directly below has red arrows like the compass needle and buttons for west, south, east.
W, E, S, W
Get a key. Use it in the pedestal by the space suit.
Yellow
The space suit has been replaced by a tree. Get the single apple from the tree, which has PAPER CLUE 2, and the handle on the floor.
Crank
Put the handle in the hole by the Earth/moon model. The moon rotates and you can see PAPER CLUE 3.
3 Clues
Combine the clues from the Earth, apple, and moon and use them.
They open the dot safe in scene 2.
The bottom right space is empty. Click the others 5, 4, 3 times.
Get another key and use it.
Green
The alcove has a gray sphere with lights around it and a red button.
Moon Phases
Push the red button and watch the sphere (the moon) for a clue.
This is the combination for the lunar rover.
left half, right half, right crescent, left crescent
Exploration (Inside)
There are Roman numerals outside the colored windows and a safe that needs 4 Roman numerals. Turn left.
There's a monitor that shows the robotic arm, and below it are two holes. Take the wrench.
Roman Numerals
The safe inside the rover needs four numbers: two in a big white square and one each in red and yellow squares.
Check the windows. The white window in the room currently shows II over IV, and the red and yellow windows in the rover have IV and III.
Get a red button.
Robot Hand
The button looks like it's for opening and closing the robotic hand. Install it under the monitor and push it. The hand opens and you can get the binoculars (outside the rover).
Arabic Numerals
When you pick up the binoculars, you can see a clue for where to use them:
on the exit sign, currently in scene 3.
Get a number for the safe that had the clue:
5286
Get another key.
Remove
Where can you use the wrench?
Climb the rover and get antenna parts. There's nothing to use the antenna parts for, so use the key.
Light Blue
The alcove contains a familiar-looking rig with a display that has no signal.
Signal
Install the antenna parts and see the color grid on the screen. The columns are labeled with capital letters and the rows with lowercase letters. (If you don't have the antenna parts, get them from the top of the lunar rover with the wrench from inside the rover.)
The safe next to the alcove has a smaller grid: you only need colors for Cb, Ab, Cc, and Ac.
The colors are dark blue, light blue, yellow, green. That's 0, 1, 3, 2 clicks.
Get another red button.
Roll
Put that button in the rover and push it. The rover rolls forward a bit, changing the numerals outside the windows. Get out and see that you can now reach the high safe by climbing the rover. Go left to find a paper and two new safes that need: a color sequence with a small white dot in it, letters in circles.
Roman Numerals, pt. II
The safe above the rover looks just like the one inside it, but the numbers have changed.
The white window has III over III. The red window has II and the yellow window I.
Get a tablet and look at it. It's playing a video on loop, which you can pause by clicking on it. There's another video, but it's locked and needs a code with white and black 4-pointed stars.
Orbit
The video of colored circles has a clue for one of the new safes.
Pause the video about halfway through to get four colored circles with a white dot after the first one.
orange (3 clicks), blue (0), yellow (2), green (1)
Get a coin.
Triangles
Look at the paper in your inventory. The game points out the triangles at the bottom, which tell you where to use it.
Put it over the lightbulb with matching triangles on its base (scene 3). Certain letters are in connected circles.
Circles and Lines
There's a safe that needs letters in circles connected to lines. Match them to circles from the paper.
W, T, U, S.
Get a switch.
Flip
Put the switch in the lightbulb and turn it off. It's the clue for the second video, but what order do they go in?
Look at the coin. It has a matching lock icon and gives you the order:
open, open, filled, filled, filled, open. On the tablet, that's left, left, right, right, right, left.
Coin Slot
Use the coin to unlock the floor panel in scene 4. A projector comes up and there's a spot for the tablet but nowhere to use that clue yet. Take the key and turn the room again.
Royal Blue
The new alcove has some rings you can't move over a table with some particularly boring constellations that you can turn.
Note the shape of the outline around each constellation. Put the tablet on the floor under the projector. Zoom in and see the constellations move in and out of a familiarly-shaped dark blue region. You can still pause the video by clicking on it. Turn the constellations under the rings to match the tablet:
The acute angle belongs on the bottom right. The box should be open at the top. The line should be on the bottom. The right angle goes on the bottom right.
The rings rotate.
Rings
This clue is for the safe at the right. The biggest rings are always facing you; the others can be in any of three orientations. Use the code:
orange: vertical, circle; blue: horizontal, circle; green: circle, horizontal. (The colors on the safe are in the same order as the clue, so you don't really need to know the colors.)
Get yet another key. You know what to do.
Fuchsia
There's a funnel-shaped table that simulates a gravity well. Take the scissors.
Gravity
You can't pick up the orange ball, so use the scissors
to remove an iron ball from the Newton's cradle.
Put the ball in each of the lettered ramps and note what number it ends up on. (You don't need to pick the ball up; just click on a new ramp.)
Safe code: 8216
Get the last key and use it. The door rotates into place, and it's not even locked; just go out!
Space museum was great. Nothing particularly sneaky, just logical. Relaxing even.
hope more walkthroughs are on the way.
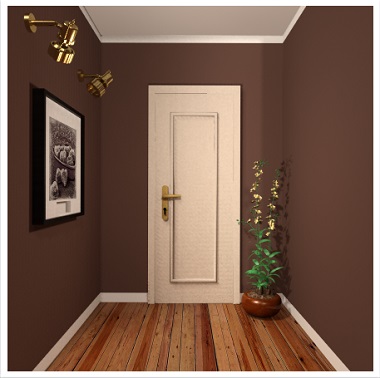
Amajeto Hotel Escape: Autumn
I've had issues with the tilty/shifty picture not working, so you should test it first.
Exploration
You start off facing a locked glass door looking out onto the balcony. Let's ignore the left side for now.
Turn right to face a television screen (turned off) surrounded by wooden houses with green birds and round lids that swivel up to reveal colored letter clues. And under that, there are four compartments with different combination locks.
Turn right to face the locked room door. The picture beside it in the corridor has eight tiles missing. The right half of the screen is a wardrobe, and beside the mirror you find a lock with a grid of color buttons.
Turn right. Each of the side tables has a lamp you can move and flip to find a number clue. The three framed pictures have different locks, including the middle one that shifts when you click its corners.
Two compartments
You'll need the clues from
the lamps and the houses around the TV
For the rightmost compartment under the houses:
The holes numbered with roman numerals Ⅰ to Ⅳ are
Red Yellow Blue Green
(2 0 6 7 clicks).
Take a pink square tile and remote control.
For the second compartment:
The digits from 1 to 5 appear on the
LLRLR
lamps.
Take a square tile and key.
Screen / Balcony
Use the remote on the TV to turn it on and view a geometric clue.
Then use it on the TV again to view a word clue.
Use the key to unlock the balcony door.
In between two chairs is a bowl of onion rings with what looks like two flags in them. Take the square tile, and lift the bowl to find a cross mark under it.
Other two compartments
You'll need
the clues outside, the clues on the lamps and a clue from the TV.
For the leftmost compartment:
The symbols outside form the clue ★×♥, so use the lamp numbers to work out 124×35 which is
4340
For the third compartment:
The arrows on the first TV clue tell you to observe the shapes from outside in:
Square Circle Diamond Hexagon
That gets you a total of 2 square pieces.
Picture frames
You'll need clues from
the TV, the flags and the houses.
For the left framed picture:
Read the word puzzle on the TV. The words have something in common.
Each word has a letter that appears twice. From top to bottom, those doubled letters form the code
FALLFor the middle framed picture:
Match the colors on the flags to the corners shown on TV:
⌝ ⌞⌜⌟ ⌞⌝
For the rightmost picture frame:
Compare the heights of the birds (or the stems) to get the answer:
0 2 3 1 clicks
You get two square tiles and a flower clue.
Grids
Use the flower clues to unlock the color grid wardrobe:
Each of the compartments has a different grid of flowers, and the flowers in each grid have different numbers of petals.
So combine the flower grids as indicated on the back of the middle picture to form one large grid:
R G G R

Y R R Y

Y R R Y

G Y Y G
(Click once for green and twice for red.)
Take the last square tile.
Place all the square tiles into the picture beside the door, and rotate the tiles until they align:
3 1 1 2
2 2 1 3
3 2 3 2
1 3 1 2
Take the key, unlock the door and leave!
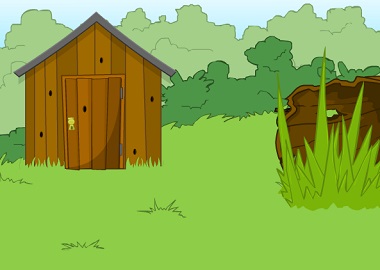
Woodland Hills Escape
Exploration
A butterfly floats past some sunflowers and over some leaves on the ground which you can move to find a blue egg.
Go right to find a locked shed and tall weeds blocking a log.
Go right to find a rabbit by a river.
Go left twice to the starting screen, then down. Search carefully to find
the handle of a sickle in the bottom right.
Go left to find a golden snail. The game thinks it's hungry.
Use the sickle to clear the weeds, and pass through the log.
An arch of flowers is decorated with colored butterflies, and in the middle is a five-slider box.
Go left to find a tree with four picture buttons on its trunk. A blue bird needs three eggs.
Go right twice to find a path of four stones with pictures on them. There's something buried in the middle of the field.
Codes
Clues:
The sunflowers at the start, and the picture stones.
For the treasure chest:
Click the sliders
1 2 0 3 2
times to match the heights of the flowers.
Take a shovel.
For the tree trunk:
Follow the stones:
Snail Flower Acorn Flower
Take a berry.
Crops
Use the shovel to remove a carrot from the field.
Give the carrot to the rabbit to get an egg.
Also give the berry to the snail to find an egg.
Escape
Give all three eggs to the bird, and take a silver key from its thought bubble.
Use that key to unlock the shed and find a boat.
Use the boat on the river to escape!
Thanks KK. Good job as always.
Update