
 Hi, it's time for a break, it's escaping time!
Selfdefiant wants you to escape a desert temple which is, very conveniently, placed next to a stream so no worries of dehydration in case you stay here longer than expected. TomoLaSiDo locked you outside a door in open landscape and you're supposed to get in. Then you need to escape from standard Spiceapp's room and the last comes wonderful Nicolet, cute, joyful and smart.
Have a good time and enjoy!

Selfdefiant let you stranded somewhere far from civilisation and you need to get back somehow. Luckily, soon you find a place with obvious signs of human activities and even though it's not clear how solving puzzles would possibly help you in return, it can't do any harm. Pick up any item you find, solve any puzzle you come across and you'll see. The worst-case scenario is long holiday - not bad, right?
The cursor is changing, autosave, one ending.
P.S. Talking about desert temples or, more precisely, about quests going not as expected, here is Nani-Quest and its sequel NaniKono-Quest by Detarou. Excellent escape games, quite long. And fun.
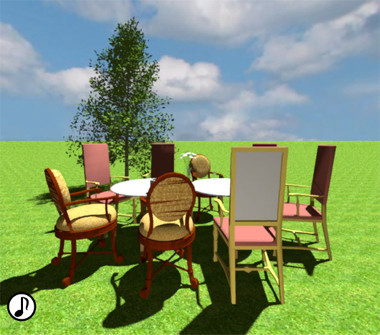
It's beautiful sunny day with white clouds slowly floating in blue high skies, everything around is green and peaceful, and someone took out all chairs and tables they could find for an improvised picnic. The target in this inside out tomoLaSiDo's game is to open nicely painted white door and see what's behind it - the key parts are hidden in six capsules as usual. For fulfilling the side quest you have to find seven tokens. Can you?
The cursor isn't changing, no save button, one ending.
The cursor isn't changing, autosave, one ending.
In the beginning it seems that Nicolet imprisoned you in one of their cubes - those tiny rooms they made at their beginnings, remember? But no, the game is bigger than seems and you'll get further soon after solving some good puzzles, perfectly ballanced and original. Good observation is required. Positive effect on players guaranteed. Happy playing! Also, we've met the Egg King before (WE N°214).
The cursor isn't changing, autosave, one ending.
The game is available fo Android and iOS, too. Here is the tip button.
P.S. Talking about statues, here is lovely Statue of Sun by Minoto with two endings (Revival End and Treasure End)
We love escape games, and our readers love talking about them and sharing hints! How about you? Let us know what you think, ask for clues, or help out other players in the comments below.


can;t wait for these
This post is also missing its tags, and the extra links to Detarou's games are missing (they're in the archives).
Desert Temple Escape
Exploration
You are all alone in the desert… with a flowing river next to tall trees against a mountainous background. Once you're done enjoying the unexpected landscape, click the second white bush from the left to find an arrowhead.
Go left. This stony area has a sign with a triangle painted on it, and the pot to the left contains another arrowhead.
Go up. To the left of this locked door, there's an unusual ring of five color buttons in the wall. Also, the changing cursor points out the dark rectangular holes, but you can't do anything with them.
Go right to find a huge rock that's definitely hiding something. Small bricks in the wall are marked with straight scratches.
Go right to find another locked door, more weird rectangular holes and a small brick with a cross-shaped crack. Clicking it reveals a scroll with a clue involving five colored diamonds.
Pentagon
Use the clue from the scroll to solve the puzzle with the color buttons.
Based on the arrangement of the diamond shapes, you can tell that the clue is upside-down relative to the buttons.
Thus, the bottom buttons should be green (1 click), the ones above them yellow (2 clicks) and the top button red (3 clicks).
Once you're set the buttons correctly, an arrowhead appears in the middle.
Less
Use the clue from the sign to do something with the small marked bricks (near the huge rock).
The marks on the bricks are tally marks, with each diagonal line completing a group of five, which means the marks on the bricks represent:
2 7 6 4
1 5 3
As the sign indicates (and the game interprets), you need to push them in descending order from 7 to 1. After you do so, the 1 brick reveals a black key.
Unlock / Exploration 2
This key unlocks the door on the left side, allowing you to enter a new room.
This room has a dark hole surrounded by neatly carved blocks on the left and right. The left block hides a silver key. On the wall are some circles with dots. (There are also more black rectangles, but this time the cursor doesn't even change over them.)
Use the silver key to unlock the door on the right side, allowing you to enter another new room.
This room has a brick wall in the middle, and on the right side you can pick up a ladder.
Descend / Exploration 3
Use the ladder to climb down the hole in the left room.
You find a treasure chest on the left, locked with five dials.
Go right to find an unusual wall with four oddly-shaped slots. There's an empty basin on the left, and behind the stone block on the right you can take a pickaxe.
Destruct
Use the pickaxe to flatten the large rock, revealing a doorway to yet another room.
There's a large metal ring with a diamond-shaped slot in the lower left, and there's also a dry mound of dirt on the right side.
Spin
Use the clue from the dotted circles to unlock the chest.
As shown on the clue, the dots on the dials need to point down, left, right, up-left, down-right.
Click them 4, 6, 2, 7, 3 times and open the chest to find an empty bowl.
Spring
Fill the bowl in the river and then use it to fill the basin, which makes another arrowhead appear.
Complete
Place all four arrowheads into the strange wall beside the basin to make a yellow gem appear.
Place it into the slot on the large ring, which dazzles you with its accelerating rotation.
Click it to escape!
More walkthroughs coming, but the other games won't be nearly as easy.
Thanks for noticing and letting know. Here are links to Nani-Quest and NaniKono-Quest (by Detarou).
Escape Challenge 106: April Fool's Day 2020
The title really says Room with April Fool's 2020, which makes no sense and you're not even escaping a room, but that's probably in the spirit.
Exploration
You start off facing two tables surrounded by chairs. A closer look at the table reveals a mug, a vase of flowers, and a cocktail glass holding a capsule containing a key piece. In the background, there's a tree with a box attached to it. The tree box has three grooves meeting at a single apex, with one slider in each groove that slides up when clicked.
Click the top of the tree box to find a purple April Fool's token.
(If you're curious about the inscription on the token, you'll get a chance to read it on the end screen.)
Turn right. There's an oval-shaped bench on the left, and zooming in on it reveals a token as well as an unusual clue involving simple drawings. A short hedge is planted under a table with a machine on top, which has text telling you about a "commemorative medal" that's "super rare" and "only available today". It has a coin slot but you don't have any item to use yet. The longer hedge on the right has three posts extending from it.
Turn right to face a locked door, mounted on possibly the smallest wall ever in this series. But there's no getting around it: you'll need a key to leave.
Turn right to face an unusual-looking set of shelves containing various items, where the middle cupboard door has a four-digit lock. While you're looking at that lock, pick up the token to its left. On the right, there's a chest of drawers where the top has circle and square buttons, the middle has three sliders and the bottom has three color buttons.
Zoom in on the wooden bench to the left, which has some white lines painted on it. Sitting on the bench, you get a side view the chest of drawers. You can also zoom in on the blue bin beside the bench to find that it's empty, but on that view you also see a token at the end of the bench.
Lines
Use the clue from the wooden bench to unlock the tree box.
The lines on the bench are oriented the same way as the lines on the box which are connected to the CRCLC sliders.
After clicking those sliders, the box opens to reveal a key piece.
Colors
Use the clue from the side of the chest of drawers (as seen from the bench) to unlock the bottom drawer.
The colors on the side are:
Yellow (0)
Green (1)
Red (3)
so click the buttons that many times and open the drawer to find a token and key piece.
Heights
Use a clue from objects in the game to unlock the middle drawer.
The three sliders remind you of the three posts on the long hedge, which are wide at the top.
So click each slider twice to set it to the top position, and open the drawer to find a key piece and token.
Shapes
Use a clue from the objects in the game to unlock the top drawer.
(I don't see any clear hint to tell you which objects, so you might as well guess.)
The tables on the first screen are both circular, so click the circle button twice and then open the drawer to find another key piece and token.
Numbers
Use the clue from the shelves to unlock the four-digit cupboard among them.
The top shelf seems to suggest a sequence of items, so all you need is to count them.
Including the samples on the top shelf, you find that there are a total of 3 balls, 5 tiny crates, 4 rolls of tape and 1 handheld drill.
Enter 3541 in the cupboard door and open it to find a key piece.
Unlock
Now that you've collected all the key pieces, unlock the door, which opens into a toilet!
The archway out has a thank-you message on it, but you can't leave because of a single wooden plank having a four-digit lock. You can also zoom in on the toilet to find a token (item) and see another thank-you message on the wall.
You may have noticed that this token has no text at the bottom.
Rare
(This hasn't affected the ending of any of my playthroughs, so either I'm doing it wrong or it's entirely optional.)
Insert the token into the machine and use the buttons to make it super rare.
Simply rotate the dial using the curved arrow buttons until 2 is at the bottom, then push the 刻印 (engrave) button. You should see the bar fill up slightly.
Repeat this for the entire sequence
2020.4.1shown at the upper left, remembering that the dots also need to be engraved.Once you're done and the bar is filled, the machine dispenses a super-rare error medal.
Digits
There's still a puzzle to solve before you leave! Use clues from the game to unlock the plank covering the exit.
Hints: Read from left to right, but you don't need to look near the exit.
The game has several objects that look like numbers. Going around clockwise from the exit, they are:
Shelves that look like 4 sideways
Tables that look like 8 sideways
Oval bench that looks like 0
Hedges that look like 7
Enter 4807 into the plank to remove it, then click the exit to exit!
Item list
6 key pieces:
Top left: in top drawer
Top middle: in middle drawer
Top right: in bottom drawer
Bottom left: in middle shelf compartment
Bottom middle: in tree box
Bottom right: in cocktail glass
7 tokens:
On tree box
On oval bench
Beside middle shelf
On long bench near bin
In bottom drawer
In middle drawer
In top drawer
And something else:
A blank medal that you can make super-rare!
In Collector, I have one item left in the end:
a stone.
Does it go anywhere or is it a "happy" item?
kk, are you working on a walkthrough already? Otherwise I could write one.
I have not started the Collector walkthrough, so you can write it and I'll go ahead with Statue. However, in my testing it's possible to lose the laptop password by carelessly
using the phone before opening its app, so I'll just leave it here:
TIEAR
The unused item in the end is
required for you to exit; the game won't unlock the door if you haven't picked it up.
For an explanation of what it is, here's my summary translation of the intro and ending text:
As an ordinary salaryman at a trading company, you were working overtime alone when the phone rang. The director has brought a secret and needs you to come to his office right away, or else.
Despite your various doubts, you have no choice but to go.
The director's secret was an egg fossil! But the truth was more surprising than comedic.
This fossil as large as 100 chicken eggs was found in Africa, and he won it at a London auction, which is why he guarded it with so many puzzles. But the director goes to even more world-famous auctions regularly.
Amazed by this director's true nature, you sneak in again to investigate.
Statue
Before we go back to the world of sand, I'd just like to point out that there's a video walkthrough link on the game page! For those who prefer good old text, read on.
Exploration
There's no intro cutscene this time, you just start facing a chest of drawers. The top one has four buttons each having a colored stripe that shifts up when clicked, and the bottom has five buttons with crescent moon shapes that flip between two different orientations. Pick up the hoe leaning on the drawers. On the left, there's a framed picture with colored corners above a patch of dark-colored bricks.
Turn right to find a spear bolted to the wall, a chest with color-changing shape buttons, a pedestal with a diamond-shaped indentation and a pot full of water with crescent shapes marked on its rim.
Turn right to find a pair of double doors without any handles. There appears to be a lever slot beside, but no lever at all.
Turn right. Part of the wall is boarded up with colorful nails. There's a pedestal with a club suit carving. And the dirt pit on the right is surrounded by eggs wearing red and black hats, one of which is looking at the worm in the corner.
Stripes
Use the clue from the colored nails to unlock the top drawer.
The pink, yellow, blue, black nails are on the middle, top, bottom, middle planks.
Set the stripes on the buttons accordingly and open the drawer to find a club key.
Five moons
Use the clue from the pot of water to unlock the bottom drawer.
Based on the clue on the pot you need to flip the 1st, 2nd, 5th buttons on the bottom drawer.
Do so and then open it to find a lever handle.
Place the handle in the lever slot and shift it to open the double doors.
Surprise, there's another pair of doors behind it! These have moon and star-shaped holes, and you can pick up a large ladle from the floor.
Box
Use the clues from the pit and the framed picture to unlock the chest.
The circle, square, hexagon, octagon shapes match the hats of the eggs in the lower-right, upper-left, upper-right, lower-left.
The corresponding corners of the picture frame are green, blue, brown, pink, so click the buttons 2, 3, 0, 1 times.
Then open the chest to find a seed with a wavy pattern as well as a grid clue showing various weapons.
Field
Follow the instructions from the framed picture to do something with the dirt pit.
Use the hoe to dig up the dirt, and take the purple box it reveals.
Then place the seed in the hole and use the hoe to cover it back up.
Then fill the ladle in the pot and then use it to water the dirt.
A purple plant grows out and blooms open to reveal a red diamond piece!
Place the diamond piece in the diamond pedestal, and an egg rises up in a cup to give you a moon piece!
After taking the piece, the egg just jumps up and down when you click it.
Unlock
Use the club key to open the purple box and get a club piece.
Place the club piece into the club pedestal, and an egg rises up in a cup to give you a star piece.
Night / Exploration 2
Place both pieces into the double doors to open them, and you find yourself in another room!
The left chest here has three buttons with pictures of weapons, while the right just has a keyhole. (Also, you can faintly see something in between but it's not important yet.)
Turn right to face a green spade pedestal surrounded on both sides by smaller moon and star platforms holding egg people, where the one on the right has a bow. There's also a raised bit of floor here but you can't do anything with it.
Turn right to face the doorway back. On the right, a brown panel has four sliders of different shapes.
Turn right to face a green heart pedestal. Various shapes hang from the top left. On the right, there's a chest of drawers, the top having four buttons marked with card suits that cycle between line and dot patterns, and the bottom having four colored buttons that fill up from the bottom when clicked. And on top of that, there's a golden cup with a tiny red ball inside.
Drink
You still have the ladle, so fill it in the pot again and use it to fill the cup. This makes the ball expand into a heart piece!
Place the heart piece into the heart pedestal, and the egg that appears gives you a wand with a crown symbol at the end of its handle.
Suits
Use the clue from the card suit pedestals to unlock the top drawer in the second room.
The spade, heart, diamond, club pedestals have two lines, crossed lines, a square, and one line on them.
Click the buttons 3, 2, 0, 1 times and then open the drawer to find a spanner.
Unbolt
Use the spanner to remove the spear from the wall near the diamond pedestal.
Armed
Give the spear to the egg on the moon platform, who uses it to lift the hidden trapdoor in the floor.
Looking inside, you find an (actual) arrow on top of a grid clue with an arrow (symbol).
Give the arrow to the egg on the star pedestal, who shoots it across the room.
The shapes hanging high are now dangling on single threads, and the black spade piece has dropped on the floor.
Place the spade piece into the spade pedestal to release King Egg. Well, he's not so much of a king after you take his crown.
Heights
Use the clue from the now-dangling black pieces to unlock the panel beside the door.
From bottom to top, the pieces are the egg, pot, candle, bowl.
Click the sliders (from left to right) 2, 0, 3, 1 times to set them accordingly, then open the panel to find a pickaxe.
Smash / Unbolt 2
Use the pickaxe to remove the bricks in the first room, revealing a rope on top of a metal panel with bolts at its corners.
Use the spanner to remove the bolted panel you just found, then take the unlit candle.
Blocks
Use the clue from the removed bricks to unlock the bottom drawer in the second room.
There are two of each brick color except for three of yellow, so click the buttons (from left to right) 1, 2, 1, 1 times, then open the drawer to find another switch handle.
Aggressive
Use the clues from the trapdoor (in the second room) and the chest (in the first room) to unlock the left chest in the second room.
The squares indicated by the trapdoor clue (other than the egg) show an arrow, spears, spears, an arrow and a bow.
Click the RCCRL buttons on the chest and open it to find a crowbar.
Pry
Use the crowbar to remove the planks in the first room (near the club pedestal).
This reveals two weird rectangular holes with deeper hexagonal holes inside and triangular markings around.
Switch
Place the switch handle into the weird grooves, which makes a crown pedestal appear!
The pedestal has four triangular buttons on its front.
Tipped
Use the triangle clue where you just placed the switch handle to unlock the crown pedestal.
The triangles point:
Left(1) Up(0)
Down(2) Right(3)
so click the buttons that many times and open the pedestal to find a large pin with a ring-shaped handle.
Royalty
Now that we know which egg is the real king (the one on the crown pedestal), give him the crown and wand, and he pulls out a crown key from his bowl.
Use that key to unlock the right chest and find a big yellow button.
Push that button to make the wall open up!
Descend / Exploration 3
This room has a well with a lit brazier nearby. The hole on the rim of the well suggests what you need to do.
Insert the pin into the wall of the well, then tie the rope to it and descend. Hmm, it's completely dark down there.
Light the candle on the brazier, then bring it down and use it on the darkness.
A four-digit panel at the bottom is marked with a crown!
Kingdom
Use the clue from the eggs to unlock the panel at the bottom of the well.
The two eggs closest to the king (left and right) jump 2 and 4 times when clicked.
The remaining eggs nearest to those two jump 3 and 2 times.
So click the buttons
2 4
3 2
times, then open the panel to find a round handle. Turn it to escape!
The Collector
Background
There are two earlier versions of this game from 2009 and 2013. I could not find them online, just some screenshots on Gotmail's website (https://www.gotmail.jp/contents/?p=2052, scroll down) and a video walkthrough for the 2013 version on Youtube (Youtube. In the new version, some of the puzzles have been simplified a bit, but the graphics are much more polished. It's interesting to see in one and the same game how the style has changed over the years.
Intro
You can read an English translation of the 2013 game's intro and outro texts in the video walkthrough above. Here's the intro:
I'm your average businessman working for a trading company. Today I happen to be working overtime alone. All of a sudden, the office phone rang. When I piecked up the receiver, to my surprise it was the president.
"It's urgent, could you bring over a 'secret'? ... you'll understand if you go to my office." This is all he said before hanging up. Whe me? What secret? Questions swirled around inside my head. Even so, it's an order from the president. I have to do it.
Here's kktkkr's summary translation of the 2020 game's intro:
As an ordinary salaryman at a trading company, you were working overtime alone when the phone rang. The director has brought a secret and needs you to come to his office right away, or else.
Despite your various doubts, you have no choice but to go.
TAKE CARE:
You can put the game into an unwinnable state by "using" the cellphone before activating its app. So click on the cell phone before doing anything else with it!
Thanks to kktkkr for finding this bug.
Exploration
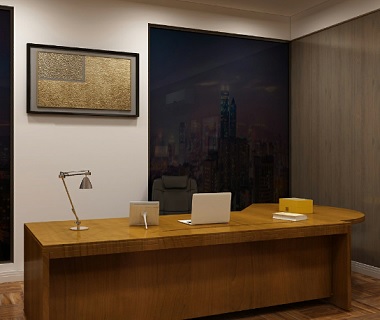
DESK view (where you start off):
Click to move behind the desk. On the chair is
- a red-brown box with 18 buttons, arranged in 3 rows.
On the desk:
- a yellow box
containing some sheet music and a number clue,
- a book with a clue (a picture of a cell phone to be used with a bar code),
- a laptop, which is inactive,
- a picture.
Take it and turn it around to reveal a date.
On the right side of the desk are three drawers:
- The top drawer is locked.
- the middle one contains a blue book with a number lock and the word "BOOK" written on it,
- the bottom one contains a red-and-white sheet.
Behind the desk hangs a picture
hiding a wall safe with a keyhole.
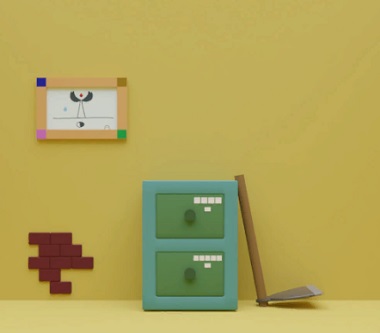
Turn right to view the DOOR. Beside it is a red panel with a card slot a six number lock.
Left of the door, there's a sideboard with three doors.
- The right one can be opened. Take the egg fossil from it.
- The left one has a lock on it, fastened with screws.
Above the sideboard is an air conditioner.
On the same wall sits a small grey panel with two buttons (arrows pointing up and down).
Does it control the air conditioner? But the number on the display doesn't change when you press the arrow buttons. What can it be for?
In the SITTING AREA, zoom in to find long pointer in plain view.
Facing the WINDOWS, there is a picture and a yellow panel mounted on the wall. Zoom in to the panel to see it has a switch and a hole.
The windows' blinds are up;
if you pull the right one down, a bar code is revealed and a crank falls out; take it.
Puzzles
18 buttons
Open the 18 button box using clues from the desk area.
Use the two clues from the yellow box and the red-and-white sheet from the bottom drawer.
Combine the sheet music and the red sheet. The musical notes are in fact holes, and the red-and-white sheet shines through them.
The red notes form two numbers with a dot between them.
The clue reads 9 · 1.
The other clue in the yellow box shows you how to translate Arabic numerals into Roman numerals. Use that on the box with dots.
Don't forget the dot between the two numbers!
Set the buttons on the box so they form a red IX·I:
x x · x · x

x · x · x x

x x · x · x
You find a leather belt.
BOOK
You don't need any clues outside of the book itself to solve this puzzle.
You are to represent the word BOOK by four digits plus a "k", which is already there.
So obviously the last two digits are 00, which gives you _ 0 0 k. That leaves two digits for the letter B.
Look only at the shape of the letter B. How could you draw it using two digits?
The vertical line of the B represents a 1, the two round lines form a 3. So enter: 1300. You find a graph.
Arrows
Use the clue from the blue book in the desk on the grey panel near the air conditioner.
Look whether the graph is rising or descending when reaching the dots.
It goes UP - UP - DOWN. That's how to press the buttons on the panel.
Look at the air conditioner: a small red object is sticking out from it now, but how can you reach it?
Use the pointer from the sitting area.
Top drawer
Unlock the top drawer using the red key from the air conditioner.
You find a USB drive.
Yellow panel
Open it using the crank that falls from the blinds in the WINDOWS view.
Nothing happens? Step back and look again!
In fact, step back twice. You will now see that one of the seats has moved, yielding access to a white trapdoor.
Trapdoor
You can only access the trapdoor from the WINDOWS view, not from the SITTING AREA view, although it's better visible from there.
The trapdoor isn't locked, but the cover is heavy. You need a kind of handle to lift it.
Use the belt from the 18 button box.
Inside, there is a portable lockbox.
Lockbox
Use the clue from the picture on the desk to unlock it.
You only need the first four numbers. So enter "1983" to find a golden key.
Wall safe
Use the golden key from the lockbox to unlock the safe behind the golden picture. You find a screwdriver and a cell phone.
Click the cell phone to activate its app before using it!
Bar code
Read the barcode on the blinds using the cell phone from the wall safe.
In case you didn't activate the cell phone app before using the phone with the barcode, here it is: TIEAR.
Laptop
Use the USB drive from the top drawer to activate the laptop.
Use the password you got from the bar code on the blinds (see previous set of hints).
The screen now shows an arrangement of white flowers.
Sideboard
Unlock the left part of the sideboard using the screwdriver from the wall safe.
Okay, you can remove the metal plate that was fixed with the screws, but the door is still locked. You can turn the lock in two directions by two arrow-shaped buttons, but in which order?
Step back and take a close look.
The metal plate has fallen on the floor. Take it to find the missing clue.
Use the sequence R - R - L - R to open the sideboard.
Inside, move the vase to reveal a chip card.
I was not able to open the middle part of the sideboard. Was anyone?
Exit
Use the chip card from the sideboard to activate the red panel by the door.
Use the clue from the laptop to unlock the door.
The flowers may appear to be randomly strewn about the screen, but there's an order.
They are arranged in rows.
Just count the flowers in each row. You get 6 digits.
The code is 143526.
As soon as you open the door, the fossil begins to glow. Is it magic?
Outro
Here's the outro from the earlier game version:
The president's secret is an egg fossil... Giggling nervously, I was shocked when I heard all the details. This egg fossil found recently in Africa is a hundred times the size of a chicken egg. He sold it off at an auction in London.
It seems the president's office had a bunch of anti-theft mechanisms installed, but more importantly, just who is this man, who frequents internationally famous auctions... He's not just some ordinary company president, that's for sure...
My interest peaked, I sneak back into the president's office at my discretion and conduct investigations.
And here's kktkkr's summary for the 2020 game:
The director's secret was an egg fossil! But the truth was more surprising than comedic.
This fossil as large as 100 chicken eggs was found in Africa, and he won it at a London auction, which is why he guarded it with so many puzzles. But the director goes to even more world-famous auctions regularly.
Amazed by this director's true nature, you sneak in again to investigate.
Thanks for your help, kktkkr!
Sorry - something went wrong with my link to the video walkthrough for the 2013 Collector game. So here it is again: https://www.youtube.com/watch?v=nBmqiO10-Ug
Update