
 Another escape Wednesday is here!
Very retro Ariyoshi's game is quite short but fun, with refreshing approach to the genre. TomoLaSiDo locked you in their room on the day with special calendar date and you need to gather several outlets to escape. Next stop on your adventurous journey with Pixel Kobo is in the country in the middle of green meadows and fields, and finally, lucky us, we get a new Nicolet, awesome, funny and witty.
Have a good time and enjoy
To play short Ariyoshi's game, click the first button under the image of a couch and you're in. Big pixels style can be a bit confusing at the beginning but the room where you're locked is small, with just a few pieces of furniture, and you get used to the graphics soon. Otherwise it's standard escape game with common puzzles - can you escape?
The cursor isn't changing, no save button, one ending.
P.S. Let me remind you of excellent Pixel Room by Kotorinosu. For those who haven't played this gem yet - try to not get discouraged by the graphics. This game worth playing. Also, when you've finished click the "HOME" button on the final screen which will take you to the new screen with an extra game! If not, try another browser - I remember that there were problems with the extra game in some browsers and don't know if they persist.
TomoLaSiDo's a bit psychedellic room hides eleven outlets - seems like quite a high number, right? Especially after you open almost everything what can be opened and you still have only three of those in your inventory. Well, they all are in the room, really, but remember that at one place can be stored several - and also remember that you don't need to get them, your main task is the key.
The cursor isn't changing, no save button, one ending.

The cursor isn't changing, autosave, one ending.
With Nicoletyou go to a room where is celebrated Doll's Day. A platform covered with a red carpet displays a set of dolls but after you move nearer dolls suddenly come alive and flee in different directions. Great. The celebrations is ruined. Unless you find (or rescue) all the escapers - not real dolls but Nicolet's cute animals which play them - and also find items which 'dolls' request (some of them). And solve may clever and intuitive puzzles on your way. Another beautiful and highly entertaining game, enjoy!
The cursor isn't changing, autosave, one ending.
P.S. Bonus game by inspired by the same festival is here: Hinamatsuri. Lovely and silly. Don't forget to read poetic descriptions of items in your inventory.
We love escape games, and our readers love talking about them and sharing hints! How about you? Let us know what you think, ask for clues, or help out other players in the comments below.


these look awesome. especially Nicolet. Can't wait for these.
It seems that the site that hosts this first game is an escape game maker, and the cool/weird games there are user-submitted. If you speak Japanese and have a simple escape game idea, perhaps you should try their app.
room0
(Quick overview of the menu options: Save, Quit, Load, Info & Comments, Hint (only works in app), Cancel.)
This game doesn't have a storyline, but the item descriptions suggest that you somehow managed to lock yourself in your own escape room.
Exploration
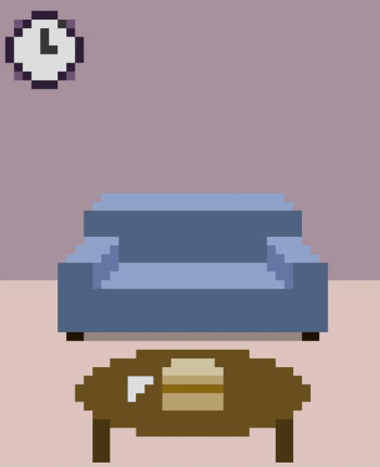
The first screen has a stopped wall clock, a couch and a table with a drawing piece next to what looks like a burger but is actually a wooden box you can zoom in on.
Click the right side of the wooden box to find a tiny hole.
Click under the couch to find a needle.
Turn right. Both of the drawers are locked, but the bottom one also has a three-digit panel. You can open the curtains and look out of the window at another house, where the game tells you about something on its roof that you can't see very well.
Turn right to face a television on top of a cupboard with three compartments. The left and right ones have bird motifs and close shortly after they open, whereas the middle one appears to be just locked. In the background, there's a picture frame with only part of the picture present.
Turn right to face the locked door. The shiny-looking part of the potted plant is actually a drawing piece on the leaves.
Pinhole
Use the needle on the hole in the right side of the wooden box, then click it until the box opens and you get the small key inside.
Use this key to unlock the top drawer on the screen with the curtains. You'll need to click exactly on the keyhole.
Then open the drawer to find a pair of binoculars.
Avian
Look out the window and use the binoculars on the distant roof to take a closer look at the birds.
Then use that clue to unlock the cupboard under the TV.
From left to right, the birds face RLLRL.
So open the LRRLR doors (not too fast; you should wait for each door to close before clicking the next), and the middle cupboard should spring open. Look in it to find a remote control.
Display
Use the remote to turn on the TV, which shows three large colored circles.
Bits
Place both drawing pieces into the picture frame to complete the frame.
Then use the clues from it and the TV to unlock the bottom drawer under the window.
There are 6 yellow, 3 pink and 3 blue dots on the picture.
Enter 633 into the drawer, then open it to find a golden key.
Use the key to unlock the door and escape!
Escape Challenge 104: Room with Leap Year Commemorative Outlet
The decoration of this room evokes cycles, the number 4, and the steady passing of time. A great way to celebrate a leap year!
Exploration
Look at the table and the flier on it, which has one particularly interesting line: "Collect 5 and we'll give you 6". Pick up the chair for some reason, then look under the potted plant beside to find a power outlet that shifts slightly when you click its edges.
Turn right to face a chest of drawers. The top drawer has two buttons one above the other, the middle has three color buttons with a weird gap between the left two, and the bottom has a grid of buttons that turn yellow (except for the one that's already red). There's also an empty bin here and a picture frame with lots of arrows drawn on.
Turn right to face the locked door. Under the wall clock, there's a big machine with three digit buttons and five rectangular slots. On the right, there's a three-digit wall box. (You can also look under the table to find nothing.)
Turn right to face a table with two boxes on it. The taller left box has a glass case covering a blue-and-white capsule, while the right box is a normal-looking calendar for February 2020. On the right, you see a power outlet near the ceiling. (You can also look under the table to find nothing.)
Enter the corridor sitting to the toilet, where you can sit down, look right, look up and look left to find a drawing of someone listening to electro.
Glass
The glass case on the table has a narrow slot, but that doesn't help you manipulate the capsule inside. You'll need a different approach.
Drag the glass cover upwards, leave it floating, and pick up the capsule. As you already know, it contains a key piece.
Grid
Find the secret of the calendar box, and use it to unlock the bottom drawer.
Clicking on the day 29 (which is the leap day, also the day indicated on the flier) makes it flash red, and then some squares flash blue in the shape of an arrow.
As the arrow indicates, click the space to the right of the number 15 to make the number 13 flash yellow.
Since 13 is two up and two left from 29, click the middle button on the grid, then open the drawer to find a key piece and power outlet.
Colors
Use a clue from the flier to unlock the middle drawer.
On the bottom of the flier (or the power outlet item if you're sharp-eyed enough), the colored stripes are blue, yellow, black, green, red.
(This is also a reference to the Olympic logo, since the modern Olympics are held in leap years.)
Since black is already represented by the gap between the buttons, both blue and yellow must be on the first button, while green and red are represented by the remaining buttons.
Click the buttons 2, 6, 4 times and open the drawer to find another key piece and power outlet.
Loops
Use another clue from the flier to unlock the top drawer.
The date on the flier is written with digits that each contain a loop, and the loops in 2 and 9 are higher than those in 0.
So push the UDUDUUU buttons on the drawer and open it to find a key piece.
Directions
Use the clue from the framed picture to unlock the outlet behind the potted plant.
Each arrow has a different thickness, and from thick to thin they point UUDLRR.
Click those edges of the power outlet to remove it and reveal a key piece and some weird wiring.
Digital
Use the clue from the gold wiring to unlock the wall box.
Looking at it sideways, the wiring (and power outlet) forms the code 384.
Enter that into the box and open it to find a power outlet and key piece.
You can now leave, but there's more you can do in the room!
Climb
Place the chair to the right of the long table, then click the power outlet (item) near the ceiling to climb up and take it.
Set
You can place the power outlet you picked up into a slot on the big machine.
But in fact, you can also select the "collectible" outlets and place them into the machine!
Once you've filled up all five spots, the code 229 appears on the buttons.
So enter that into the machine and push the button, which raises the shutter to reveal 6 power outlets.
Green
Hey, that wasn't the deal! You were supposed to keep the first five.
Look around on the machine for a way to bring the shutter back.
All that remains visible on the shutter is three lines at the top with varying thicknesses.
The hands on the clock with those thicknesses point to the 6, 4, 2 o'clock positions.
So enter 642 in the machine to bring the shutter back down, and then click it to reclaim the first 5 power outlets.
Now you can just open the door and leave with all your items!
Item list
6 key pieces:
Top left: in top drawer
Top middle: in middle drawer
Top right: in bottom drawer
Bottom left: in wall box
Bottom middle: in glass case
Bottom right: behind potted plant
11 outlets:
In bottom drawer
In middle drawer
Behind potted plant
In wall box
Near ceiling above long table
6 from wall machine, after claiming previous 5.
Thanks again KK. the first 2 games were awesome. looking forward to the last 2.
Reoda: Chapter 5
Chapter-05: England
Your search for the SD cards brings you to the south of England, near Stonehenge. It's not the actual landmark, just a replica that seems to be recently made.
Exploration 1 (East)
Before we get to the actual stone circle, let's take a look around.
Turn left to find a pile of rocks, and click it to go there. Look down to find a trapdoor hiding a digital keypad.
Look up, turn right and click twice to face the pile of rocks at the other end. Looking down, you see a particularly small rock that hides a switch you can turn.
Look up, turn left and click once to return to your starting position. Turning left, you see an empty grassy landscape all the way to the horizon.
Turn around to face Stonehenge, and go forward. Now that you can see the compass rose in the middle, you can tell that you're standing on the east side.
That's not all! Look down to find a dark-colored stone. We'll come back to it later.
Look up, and turn right (nothing interesting), and turn right again. From here, you can look up to find an asterisk in the top of the arch. Look back down.
Turn right to find a triangle mark carved into the pillar.
Turn right and step into the middle of the circle, where the game autosaves.
Exploration 2 (North)
(Following the previous steps, you should now be standing in the middle of Stonehenge.)
Turn right. Before you go anywhere, look down to find a weird double door built into the ground surrounded by six symbol buttons.
Look up and click to walk towards the arch. Turn right to find a triangle. Turning right, right and right again reveals nothing.
You can't walk out this way, but you can still look up to find another triangular marking on the top of the arch.
Exploration 3 (West)
(Turn around and click your way to the center of Stonehenge.)
Turn right and go forward. Similar to the previous, there's a symbol at the top of the arch and a triangle on the right side, but you also see a rectangular panel on the left side of the arch.
Exploration 4 (South)
(Make your way back to the center.)
Turn right and go forward. There's also a symbol at the top of the arch, but this time the triangle is on the left side.
Second
Remember the switch hidden under a rock on the east side? As the marking on it suggests, turning it releases the dark rock on the east path.
Move that rock to find a plaque with a message that hides a two-button panel with a colorful clue.
News
Use the clue under the dark rock on the east side to unlock the doors in the middle of Stonehenge.
Each letter is the initial of the name of a different direction, and each arch has a symbol marked at its top:
East: asterisk
North: triangle
West: five-pointed star
South: octothorpe
Thus, the symbols on the WESEENEWS sides are
★∗#∗∗△∗★#
so click those buttons and then the doors to open them, revealing a red button.
Push that button to get launched into the sky!
In the north direction, you see something red and brown on the arch.
Turn right to face east (green) and again for south (blue) and once more for west (yellow).
Once you're done admiring the stones, face north again and look down, open the doors and push the red button to descend.
Colors
Use a color clue you just saw to unlock the two-button panel under the rock on the east side.
The RGYRBGB colors appear on the NEWNSES arches, which have triangles on them facing RLRRLLL.
After pushing those buttons, the panel slides aside to reveal a switch labeled W. What does it control?
After turning the switch, check the west arch. You can now open its compartment to find another letter clue.
Pairs
Use the clue in the west arch to unlock the keypad outside (exit from the east side and turn right).
From the raised platform you get a view of the piles of rocks around Stonehenge, and those on the NW SE SW NW NE SW sides are shaped like the digits 584574.
Enter that in the keypad and remove it to find a round object.
Now if you try to use the elevator again you'll find that the object fits on top of the button instead.
The elevator rises along with the stones on the north path, allowing you to walk over to the north arch and move the wooden lid on it, revealing the microSD card!
Ending
(If for some reason you choose to go Back on the ending screen, the game places you back at the bottom of the elevator and gives you the handle back.)
When you try to verify this card using the card reader that you conveniently were wearing all along, it just projects some lines into the air. Hmm?
Oh right, Dr. Reoda has split the code up so this is only part of it. Checking your tracker again, you see two others in America and Italy. Italy is closer, so we're going there!
Actually, Tika asks you to fly her there, to which you respond that she's just bossing you around. It's just business, she says.
i'm confused on Ryoda.
i am supposed to find a 2 button rock hidden underneath but i don't see it.
Please help.
It's the same panel you discover in "Second":
There's a darkened rock along the east path, visible from the center looking east.
But you can only interact with it while standing over it facing west, and then looking down.
Move that rock and then the stone plate with letters to get to the panel.
Thanks for explaining that to me, KK. I guess i never paid attention to that. Anyway looking forward to the last one.
Thanks for reminding us about Pixel Room by Kotorinosu. Great fun to replay it. One of my favorites of all time.
Mine too.
Nicolet games rule. looking forward to it. :)
I haven't checked this very thoroughly but I hope it works.
Hinamatsuri
I can't recognize all the details, but you might want to do some reading on Hinamatsuri to make sense of the game.
Exploration
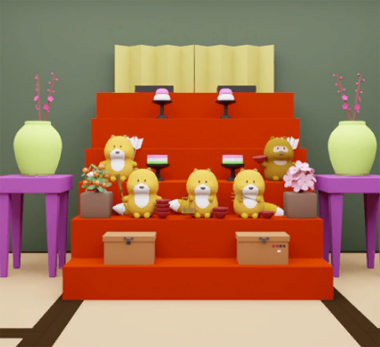
Surprisingly, the best place to start is the right pink table, which has fifteen white symbols marking the arrangement that the dolls need to be in. Comparing this with the red stair-shaped platform you find that only the bottom two rows are intact. Three foxes stand beside stacks of bowls (cups?), one fox on the left asks for a brush, and one tanuki on the right holds a bowl and asks for water (wine?). At the bottom, one locked box has a keyhole while the other has four picture buttons with different shapes and colors. Finally, check the table on the left to find what looks like a pen stuck in the pot.
Turn right to face four small tables, each with a sakuramochi ball and a pair of chopsticks.
Turn right to face locked double doors. If you look closely, you can find a sakura panel on the floor.
Turn right to face another pair of double doors, but they're linked together with a piece of wood with screws. You can pick up some kind of orange tube on the floor.
Red and Black
Use a clue from the tables to unlock the right box at the bottom of the display platform.
The red square and circle followed by the black square and circle match the plates that are 1st, 3rd, 4th, 2nd from the left.
Click the buttons 3, 1, 0, 2 times to match the condiments, then open the box and take the cup of water.
Give it to the tanuki who rewards you with a key.
Use the key to unlock the left box and find a horseshoe magnet on a string.
Rod
Use the magnet to pick up the pen from the pot. It's actually a screwdriver head!
Which means you can attach the orange tube (actually a handle) to it to make a screwdriver.
Unscrew the opaque double doors to continue.
Exploration 2
Oh no, somebody appears to be tied up in this Japanese room! To the left, there's a puzzling scroll over a light blue urn over two trays. Both trays have matcha but only one has mochi.
To the right of the tanuki is a cupboard whose left compartment has a box nailed shut and right compartment contains a tanuki who runs into the oxcart. Wait, what?
Take the scissors it leaves behind and look at the top of the cupboard to find a pot with a leaf tile on top of some flowers.
Turn right to face a wall with a square bit protruding from it on the left and a large chest of drawers on the right. There's a four-color drawer above a four-arrow drawer where each arrow is white and pink with a colored border beside. The remaining drawers all have keyholes of different shapes. You also see a tanuki trapped between the drawers and the right wall.
Turn right to face the way back, as well as the carter who gives you a clear picture of what you're trying to get.
Turn right again to face more double doors. This set is guarded by a pair of tanukis who perform a weird song and dance and then ask you for some rod-shaped items.
Rescue 1
Use the scissors to cut the ropes and free a tanuki.
In case you blinked during the animation: he waved a square key at you on the way out.
Use that square key to open the top drawer and find a pair of sticks.
Four colors
Use a clue from the scroll to unlock the four-color drawer.
The stripes at the bottom are blue, yellow, green, pink, so click the buttons 4, 2, 1, 3 times and open the drawer to find a paper bag with a dotted line on it.
Use the scissors to cut the bag open and find that it contains a brush.
Bring the brush back to the first room and give it to the fox on the left, who rewards you with a metal pipe.
Rescue 2
Attach the metal pipe (actually a handle) to the wall beside the tall chest of drawers, and you automatically turn it to slide the drawers aside, revealing a panel with two picture buttons under a row of five lights.
Dialogue
Use the clue from the door guards to unlock the wall panel.
(You can click them again to review that clue.)
The bubbles appear on the RLLRL sides (and the pictures match too), so click those buttons and open the panel to find a flute.
Collection 1
Give the sticks (actually drumsticks) and the flute to the door guards, who load onto the cart, which drives into the first room and releases all five of the dolls onto the platform!
During the animation, you get a pentagon key. Also, the doll at the top right is missing his fan.
Use the pentagon key to unlock the middle drawer and find a shovel.
Exploration 3
Since you've removed the door guards, you can now exit from the second room.
Two large goldfish are swimming in the pond, and there appears to be a fox trapped in a dirt pile beside. In the background, you see a box attached to the fence but it's nailed shut.
Click the arrow in the speech bubble to find some bamboo. One of the plants is gently glowing. At the top right, you see a fox trapped high out of reach.
Back out to the pond view, and you'll notice that there's another arrow at the bottom of the screen.
Use it to turn left and view the corridor. You can remove the long wooden pole blocking the double doors, as well as open the wall box to find three square holes marked with patterns.
Those double doors open back into the first room!
Rescue 3
Use the shovel to dig out the fox in the dirt pile, and you also find a cloud tile (?) under it.
Rescue 4
Use the pole to bring down the fox on the bamboo.
Patterned
Use the other clue from the scroll to unlock the panel in the corridor.
The orange dots, pink stripes and green stripes appear on the trees in areas shaped like the leaf, cloud, sakura tiles. (Sorry I couldn't make this any more descriptive, I don't really know trees.)
A blue bowl appears with a gold fish on top and some pellets inside.
Feed 2 / Collection 2
Use the blue bowl on the pond to feed the fish. A third fish appears with a fox on its back!
Those three take their position on the display, and you get a trapezoidal key.
Use that key to unlock the second drawer from the bottom, which contains a crowbar.
Pry
Use the crowbar to open the box in the (low cupboard in the) second room, which contains the fan.
Also use it to uncover the box in the yard, which has a lock with three labeled rectangles that fill up with brown from bottom up.
Give the fan to the tanuki to get a box of colorful balls.
Props
Use the clue from the display (and pink table) to unlock the box in the yard.
The symbols on the box represent the objects held by the bottom row of dolls.
Those dolls are also standing next to stacks of brown bowls.
Counting the bowls, you find that there are 4, 2, 1 of them, so click the buttons 3, 1, 0 times and open the box to find a green button.
Push the button to make a turtle swim up. It asks for a box of colorful balls.
So give the item you have to it and you get a moon box in return.
Opening the box, you find sticks of purple incense and an instruction on how to use them.
Arrow
Use the clue from the meals in the first room to unlock the second drawer (on the left) in the second room.
Looking at the places with red, black, aqua, indigo chopsticks, you find that their chopstick stands are shaped like arrows pointing left, right, down, right.
Click the buttons 2, 0, 3, 0 times and open the drawer to find a matchbox.
Flame
Use the moon box on the moon urn to place a stick of incense there.
Then examine the matchbox and click it to light a match.
This releases a kingly fox who floats to the display platform and gives you a circle key.
Use the key to unlock the second drawer (on the right) in the second room.
It contains a piece of sakuramochi on top of some drawings in shapes.
Place the mochi on the right tray in the second room, which lifts the scroll to reveal a panel with three shape buttons that cycle through different numbers of flowers.
Flowers
Use clues throughout the game to unlock the panel you found behind the scroll.
The square, hexagon, circle shapes appear in the drawer around the ox, pot, turtle.
Looking at those things, you find that they are decorated with 2, 3, 1 flowers, so click the buttons 1, 2, 0 times and open the panel to find an axe.
Rescue 5
Use the axe on the glowing bamboo to release a queen fox who floats into place and gives you a hexagon key.
She also asks for two lanterns.
Use the key to unlock the bottom drawer in the second room, which contains a locked box with a grid of symbols and animal buttons.
Sort
Use the clue from the display platform to unlock the box in the drawer you just opened.
The tanukis are (almost all) the ones holding the musical instruments, which means you only need to click the 3rd and 4th buttons.
Open the box to find two lanterns.
Give them to the queen to end the game!
Wait, you aren't Japanese? Shocking.
Wikipedia (and Wiktionary, and the Japanese editions of those sites) has been really helpful for covering up the gaps.
Which I had to do a lot of for Monthly Escape (WE N°150), but Nicolet has a rather creative interpretation for this game.
smal problem on Nicolet
i think t was wen it said i'd see something glowing. after tat it says to ack out to see a down arrow. the only thing the down arrow does is take me back to the previous room but nothing is there that t asks me to collect.
Ah, I forgot a word there.
On the pond view, there's both the left arrow in the speech bubble and the left arrow where you'd normally find it, next to the down arrow.
Hello there, due to different problems, I will post the WE of this week on Sunday. Thank you for your understanding and take care of yourself. The situation is dramatic here in France.
No worries! Take care of yourself, that's what's most important right now! Thank you for the update!
kk, actually i thik i saw the problem.
seems like you said "down" when i found the part i was to go to, it was "left" but anyway i figured It out.
thanks again as usual for your awesome walkthroughs. Hope you'll keep up the good work :)
hinamatsuri (Minoto)
Maybe it's already getting late in March, and fifteen dolls is just too many to deal with. This game may be for you!
Exploration
You start out in a traditional garden. The colors here are really low-contrast, but you still manage to and take a table (Japanese-style, which means it's low!) and a green toride (handle).
Go right to a tatami-carpeted room with a ninja standing next to an arrow that has oil paper wrapped around its tip.
Go right to a room. The chest of drawers is really weird, and the bottom two drawers are fake and the top drawer is missing three handles! There's also a ninja star on top that you can't reach. There's also an unlit candle on the floor as well as a scroll hanging on the wall, and you can faintly see some holes in front of the drawer and a pink toride under the scroll.
Go right to a screen that's almost completely dark except for a bright spot where you can see a bird holding some sort of thin string. (It's actually a bow.)
Blade
Place the table in front of the chest of drawers, and climb up to get the dirk.
(If you're wondering about the translation: shuriken literally means hand-hidden blade.)
Give it to the ninja, who tosses it a short distance before it's stopped by a fox that was hiding under the floor.
Pick up the peach flower that was next to the fox.
Plant
Return to the garden on the left, and place the flower onto the withered tree in the pot.
A monkey comes over to enjoy the floral display, sitting down with a cup of tea.
Use the cup on the bamboo sōzu/shishi-odoshi, which tips over and ejects a brush with ink on it.
Black
Apply the brush to the scroll, and a dragon appears, comes to life, and blows fire onto the candle.
Light the arrow on the candle, then bring it to the last screen and give it to the bird, who lights up the room.
You see a crying lady and a cloth that covers a three-layered cake with a white toride on it.
Stack
You can now place all three colored handles, but in what order?
Either by following the cake or by using your knowledge of hanami dango, place the pink handle in the top hole of the drawer, the white in the middle, and the green at the bottom.
Open the drawer to find a boy's doll.
Then use the doll on the lady to cheer her up!
(Don't get confused by the message "Two end". it's supposed to read Couple end, and the "one method of one" means you got the only ending.)
Update