
 Hello escapers! Your time is here!
Halloween is over - still we return twice to that night full of magic with Amajeto and Selfdefiant. Both lock you in a darkish room and both expect you to escape without fear. Not a big deal, the rooms are very little spooky. Sharp cut comes and suddenly you are cute little squirrel in Nicolet's game who sets off for an adventure in fresh green forest. The last Masa's game is a real challenge - you aren't supposed to overcome fear, but your own brain's laziness.
Have a good time and enjoy!
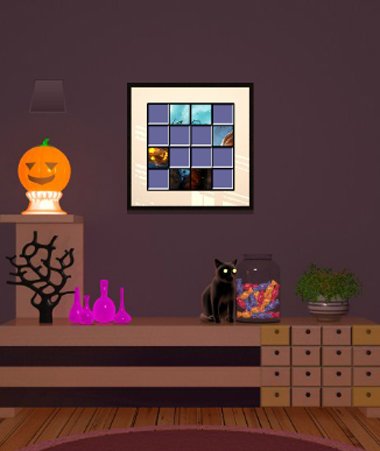
Amajeto's halloweenish room is (not surprisingly) decorated with pumpkins, bats, a skeleton (which seems a bit too real), and several birds and a cat (which seem stuffed or plastic). Otherwise it's good standard game with usual amout of puzzles - can you escape?
The cursor isn't changing, no save button, one ending.
Selfdefiant trapped you in a very dark room where the darkness is so thick that the light from merrily burning fire doesn't spread more than one or two meters away from it. No switch around. Luckily, your cursor behaves like a weak torch and so you are able to explore the room (tolerably), find items, and use them. There are two doors leading out of the room - behind which is your freedom?
The cursor is changing, autosave, one ending.
Clever and sweet game by Nicolet tells a story about a little squirell - I'm not absolutely sure about its squirellness so let's say about a little rodent - who goes to visit her grandmother (no, a red cap or a hungry wolf aren't involved in the script). Setting is beautiful, and you'll meet several cute and helpful animals, and need to solve many intuitive and quality puzzles on your way. Be prepared for quite a long journey as the granny's house is far!
The cursor is not changing, autosave, one ending.
The game is available for Android, iOS and on Steam. You may buy authors a coffee.
Masa's room seems quite difficult, however, cunning puzzles and operations pretend to be more complicated than they really are. At the beginning chose English version as some comments which game provides may be helpful, and during playing try to be observant to details. Thinking out of the box is important...but ovethinking can happen easily. Will you escape?
The cursor is not changing, autosave, one ending.
The game is available for Android too.
We love escape games, and our readers love talking about them and sharing hints! How about you? Let us know what you think, ask for clues, or help out other players in the comments below.


the games look cool this week. I think my favorites lately are Nicolet games. I think i'll like that the best.
Halloween is Coming
If you think about it, Halloween is always getting closer.
Exploration
The incomplete picture grid on your first screen this time appears above a low platform with a display of several things, ending in a grid of tiny drawers with the corner ones highlighted. Opening those four, you see different numbers of dots in them. There's also a shiny pumpkin/jack-o'-lantern on the left that lights up when you click it, illuminating the square tile hanging above. This also lets you zoom in on the lantern by clicking and holding, and also highlights four more of those tiny drawers in orange.
Turn right to find a couch, a table with a square tile next to some food, another jack-o'-lantern that you can zoom in on, and a row of orange and black icons on framed pictures. As you might expect by now,
you can click on the corners of the third picture to tilt it.
Turn right to face the locked door, a television screen with bats hanging above, and a skeleton sitting underneath a word on the wall. In addition to the crow and jack-o'-lantern he's holding, you can zoom in on him to see a square tile on his shoulder and a screw in the wall within the letter W.
Turn right to face the windows with a view of an alarmingly huge full moon. Four muffins wear witch hats between the crow and jack-o'-lantern, and there's a square tile resting on them. As for the five cupboard compartments, their locks have:
four dark red bars that grow vertically when clicked,
four gray digit buttons,
a grid of sixteen buttons that change from white to orange,
four symbol buttons,
and four orange letters.
Heights
Use the clue from the bats above the TV to unlock the left cupboard door.
The bats, from left to right, are 2nd, 1st, 4th, 3rd from the bottom, so click the bars 1, 0, 3, 2 times, then open the door. Inside, there's a square tile.
Grid
Use the clue from the tiny drawers on the first screen to unlock the middle cupboard door.
Only four drawers are highlighted in orange:
----

O--O

-O--

--O-
Click the buttons in those positions and open the door. Inside, there's another square tile.
Shapes
Use the clue from the jack-o'-lanterns to unlock the middle-right cupboard door.
Examining the lanterns closely, you find that each has different-shaped eyes, and each has a different number of dark spots marked just below the face (along the top of the base).
From 1 to 4 spots, the pumpkins have eyes that are triangular (up), triangular (down), diamond-shaped and circular.
So click the buttons 7, 3, 5, 1 times and open the door to find a square tile and remote control.
Screen
Use the remote to turn on the TV, which shows a row of rectangles with some of them colored orange.
Use it on the TV again to change the channel. Now some of the rectangles are gray instead.
Use it on the TV again. This clue shows a square above a sequence of digits.
Four letters
Use clues from the TV and the wall beneath to unlock the rightmost cupboard door.
The letters in Halloween are all orange, but since only the 4th to 7th boxes on screen are colored orange you should only look at the 4th to 7th letters, which spell out LOWE.
Enter that in the lock and open the door to find a screwdriver and square tile.
Screw
Use the screwdriver on the screw in the wall (under the TV), which makes the text flip over.
Four digits
Use the clues from the TV and the wall beneath (again) to unlock the leftmost cupboard door.
The letters (now upside-down) in the (new) positions indicated by the TV are shaped like digits that form the code 3077.
Enter that into the lock and open the door to find another square tile.
Square
Use the remaining clues from the TV and the tiny drawers to unlock the tilty candy picture.
The drawers with 3, 4, 3, 1, 2 dots appear in the upper-left, upper-right, upper-left, lower-right, lower-left corners.
Click the ⌜⌝ ⌜⌟ ⌞corners of the picture, which comes loose, then flip it over to find the last square tile.
Complete
Place all 10 square tiles into the grid on the first screen, which activates a randomized puzzle requiring you to rotate the tiles until they align.
Once you finish assembling the dramatic picture of pumpkins, it slides up to reveal a golden key. Use it to unlock the door and leave!
Hallowscream Room Escape
If it's any consolation, this may be the last time you see a spider for a while.
Exploration
Wave your really weak cursor light around the room (and use the changing cursor) to find a heart picture above the couch, and a skull on top of the bookshelf.
(The navigation arrows are also hidden in darkness, but they're intuitively placed at the bottom corners.)
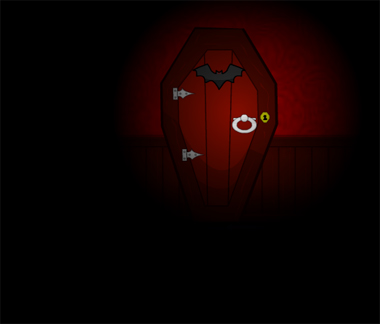
Go right to find a locked coffin-shaped door. The cupboard on the right has a four-digit lock, and you can take an unlit candle from the table on the left.
Go right to find a piano. The game helpfully labels and only lets you click seven keys, but mysteriously they don't produce any sound. A small pendulum clock on the right shows the wrong time.
Go right to find a lit fireplace. On top of it is a box with five sliders. (Light your candle on the fire to make things slightly easier to see.)
Go right to find a giant spider web with a spider in the middle. You can't do anything with the pots on the sides.
Go right to find another coffin-shaped door next to a comfy-looking couch you can't sit on. Take a fly from the web attached to the small table on the left.
Prey
Place the fly on the giant spider web, and the spider crawls towards it, leaving a silver key behind.
Use this key to unlock the door with the silver keyhole.
Exploration 2
Passing through the doorway, you find yourself facing it from the other side. This stone room has a shackle chained to the wall.
Go right to find four blank tombstones, one of which has a skull on it. (Or as the game tells you, three of them are missing skulls.) There's also some hanging vines, a conspicuous small table in the middle of the screen, and a scroll hidden behind the right tombstone.
(Click the scroll to read it.)
Lettered
Use the clue from the scroll to play the piano.
You only need the four darker letters in the middle.
Click the piano keys labeled G, E, A, D, and a skull appears on the keyboard.
Numbered
Use the clue from the clock to unlock the cupboard (beside the other coffin door).
In 24-hour time, 4:19 pm is 16:19.
Enter 1619 in the lock and open the cupboard to find a broom.
Reach
Use the broom on the skull on top of the bookshelf (on the first screen) to knock it to the ground where you can pick it up.
Sliders
Use the clue from the picture near the bookshelf to unlock the box above the fireplace.
The hearts on the picture appear at (roughly) four different heights, corresponding to the four possible positions of each slider on the box.
So click the sliders 2, 3, 0, 2, 1 times to set them accordingly, then open the box and take the skull inside.
Collection
Return to the tombstone room, and place the three skulls you got onto the empty stones.
A gold key appears on the middle table!
Use it to unlock the other coffin-shaped door, and go through it to end the game.
Thanks for the Hallowscream Room Escape walkthrough, kktkkr. How you determined the clock time
as 4:19 and not 4:20
is beyond me though..
When playing Flash games, I've noticed Google is has begun automatically blocking my Flash Player. Have to now change settings manually on most games. Google sure is trying to take the fun out of gaming with their apparent abhorrence of Flash.
The clock time is just
the text description when you click it.
Onward to the next walkthrough!
Trip
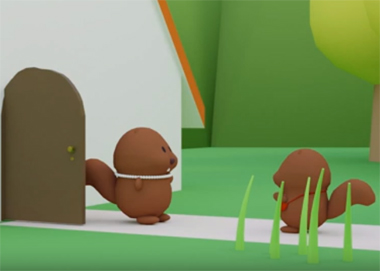
These animals look similar to the beavers from last time, but the game's description tells you that they/you are squirrels.
Exploration
After a short intro, you (the little squirrel) set out on the trip. The path immediately forks, and according to the signs there's a campsite on the left and flowers on the right.
Take the right path. It ends abruptly at a pair of posts (and a cart sign), but you can pick up a stick and look at the flowers on the right side.
Back out to the fork and go left instead. There's a giant spider web here but no spider. The left tree has four lines next to small icons, and on the right side you see a wooden crate containing a wooden box having four square color buttons with smaller square centers that don't change in color.
Border
Use the clue from the flowers to unlock the four-button box.
The flowers with green, black, yellow, blue centers are purple, red, white, yellow on their petals.
Click the buttons 1, 3, 0, 2 times, then open the box to find a crowbar.
Tear / Exploration 2
Use the stick to break the web.
Continuing down the path, you find a campsite with two red tents, in front of which a goat asks you for mushrooms. The sign on the right points to mushrooms ahead.
Enter the right tent, which is lit by a lantern on the right that you can't do anything with. You can still examine the box on the right which is nailed shut and the box on the left which has four square symbol buttons, but the square outline of each button is broken on a different side.
Going forward along the path, you find it cut short by a trench (or perhaps a river).
Pry
Use the crowbar to open the right box, which contains an unlit candle.
Light the candle on the campfire.
Icons
Use the clue from the tree with lines to unlock the left box in the right tent.
The squares with openings in the top, left, bottom, right sides surround the basket, watch, fishing, umbrella(?) icons.
Enter that in the box by clicking the buttons 0, 3, 1, 2 times, then open it to find an axe.
Bridge
Where the path ends beyond the campsite, use the axe to chop down the tree next to the chasm.
The only thing across it is an enclosure of mushrooms, guarded by a padlock with four picture buttons.
Landmarks
Use the clues from the signposts to unlock the padlock on the enclosure.
Each of the signpost planks has a different number of nails in it.
From 1 to 4 nails, they show the mushroom, flower, tent, cart.
So click the buttons in that order, then remove the lock, and now you can pick some mushrooms.
Fungi
Give the mushrooms to the goat, who rewards you with a box with a ladder on its label.
Unsurprisingly, the box contains a rope ladder.
Descend / Exploration 3
Return to the fork, take the path through the flowers and use the ladder on the posts at its end.
It hangs all the way to the bottom of the cliffside and you climb down easily.
You stand at a path leading to a junction. On the left, you see a wooden structure with three labeled plates, and three birds fly up from the branches of the nearby tree.
Go forward to the junction. The front path leads to a rectangular stone hill, but the cave entrance is blocked by a giant boulder.
The left path at the junction ends in another padlocked enclosure, but this one contains flowering grass and the padlock has different circled symbol buttons that change size when clicked. There's also a locked blue box on the left tree that has a keyhole on its handle.
Back out to the junction and take the right path, where you find two painters, one of them asking for a pencil. You can click the paintings to read them and take the square tile from the corner of the left one. To their right, there's a patch of flowers and a tree stump with a locked briefcase on it that has three colored digit buttons.
Sized
Use the clue from the left painting to unlock the padlock on the fence nearby.
(I can't be sure what the pictures are supposed to be, but here's what I'm calling them.)
On the painting, the can with the leaf label is small, the ones with the tree and rock are medium, and the one with the grass is large.
Click the buttons 2, 1, 1, 0 times, then open the padlock, and the fence swings open. Entering it, you find more flowering grass as well as a mole who asks you for a bracelet (or watch?).
Fetching
You've seen that bracelet before… when the goat was wearing it!
Backtrack to the fork, take the left path to the goat (who's now cooking stew), talk to it to get the bracelet, then backtrack to the fork again and take the right path to the mole.
After handing the bracelet in, the mole stashes it underground and rewards you with a nut.
Counting
Use the clue from the tree with birds to unlock the briefcase.
(You can always back out and zoom in on the tree again to review its clue.)
The black, yellow, blue birds fly up a total of 3, 4, 2 times.
Enter that into the lock and open the briefcase to find a small scythe, or rather a sickle.
Reap
Use the sickle on the nearby patches of grass to get both white flowers and red flowers.
Feed
Use the clues from the paintings to feed the birds.
The grass, leaf, tree symbols appear under the yellow, blue, black birds on the left painting, and those birds hold the nut, red flowers, white flowers on the right painting.
Place those items on the orange plates. The birds fly down to take/eat them, and leave behind a key.
Unlock
Use that key to unlock the blue box, which contains a pencil.
Give the pencil to the right painter, who rewards you by helping to push the boulder away.
Exploration 4
Enter the cave, and use the lit candle on the darkness to light it up.
Some yellow bars on the left hide something interesting, but to open them you need to figure out the panel beside with five lights and three colored buttons.
Following the tracks, you see a cart and a white square block with something in its top. Click on the cart again to take a closer look, and click it again… to take a ride!
(While you can see the way out from the cart ride, you can't get off except where you started.)
Colors
Use the clue from the cart ride to unlock the three-button panel beside the gate.
In order of appearance, the lit lamps are red, blue, yellow, red, blue.
So click the RLCRL buttons and push the big button to open the gate.
Exploration 5
After examining the tall pillar with symbols on it, zoom in on the pit at its base and click it to go down. (Mysteriously, this doesn't trap you and you can easily climb back up any time.)
Pick up the square tile from the tunnel, and go forward to face a treasure chest with four colored sliders. Here, there are paths to both the left and right.
Take the right path to find it blocked by bats (with colored symbols on their bodies and wearing some white things) and a worker who can't deal with them.
So back out and take the left path, which curves around to reach a squarish structure. The smaller pillar beside has four holes in its top.
Sliders
Use the clues from the pillar near the hole and from the bats to unlock the treasure chest.
The blue, yellow, red, gray colors appear on the star, diamond, moon, sun symbols on the bats, and those symbols are 3rd, 2nd, 4th, 1st from the top of the pillar.
However, the symbols on the bats are upside-down (because the bats are upside-down) and the lock has small notches at its top while the pillar has a groove at its bottom, which are both clues telling you to invert the answer.
This means the sliders (from left to right) have to be 3rd, 2nd, 4th, 1st from the bottom position, so click them 2, 1, 3, 0 times and open the chest.
Pretty treasure! Oh no, it's gone! You can still pick up the tile at the bottom of the chest though.
The bats are now hovering over the area at the end of the left path.
But since they're gone, you can now talk to the miner, who digs up yet another tile for your collection.
Jigsaw
Place all four tiles in the small pillar near the bats, making sure that the black markings on them line up.
Once you're done, another treasure chest appears with a spanner in it.
Turn / Exploration 6
Back out to the tracks and use the spanner on the white block.
Now that the tracks are switched, jump onto it and exit the cave!
You're now at a path leading to another junction. The box on the right has a star, four animal pictures, and four shape buttons.
Go forward to the junction, and turn right to find a squirrel who refuses to share its fishing spot and asks for three coins instead. Checking the colorful cans beside it, you find that one of them contains a bottle opener.
(You can also see something in the distance…)
Back out to the junction, and move forward. To your right, you see a box with three animal buttons and an extra white circle in its corner.
Keep going forward, and you reach a second dock with another can (unopened). From here, clicking on the pond reveals that something is floating in it.
Back out to the junction once more, and turn left. You find yourself at another cave entrance, and the long thing leaning on the wall beside is a fishing rod.
Go into this cave, which has a squirrel sitting on a rock asking for a bottle of wine (probably grape juice), facing a different rock face with a narrow crack in it. On the wall, you see two grids of animal pictures with stars on them.
Stars
Use the clue from the animal grids to unlock the box marked with a star.
(Since there seem to be two sizes/types of squirrels, I'll call the one with the pink hat a painter.)
As the positions of the stars indicate, the second grid has to be rotated counter-clockwise before it can be combined with the first. After doing so, the positions of the animals (squirrel, goat, painter, bat) are:
(First/Second)

GS PB SB

P- S- SG

-G BP -B
Connecting the occurrences of each animal creates triangles/quadrilaterals with those vertices, and you can enter those shapes by clicking the buttons 3, 1, 2, 0 times.
Open the box to find a fishing hook.
Cast
Attach the hook to the (end of the line at the bottom left corner of the) fishing rod, and use it to retrieve the green wine bottle floating off the unoccupied dock.
You still have the rod, so use it once more to fish up a boot.
Search the boot to find a coin.
Pour
Use the bottle opener to open the bottle, and then give it to the squirrel in the cave, who rewards you with a coin.
Frames
Use the clues from the cans to unlock the remaining box.
The shapes on the box appear (in that order) on the purple, yellow, blue cans, which have circular dots on their bottom-right, top-left, top-right corners.
Since those are roughly 1, 3, 2 quarter-turns from the bottom left (as marked on the box), rotate the buttons by that much by clicking them that many times.
Then open the box to find a hammer.
Smash
Use the hammer to strike the cracked rock in the new cave, widening the crack enough to reveal a coin.
Fee
Now that you have all three coins, talk to the selfish fisher to get a boat ride across.
You're finally here! Open the fence, then open the door- wait, it's locked. Whoops!
Trip
After a short cutscene, you're ready to begin the trip.
Thankfully, there are no puzzles left to solve, and you have no trouble making your way along the right path, down the cliffside, into the mountain and out via a cart, right at the junction and across the river with the help of a fishing squirrel, and to the house where the little squirrel is now waiting.
Click on the door to end the game.
Now with even more Wikipedia links!
Geometric Room Escape
Put that protractor away! This game is about spatial thinking.
(Reminder: no skipping allowed. View the clues before you solve the puzzles.)
Exploration
You start off facing a locked door with a grid of sixteen buttons and an unusual shape clue on its handle.
Turn right. The black wall has three loopy figures with pairs of dials under them that don't seem to do anything. You also see plants growing out of a hanging basket and growing in a cubical glass case.
Turn right. The shelves continue and you find a paper strip divided into squares with the start of 𝜋 already drawn on, a small weighing scale missing a battery next to three solids, a red cubical safe with a equation involving the same three solids, and a black safe with five branching lines above square buttons. At the end, part of the wall is cracked and fixed with duct tape that's attached too well. Look up from the shelves to find something on the ceiling that's too high to reach.
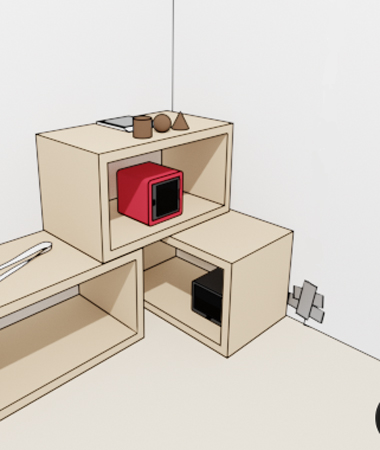
Turn right to find a table. There's another red box here with a four-digit padlock, next to an unusual marking on the table leg, as well as a black box with a glass lens and a rectangular slot. On the desk, a tablet computer asks you to trace the curve shown, but the precision and speed required is well beyond your human capabilities. On the wall, there's a wheel with three symbols and a hole in its lower-right quadrant that exposes a fourth symbol, as well as a keypad with seven unusual symbols arranged in a honeycomb pattern. The table also has two locked drawers, the left having a red lamp and the right having a keyhole.
Turn right to find some more shelves and more potted plants, one on the top shelf and one on the floor. The middle shelf has a slider puzzle and a piece of paper that looks very similar. Unfortunately, the puzzle doesn't ever reset and to make things worse two of the pieces are screwed into place. There's an easily-missable black object on the shelf that shows a folded paper strip and a circle of letter buttons.
Trees
Use the clue from the potted plants around the room to unlock the black box on the rectangular shelves.
The plants in the room have been represented using connected graphs:
Each tree graph on the box represents a plant, each line is a stem or branch, and the lowermost points of each shape are roots. Since each shape-changing button appears exactly beneath a root, those represent plant pots:
Purple plant, pot on the ground = conical frustrum
Red plant, pot in cube = one-sheet hyperboloid
Green plant, two pots on shelf = cylinders
White plant, hanging pot = hemisphere
Enter their side views into the box by clicking them 1, 2, 0, 0, 3 times, and the box spits out a yellow paper strip.
Examining this new strip, you find that its other side is pink, and both sides have letters connected by arrows.
Twist
Use the clue from the new paper strip to unlock the small black device on the slider shelf.
While the picture suggests that you should rapidly alternate between the yellow and pink sides, the fact that the letters appear at identical positions on both sides makes this interpretation impossible.
Instead, realize that the design in the picture is of a Möbius strip, and an arrow following the surface would cover the entire yellow side and then the entire pink side (and then return to yellow).
Functionally, this is the same as following the arrows printed on the note, where the arrow leading off the left edge of yellow continues from the right edge of pink, and vice versa.
Starting from
v, this sequence (which you need to enter clockwise around the circle) isvxwywz.Once done, the strip disappears and you can click the black device to open it. It's a pencil case containing a single pencil!
Around
Use the pencil to fill in the paper strip with digits of pi. (Don't worry, the game fills in the correct digits for you.)
Use the completed paper strip on the marked table leg to wrap it around.
Then use that clue to unlock the red box (next to the table leg).
In this partial cipher, the digits that are visible on the front of the table leg form the code 2969.
Enter that into the padlock and open it to find a weird device with a screen that draws a red line, controlled by two knobs.
Tuning
Play with the device to understand it better, then use it to help you set the dials on the black wall.
Each of the shapes shown is produced by a unique combination of knob settings which you can find by experimentation, or you can apply the following reasoning:
The device produces Lissajous figures. In fact, its behavior is consistent with an oscilloscope that plots one sine wave on the X-axis and another on the Y-axis (where both waves have their zero crossings synchronized).
The shape of the curve depends on the ratio between the wave frequencies, which you can obtain by counting the number of times it touches the left (X, left dial) and top (Y, right dial) edges. Based on this, the ratio of the frequencies produced by the knob settings in the top, (bottom-)left, (bottom-)right positions is 2∶4∶3.
The figures shown have X-Y ratios of 3∶2, 2∶4 and 4∶3.
Set the dials to the right, top, top, left, left, right positions, and you should hear a click.
Click the dials once more to open them and find a USB drive.
Wheel
Insert the USB into the black box on the table, which shines a beam onto the wall.
Then use that clue to unlock the seven-button panel.
I'll denote the seven buttons by З ω q Ο ε σ b.
Following the arrows on the clue, the first sequence you have to enter is
ε q Ο Ο (right, left, center, center)
The disk rotates, and after taking a battery you can follow the same arrows to read the next code:
Ο ω ε σ (center, top right, right, bottom left)
The disk rotates again, and after taking a key you can follow the same arrows to read the next code:
q Ο b З (left, center, bottom right, top left)
The beam turns off, and the disk rotates once more to reveal a screwdriver.
Unscrew
Unscrew the disk on the wall to reveal the clockwork that drove it, from which you can take 2 gears.
Also unscrew both tiles on the slider puzzle. While this seems like it doesn't help, both of those tiles can now be moved.
Slide
I'm going to follow the pattern and link you to the Wikipedia page on the 15 puzzle, but also mention that we've done a similar slider puzzle before.
Maybe these will help you solve the unscrewed slider puzzle. (It's impossible to solve the puzzle without using the screwdriver, as the 0 tile can't get into place without trapping the empty space at the bottom left. It's also impossible to solve the puzzle if you only unscrew one panel, for obvious reasons.)
(Note that half the tiles are already in the correct place, but we'll move all of them in the solution.)
One idea for how to start is to pull the top (𝜙) tile away from the top-left (∇) so that the left (Δ) one can move to the right of ∇. It makes sense to "linearize" the four already-correct tiles by pulling them into consecutive boundary positions, from which they can be restored by reversing the moves.
∇𝜙 ↓, · →, Δ →, 0 ↑, = ←,
∇𝜙 ←, ≔ ↓, · ↓, 𝜙 →, Δ ↑
Since the current right and bottom tiles are part of the sequence we pulled out, there's a clear choice for how to proceed:
0 →, ∇ ↓, Δ ←, 𝜙 ←, ≔ ↑,
· ↑, ∇𝜙 →, 0 ↓, · ←, ∇𝜙 ↑.
Once done, you hear a click, and touching the panel again opens it up so you can take the dodecahedron inside.
Weights
Place the battery in the weighing scale, and use it to weigh the three solids.
Then use that clue to unlock the red safe among the shelves.
(The game doesn't actually require you to do the measurement, and that's because you can work out the answer without measuring.)
The weights of the cylinder, sphere and cone (and the volumes of those shapes, assuming equal heights and equal maximal diameters) are in the ratio 3∶2∶1.
However, the phrasing of the equation means the numbers you have to enter must have the ratio ⅓∶½∶1, which is actually 2∶3∶6. (You can also work this out by taking the lowest common multiple of the weights (which is 60), and then dividing by each of them.)
After setting the rows to read 2, 3, 6, open the safe to find an octahedron.
Unlock
Use the key you have to unlock the right desk drawer, which contains a tetrahedron.
Guide
Place the gears on the tablet, and they form a spirograph that helps you draw out the star-shaped hypotrochoid path.
This unlocks the left desk drawer which contains a cutter knife.
Slice
Use the knife to cut off the duct tape on the wall. An entire section of wallpaper peels off and reveals a hidden compartment with an icosahedron.
Long
Examine the wallpaper you picked up and click it to roll it up.
Then use that to tap the ceiling panel. The trapdoor opens but there's only a digit painted there.
Regular
Use the remaining clues from the Platonic solids to unlock the exit door.
The red, blue, white triangles appear on the tetrahedron, octahedron, icosahedron, while the pentagon appears on the dodecahedron and the square appears on the ceiling (of the cubical room).
Those clues (in the order shown on the door) form the code 870DE, so enter that into the door and open it to escape!
confused on Geometric
Slider puzzle is confusing. I can't move to any of them weird.
Please help.
Not sure if this is the issue, but I forgot to say that the slider pieces have to be clicked, not dragged.
oh ok. i understand now. thanks KK.
that don;t work either kk. not sure what i'm doing wrong.
the directions on
slider puzzle can;t move because the top walkthrugh has those tiles that can't move.
To clarify, are you having an issue with the specific steps in the walkthrough, or the puzzle itself?
In other words, this is how slider puzzle works, in general:
The puzzle is a square divided into nine small regions, eight of which are filled with tiles/pieces at any time. The goal is to move those eight tiles into specific locations, but the only type of permissible move is to slide a piece into the empty slot when they are adjacent.
When you click a tile, it only responds if it can perform such a slide, in which case it does so.
That's exactly what you should be seeing, but what I described in the walkthrough is slightly different, and actually false:
I mentioned that the pieces with screws don't move unless unscrewed, which seemed to be the case when I played it.
Now it seems that you can move those pieces before unscrewing, but using the screwdriver is still required to solve the puzzle.
The solution I gave has 20 steps. If you followed the required order of
using the screwdriver on both tiles before following the sequence of symbols
then I see no problem with it, but if you're
following the sequence of arrows instead, all the moves should still be valid, and you can fix the final result by using the screwdriver.
KK
for example at the first set of directions, you said
∇𝜙 ↓
fr the first 2 steps. where ∇ is, that;s where the tile is where you used the screwdriver and that is connected to another tile so you can't move it.
Ah, okay. ∇𝜙 is the name for
the tile on the right side, which is moved on steps 1, 6, 17, 20.
The tile in the top left (after rotation) is ∇, and is moved only on step 12.
The tile in the top position is 𝜙, and is moved only on steps 9 and 14.
ok. well maybe it;d be easier if
you showed me the step by step moves and that might help. because i'm confused.
Agreed. I found another error (swapped steps 7 and 8), which should be fixed in the following list, which also replaces ≔ with := to make it clearer at small font sizes.
(This assumes you have already used the screwdriver to rotate the top-left tile from [Δ] to [∇] and the left tile from [∇] to [Δ].)
Right [∇𝜙] moves down
Middle [·] moves right
Left [Δ] moves right
Bottom left [0] moves up
Bottom [=] moves left
Bottom right [∇𝜙] moves left
Right [·] moves down
Top right [:=] moves down
Top [𝜙] moves right
Middle [Δ] moves up
Left [0] moves right
Top left [∇] moves down
Top [Δ] moves left
Top right [𝜙] moves left
Right [:=] moves up
Bottom right [·] moves up
Bottom [∇𝜙] moves right
Middle [0] moves down
Right [·] moves left
Bottom right [∇𝜙] moves up
Thanks KK. i think i understand why i mixed it up. but thanks again for doing it simpler.
Update