
 Hi everybody, this is Halloween Special Weekday Escape 2!
BOO! It's Halloween time again! Only Halloween themed games are featured this week, starting with two Amajetos, as good as always with quality and solid puzzles, but different in their visual aspects. Usawanhouse mixes horror and humour to create funny game (successfully) and the same approach takes atmospheric Esklavos with lovely art on top. No1game entices you with the promise of a Halloween Party to a dark apartement...curiously enough, the promise is true, you just have to catch few green guys before the party begins. Minoto wants you to get ready poor hungry bear for trick or treating!
Have a good time and enjoy
Amajetos's latest game takes you to the room fully prepared for Halloween. Bowl with candies, box with candies, pumpkins, ghosts, spiders and also several full moons - yes several - behind each window brightly shines the moon, and one more in a picture!
The game is in their new clean style, it's purple and orange, and enjoyable.
The cursor is changing (its color), no save button, one ending.
This Amajetos's is older and you can compare how much their style has changed...you need to escape from a witch's hut crammed with magical objects, not talking about front courtyard, where you can't make a step without stumbling over some skull or pumpkin. You can see bats silhouettes looming against huge silver full moon, hoping that comings bats are smaller than they seem and if not, that you find way out before they reach you...
The cursor is changing (its color), no save button, one ending.
In Usawanhouse's nice small game you find yourself under the purple skies in the alley leading to Vampyre Castle, but before you can enter it and explore, there are some obstacles in your way. You meet magical creatures and appearances to the contrary, they are friendly and helpful, and even give you hints for solving codes. Well, not all of them...
The cursor is not changing, save button, one ending. The game is in Japanes only, but can be easily played without knowing any Japanese.
You're the main ingredient in delicious soup. You have two options, wash your feet and get into the cauldron or find a way to escape...what?! Yes you read well, it's Esklavos' magical world (a bit different graphics this time, and lovely!) and beautiful but cruel witch wants to cook you in the large cauldron, where something is already boilig. Maybe unsuccessful escapers, who knows...these witches are unpredictable, pretty looks, innocent face and suddenly BOOM - you're the supper course. Can you get away?
The cursor is changing, no save button, one ending.
You get an invitation to a Halloween party, probably from a friend (sender's name is unreadable). As a naive No1game player you go there without slightest suspicion, as many times before, and when you enter the apartement, the door slams shut behind you, and you're standing alone in the middle of a room. As many times before. What a surprise. You vaguely remember that the invitation said something about little green men...maybe you can try to find any? They are ten, and after you've found them, the party begins! It wasn't a trap after all!
The cursor is not changing, no save button, one ending.
.jpg)
That swaying bear is longing for candy so much that he can't controll it, will you help him? You are in Minoto's poetic and charming game, so don't think much, or maybe stop thinking at all, click everywhere and see what happens.
The cursor is not changing, no save button, two ending (mistake end and candy end).
P.S. For more, see Weekday Escape N°160 (Halloween Special 2017)!
Also don't miss Escape from the Pumpkin Room by Tesshi-e or Three Cats in Halloween by Choko-Chai!
Or The Vault: Super Halloween Edition with so adorable Jinx: A Dark and Stormy Night!
We love escape games, and our readers love talking about them and sharing hints! How about you? Let us know what you think, ask for clues, or help out other players in the comments below.


Hello Win
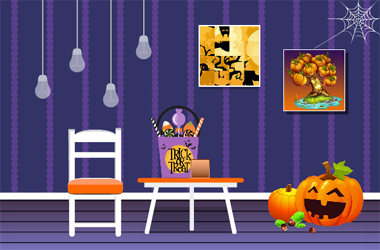
Amajeto has prepared a not-so-spooky room for you — even the pumpkin is smiling!
Exploration
You immediately spot a square tile next to a bag of candy on the table. You can pull the light bulbs on the left to turn them on, and play with the scrambled image puzzle on the right.
Turn right to face a window looking out at the night sky. Beneath it, there's a small side table whose only working drawer has a lock with four pictures, and the lamp on top also lights up some other things on the same screen, including the grid device on the wall above the shelf (itself on the wall above the couch).
Turn right. A witch's hat dangles from the ceiling, filled with candy and decorated with spiders! There's also a picture which tilts when you click its corners, and the locked exit door.
Turn right. A sparkle outside the window draws your attention to the view of the other houses. Beneath that window, four large candy corns rest on a shelf which appears to have twelve colored drawers, none of which you can open. The desk on the right has a computer with a rectangular socket on its monitor and some colored balloons tied to one of its speakers. The locks on the four desk drawer have two brown buttons (one above the other), four shape buttons, a grid of buttons that turn orange, and four letter buttons.
Unscramble
Start by solving the (randomized) picture puzzle on the first screen, rotating its tiles until they align.
Once you're done, the picture slides down so you can take a square tile.
Four colors
Use the clue from the balloons to unlock the colorful drawers.
From left to right, the balloons are orange, purple, yellow, pink.
So click the 2nd and 4th drawers in the right column, the 3rd drawer in the middle column, and then the 1st drawer in the left column. The yellow drawer opens so you can take a folded note, and unfolding the note gives a clue with three rows of boxes and numbers on some of them.
Four letters
Use the clue from the folded note to unlock the bottom desk drawer.
The lengths of the rows of squares (5, 2, 5) match those of the words on the hat and bag: Trick Or Treat.
So each square represents a letter, and in particular the squares marked with the numbers 1, 2, 3, 4 represent the letters R, O, C, K.
Enter ROCK in the drawer, then open it to find a square tile.
Sixteen buttons
Use the clue from the grid device to open the third desk drawer.
When the lamp is lit up, only the squares around the outside of the grid turn orange.
So click the twelve outer buttons on the lock to turn them orange, then open the drawer to find another square tile.
Four corners
Use the clue from the other houses to unlock the tilty picture.
The orange arrow indicates that you should look at the houses from right to left.
Those houses have orange window panes in the ⌟ ⌞⌜⌟⌝ positions, so click those corners of the picture to loosen it, then click it again to turn it over and find a square tile.
Four lights
You'll notice that the lightbulbs turn off if you pull them in the wrong order, so use the clue from the large candy corns to turn on all four lightbulbs correctly.
Since the clue involves patterns of 1, 3, 4, 2 triangles, you should turn on the lightbulbs in that order (leftmost, rightmost, second left, second right).
Doing so not only turns on all the light bulbs, it also makes spooky silhouettes appear.
Four pictures
Use the clue from the light bulbs to unlock the drawer of the side table under the window.
To enter the hat, bat, ghost, skull symbols, you need to click the buttons 4, 1, 2, 6 times.
Open the drawer to find a square tile.
Two buttons
Use the clue from the witch's hat to unlock the top desk drawer.
Looking at the spiders on the hat, you find that the 3rd and 4th spiders hang lower than the others.
So push the UUDDU buttons to open the drawer and find a USB stick.
Show
Insert the USB stick in the computer, which displays a happy pumpkin with a witch's hat holding up some really orangey hand signals.
What could that be a clue for?
It's a clue for the second drawer! The hands held up show 4, 0, 3, 5 fingers, so you need to make the buttons show the shapes with 4, 0, 3, 5 sides.
Enter the code (square, circle, triangle, pentagon) by clicking the buttons 2, 0, 3, 4 times, then open the drawer and take the last square tile.
Complete
Place all 7 tiles in the grid device, and another randomized image puzzle appears.
So solve this one by swapping its tiles into the correct positions to make them align. (Hint: start with the orange tiles at the bottom of the gradient.)
Once you're done, the device opens up to give you a golden key. Use the key on the door to escape!
Amajeto Halloween
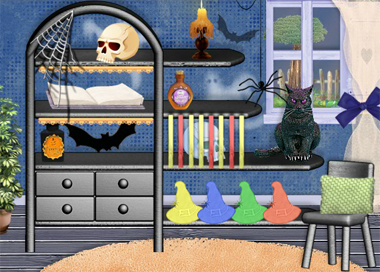
This room has more spooky decorations but less spooky colors, and if it feels more claustrophobic than the other one, you're not alone.
Exploration
Looking past the huge variety of spooky stuff, you find a few things that aren't spooky: a book with two pages of clues, a set of colored bars in front of the skull, four colored hats below that, and four drawers whose locks have four bars, four letter buttons, four color buttons and two buttons (orange and red).
Turn around (left or right) to face the door, whose panel has a jumbled image with some parts missing. There's also four unlit candles, a row of hanging colored pumpkin lanterns, as well as drawers whose locks have four symbol buttons and a grid of buttons that turn white.
Two colors
Use the clue from the lanterns to unlock the lower-right drawer on the first screen.
The lanterns are red, orange, red, red, red, orange, so click the RLRRRL buttons and open the drawer to find a square tile.
Four colors
Use the clue from the hats to unlock the lower-left drawer on the first screen.
Turn the buttons yellow, blue, green, red, by clicking them 3, 1, 2, 0 times, then open the drawer to find a lighter.
Flame
Examine the lighter and click it to turn it on, then use it on each of the candles to light them.
Wasn't there another candle clue somewhere? Which drawer does it open?
The first page of the book tells you that each color (of candle) is associated with a letter.
Following that clue, the green, red, yellow, blue colored letters spell out FEAR, so enter that in the upper-right drawer and open it to find a square tile.
The changing cursor reveals that you can pick up the lit yellow candle.
Grid
Use the other clue from the book to unlock the right table drawer.
The second page of the book has a grid of sixteen pictures, and you can click and hold on the grid to zoom in. Which ones are different?
All of them are different, except for four which are identical! The pumpkins appear in the 2nd position of the top row, the 2nd and 4th positions of the third row, and the 1st position of the bottom row.
So click those buttons to turn them white, and open the drawer to find a square tile.
Jigsaw
Place all three tiles in the door, and solve the randomized jumbled image puzzle by swapping its tiles into place. (Hint: Assemble the moon in the top middle first.)
Once done, you can open the door… to the backyard!
Exploration 2
Bats cover the sky in front of the moon, or perhaps the decorations have gotten too realistic. You don't have to worry about them, just the locked gate, the skulls on poles to the left and woven mat on the red bench in front, and the pumpkin you can take from the right side.
Four pairs
One pair of eye sockets on each skull, and you can change the colors of the eyes from yellow to red.
So use a clue from inside the house to turn the correct eyes red.
The colored bars covering the blue skull on the first screen are all yellow except for the 2nd, 5th, 7th which are red.
So click the right, left, left eyes of the first, third, fourth skulls from the left. The skulls open their jaws menacingly.
Four bars
Use the clue from the four skulls to unlock the top-left drawer on the first screen.
Looking closely at the skulls, you see that the leftmost one has its jaw opened the widest, followed by the third, fourth and second.
So click the bars (from left to right) 3, 0, 2, 1 times to match, and then open the drawer to find a knife.
Face
Place the pumpkin on the mat outside, then use the knife to carve it and then place the candle (which you took from the shelf earlier) inside.
Use the clue from this jack-o'-lantern to unlock the left table drawer.
Counting the shapes from least to most, you find that there's 1 upward triangle, 2 downward triangles, 3 circles and 4 squares.
So enter that code in the lock by clicking the buttons 0, 2, 5, 4 times, then open the drawer to find a golden key. Use that key on the gate to escape!
Since Monjirou has something to say about literally everything (in the game and in the series), I'll ignore most of the text.
Monjiro Escape 6
(On the title screen, the top option in the speech bubble is Start, and the other is Load.)
Otoha appears to have dropped her hat on the way back from her friend's place. It's time for you (Monjirou, the dog) to retrieve it!
Exploration
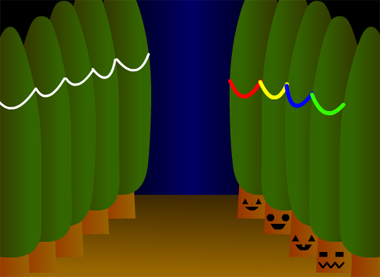
The path through the forest is lined with trees on both sides, and somebody on the left is dressed in rags, holding up a leaf and asking for a roll of paper. On the right, there's an unusual leaf pile next to a small door in a tree that you can't open.
Move forward by clicking the space in the middle. The sky darkens, and the trees gain some curious drapes in white on the left and more colors on the right, as well as some faces carved in their trunks.
Move forward. The sky is now an unsettling shade of purple, so cloudy you can't see the moon. Ahead, you see a castle but the path is blocked by a sleeping dog. There's only one row of trees on the left, and one of them has no leaves. Instead, it has a creepy face and a three-digit panel. The graveyard on the right is equally scary, but you notice a gravestone in front with a tiny circle marking, which tilts when you click any corner. If you look closer at the ground, you also see something white, which turns out to be the end of a long stick.
White
Use the stick to pull down the bandages from the trees on the left of the second screen.
(Instead of marking used items, the game won't let you select them and Monjirou will tell you they're no longer needed.)
Give them to the mummy on the first screen, who blushes(?) and drops the leaf on the ground. You can flip over the leaf to find a three-digit code.
Number
Enter the code from the leaf (375) in the creepy tree. As you open the panel, the tree also seems to open its mouth.
Don't panic! Just grab that broom and read the clue with a letter in a heart shape.
Clean
Use the broom to clear out the leaf pile on the first screen, revealing a clue with some sort of drawing.
Square
Use the drawing under the leaf pile to unlock the tilty gravestone.
The drawing is a single line, or rather an arrow starting from a circle. Since the circle on the gravestone is in the lower-right, you need to turn the clue upside-down before clicking the corners it passes through.
The corners you need to click are ⌟ ⌞⌜⌝ ⌞⌟⌝ .
Boo! A ghost pops out from the grave, with its own letter and shape clue.
(Monjirou: I hope it's only a dream!)
Spooked
You're out of clues and items, but you can't give up just yet! Look around a bit more.
On the first screen, the door in the tree has opened with another ghost poking out from the doorway. Muster your courage and grab the red key from inside.
You haven't seen a keyhole anywhere, so it's time to look around again.
Exploration 2
The dog blocking your way has vanished… wait, he's a werewolf wearing clothes and holding a welcome sign! The clouds must have moved while you were away.
Walk up to the castle gates, where you find a four-digit lock. The lanterns on both sides slowly flash yellow and white.
Red
You don't seem to have seen any more numbers, but you do have several new clues.
The red color of the digits on the lock matches both the red letters on the welcome sign and the triangles on the werewolf's shirt.
The triangles on the sides point sideways, suggesting that you should rotate the first and last red letters (w and m). More specifically, you need to turn the left triangle anticlockwise and the right triangle clockwise to make them point up, and if you do that with the letters they both become the digit 3.
So the letters w, l, o, m become the code 3103, which you can enter in the gate to unlock it.
Exploration 3
Oh look, we're welcome! Walking into the front yard, you see a large pumpkin which only appears to have outlines carved into its skin. The doors ahead are locked, with a red keyhole.
Go right. Beneath some really stealthy bats, you find a panel with four familiar and cute pumpkin faces which you can recolor. The door on the right is locked.
Use the red key to open the main door. An eerie red glow emanates from the doorway, but you decide to enter anyway.
The inside of this house is surprisingly well-lit. Some cards with card suits printed on them hang from the ceiling. The door on the right has a star-shaped hole and is labeled "Exit". Even Monjirou can read that!
Enter the doorway on the left to find a box which takes a password (halfwidth alphanumeric, which is an instruction you can safely ignore). The black sign above asks you not to open the box. Oh well, it's just a sign, right?
Colors
Use the clue from the colorful banners to unlock the colored pumpkin panel.
The faces on the panel appear on the trunks of trees with blue, yellow, green, red streamers.
So click the pumpkins 1, 0, 3, 2 times, then push the Open button to open the door.
Monjirou: Excuse me, is anyone here? I'd like to know the way home.
A monster with bolts in his head slowly pops up in the window and sticks out his tongue before going back down. He's wearing a letter clue in a heart.
The coffin on the ground both intimidates and intrigues you, but first you need to know which buttons to press.
Two buttons
Use the clue from the two lanterns to unlock the coffin.
Not including the times when both lanterns are the same color, they flash yellow in the order RLLRRL.
So push those buttons to open the coffin, releasing a vampire. He can't tell you much, but he can show you another letter clue on his cape.
Spell
Use all the card suit clues to unlock the password box.
Following the pattern on the banner, you find that the letters that appear in the spade, heart, club, club, diamond suits spell out HAPPY.
So type that in the box (either all uppercase or all lowercase) and open it to find the hat. Oh no, taking it has awakened the Reaper himself!
Danger
Oh well, it had to be done. The grim reaper's upset but doesn't seem too eager to attack you. Here's your chance to salvage the situation.
Pull that sharp scythe right out of his hands.
You're not just holding on to it for safekeeping. What else can you do with it?
Use the scythe to cut up the large pumpkin in the front yard. The halves fall apart and you can take the star plate from it.
Exit
Place the star in the exit door, whose sign changes to Open. It's time to go home!
You leap out the door and quickly return home (which was really nearby). After returning the hat, you get to enjoy Mom's tasty cookies!
Halloween Tales Escape
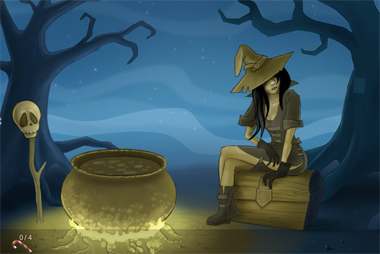
All that messing around with spooky stuff has gotten you in trouble with this witch. Thankfully, the cauldron's not the only way out.
Exploration
The witch refuses to boil you until you wash your feet, as if that little bit of dirt would ruin her excessively oily soup. While you're making her wait, read the clues on the tree behind her, and talk to the skull to find out what it's missing.
Turn left to find a tombstone covered in spiders that rotate when clicked. You see a bone and a dirt mound to its right, and a vase, an urn with a stuck lid, some sort of stand with a small hole, and a pair of skulls that's actually a puzzle with five skulls. Before you go, take the cobweb from the tree.
Turn left to find another grave marker in the shape of a Celtic cross. It has a pile of dirt in front of it, as well as a raven who tells you about poor Willy. And of course, there's a floating hat that just moves away when you click it.
Turn left to find a ring of candles (actually a symbol puzzle) and a cat who asks you to repair an orange cube (actually an orb puzzle). The hat from before is now on this screen, and if you click it it just flies back. You can also speak to the jack-o'-lantern, read the clues on the right tree, pick up a stick from the lower left, and pick up a shovel from the background (directly beneath the hat).
Circle
Solve the candle/symbol puzzle using the clues from the tree behind it.
The six symbols that appear on the left match those on the lower row of the clue, and the arrow on the puzzle screen tells you to place them accordingly in clockwise order.
Labeling the symbols (from top to bottom) 1 to 6, you need to place them in the order
-4-5-

6---2

-3-1-
Once done, a crystal falls out to the side.
Cube
Use a clue on the note behind the witch to "repair" the orange cube.
Once you realize that the large, medium, small orbs beside the cube are worth 15, 10, 5 points, it's easy to make them add up to 25, 35 and 30 (the numbers on the bottom of the note), for example as 15+10, 15+10+10, 15+5+5+5.
One minor detail that you have to pay attention to the order: 25 goes on the top, 35 on the left and 30 on the right.
Once you're done, the puzzle goes away and you notice a candy key beside the cat.
Five skulls
Use a clue on the note behind the witch to solve the skull puzzle.
You'll notice that the skulls only respond to being tapped with the stick, so the main question is what order to tap them in.
In the skull clue, the shapes that appear with each skull are made of a different number of lines: 4, 3, 5, 1, 2.
In the puzzle, the left skull appears with one white line, suggesting that similar shapes are missing from the others…
If you assume that the left skull has one line because it's the first, then the skull clue simply tells you to hit the 4th, 3rd, 5th, 1st, 2nd skulls.
Do so, and a bone appears.
Four spiders
Use the remaining clue behind the candle ring to solve the spider puzzle.
In order to make the spiders face the ↓↗←←↘ directions, you need to click the spiders 4, 1, 6, 6, 3 times.
Then push the small button on the right, and a scepter appears.
Staff
Combine the crystal and scepter, and place the empowered scepter in the stand to make another candy key appear.
Underground
Use the shovel to dig up both dirt mounds. One of them contains the last bone, and the other just becomes a hole in the ground.
So return all three bones to Willy by placing them in the hole, and he returns your favor with thanks and a candy key.
Smooth
Fill the vase with oil from the cauldron.
Then use it on the jar lid, which comes off easily. Click the jar again to pull out a pair of glasses.
Landing
The hat just won't stop floating back and forth, unless you can block its path.
Place the web in the right tree on the screen with the candles.
Now the hat gets stuck in it when flying to the right, and you can simply pick it up.
Accessories
Give the skull on the first screen its hat and glasses, and it drops the last candy key on the ground.
Exit
Use all four candy keys on the lantern, which creates a portal for you to escape!
Find the Escape-Men 193: Halloween 2018
Celebrate one of your favorite days of the year in classic Escape-Men style, by simply accepting anonymous invitations to creepy mansions!
Exploration
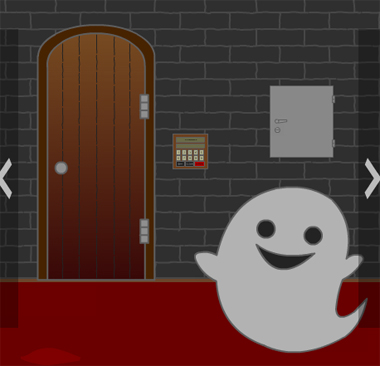
Don't fear the ghost, it's just a little squishy. The door is locked and this time the keypad lock is extra secure, requiring eight digits. There's a wall box on the right which requires a key to open.
The carpet has a bump in the lower-left corner.
Also, you can look above the wall box at the ceiling and (turned-off) lights.
Also, you can look above the keypad to find a clue.
Turn right to find four carved pumpkins on a white table in front of a geometric picture. You can press each of the pumpkin stems, as well as lift the tablecloth in two places to find a boomerang on the right.
Turn right to face some zombie heads beneath a window you can unlock and open. Outside, some bats hang from a tree and as you wait a green witch flies overhead on a broomstick.
Click the space under the tree to look down at a parade of trick-or-treaters. One of them seems a little weird…
Back in the room, check behind the shelf to find two more zombies and a green stool.
Turn right. Aargh, this screen has been overrun by black cats! They've even gotten under the table. Of the three boxes, the left one has a lock with digits in colored squares, the right one has a lock with four black and red digits, and the middle one holds a fruit knife.
Lacerate
The edges of the box you found the knife in appear to be stitched, so unsheath the knife and use it to cut out the false bottom. Beneath, there's a fluorescent light bulb.
Since you can still use the knife, you should look around for other places to cut.
Cut the carpet bump on the first screen to find a key.
While you're on the first screen, squish the ghost again. While squished, a stitch line appears, and it vanishes again when the ghost bounces back. Can you get it to stay down?
After a total of twelve clicks on the ghost, it finally remains in the squashed state, and you can slit its throat to find an Escape-Man.
Turn the stool over and use the knife to cut the bottom of the cushion and find another Escape-Man.
Finally, your slashing spree has come to an end.
Power
Use the key to unlock the wall box on the first screen. It contains a switch that doesn't work yet, so maybe you should investigate further.
First, close the door of the switch box to find an Escape-Man hiding on the wall.
Still on the first screen, place the stool in the middle of the floor, then look at the ceiling again.
Now that you're standing on the stool, you have a closer view of the light fixture and can easily swap out the old, used fluorescent light bulb (click it 12 times until it unscrews) for the new one you have.
Now you can turn the lights on! The walls are no longer gray, so the room is slightly less spooky.
Check the old light bulb to find a green dot on the inside — another Escape-Man!
Colors and numbers
Use the clue from the lit room to unlock the left box.
The number and color buttons are outlines with fixed colors that match the walls of the room.
So which numbers and colors do the walls have?
The black wall has 4 orange pumpkins.
The light green one has 8 black cats (three of them under the table).
The white one has 5 light green zombies (two of them behind the shelf).
The orange wall has only 1 white ghost.
So click the color buttons 2, 5, 3, 0 times, then the digit buttons 4, 8, 5, 1 times. Open the box to find another Escape-Man!
Magical
Use the boomerang to take down the witch, which turns out to be an Escape-Man.
Masquerade
While watching the "parade", you find that one of them (in a green cat suit) has an unusually green face. If you try to pick him up, the game tells you that he's too far to reach.
The text popup has a picture of that costumed guy on the left side, and all you have to do is click that. One more Escape-Man down!
Hanging
Watch the bats for a while, and you'll notice their eyes flash red.
So use that clue to unlock the right box.
Hint: there's one other detail to look out for before you start counting.
The tree trunk splits into four groups, which have different numbers of:
branches: 3, 4, 1, 2
black bats: 4, 2, 3, 3
red eyes: 6, 1, 2, 5
Rearranging these numbers in order from least branches to most gives the code:
3342

2561
Open the box to find another Escape-Man.
Concentric
Solve the pumpkin puzzle using the clue from the picture behind it.
The downward-pointing arrow passes through shapes that match the eyes on the pumpkins. Including the black square frame, those shapes are (from outside in) square, circle, square, diamond, square, circle, triangle.
So push the buttons on the 1st, 3rd, 1st, 4th, 1st, 3rd, 2nd pumpkins from the left. The exclamation mark that appears hints that something has changed, so look under the table again to find another Escape-Man.
Easy
Use the clue on the top of the keypad to unlock it.
Enter 1234 followed by 5678 (i.e. just 12345678), and after pushing the ENTER button an Escape-Man appears briefly on the screen.
Complete
The chime confirms that you have all 10 Escape-men:
In walkthrough order:
In ghost
In bottom of stool
Beside switch box
In old light bulb
In left box
As witch
On street
In right box
Under white table (from pumpkin puzzle)
From keypad
Watch as they transform before your eyes… nope, they're still the same, except that they hold up signs that you can move your mouse over to read.
Escape
Put together, the signs read 20181031, which is the date of Halloween. (If you try to enter this earlier in the game, the keypad won't accept it.)
Enter that in the lock to open the door. You choose not to leave, because 10 green people come in to party!
Last game for the Halloween special!
Halloween (Minoto)
What do you do when the candy craving gets unbearable?
Exploration
The game starts with a drooling bear in front of a house. Clicking the bear makes it approach the house… and immediately get chased out, for a Mistake End. (But you get to undo that mistake without any penalty.) After picking up the shovel and flower from the ground, all that remains is a group of black cats fighting over something and a single white cat left out of the action.
Go right. A pink-haired witch stands in front of a horse-driven pumpkin cart, except that the horse is smaller than usual. There's also a dirt mound with a hand extending out of it.
Go right to find a zombie chained to a machine with a lightbulb and two levers, with a hole for a third. There's a long plank of white wood and another flower next to a tree with a pointy hat that you can get by clicking the tree twice.
Go right. A coffin stands upright, but it's chained shut. Beside it, a dog has a collar chained to nothing at all. Take the wide plank of white wood.
Magical
Give the hat to the witch, who transforms the pumpkin carriage into a small carved pumpkin you can take.
Burial
Use the shovel to dig up the dirt mound. Out pops a guy who looks like he's trying to wear three costumes at once, and he gives you a can of black paint.
After you take the paint, combine the wooden planks to form a cross, and place it on the ground behind the hole to send him back.
Finally, put him to rest with both flowers. As a ghost escapes, it drops some garlic on the ground.
Herd
Use the paint on the white cat to turn it black. It draws the attention of the others, allowing you to pick up the lever.
Reanimate
Replace the lever in the zombie machine, then flip the correct levers to activate it.
(I'm not sure about the reasoning for this one.)
Looking at either the house roof or castle roof suggests that the middle lever should be up and the others down. So flip the 1st and 3rd levers to turn the machine on.
The zombie wakes up and throws its chain to the ground.
Use the chain to connect the dog to the coffin. Once it's linked, the dog pulls the chain off the coffin, and a vampire steps out!
Use the garlic to defeat the vampire, who turns into a bat and flies away, leaving its mantle behind.
Costume
Give the bear the mantle and pumpkin, and then send him into the house to receive sweet treats in a Candy End. Game clear!
Update