
 Hi! Hope you've a nice week so far! Now is even better, with a new Weekday Escape!
Joyful room by Amajeto is perfect kids room - everything what should be here is here, fluffy plush animals, toys, books...and also several coded drawers, so before you can play with the train or explore the upper bunk bed, some puzzles must be solved and codes cracked. Then you get to the room by MysteriousBox and don't forget to look out from windows before you escape, the surroundings worth it! Quite cosy Flash512's dungeon totally lacks skulls, chains or manacles...still, there is something typical for dungeons...let surprise yourself.
Have a good time and enjoy!
Amajeto's created new room for escaping, a playroom, and some items may feel a bit familiar, like the clock or the ball, the puzzles though are new and inventive variations of four colors/letters/digits/shapes theme codes. And as I've mentioned more than once, it may take a while to figure them out even to experienced players. Wobbly picture and jigsaw are not missing, of course.
The cursor is changing (its color), no save button, one ending.
The room you are locked in seems plain (apart from the floor) with very few pieces of furniture and only one item to be collected. After short exploration you can see that the view is breathtaking, the landscape's romantic and fantastical (MysteriousBox's art too), and the puzzles definitely not simple; they're fresh and clever. There isn't any language barrier even if it may seem so. I think that many players after finishing the game, me included, start looking forward to October Escape!
The cursor is not changing, no save button, one ending.
Few years ago, Flash512 imprisoned you in dump and dark dungeon (WE N°68), and this week you are locked in another dungeon of theirs. However, years passed by and dungeons are not what they used to be; they've been noticeably upgraded and turned into pleasant, light and clean places with luxury bathtubs and bidets - that's great, but it's still jail, and you want to escape it, right?
The game has polished and detailed graphics (what is important as there are few not obvious hotspots), atmospheric music (can be switched off) and good puzzles. There's one short animated part and if the animation gets interrupted (in Firefox), the game may freeze, so let the animation finish by itself. Playing in Chrome is fine.
The cursor is changing, no save button, one ending.
We love escape games, and our readers love talking about them and sharing hints! How about you? Let us know what you think, ask for clues, or help out other players in the comments below.


Trickiest bit on Bunk Bed Room, for me at least was
figuring out what to do with the toy rabbit and truck.
Turns out, you
place them in the pink house-shaped cubbies above the stuffed elephants.
Didn't really see any clues indicating that was the solution, (had to watch the walkthrough to get it myself) so I figured I'd post it here in case anyone else got stuck there. Otherwise a nice, cute little game.
Stumped on September escape!
I opened the drawer and
got the "eye" codes from the calendar, cross-referenced them with the letters in the diary,
and that gave me the code
VTM
but it still doesn't work on the box - is there another step or have I messed up somehow?
Dah! Power of posting! You have to
flip it upside down so the side colours match!
silly me.
This may be a very neat kid's room, but you can still stumble on the stairs if you don't pay attention.
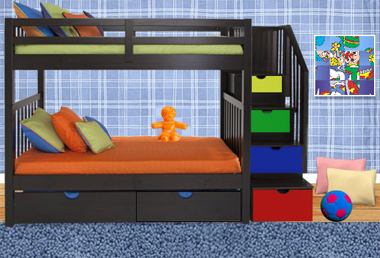
Bunk Bed Room
Exploration
You start off facing a bunk bed with colorful stairs. The orange figurine on the bottom bunk can be moved to reveal a small grid of squares on the wall. On the right side, a picture has its 16 tiles jumbled up.
Turn right to face some shelves with books and stuff. The compartment in the lower left needs a key to unlock, and the one in the upper right needs a four-color code. There's also a clock (which you may recognize from a more cluttered room) that shows the correct time.
Turn right to face a locked door and three wooden house shapes on the wall. The middle house has an empty grid that you can't do anything with right now. Under them, you can click to examine two elephants with googly eyes.
Turn right to face a chest of drawers with a colorful toy train on top and a picture above that tilts when you touch its corners. The top-left drawer lock has four colored bars, the top-right one has four dials, the bottom-left one has buttons that cycle through different shapes, and the bottom-right one has a grid of 12 square buttons that light up.
Unscramble
Solve the randomized picture puzzle by clicking on the tiles to rotate them until they align.
Once the clowns are reunited, a drawer under the bed opens up so you can take a square tile.
Oblong
Use the clue from the grid behind the bed to unlock the bottom-right drawer.
The four light-colored squares are in the top-right and bottom-right corners of the grid and in the middle:
w---

-ww-

---w
So push those buttons to light them up, then open the drawer to find another square tile and a key.
Unlock 1
Use the key to unlock compartment at the lower left of the shelf. Inside, there's a square tile and a clue with colored squares.
Directional
Use the clue from the toy elephants to unlock the top-right drawer.
From left to right, the pupils are on the URLD sides of the googly eyes.
So turn the dials to make their black markings point in those directions, then open the drawer to find a toy truck and square tile.
Ascend
Use the clue from the stairs to unlock the top-left drawer.
Notice that the colors on the stairs are on the fronts of the drawers built into them.
In the direction that they open (towards you) red is furthest from the wall, then blue, green and yellow.
So click the red, blue, yellow green bars 3, 2, 0, 1 times to match, and open the drawer to find a toy bunny and square tile.
Incremental
Use the clue from the toy train to unlock the compartment at the top right of the shelf.
The train cars with 1, 2, 3, 4 balls in them are yellow, red, blue, green.
So click the buttons 2, 0, 1, 3 times, then open the compartment to find a square tile.
Storage
Find somewhere to place your toys.
On the screen with the toy elephants, the bunny fits in the left house and the toy truck in the right house.
Both of those houses slide down and you can view colored squares in their windows.
Windows
Use the clue from the colored windows and the lower-left shelf compartment to unlock the tilty corner picture.
The squares in the shelf clue are red, yellow, red, blue, red, green and those colors appear on the windows in the UL LR UL LL UL UR corners.
So click the ⌜⌟ ⌜⌞⌜⌝ corners of the picture, which loosens off the wall. Turn it over to find a four-digit code.
Round
Use the clue from the solved tilty picture and the clock to unlock the lower-left drawer.
The shapes in the 6, 3, 8, 4 o'clock positions on the clock are ▲■⬟◆.
So click the buttons 6, 2, 5, 4 times, then open the drawer to find the last square tile.
Finish
Now that you have all seven square tiles, place them into the grid on the elephant screen.
Then unscramble the (randomized) picture by swapping its tiles.
(Hint: just like in the other pictures, the blue clown is on the left.)
Solving the puzzle opens up a compartment with a golden key. Use it to open the door and end the game!
Lol Hyosho, I was stuck on the same puzzle!
Here's my first crack at a walkthrough for something :)
Unknown Dungeon Room Walkthrough
Exploration
Bed View:
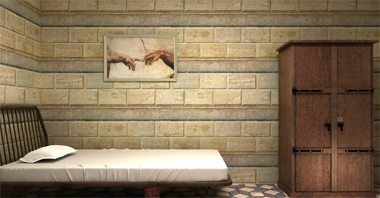
You start facing a bed, a dresser and a picture of two hands.
Clicking the headboard of the bed reveals an area with an exposed piece of paper. Retrieve it and read it to see the words No One Can Escape.
From the headboard view, clicking the right bar of the headboard will take it as a 'stick'.
Back to the full view, clicking underneath the bed reveals sandals and a pot, but neither are in reach.
Clicking the picture of two hands reveals that there is some secret, but no clue as to what the secret is.
Clicking the dresser shows there is a lock with 4 picture symbols.
Clicking on the left side of the dresser shows a small creature with two red eyes hiding behind it.
Turn right to explore Table View
Table View
Clicking the shelf shows 3 decorations that can be lifted. Under the right one is a blue key.
Clicking the top of the window frame shows a locked panel.
Clicking the top of the table shows an arrow pointing up on the right side. Clicking on the right side of the table at it's mid point shows a locked drawer on the side of the table.
Turn right to explore Door View
Door View
Clicking the purple wall panel shows that something is missing.
Clicking the light fixture shows that the bulb is missing.
Clicking the orange gear above the door shows that something is missing.
Clicking the white pedestal shows that something is missing.
Clearly we're missing to much to deal with this. Turn right to see Bathroom View.
Bathroom View
Clicking the night table shows a picture with several faint yellow symbols.
Clicking the red buttons above the door handles of the night table show two red buttons that can be pressed.
Clicking the toilet shows a large screw holding it in place.
Clicking the tub shows that it is full of opaque fluid. Clicking on the right side of the tub shows that the drain is missing a handle.
Clicking the vent in the top right corner of the wall shows it's secured to the wall with 4 screws.
Clicking the vanity shows that it's missing a door handle. Open the vanity drawer by clicking the 4-grey-block handle and retrieve the first cloth patch. Click the towel on the side of the vanity to show the side view and then move the towel and retrieve the screwdriver.
Harassing the Mouse
Look behind the left side of the wardrobe to see the red-eyed mouse. He's pretty well stuck in there. How can you get him out?
Poke him with the stick.
Now he's run under the bed. Have a look there. It seems he's knocked over the pot. Click on it and retrieve the brown key from the sandals.
Click on the mouse hole. Something is odd about this mouse...
It's eyes are flashing. Note the sequence.
L R R L R L L
Window Frame
Use the blue key on the locked compartment on the top frame of the window to retrieve the second cloth patch.
Prison Escape
Return to the vent in the bathroom view. Remove the 4 screws with your screwdriver and remove the vent cover.
Time to escape through the air shaft!
Yeah, ok, so that's not happening, but at least you can grab the handle.
Night Stand
Click on the two red buttons on the night stand. Two red side-by-side things. Where have you seen that before?
The mouse eyes.
Click the buttons in the same pattern as the eyes.
L R R L R L L
Open the doors and retrieve the third cloth piece.
Draining the Tub
Return to the tub and click the right side to look at the drain pipe. Add the handle you retrieved from the vent and drain the tub.
Look at the inside of the tub.
Note the 3 digit number.
752
Table Drawer
Return to the table view, click the top and then the side to reveal the drawer. Open it with the brown key you retrieved from under the bed and take the wrench.
Messy Business
Return to the toilet and use the wrench to remove the screw securing it. Eww... Go wash your hands...
Look at the panel on the bottom to see a place to enter 4 letters. Where have you seen letters before?
The note you retrieved from the headboard of the bed.
What letters stand out on the note?
The first letters are capitalized.
Enter N O C E on the panel.
Retrieve the ring from the compartment.
The Vanity
Return to the vanity. Use the ring as a handle for the door. Open it and retrieve the light bulb.
Let There Be Light
Return to the door view, look at the light fixture and add the bulb. Finally, slightly less is missing. Retrieve the magic purple-ey wand of secret revealing.
Secrets revealed
Now where did we find that secret that needed revealing?
The painting of the hands. Head over there.
Use the magic purple-ey wand of secret revealing on the painting.
Note that there are 4 corners and 4 pictures.
The top-left is a forest.
The top-right is an ocean.
The bottom-left is a sky.
The bottom-right is a desert.
Where did we see 4 corners with 4 pictures before?
The wardrobe. Head over there.
The Lion, the Witch and the...
Wardrobe door lock full of pictures?
The choices are dolphin, key, fire, egg, cloud, leaf and cactus. Where did we see 4 corners and 4 pictures?
The secret picture. How does it map onto these?
How does the pictures of forest, ocean, sky and desert relate to the choices of dolphin, key, fire, egg, cloud, leaf and cactus?
Forest = Leaf
Ocean = Dolphin
Sky = Cloud
Desert = Cactus
Enter the 4 pictures in the matching corners and open the wardrobe
Top-left is a leaf, top-right is a dolphin, bottom-left is a cloud and bottom-right is a cactus.
Grab the purple patterned circle from the top shelf.
Click on the door at the bottom to reveal a place to enter a 3 digit code. Have we seen one of those before?
In the bathtub.
Enter 7 5 2
Grab the hexagonal cylinder. Where have we seen that before?
The pillar by the door. Head there.
Pillar
Insert the hexagonal cylinder into the pillar, press it, and retrieve the fourth and final cloth patch from the base.
Purple Circle Panel
Insert the purple patterned circle you retrieved from the wardrobe into the panel and it lights up and allows you to press the 4 corners.
Where have you seen those mushroom-like patterns before?
The cloth patches.
Look at each cloth patch and notice that they have different symbols corresponding to the 4 corners of the panel. Turn over each patch and note that they have different symbols on the back. Note down each symbol corresponding to each corner of the panel. Where have we seen those symbols before?
The picture on the night stand. Head there.
Note the symbols on the picture each match one of the cloth patches.
I won't attempt to describe each symbol, but instead will refer to them by the corresponding corner of the mushroom-like symbol on the front of their cloth patch (bottom-right, bottom-left, top-right, top-left).
How do these symbols help us with the purple panel?
What if they were in order?
What if the picture showed the order, say, left-to-right?
Read the symbols on the picture left-to-right and note down the corresponding mushroom-corner that each symbol represents.
Left-to-right they are:
BR TL BL TR TL BL TR
Click the corners of the purple panel in order to open the panel. Retrieve the gear. Bout time we get out of here.
Escape
Use the orange gear on the gear above the door and you're free! Congratulations!
Thank you for the super-detailed walkthrough!
September Escape
Now that song's stuck in my head.
Exploration
(Your inventory has room for exactly one item, but that's all the space you need.)
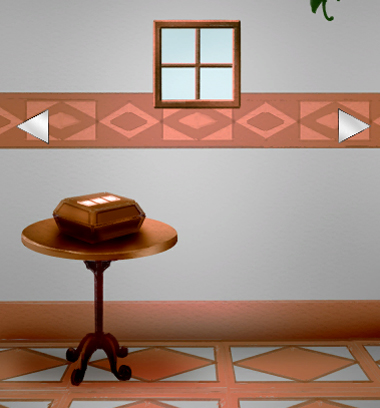
Next to the locked door, the calendar on the wall reminds you that it is indeed September.
Turn right to face a square window, a small table with a wooden box, and a plant pot hanging from the ceiling. Examining each of these, you find that the box has a three-letter lock with colored eye markings, the window faces a tower, and the pot has a decorative pattern with red triangles on a blue stripe,
Turn right to face another window, this one overlooking a sandy shore with a dock. Below the window, there's a silvered panel with a piece missing, another panel with four triangle buttons forming the shape of a diamond, and a small pedestal with a three-digit lock next to a mix of square (polyomino) and drawing clues.
Turn right to face another window, this one facing a view of snow-capped mountains. (Where are you, anyway?) Beside the stationery on the desk, there's a framed picture of a rectangular checkerboard with some of its squares colored blue and red. Several colored eyes are drawn around the outside.
Corners
Use the clue from the flower pot to solve the panel with four buttons.
The ◤◢◥◤◣◥ triangles that appear on the pot are on the LR UL LL LR UR LL corners of the panel.
A rumbling sound tells you the code is correct. What moved?
The flower pot is now lowered to eye level, and you can look in it to find a blue key.
Unlock
Use the blue key to unlock the desk drawer, and read the blue book inside:
(氏 here refers to a person with a particular surname, and can also be used to refer to women.)
9/3 Dinner with Mr. R
9/5 Attend meeting at F company
9/7 Attend Mr. T's party
9/11 Speech at B School
9/15 Shopping at Q Department Store
9/20 Watch a play at V theater
9/24 Barbecue at M river
9/28 Attend Mr. P's party
Date
Use the clues from the desk to unlock the box on the small table.
Notice that each pair of matching eyes on the framed picture looks out along one row and one column, intersecting in one of the boxes in the checkerboard grid.
Next up, we have to do something with that grid.
The dimensions of the checkerboard (6 rows by 7 columns) match the calendar grid, with one minor difference: the calendar has red Sundays on the left and blue Saturdays on the right.
So you need to mentally rotate the grid upside-down to make it match. The boxes marked by the red, blue, green eyes now match the cells for the 11th, 24th and 7th.
Referring to the book, the events on those days are written with the letters B, M, T.
So enter that in the box to open it and find a silvered T-shaped tetromino.
Pieces
Place the tetromino in the shiny panel, which breaks apart into a tessellation of other polyominos.
So use that clue (and all the remaining ones in the room) to unlock the pedestal.
The separated shiny panel has horizontal and vertical cracks that extend to a familiar-looking grid pattern. Yes, you can superimpose the calendar grid on this too.
The marked squares on the pedestal then correspond to the cells for the (first row) 4th, 21st, (second row) 15th, 18th, (third row) 23rd, 3rd.
But since some squares with two-digit numbers are only half-filled, you need to take the first or second digit accordingly, getting 4, 1, 15, 8, 3, 3.
The drawings represent what you can see out the windows. Each window is square, but their muntin bars form the mathematical symbols +, −, ×.
So the clues on the pedestal work out to:
4+1 = 5
15−8 = 7
3×3 = 9.
Enter 579 in the pedestal, and you hear something move.
The top of the pedestal opens up to give you a fancy key!
Exit
Use the key to unlock the door and escape- not so fast! What's this corridor?
The corridor leads to a fork in the path, and then each of those leads to another fork. This could get hairy.
You can solve this maze by trial and error since it resets you to the start only when you make a mistake.
But you might also notice that the start room is different: it has an interesting symbol on the floor.
That symbol matches the handle of the key that you still have, which you can examine by clicking the item box.
Of course, you have to look at the key upside-down too to make it match. When you do so, the tip of the key is an arrow pointing up, and the points on the sides form arrows pointing (from bottom up) to the left, right, right, left.
So move forward along the corridors, taking the L, R, R, L paths at each fork, until you find the path leading out into the light!
Great walkthrough @Clancy, thanks!
Update