
 Hello everyone, Wednesday is here with regular dose of games!
Colorful and joyful game by Maymay is warm-up only - Masa, on the other hand, tests your escaping skills, observation and deduction thoroughly, and if you were ever wondering how do tent manufacturers test water resistance of their products, you'll learn now. The last entry in this Weekday Escape is by no1game and Wanpa; and brings very well-done game (more adventure than escape) with few rooms to explore...that's good concept, if you get stuck in one room, you can go elsewhere and not brood over one puzzle and overthink it.
Have a good time and enjoy!
This time, Maymay suprisingly doesn't want you to fix anything - you have to find five umbrellas to escape, or precisely, to get the last clue. And do a bit of cleaning while hunting for clues. It's simple game with three game screens and three doors to get through - in the end you get important advice from the designers: "Don't forget to bring your umbrella, be safe!". But they don't let you keep even one of found umbrellas!
The cursor is not changing, no save button, one ending.
Three weeks ago, I complained that Masa's games are very rare - well, what do you know! POP - a new one immediately arrived! That was pretty quick - I should try that more often!
So, you find yourself locked inside a room which purpose seems to be testing camping equipment. There is a tent, fireplace and bike; and two flower pots with plastic plants trying to create illusion of nature (not very successfully). Puzzles and hints are around too, but solutions are not simple; you need to combine more hints to get somewhere - can you get out? And can you get out twice?
The cursor is not changing, no save button, two endings.
The game is available for Android too.
Not many designers created such an amount of great games as no1game; there are more than 180 now! Sometimes, they collaborate with other japanese designers - e.g. Find the Escape Men in WE N°132 - or remarkably change their style (Marble Escape in WE N°125). This game is a crossover between no1game and Wanpa; and it's also a crossover between escape and adventure genre with action element at the end.
At the starting screen you are asked to choose a language (English or Japanese), then follows an opening with short story explaining Wanpa's presence in no1game's universe.
Afterwards you end up in some enclosure and, needless to say, you have to collect ten escape men. But that's not all this time...you have to escape the place too...and fight!
The cursor is not changing, save button, one ending.
We love escape games, and our readers love talking about them and sharing hints! How about you? Let us know what you think, ask for clues, or help out other players in the comments below.


I know this sounds like a Funkyland game, but there will be no magical item-combining in this one.
Find 5 Umbrellas
Exploration 1
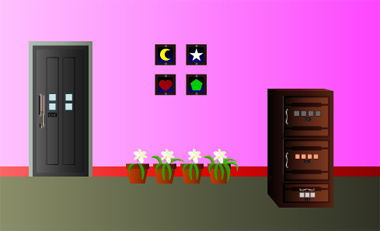
You start off in a room with four droopy potted flowers beneath colored symbols in picture frames held to the wall by screws. There's a cabinet with three locked compartments. There's a four-color lock, a four-digit lock and a three-symbol lock with weather icons. The door to this room is locked, with four letter buttons arranged in a square.
Four digits
Use the clue from the flowers to unlock the middle drawer.
From left to right, the flowers have 2, 5, 3, 7 leaves.
So enter that in the safe to unlock it. Inside, there's a spray bottle of glass cleaner.
Four letters
Use the clue from the spray bottle (and picture frames) to unlock the door.
The arrangement of buttons on the door matches that of the picture frames.
The letters under the moon, star, heart, pentagon symbols on the spray bottle are C, A, R, S.
So enter
C A

R S
into the door to unlock it.
Exploration 2
This room is filled with even more puzzles and locks! The wall cupboard has large doors covered in dirt and two drawers having locks with four face buttons and five colored triangle buttons (forming a pentagon). The cupboard on the right has an unlocked left door containing a red umbrella and a squeegee, and a locked right door with triangles on square buttons. The door to this room is locked and needs a key.
Cleanup
Use the glass cleaner on the cupboard, then clean it off with the squeegee to reveal a clue.
You can now access the lock on the cupboard doors, which has pictures of fruit on its buttons.
Emotional
Use the clues from the wall cupboard to unlock its left drawer.
The symbols in the clue can be arranged to form different faces.
Click the buttons
5 2

1 4
times to display those faces, then open the drawer to find a key inside.
Use the key on the door to open it.
Exploration 3
This room has a picture of dogs, but it also seems to be obscured by some dirt. Under it, there's a (relatively) uninteresting L-shaped couch and a small table which you can flip over to find a fruit card beneath. There's also a four-digit safe on the right, and the door to this room is locked and needs a key.
Fruits
Use the clue from the fruit card to unlock the wall cupboard doors in the second room.
Click the buttons
3 2

1 5
times to match the fruit on the card, then open the cupboard doors to find a green umbrella and an empty cup, and also a clue that was on the back of the cupboard behind the cup.
Right triangles
Use the clue from the back of the wall cupboard to unlock the cupboard door with four triangles in the second room.
The triangles numbered 1, 2, 3, 4 point towards the ↖↗↙↘ directions, so click the buttons 5, 4, 2, 3 times to unlock the door. Inside, there's a yellow umbrella and a feather duster.
Cleanup 2
Use the feather duster on the dog picture. Now you can see every single spot.
Four digits again
Use the clue from the dog photo to unlock the four-digit safe in the same (last) room.
The dogs have
7 5

3 4
spots, so enter that in the safe to unlock it. Inside, there's an insulating water bottle.
Hot
Uncap the bottle and pour the hot water into the cup, which shows three symbols on its front.
Then use that clue to unlock another lock.
The clue matches the buttons on the bottom drawer on the first screen.
So click the buttons there 2, 3, 1 times to unlock it. Inside, there's a black umbrella and a screwdriver.
Unscrew
Use the screwdriver to loosen the picture frames, which swivel down to reveal numbers.
Four colors
Use the clue from the picture frames to unlock the top compartment in the cupboard on the same (first) screen.
The frames under the numbers 1 to 4 contain symbols colored white, green, red, yellow.
So click the buttons 4, 5, 1, 2 times, then open the compartment to find the blue umbrella.
Five colors
You should now have all five umbrellas, so click on them (to the left of your inventory) and open them up. Each one is one-fifth a different color than what it's supposed to be.
So use that clue to unlock the right drawer in the wall cupboard in the second room.
The sectors which are colored differently are:
Green, lower-left of red
Red, bottom of green
Black, upper-left of yellow
Yellow, upper-right of blue
Blue, lower-right of black.
So enter
Black(4) Yellow(2)

Green(3) Blue(1)

Red(5)
in the drawer by clicking the buttons that many times, and open it to find a golden key.
Use the key in the last door to escape!
Can't say I'm a fan of the Escape Men series. This one included a lot of what I dislike about them, such as
the absurdly tiny click area for the inside of the vase and having to chase down the green man which leaps in and out of the aquarium.
Things like that are a pain in the butt when using a trackpad instead of a mouse.
And did anyone else have issues with the map?
I clicked that thing many times before that corner turned up to reveal a green man.
"Camping Room Escape" was pretty satisfying. I liked it better than "Chemical Room Escape". Wouldn't mind seeing more of Masa's games featured.
I'm stuck in Wanpa Quest.
I have 8 Escape Men and the only items I haven't used are the shield and the sword, which has a hole in it.
I also have no idea what to do in Camping Room Escape. I managed to unlock the first drawer, but now I'm stuck.
Camping Room Escape
Exploration
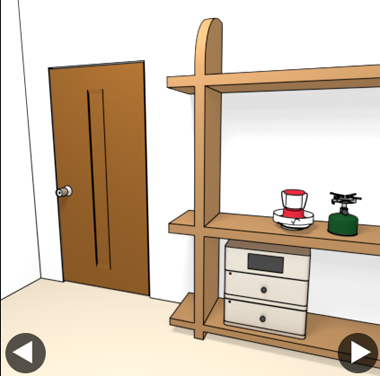
You start off facing a locked door and shelf.
On the top shelf is Lamp you can take that does not light up, and a gas burner you can turn on and off.
On the bottom shelf is a cabinet with two locked drawers and panel with shape buttons.
Turn right and you can pick up the Ball on the bottom shelf.
There is a basket that is locked with a 4-number code.
Turn right and there is a tent with a sprinker head over it. its door flap is stked open with some sort of screw panel.
You can enter the tent and pick sheet of paper with a Diagram. on it.
Leave the tent and turn right. There is a bicycle near a corner with shelves of potted plants or something.
Over the shelves is another sprinkler head covered with a balloon. On the wall is a folding Ladder which you can take.
Turn right and there is a firepit with logs and a locked window with a sheet of paper behind it.
If you look up there is skylight with a card that is too high to reach.
Light
Use the bicycle to light the Lamp
If you zoom into the bike, it has a charging cable connected to the handlebars.
If you click on the Lamp and click the cable, the Lamp lights up.
Return
Return the lamp back where you picked it up and then use it and the Diagram to unlock the drawer below.
If you replace the Lamp on the vessel it came from and then click the lamp, it lights up.
Zoom into the diagram on the vessel to see the light beam lights up "house",A,D,D,C
Referring to the Diagram, starting at "house" and following A,D,D,C, you visit "house","circle","house","tunnel","triangle".
Enter those shapes into the lock in the cabinet to unlock the top drawer, which contains cold packs.
Toss
Use the ball to retrieve the card from the skylight
Look up at the skylight, click the Ball, click on the skylight to knock down the card, which appears in your inventory
Invisible Ink
If you examine the Card and click on it, it will tell you the card is temperature-sensitive
Hold the card over the lit burner and cold packs in the top drawer to receive a number clue. Use that clue to unlock the basket.
The heat gives you 6-2- and the cold -4-8, so the code is 6428
Unlock
Enter the code into basket lock. Remove the "thin metallic Part" from the lock and open the basket to remove the Cardboard Tubes.
Unlock
Use the metallic Part to unlock the window and retrieve the paper
Arson
Light the gas burner and use it to light the paper. Use the paper to light the firewood in the firepit... but first plan your next move.
Quickly turn left twice or right three times and click to enter the tent before the balloon on the sprinkler bursts.
If you are too slow, the cardboard tubes will get soggy and End-2 will be impossible.
Burst
Turning back to the bicycle, you will see fragments of the burst balloon on the floor.
Pick one a balloon fragment and notice the symbols drawn on it.
Use the symbols with the paper diagram to unlock the second drawer.
The three middle symbols are ambiguous, but there is only one combination that will take you through three square-bottom symbols from circle to triangle.
Circle, house,square,tunnel,triangle fits. That takes you through the letters D,C,B,C.
Enter that in the panel above the drawers. Remove the Duct Tape.
Ashes
Examine the burnt logs in the firepit and retrieve the screwdriver piece.
When you examine the screwdriver, you see it has no handle. Click on the duct tape and on the screwdriver piece to make a handle.
Tent Stake
Use the screwdriver to remove the cover on the tent stake. Remove the Stake which is actually a key
End-1
Use the key on the door and Exit
End-2
This end is only possible if you kept the cardboard tubes dry
Examine the cardboard tubes and use the duct tape on them to produce a "long object".
With Ladder and Key in your inventory, use the Long Object on the skylight for End-2.
Gah, just a little slow!
Camping Room Escape
I'd really like to know the backstory of how you got here.
Exploration
You start off facing a locked door and a shelf where a red lamp (with a cable socket) sits in an unusual vessel with a cut in it, a working burner is glued down, and a high-tech display locks two drawers.
Turn right to view the other end of the shelf, which has a plain blue ball on it. There's a small metal cage container with some tubes inside, but its padlock requires a four-digit code.
Turn right to find a tent under… a sprinkler? It's open and fastened to the ground by screws, and you can enter the tent to find a paper note with symbols and arrows.
Turn right to find a bicycle whose back wheel is held in place on a rack. Clicking on it zooms you to the front of the bike, where a power cable extends from it. A rope ladder hangs on the right wall, and there appears to be a balloon covering something attached to the beam above.
Turn right to find a fire ring with firewood tied to the ground in it. The window behind it has a piece of paper stuck outside, but the window is locked with a metallic device.
Look up to view the skylight, where a card is stuck to the window. There's also some sort of grip below it. Examine the sprinkler on the right, and the game tells you there's one in each corner of the room.
Illuminate
Connect the lamp to the bike. After a bit of pedaling, it's lit up and you can just back out of the bike screen.
Is there anywhere in this room which needs lighting?
Place the lamp back in its receptacle where you got it. The light shines though the cut to connect the pentagon to four other letters.
Multiple choice
Use the clue from the lit lamp to unlock one of the drawers beneath.
The light shining though the cut connects the pentagon to A, D, D, C.
So follow the marked arrows on the note accordingly.
The arrow marked A from the pentagon links it to the circle.
The arrow marked D from the circle links it to the pentagon.
The arrow marked D from the pentagon links it to the extended semicircle (mousehole).
The arrow marked C from that shape links it to the triangle.
So enter that code in the drawers by clicking the 1st, 4th, 5th, 2nd buttons from the left on the display.
The upper drawer unlocks to reveal a lot of ice packs, and the display changes. Now it requires a sequence of four letters.
High
Throw the ball at the skylight to dislodge a plain green card.
On closer examination, the card changes color where you held it, so you know it's temperature-sensitive.
Thermochromic
You can use the card on the gas burner to heat it up, revealing two digits and two dots.
But you can also use the card on the ice in the drawer to cool it down, revealing another two digits and two dots.
Four digits
Use the clue from the card to unlock the metal cage.
The digits that appear in the 1st and 3rd positions on the card (by heating it) are 6 and 2, and those in the other 2 positions are 4 and 8.
So set the padlock to 6428. As it opens up, you notice that there was a metal part attached to the padlock too. Pick up the cardboard tubes from the cage.
Unlock
Use the metal part you got to open the window and take the blank piece of paper.
Pyro
Use the burner to set the paper on fire, then use it to light the firewood.
Shortly after, the sprinklers put the fire out, and you hear a balloon pop.
Let's review. The firewood is now burnt, and zooming in on it you find that it's split and there was a screwdriver head inside.
The sprinklers made you soaking wet, and the cardboard tubes you're holding have been softened.
The remains of the balloon are on the floor beside the bicycle, and you can pick up a balloon fragment with a clue on it.
Fragment
Use the clue from the balloon fragment to unlock the other drawer.
The fragment shows a path from Circle to Triangle, passing through exactly three other shapes. If you remove the circle from the directed graph it becomes acyclic and just kidding, we're not going to get that technical.
The shape before the triangle must be the extended semicircle, which means that the remaining two shapes must be the pentagon and square. Since the only arrow between those two shapes goes from the pentagon to the square, the pentagon must come first.
The path indicated on the fragment takes arrows labeled D, C, B, C from the circle to the triangle. Enter that in the display to unlock the bottom drawer. Inside, there's a roll of duct tape.
Grip
The grip for the screwdriver is nowhere to be found. Is there an alternative?
Wrap the duct tape around the screwdriver head so you can get enough grip.
Now you can release the tent peg from the ground.
Ending 1
Use the tent peg to unlock the door, and you've escaped!
Ending 2
Replay the game up to the point where you open the window. You still need to trigger the sprinklers to proceed, but you can't get the cardboard tubes wet.
(They will get wet even if you don't pick them up.)
So light the paper on fire as before, but right after placing it under the firewood, turn left twice and quickly enter the tent.
The cardboard tubes, being in the tent with you, don't get wet when the sprinklers go off.
Use the duct tape to attach the tubes together into a long pole with a wide head.
With its help, you can now place the rope ladder on the bar under the skylight, and climb to freedom.
Find the Escape-Men: WANPA QUEST
(While you can change the language freely during the game, you cannot do so during cutscenes. So make sure the title is in English before you start.)
In an unusual collaboration, WANPA (played by you) has gotten on the Find the Escape-Men TV show. Find ten Escape-Men to win!
Exploration
Your extraordinarily large inventory is currently empty except for a fist (you can Wan Punch stuff), a flame (you can breathe fire), and a Himajin figure that you got during the cutscene.
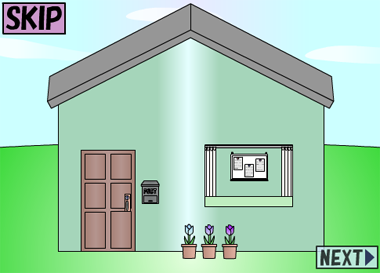
You start off facing the exit gate. A map on the left shows a plan of the place.
Lift the lower-right corner of the map to find an Escape-Man.
Turn right to face the red house, which has a patch of exposed ground in front of it. The door to the house is locked.
Turn right to face the yellow house, which is also locked. There's nothing interesting outside.
Turn right to face the "brack" house, which is also locked. You can't fix the misspelling yet, but you can pick up the letter R by clicking on it twice.
Turn right to face the blue house, which is also locked. You can zoom in on the box around the left side, which has a stick inside.
Turn right to the "gleen" house, which is also locked. You can pick up the letter L from the sign.
Pick up the Escape-Man camouflaged at the lower-left corner of the house (beside the left pillar).
Spellcheck
Place the letter L on the black house and G on the green house, unlocking each of them.
The black house is too dark to see inside, but the green house is lit.
Exploration: Green
At the left of the room, there's a (stopped?) clock and a crack in the wall. There are also two locked boxes on the floor, one with five rows of buttons and the other with an uncolored map where the houses are buttons that change colors. There's a wall safe that needs a key and a mirror you can just pick up off the wall.
Flip the clock over and remove its battery.
A small crack
Use your fist to punch the wall crack. It's too dark inside to see anything.
Minimap
Use the clues from the houses (or the map beside the gate) to unlock the map box.
The top house is where you're currently at, so that's green. Click it four times.
Color the other boxes (in clockwise order) 0, 1, 3, 7, 2 times, then open the box to find a yellow key.
Use the yellow key to unlock the yellow house.
Exploration: Yellow
The main feature of this house is a giant fireplace which is currently empty. You can't even zoom in on the clock above. Next to the fireplace, there's a fish tank with water and no fish. On the left, there's an unusual coat rack with a spade hanging from it. The top of the coat rack is a sphere that hinges open so you can get a green key.
Look closer at the top half of the sphere, which hides an Escape-Man.
Unearth
Use the spade in the ground in front of the red house to find two lenses covered in mud.
Use the lenses in the fish tank to wash them clean.
Green Key
Use the green key to unlock the wall safe in the green house. There's a candle inside.
Bright
Spit fire onto the candle to light it.
Now you can use it to light up the hole you broke the wall here to find an Escape-Man.
Exploration: Black
Use the candle in the black house to find the light switch. Turn it on.
This house has a mysterious door locked with a keypad of letters, and a trapdoor below it. On the left, there's an uninteresting clock over a lamp with a dark-colored lampshade that doesn't seem to work. Under the light switch, there's a locked box with four corner buttons.
Look under the lampshade to find a hidden Escape-Man.
Dim
You're mysteriously drawn to the space under the lamp, so turn the lights off while the lamp is on.
The lamp shines a light on the space, and shows four green shapes there.
Turn the lights back on, and place the mirror where the shapes appear.
Now when you turn the lights off an Escape-Man appears on the ground.
Bend
Use the clue from the coat rack in the yellow house to unlock the corner button box in the black house.
From top to bottom, the arms on the rack form the⌟ ⌞⌟ ⌜⌝ corners, which confusingly are on the UL UR UL LR LL buttons.
So push those buttons to open the box, and take the blue key from inside.
Exploration: Blue
(Use the blue key to unlock the blue house.)
Surprise! There's a huge boulder in this room. Above it, there's a safe with six shape buttons, and an uninteresting clock. The blue desk has an unlocked drawer with a remote control (no batteries), and a locked drawer that requires a key. It also has a flower vase on it.
Click the opening of the flower vase to zoom in. An Escape-Man clings to the stem.
Shapes
Use the shape clue from the black house to unlock the wall safe in the blue house.
The shapes shown/shone by the lamp are
Circle(1) Blank(0) Triangle(2)

Blank(0) Triangle(2) Square(3)
so enter that in the panel to open it. Behind, there's a monitor screen that's turned off.
Screen
Click the lower-right corner of the remote control to turn it over. Place the battery (that you got from the green room's clock) in it, then use it to turn on the monitor in the blue house, which shows five letters in a cross.
Five letters
Use the clue from the monitor to unlock the door in the black house.
Enter
-H-

ADE

-G-
in the keypad, and open the door to a narrow room.
There's a red key on the floor, a chest with a magical shield (but taking it seals the exit), and a clue with six unusual shapes on the wall.
Exploration: Red
(Use the red key to unlock the door to the red house.)
This room has a larger wall crack, some firewood on a table underneath an uninteresting clock, and a huge box with a pickaxe head.
Burn
Place the firewood in the fireplace in the yellow house, and breathe fire onto it.
An Escape-Man runs out and douses his flame in the tank.
A large rock
Use the stick on the pickaxe head to assemble the pickaxe, and use it to chip away at the rock in the blue house.
Pick up the Escape-Man and chunk of rock.
A large crack
Use the pickaxe to break the wall in the red house.
In the room behind, there are three empty chests. Huh?
Hidden treasure
Use the clue from the hidden room in the black house to solve the chest puzzle.
The markings on the wall indicate the left, center, right, right, left, center chests.
So open (and close) the corresponding chests in the red room in that order, and an Escape-Man appears in the last chest you open.
Look in the other chests again, and you'll find a light blue key in the left chest and six digits in the right chest.
Ten Men
You should have found all ten Escape-Men:
Behind corner of map
Corner outside green house
In top of coat rack (yellow house)
In cracked wall in green house
Under lampshade in black house
Lamp reflection on floor in black house
In flower vase in blue house
From fireplace in yellow house
In boulder in blue house
In chests in red house
But if you try to leave, they combine into a giant Escape-Man and challenge you to a final battle!
If you fight it in your current state, you'll take 3/10 damage twice and then fall to a huge special attack.
Looks like you need to gear up more before battling.
Substitute
Go back into the back room of the black house, pick up the magical shield, and replace it with the chunk of rock.
Digital
Use the clue from the right chest in the red room to unlock the middle box in the green room.
The digits in the box read 961237. Do they sound familiar?
They match the times on the clocks in each house:
Black house: 9
Yellow house: 6
Red house: 12
Green house: 3
Blue house: 7
The clocks in those house are at the center, right, center, left, center of their respective walls.
So click the CRCLC buttons to unlock the box. Take the magical gloves of strength from inside.
Second blue key
Use the light blue key to unlock the right drawer in the blue desk, and take the lensless glasses from it. Seems pretentious.
Clearer
Use the lenses (that you dug up and cleaned earlier) in the glasses.
But you already have perfect eyesight...
Use them to look at the monitor again. The lens reveals four more letters on the screen.
Four letters
Use the new clues from the monitor to unlock the keypad in the black room again.
This time, enter
FHC

ADE

BGE
in the keypad. The stairs open to the basement, where a sword is stuck in a large stone block.
Armed
Use your magical gloves on the magical sword to remove it from the stone.
Boss Fight
With the magical sword, you do 2 damage each turn instead of 1.
With the magical shield, you take 2 damage instead of 3, and 5 damage instead of 7.
Will the combined powers of both be enough to defeat the giant Escape-Man?
After three turns, you're not close to winning, and he's special-attacked you down to 1 health. What a pinch!
As WANPA says, it's a big pinch. That's your cue to use the fist to break the Himajin figure, and then pick up the jewel from it.
The jewel fits in the sword, which begins to glow!
The next attack does massive damage! You win!
...and your victory makes it on TV and then a bestselling DVD.
The copy you received from the staff hides a secret... a rematch is in your future!
AAAAA OMG thanks kktkkr!!!!!!!!! i was stuck
i was stuck on the number/clock puzzle because i was looking at where the houses were positioned on the map rather than the placement of the clocks!! thanks a bunch
I'd really like to know the backstory of how you got here.
LOL.
Update