
 Welcome back after a week, welcome to the new Weekday Escape!
This week is in the name of comebacks - Neat Escape remade two older games and takes you to a bank after opening hours, Sarameya is back with game full of codes, all hints scrammed on one wall and Kotorinosu is back too, after longer pause, with awesome game!
Have a good time and enjoy!

This game by Neat Escape is a remake of two three years old games, Escape from the bank and Escape from the Bank 2 (not on JiG).
You want to draw some money only and suddenly you are all alone in a bank lobby. Trapped, it's closed. It seems that the bank has suprisingly low security level, I have to say! No wonder they forgot a customer inside after opening hours, with this approach. Maybe if you look around you would find you way out...no, not out, but into their bank vault with gold bars! A decision has to be made - what to do with them?
The cursor is not changing, save button, three endings (!).
Do you like cracking codes? Probably yes, they are important part of escape games - there are usually four or five codes per game. Not in the new Sarameya's game though! There are forty codes waiting for you! In this one scene game all you can see is a wall with few pieces of furniture and heavily coded exit door. Clues and hints are many, at least at the beginning; later the game turns into a hunt for clues...
In the left upper corner is a save button and solved list button. The later is very useful as it gives you a hint about the codes you haven't cracked yet (gaps in the list). For solving you need to know something about Othello (Reversi) game, but one basic rule would do: "after placing the new dark piece, dark turns over all light pieces lying on a straight line between the new piece and any anchoring dark pieces".
The cursor is changing, save button, one ending.
P.S. Codes, codes, codes - Aries Escape No. 19 from Ariesescape is about codes too!
After two years of silence, Kotorinosu is back! And in a big style! Their new game is top quality, remindig about great Neutral's games.
You are confined in a pleasant, airy (somewhere must be hidden air conditioner), clean and well lit room without any door or window. Only a detail? Well sooner or later the detail isn't a detail, and only question is what starts to protest, your brain or your body. Or both at once. You'd rather start escaping process right now! Look around and be careful - the room isn't big but few active spots are not recognizable at first sight.
Hopefuly it may be a new beginning, the game says "see you in another game" after you finish it. Yes please. Any time!
The cursor is not changing, autosave, one ending.
The game is available for Android and iPhone too.
We love escape games, and our readers love talking about them and sharing hints! How about you? Let us know what you think, ask for clues, or help out other players in the comments below.


A new Kotorinosu! A tricky one too. You have to do a little pixel-hunting.
Escape from the Bank
It's the safest place to be, kind of.
Exploration
Oh no, the doors are locked and there's no one left in the bank! And the pedestrians outside the window don't even seem to care.
Search the wooden tables along the window. There's nothing more than trays of unimportant documents and cups of pencils in green, yellow and blue (and some pens), but at the end of the wall, a dustbin hides a screwdriver. Things are about to get interesting. Check the benches in front to find a two-button safe and a three-digit safe with No written on it.
Don't let that discourage you! Turn left to the doors that don't open (yes, they're locked), then turn left again to the row of four bank windows marked on the top with numbers, next to a ticket dispenser with a red PUSH button. On the left side, a "security window" has a three-digit safe on the counter with some tiny objects above the numbers.
Walk around the counters to the office table on the right with four computers, each showing different digits (after you click and hold their mice) and having either a red or green power light.
Check behind the counters. It's a little cluttered, but you find a three-digit safe with colored digits and a four-button safe whose buttons cycle through directional chevrons when clicked. You can also examine the back of the ticket dispenser to find it unplugged, with an adaptor missing.
Beyond all the office equipment, there's a pair of double doors and a plain wooden door to the left, both of which are locked.
Decor
Use the clue from the equipment in the room to unlock the three-digit safe with tiny objects.
Count the potted plants (not including the flowering one), office chairs and calculators.
Potted plants: 1+2+1+1=5
Office chairs: 4+4=8
Calculators: 2+2=4
Enter 584 in the safe, then press the button to open it up and get Security Card A.
It's labeled "For Branch Manager Use", which means it's super important.
Traffic
Use the clue from the computers to unlock the two-button box on the first bench.
The digits 1, 2, 3, 4, 5, 6 appear on the computers with green, green, red, green, red, red power lights.
So click the right, right, left, right, left, left buttons, and the safe opens up. Take the cable from it.
Queue
Look around the back of the ticket dispenser (on the screen showing the back of the counters) to find that it's unplugged.
Use the cable on it to get it connected, then push the red button on the front to get a ticket with a three-digit queue number.
So enter the queue number (777) into the three-digit No box.
Then open it and take a pink key from inside.
Tropical
Use the clue from the colored pencils to unlock the three-digit box with the pencil next to it.
There are 5 green, 6 yellow and 4 blue pencils, so enter 564 in the box.
Then open it and take Security Card B from inside. It's labeled "For Assistant Branch Manager Use".
Directional
Use a red arrow clue to unlock the four-button safe.
The arrows on the doors point left, right, left, right.
So click the buttons 4, 2, 4, 2 times, then open the safe to get a red key.
Unlock (pink)
Use the pink key to unlock the wooden door and enter the manager's office.
Inside, there's several shelves of items behind the desk. So take the mirror from the left wall and read the note in the left desk drawer, and look at the locked briefcase on the desk.
Also examine the photo frame on the right shelf that faces inwards. It's not a photo frame, it's a pair of pliers trapped under some screwed down glass!
So use your screwdriver to remove the glass and take the pliers.
Unlock (red)
Use the red key on the double doors behind the office equipment to unlock them and enter the vault room.
Inside, there's a large vault door, a card scanner on the left and a pedestal on the right with two lights, a clue reading B→A and an OPEN button that doesn't work yet.
Scan
Use both security cards on the scanner (the game won't let you scan A before B), and four digit buttons appear on the pedestal.
So use the clues from your cards (and the desk drawer) to enter the correct code.
The outlines around BANK on card A match up with those around BANK on card B, forming the shape of four digits: 5823.
So enter 5823 in the pedestal to unlock the vault.
Inside, something appears to be guarded by a helical laser tube.
Heist
Use the mirror on the laser tube, laying it across the cabinets on the left and right.
That allows you to safely take the gold bar.
Then pick the mirror back up.
Wait, this gold bar is lighter than normal!
Turn it over to find a blue key hidden inside. Save your game.
Escape?
Use the blue key on the main door to escape.
Congratulations, you just robbed a bank. Bad ending!
Escape.
Put the mirror back, and then the gold bar back, and then use the blue key on the bank entrance to escape.
The police aren't too happy about you breaking into all the locked doors. Normal ending!
Unlock (blue)
Use the blue key to unlock the briefcase on the office desk (consuming it and locking you out of the other two endings.)
Inside, there's a big red PUSH button. So push it, and the shelf behind the desk slides open, opening up a passageway into a plain corridor.
This corridor has an exit sign over a locked door, next to a panel which takes a three-digit code, and a pair of handles on (a hidden cupboard on) the right wall, which are tied together with wire.
Snip
Use the pliers on the wire to free the handles, then pull them to open the hidden cupboard, which has a hammer in it.
That's not all, though. It seems the narrow cavity here turns right, but you can't see around this corner.
Unlucky
Or can you? If only you had a smaller mirror...
Use the hammer to smash the mirror, then remove a mirror shard and use it on the corner to find a glowing three-digit code.
The code reads 512 (mirrored), so enter that in the panel, which opens up another hidden panel in the wall and gives you another red PUSH button.
Escape!
This button (at the start of the corridor) holds the exit door open, but you'll need to hold it down.
So use the gold bar on it.
Leave through the emergency door, and enjoy a pasta lunch with your friends. Happy ending!
I hope I got this right, since it took quite a lot of effort to get the codes together.
40
This may be an unpopular opinion, but working out obscure codes is one of my least favorite parts of any game.
Interface help
Use the buttons in the top left to save and view the code list.
The code list is grouped by type and location and ordered according to which codes you enter first.
Exploration
(I'm skipping most of the clues here, because that's what the game's about.)
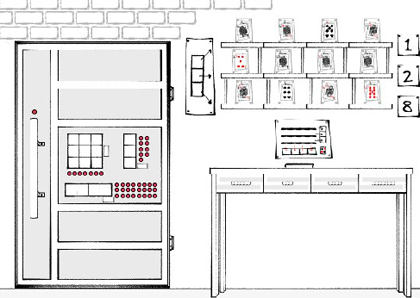
The exit door is right in the middle of the room (it's not a cupboard), and it has 41 lights on it, 7 next to a 3x3 grid of buttons, 9 next to a vertical three-digit panel, 24 next to a four-digit panel, and 1 over the door handle.
The cabinet to the left of it has three doors which open up into compartments with digit-shaped figures in them. Next to it, the cupboard with nine doors has white and orange dots on the doors, which open in different directions to reveal digits on their backs and small stacks of daruma-otoshi blocks.
On top of that, four plant pots hold plants of different types. Above that, a brick wall stretches across the screen, but the dark-colored bricks in the top left are particularly interesting.
To the right of the door, some shelves hold groups of playing cards in clear displays. There are posters to each side of the shelves with various codes and clues. Under that, a table with four drawers holds Reversi/Othello boards with clues beside them, and there's a helpful book on the table which you can flip through for even more codes.
Note that clues in two places involve faint white patterns:
The cabinet doors on the left, and the drawers of the table.
The 3x3 grid
Every single code in this grid comes from the 3x3 cabinet.
However, there are two types of code, 4 of them are sequences of all nine buttons, and 3 of them need some buttons on and some off.
All buttons in order, starting from the middle with each door opening in the direction of the next.
All buttons, in order of the digits on the back of each door.
Only the doors with orange digits on their backs.
All buttons, in order of the number of dots on the front of the doors.
Only the doors where the front dots are orange.
All buttons, in order of the number of blocks inside each compartment.
Only the doors where one of the blocks inside is orange.
For the Orange/white codes, push the buttons marked O.
789612
543
851469
237
OwwwwO
OwO
724918
653
wwOOOw
wOw
479153
682
wOOwwO
OOw
The three-digit codes
5 from the small cabinet, 3 from the shelf, 1 from the book.
First column:
Number of sides on each white shape on each cabinet door.
Digit on the handle of each cabinet door.
Number of digit figurines behind each cabinet door.
From the shelves and the posters on their sides,
follow the horizontal Amidakuji to match the squares from the left poster to the digits on the right.
According to the book's Table of Contents,
the number of sections in each chapter.
Second column:
Number of white shapes on the front of each cabinet door.
Digit shape of each figurine in the cabinet.
Clue from the poster under the shelves:
The rightward arrows are black, so count the black cards in each row.
Code on the poster to the right of the shelves.
406 493101 183
735 784
281 128
437
The four-digit codes
3 from shelves, 3 from the book, 8 from the plants, 5 from the table, 5 from bricks.
Top row:
Digit shapes formed by the shelves.
From the poster under the shelves:
The downward arrows are red, so count the red cards in each column.
Digits on the non-picture cards, from left to right.
Number of horizontal stripes on each plant pot.
Number of leaves in each plant pot, as indicated in the book.
Page number that each plant appears on in the book.
Number of dots on the each plant pot lid.
Number spelt out on each plant pot.
Middle row:
Number of letters on each plant pot label.
Position of each capitalized letter on each plant pot label.
Total number of stems in each plant pot.
Digits on the barcode on the book's back cover.
Price of the book as printed on its back cover.
Number of leaves on each plant on the book covers.
Number of counters of the indicated color on each Reversi board.
Number of knobs on the front of each table drawer.
Bottom row:
Digits formed on the Reversi boards by the black counters.
Digits formed on the Reversi boards after the black counter is placed (flipping the necessary white counters).
7084.
White digits on the front of each table drawer.
Digits formed by the gray bricks.
Number of gray bricks forming each digit.
Number of sides on each shape marked on the bricks.
Digits formed by the marked gray bricks.
Number of marked bricks forming each digit.
2222 3143 5679 2316 6538 7465 5794 19823453 3141 6532 5297 3456 2123 8956 6347
1731 7084 5555 9386 7677 3044 4795 5466
Ending
Once all 40 codes are entered, the light above the door handle lights up. Save your game, and click on the door to escape.
Actually on E.X.I.T. I discovered on replay that I did not have to pixel-hunt.
I thought I had to pixel-hunt with the notebook and magnifier, but actually
I discovered if I clicked on the closed notebook directly on the stars on the cover
that the mouse was in the correct positions to find the numbers with the magnifier.
Indeed, almost every pixel-hunt spot in this game is hinted at by some subtle clue.
E.X.I.T.
Your quest for an exit is greatly improved by these silky smooth animations.
Exploration
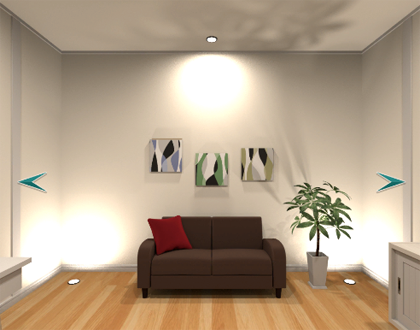
You start off facing three pictures on the wall over a sofa with a red cushion that hides a wooden star piece. There's nothing under the sofa. You can also zoom in on the potted plant on the right for some reason.
And that reason is a loose panel in the wall skirting, next to the floor light. Click it to remove it and find a capsule stuck inside, out of reach.
If only you had a stick to extend your reach...
Oh wait, you do have a wooden stick hidden on top of the left blue picture!
Take it and use it to retrieve the capsule, which has a small horizontal slit on the front.
Turn left to a screen with a table with a locked drawer. It has various items on it, but you can only zoom in onto a locked notebook and pencil holder with six colored pencils of different lengths. Above it on the wall, there's a decoration which looks like a clock, with five different colored balls-on-spokes alternating with six white ones, and a gap at the top.
Turn left. A locked treasure chest sits on the floor with a ring-bound notebook hidden behind it. The notebook has a starry cover and a vacuous interior, i.e. a blank page. Above the chest, a picture hangs over the wall, in shades of tan and brown. To the left of that, a plant hangs from the ceiling, and you can shift it aside to find a three-digit safe on the wall.
Turn left. Six photos hang on the wall, but you can only zoom in on the top-right one with screws around the photo. Beneath the photos, a cupboard has two sliding doors. The right one is locked but the left one isn't, and you find some wine bottles inside which hide another star piece. On top of it, there's a box with some star-shaped holes and a low-detail globe with nothing under it.
Astral
Use both star pieces on the star box, and a click sound signals that it's now unlocked.
So push the catch on its front to open it and find a magnifying glass.
Scope
Use the magnifying glass to uncover the hidden clue in the notebook.
Click on the blank page at the exact spots where stars appear on the cover to find the digits 3, 8 and 4.
So enter 384 in the three-digit safe to unlock it and get a gold key.
Unlock 1
Use the gold key to unlock the table drawer. Inside, there's a flathead screwdriver.
Unscrew
Use the screwdriver on the upper-right photo frame, removing the photo from it to reveal a pentagonal hole behind.
Also use the screwdriver to pry open the capsule. Take the crown piece from inside.
Royal
Use the crown piece on the hole in the photo frame, and the yellow picture slides aside to reveal a box with another pentagonal hole, except this hole points upwards instead of downwards.
It looks like you'd also be able to use the crown piece here, but there's a catch: the picture slides back when you pick the crown piece up.
So hold it open by placing the stick in the gap under its lower rail (you'll have to zoom out once first).
Then pick the crown piece up and use it in the new box, which unlocks it. Open its drawer and take the silver key.
Unlock 2
Use the silver key to unlock the cupboard door under the globe, and take the photo from inside.
This photo shows a top-down view of the room, but exactly one spot is different.
Difference
At the lower-left of the photo, something is on the wall where it's currently blank.
So click the empty wall (slightly under and) to the right of the brown picture to find a loose panel. Push it and it opens up. Take the lever from the hidden compartment.
Tock
The lever is actually just a black ball on a spoke, so use it on the clock decoration and push it down, causing all the other colored balls to extend.
So you'll need to push them back in. But do it in the wrong order and the puzzle resets.
Follow the order of the colored pencils to push the colored balls in.
From longest to shortest, the pencils are black, green, yellow, blue, red, pink. So click those balls (bottom, lower-left, lower-right, upper-right, upper-left), and a clicking sound signals that something is unlocked.
So click the decoration again to slide it aside and find another (physically implausible) gold key.
Unlock 3
Use this gold key to unlock the locked book on the table. Inside, there's a pentagonal chess piece.
(In shogi, the 玉 or 玉將 piece is the king piece for the lower-ranked player.)
Kingly
You could use the chesspiece in the hole in the photo frame, but then both pieces would be upside down.
Instead, pick the crown piece back up and use the chesspiece in its place, and place the crown piece in the photo frame.
The brown picture slides down, revealing a panel with two switches. The left switch, marked with a lightbulb, is on (up) and the right switch, marked with a key, is off (down).
Dark
Flip the light switch, plunging the room into darkness. Your photo also turns dark, with a key symbol glowing in the middle of it.
Looking around, you find something glowing in the dark next to the table: a grid of nine buttons, with the center one marked by a key. The outer buttons turn on and off when clicked.
Light
Turn the light switch back on, and the key switch flips along with it.
Back out and take a look around the room again. Now that the key switch is on, something's different — more than one thing, in fact.
Some of the lights in the floor and ceiling remain off, namely the one next to the potted plant and the two nearest to the table.
Use this clue to unlock the grid of buttons.
On the photo, those are in the upper-right and lower-left corners and on the left side.
So turn off the lights again, and click those three buttons on the grid, and then the center key button. The lights flicker back on.
Click the key button again, and the entire panel of buttons swings to the side. Take another silver key from behind.
Unlock 4
Use this silver key to unlock the treasure chest, and take a captain's wheel from inside.
The wheel has a hexagonal protrusion on the back, so look around for somewhere it fits.
Speaking of the chest, something's different on its screen.
The light to the left of the chest remained off, so zoom in on that corner.
The right wall is a little uneven, so click on that spot to tear off the wallpaper patch, revealing a hexagonal hole.
So use the wheel on the hole, and turn it. The wall behind the chest lifts out of view, leaving behind a short passage with double doors behind.
Escape
Click on the double doors to open them. Bright light floods in from outside, so click the passage to escape.
I missed this earlier, but there's a further significance to the name:
The keys spell E.X.I.T. in the order that you get them!
The Kotorinosu made me wish Neutral would have more games.
Update