

Jayisgames really needs your help to continue providing quality content. Click for details
Wishing you happy Wednesday with four new games!
Amajeto has slightly changed their style not to repeat themselves, but they are still easily recognizable. This week is ending the series by Pixel Kobo with the tenth chapter and after you finish the mission, you get stuck in tomoLaSiDo's room looking for capsules containing key parts. The WE closes with very nice Rinnogogo's creation easily recognizable by their art style, ringing soundtrack and intuitive puzzles.
Have a good time and enjoy
Snowy Hills
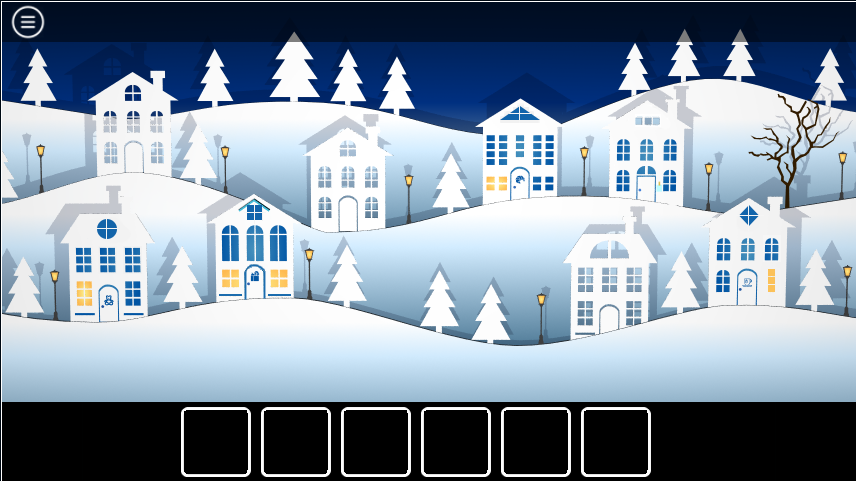
The latest Amajeto is different - no tiles, no keys, and mainly, no room. You got lost in a charming winter landscape with small houses standing here and there on snowy hills, and you can enter none. Each door requires a code - and here we identify Amajeto as we know them. For their codes - four shapes/colors/digits codes. But what you really need is to find a snow shovel.
The cursor isn't changing, save option, one ending.
Reoda: Chapter 10
In the tenth chapter of Pixel Kobo's series the journey takes you to well known places from Chapter 8 (WE N°273). Right at the beginning you have already two valuable items in your inventory - a key and a hint to a puzzle. To find out what the key opens and where to use the hint is another story since the orientation in the game is a bit confusing and it's quite hard to find active spots and follow developers' intentions. Previous chapters were similar in this aspect though so you know what to expect and it's for the last time - your mission is complete!
The cursor isn't changing, autosave, one ending.
Escape Challenge 127: Room with Kagami Mochi
 |
 |
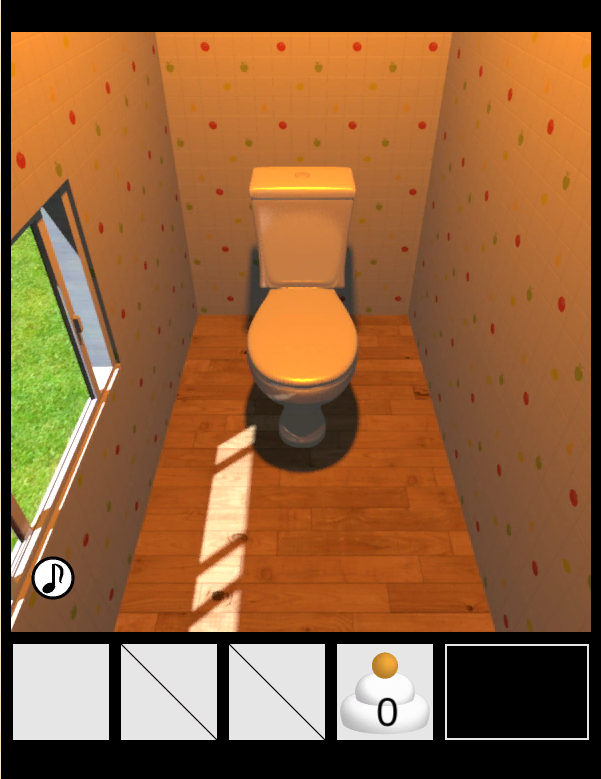 |
Kagami Mochi is a traditional Japanese New Year decoration and tomoLaSiDo hid seven of those in their room. The rice cake which seems like a foundation of another Kagami Mochi is for another purpose and you'll get a detailed instructions with pictures what to do. Don't get yourself distracted by Japanese signs - you encounter them twice. Once you get a hint easily understandable to non-Japanese players, and once you might take a close look at them...
The cursor isn't changing, no save, one ending.
Choice
 Are you fond of home design? If so, Rinnogogo gives you a chance to decorate a small house! You can chose furniture, carpets and even wallpapers for the duckie who owns it, but first you need to get money for that - furniture doesn't grow on trees, you know.
 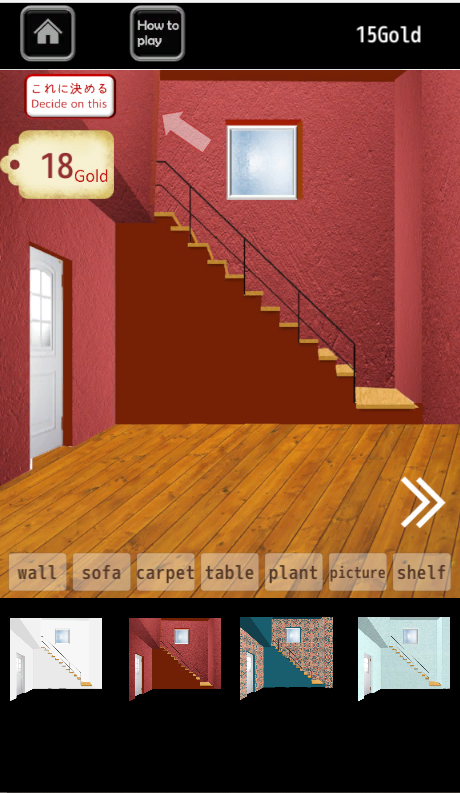 Golden coins are hidden in the garden surrounding the house and the final design depends on an amount of coins you put together...some coins are just lying somewhere around the garden, to get others you need to figure out puzzles and open boxes and coded locks on doors. When the house is ready for moving in, the garden gate opens.
The cursor isn't changing, autosave, one ending.
![]() Choice (Android, Android Tablet)
Choice (Android, Android Tablet)
We love escape games, and our readers love talking about them and sharing hints! How about you? Let us know what you think, ask for clues, or help out other players in the comments below.


Tomolasido
I found one clue to the 4 digit puzzle. But where are the other three? I consulted a walkthrough but the person solved without showing where the clues are.
can't wait for the walkthroughs to these.
Tomolasido
I was not able to comprehend the clock clue.
In case you are sensitive to questions, hints, or clues, do not click. I got the answer but had to consult a walkthrough but how was I supposed to know the answer.
How was I supposed to know to divide the numbers on the clock by 2?
Choice
How adorable. If you are sensitive to hints do not click the hint button in the game. It is very very helpful and made it more fun to me.
i somehow managed to suss out that clue without a walkthrough.
not sure if my reasoning was correct, but
i divided each number by 2 because the clock face looked like it was broken in half by the hammer.
Choice - wow, an escape game with replayability! Great innovation by Rinnogogo.
Did anyone else have problems with Riorda loading? I tried refreshing twice but all I get is a spinny thing.
Yes the game loads very slowly.
I tried again to play Reoda 10. It never loaded. I let it spin for 30 minutes. I haven't tried a different browser. I'm using Firefox.
Hmm the game does load slow, but not that much. I think - I may be wrong though - that depends on pc (I had big problems with Pixelkobo games on my old pc).
@Reoda, to solve loading problem:
type CTRL+SHIFT+K, then type "init()" and press ENTER
kktkkr recommended this once for one of the other Reoda games. It worked for me ;)
Hope walkthroughs are on it;s way soon.
Snowy Hills
The puzzles here get really tricky. Don't lose your cool!
Exploration
There are lots of houses, lamps and trees, but the shadows seem to tell you it's not real. Three of the houses are transparent, and you can't examine them further. Let's focus on the others.
The left house has shapes on its door lock, and the second house has a pile of snow blocking the door.
In the back, the third house has four buttons on its door lock, and the fourth just has a sign with weird objects. The last house at the bottom right has four colored dials on its door lock.
At the top right, there's a tree without any snow on it, but it has a snow pile under it.
Shapes / Exploration 2
For the left house, the clues are
the windows on the houses with labeled doors.
Read the top windows from left to right.
Circle Square Triangle Diamond
It's packed with toys, but you can only zoom in on a calculator you can't use next to a pair of ribbon flowers, and a green thing that all the balloons are tied to.
Dials / Exploration 3
For the right house, the clues are
the ribbon flowers.
The yellow, red, blue, pink ribbons are on the
Bottom-right, Right, Bottom, Left
It's filled with teacups with green flowers on them. At the top right are four boxes of teabags, and the second one has two buttons on its lock. Also,
the displays on both sides have locks on their bottoms.
Corners / Exploration 4
For the house with a croissant on its door:
The clues are in the previous two houses.
The flowers in the left house match the cups on the right house, on the shelves
⌝ ⌜⌞⌜⌟
This room is full of breads and cakes. You can take a croissant and read the clue above it.
Grid / Exploration 5
For the right drawer in the right house, the clues are
the croissant shelf and the calculator toy.
The symbols appear on the buttons in the positions
_ 2 _ _

4 _ _ $

_ _ _ _

_ _ E _
Push those four buttons.
There's a shovel inside.
Shovel up the snow under the tree to find a clue, and also shovel the snow in front of the second house.
It's full of fruits! But the crate of lemons on the left is locked.
Remaining puzzles
You'll need the clues from
the apples, the houses, the breads and the clue panels in the croissant house and under the tree.
For the lemon crate:
The clue panel in the croissant house indicates a sequence of all four houses.
Count the lit windows on those houses to get the code
3864
You get a lemon.
For the left drawer in the tea house:
The clue under the tree indicates a sequence of the bread shelves.
The cupcakes on those shelves are
Yellow Green Blue Pink
(1 4 3 2 clicks)
Take a pair of scissors.
For the second teabag box:
The apples are red, green, green, red, green.
(LRRLR)
You get a teabag.
Escape
In the toy house, zoom in on the green thing and cut the left thread to get the blue balloon.
Now that you have all four items, you can enter the top-right house to end the game.
Reoda: Chapter 10
Chapter-10: Finale
Story time
After solving the puzzles of the island last time, you've made it inside the facility. But as you approach the handprint…
You hear Tika's voice. She's real and she's here for the energy source (named REODA).
She explains that you're looking at a palm-print biometric sensor, and Dr Reoda probably would have put your data in. But just as you approach the handprint…
AI Pixel shows up to stop you. Yes, your old partner has been resurrected, and he tells you that Tika is actually a professional spy.
She sure did seem suspicious with all that focus on the new energy source rather than the doctor.
Anyway, she pulls out a gun and tells you to eat lead, but Pixel reminds her that the reader won't work if you're dead.
Tika doesn't seem too worried about that. BANG!
After shooting you, she explains that the bullet is nonlethal. It's not tranquilizer or truth serum, it's hypnosis drugs!
So you do as she says, and reach out your hand onto the reader. Tika looks inside… at a banana peel.
And then you shock her with the stun baton. It's nonlethal too.
Of course, there's no way that that hypno-bullet would have gotten through your vest. Not even a mosquito could have gotten in!
That banana's not just a prank, it has a key under it. Somehow, you know just where to go by looking at the key.
All signs point to Bizan. You're going back there!
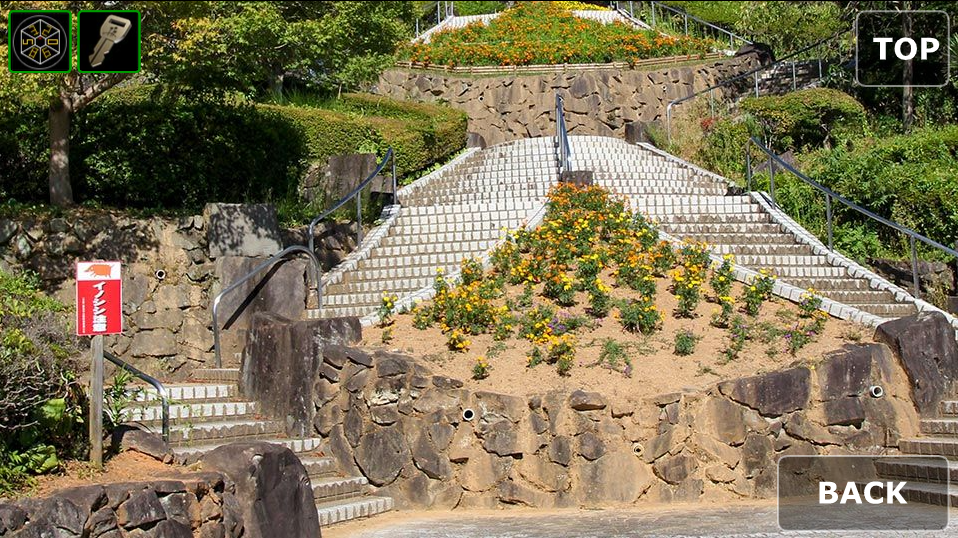
Exploration
You start off with the SD card hint (which is an item for some reason) and the key.
It's exactly the same as last time, except you can no longer zoom in on some clues. There are new features if you look closely at everything (or maybe if you compare each screen to Chapter 8):
You can look at the side of the kaleidoscope building.
The panorama panel now has a star on it.
The concrete chair nearest to the panel has a keyhole.
And while facing the vending machines (opposite the city view), you can push a button at the bottom right of the screen.
Go down the steps. At the bottom, there's a bright red sign telling you to beware the wild boar, but why does it have a handle?
Along the stone wall, there's also a small pentagonal hole you can zoom in on.
Back out and turn left to the gazebo. There's something hidden here, but it's not dangerous at all and you can't use it yet, so I'll get to it later.
Turn left. The statue is still doing that eye thing.
Click him, and then turn right to face Missing Part. Clicking it makes the rock open up!
Opening up
You can do some things starting with the dial on Missing Part:
Turn the dial to open the artwork. The picture above shows you where to look next.
The left railing of the gazebo has a switch. Flip it down, and the picture beside it shows you the next step.
Open the gazebo sign, which has a keypad lock.
Unlocking
Unlock the concrete seat where you started. There's a picture and two buttons.
Unlock that using the clue from
the statue.
The eyes look
RLLRLRRL
Take a lever handle with a pentagonal gem in it.
Use the lever on the hole in the rock. The nearby thump tells you that the
red boar sign is now open.
For that sign, the clue is
on the windows of the kaleidoscope building upstairs, after you push the hidden button
and wait for the yellow tint to become noticeable.
The yellow window panes are
Y - Y

Y Y -

- Y -
But nothing appears to happen.
The star symbol tells you to look at the map at the viewing area.
Specifically, click the star on the map to open the hidden panel there.
You get a cylindrical object.
Scope
Place the cylinder on the floor of the gazebo, then look up at the ceiling to view a clue.
Use that clue (and the hint you start with) to unlock the keypad in the gazebo sign.
Each side of the hexagon has a different number of blue dots, forming a sequence from 1 dot to 6.
You'll have to rotate the clue slightly to make the red markers align, so 3 is the fourth digit, and 8 is the first, and… is that a 6 or a 9 in the code?
The inner hexagon is the bottom of the number, so that's a 9.
The final code is 829305.
But again, nothing appears to open. Maybe take a look around?
A red button pops up in front of the man and dog statues. Push it, and then click the huge screen to end the game.
Ending (summary?)
It's another of Dr Reoda's messages! And this time, it's for you only: anybody else who pressed the button would have made the message self-destruct.
He has a story for you about his family from decades ago. When his son was 3, he started work on a national project and it became clear that it was a very dangerous job. As the subject of terrorist threats, his wife persuaded him into a divorce, and he had to let his son go.
As you may have guessed, that son is you! The doctor has been watching over you all this time, through ISMO and your smartwatch.
Yes, the energy source was eventually completed, but it came with a major flaw: it used banana peels for fuel, and it was impossible to grow enough bananas to power the world. After all, they only grow in tropical areas.
All alternative sources had the same problem, and so REODA could not be released to the world. But perhaps someone else could make it more efficient and thus viable. The doctor decided not to destroy the prototype, instead storing it in this gazebo and asking you to retrieve the SD card codes.
He looked for something to replace REODA, and settled on solar panels, making them smaller than even the ones on artificial satellites. That was completed too, and installed into the cannon on the southern island.
So the doctor's dream is fulfilled. Also, the rumor was that he was kidnapped, but he's perfectly fine, and chasing his dreams at a relaxed pace.
There's a lot more to talk about, but it wouldn't fit in this ending.
Your efforts have not been in vain. By collecting the cards, you've protected REODA from the bad guys.
You may not have found the doctor, but he did mention one more secret in your watch. Where will it take you next?
(Ending statement from the game maker, summarized: It's been a long journey. The series is done for now, and there is no sequel planned. Apologies for the bugs. Also, there are seven movie homages throughout the series. Did you get them all?)
Escape Challenge 127: Room with Kagami Mochi
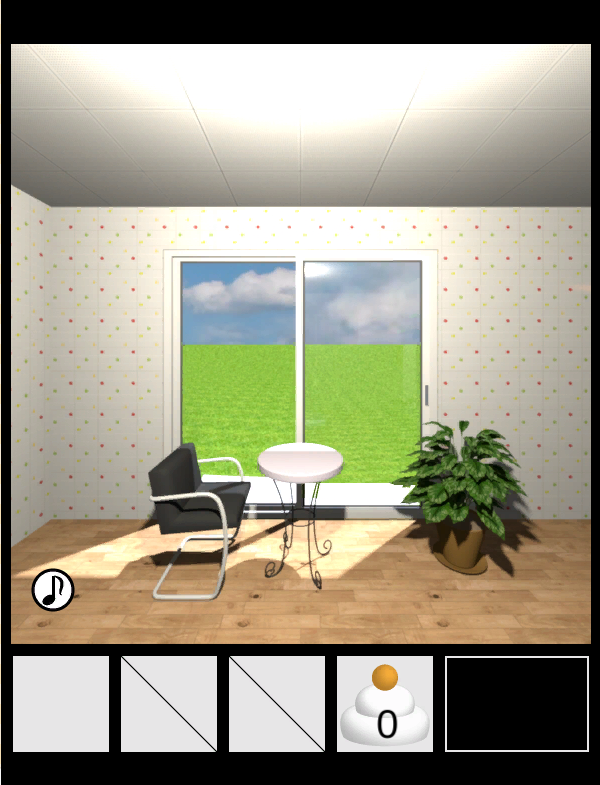
Exploration
You get the usual stuff on the starting screen, except that the table now has symbols on it, and the potted plant has a key piece beside it, and
you can click the door handle while zoomed in on the potted plant.
Turn left to find a glass case with a smiling pile of mochi, a picture frame with instructions for cutting and frying, a small wall panel with sliders, and a cupboard that you can only use as a kitchen counter.
Also, there's a clue under the machine.
Turn left to face the door, a wall clock that seems to have been smashed, a wall box with a grid of kana characters, and a chest of two locked drawers.
Turn left to find wall shelves with 3 mochi on them (actually 3 stacks but I'll count each as 1 to keep it simple). There's also a tall machine with pictures, a more normal locked wall box, and a blue bin with a key piece in it.
Enter the corridor to the toilet, where you can sit down, look right, look up, and look left to find a drawing.
After you open the glass doors, step outside for some fresh air. It seems you have to do some drying here.
Puzzles on door screen
You'll need clues
from the shelves and clock (and some Japanese helps too).
For the white wall box:
You may have guessed from the table clue that only も and ち are important. (もち is just mochi!)
If you remove all the occurrences of し and リ , the remaining spots in the grid form the code
512
Take a mochi.
For the top drawer:
Reading the clock hands with the thicknesses shown gives you 1024, but that won't fit in three digits.
(Number/computer enthusiasts may recognize that 1024 is a power of 2. Perhaps that might give you some inspiration.)
The hammer on the clock suggests that you divide the clue (or the code) by 2 to get
512
For the bottom drawer:
The green shelves are in the
high, low, middle.
The drawers contain 2 key pieces and 2 mochi.
Sliders
The clue for the wall panel is
on the white wall box. Look again.
The white spots are on the right, left, right. What about the number 3?
Click the button thrice.
You get a key piece.
Flipped
Use the clue
under the glass case and on the table
to unlock the other wall box.
The upright characters もち are in the top right of the table, and the symbols in the other quadrants are horizontally and vertically flipped. Doing that to the digit 2 (shown under the glass case) gets you
5 2
2 5
Take the last key piece.
Tall machine
The mute button covers one of the three lights in the bottom left. That's not part of the puzzle.
The puzzle has two of the same picture. Or at least, they're similar. Certain spots on the left picture are important.
The differences are in the sun, tulip and bottom left grass. Make sure you click exactly on the differences.
You get a plain blob of mochi (item).
Heated
Place the mochi on the "kitchen counter" cabinet, and click to karate it up into cubes.
Pick up the cubes and put them on the drying area outside. Hmm, looks like this will be quite the wait.
But if you've been following up to here, you can just enter the room and come back out, and your mochi will be completely dried
And you can put it in the fryer to complete the okaki snack.
You can now unlock the glass case using the clue from the
drying area.
Blue Green Yellow Red Red
(4th 3rd 2nd 1st 1st)
As you'd expect, it contains mochi.
And that's all! Leave through the door to end the game.
Item list
6 key pieces:
Top left: in top drawer
Top middle: in bottom drawer
Top right: in slider panel
Bottom left: in brown wall box
Bottom middle: in blue bin
Bottom right: beside potted plant
and 7 mochi stacks:
3 on wall shelves
1 in wall box
2 in drawers
1 in glass case
1 (item) from tall box doesn't count towards your total, but it shows up on the end screen if you complete the sidequest.
Choice
You may want to just follow the hints, which come with pictures this time! Since you only get one sequence of hints at a time, this walkthrough is almost a direct translation.
As the chick in the panda suit tells you, the empty room needs some furniture. There's a complicated-looking tutorial screen (two actually: click the hand at the bottom right) but you can close it and read later.
As for the gameplay: the outside of this room is the real escape game, and the collectibles are piles of gold. Fully decorate the room by buying up one choice from each spot.
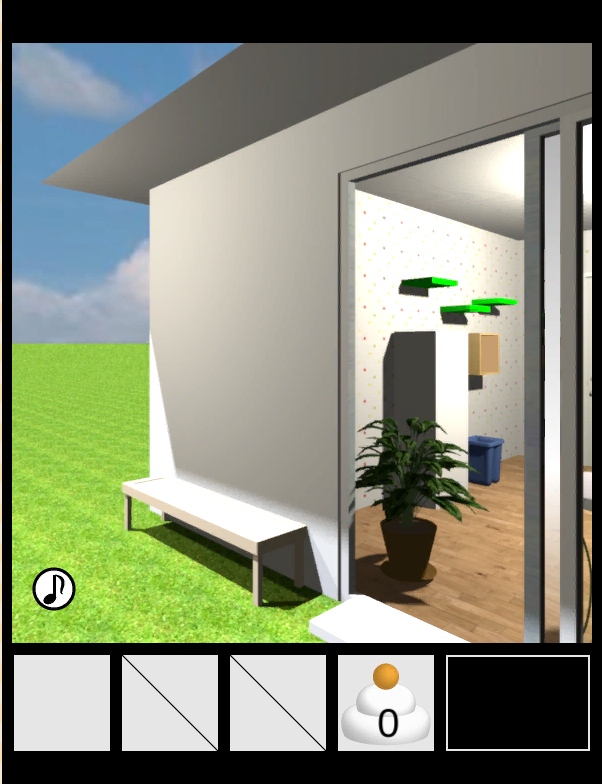
Exploration
You start with 15 gold, enough to do some shopping right away. (You can go upstairs but that room is locked.)
After you leave the house, you find a stone block with buttons and a red pin. Behind it, there's a red hut with a keypad lock. Pick up the bucket beside the passage on the left, and follow it to a locked white door.
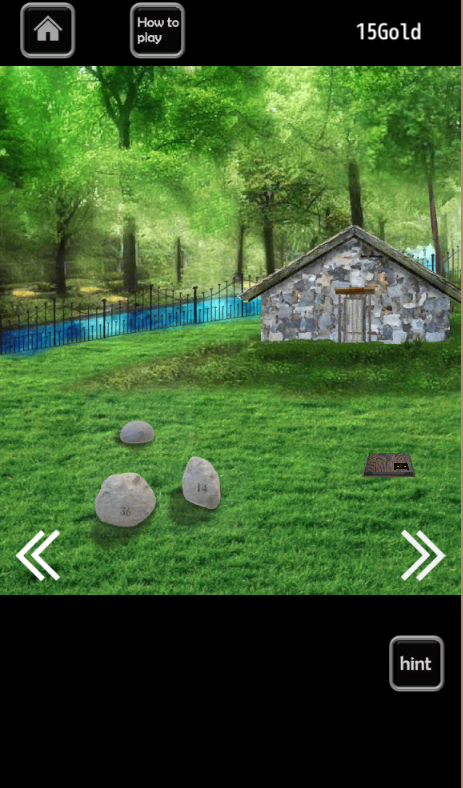
Turn right to find three stones with numbers printed on them. There's a card reader attached to the ground, and the stone house behind is locked.
But you can take a walking stick beside the door.
Turn right to find a vegetable patch where you can lift the onions. The tall green house is where you started, and you can check the red mailbox to find it locked.
Turn right to find a red door. The stone pit next to it has something shiny. There's a wooden pallet with a blue dish, which suggests that you should
check the tree to find a bird holding a key.
While zoomed in on the door, you find that the left panel has a hinge on it. Open it to find 15 gold.
Hmm, that's not much items to start. Check the bucket to find some string.
Stony
Unlock the red hut using the clue on the stones.
From left to right:
36214
Your reward is 10 gold, but you can also
click the CLEAR panel
to get a key.
Exploration 2
Unlock the stone house. The potted shrub here has a wooden stick in it.
Turn right to find a bookshelf with a color clue and a letter lock. The wall panel beside has two levers you can play with.
Turn right to find a desk with a projector pointed at a screen. The drawer has a panel with an onion pattern screwed on, and the projector can be plugged into something.
Turn right to find a wheelbarrow with a locked box in it, as well as the doorway out.
Switches
Place the stick on the levers next to the bookshelf, and tie it with the string.
This allows you to flip both levers up, getting access to 10 gold and a screwdriver.
Planted
Unscrew the onion panel on the desk, and use the clue from the onion garden to unlock it:
The onions have different number of stalks from 1 to 4:
Square Star Circle Plus
It contains 20 gold and a remote control.
Color split
Plug the remote into the projector, and push the buttons to make color clues appear on the projector screen.
Use those to unlock the box on the bookshelf:
The blue, red, yellow, green clues combine horizontally to form the code
TOPThe top compartment opens, but it's too high to reach…
High / Red
Use the walking stick to retrieve the bag, which contains 10 gold and a red key.
Use that to unlock
the mailbox
which contains 15 gold and a postcard with tulips on its back.
Color swap
Use the postcard clue to unlock the wheelbarrow.
Since the clue word
slituses letters fromTULIPS, you need to enter the colors in the same (6th 3rd 4th 1st) positions:Purple Blue Pink Red
(Bottom-middle, Top-left, Top-right, Bottom-right)
You get 10 gold and some bird feed.
(You're finally done with this room! )
Birdie
Place the bird feed in the blue bowl.
Look around the garden (by turning right four times) and then check the bowl again. The bird has brought down 10 gold and a key.
Use that to unlock the door at the end of the stairs.
Exploration 3
You arrive at a pond with very clear water, and an island full of treasure in the middle. On this side of the pond, there's a slider lock and a patch of soil.
Turn around to face the doorway back. There's a wooden seat with six pictures and 10 coins under it, as well as some plants on the right which hide 10 gold and a red shovel.
From brown
Use the shovel to dig up the soil patch, getting a color stripe panel with a red pin.
Use that clue and the one from the pictures to unlock the six-button stone slab near where you started:
(It helps to view the hint.)
Each of the buttons represents one of the six pictures, specifically the background color. The stripe clue tells you a sequence of colors.
Since the brown picture is numbered 1, you need to read the clue starting from the brown stripe (on the right). Wide stripes mean you have to hit that button twice.
Putting that all together, you have to push the buttons in the
↖↓↙↘↘↗↑↑
positions.
Take 15 gold and a keycard.
Rich
The hint system thinks you should be picking up more gold rather than advancing the story.
One hint tells you to get the gold from the red door (mentioned above in Exploration), and the other tells you to get the sparkly thing beside.
Dip the bucket in the pond water, and use it to fill the pit beside the red door.
It's a capsule with 10 gold.
Scanner
Use the keycard on the reader (near the stones) to open a trapdoor that has 15 gold and colorful baubles.
Use that clue to unlock the slider lock at the pond:
Match the lengths of the yellow, red, white, green chains by clicking the sliders
3 0 2 1 times.
This makes lilypads appear. You can pick up 40 gold from the lake.
Finale
The game stops giving you hints, because you've finished the escape part of the game!
Now you can get in the house and decorate. For each category, click an option along the bottom, and click the Decide button to buy it. (No changing your mind after you choose any options, so you might want to open the game in a few extra tabs if you're that kind of person.)
After you're done with the bottom rooms, the bedroom is unlocked and you can design it too.
Oh, you want to know about prices? Here are the ones displayed in-game:
LIVING ROOM
Wallpaper: 0 18 20 15
Sofa: 5 5 8 10
Carpet: 5 8 10
Table: 3 5 5
Plant: 3 5 10 10
Picture: 3 5 5
Shelf: 10 15 15
(I found a bug where you can buy the same picture/shelf multiple times. Doing so may make the game unwinnable, so be careful.)
KITCHEN
Kitchen: 15 15 20
Fridge: 10 10 15
Lighting: 5 10 10
BEDROOM
Wall: 15 20 20
Bed: 10 10 15
Lighting: 5 10 15
Stool: 5 10 10
Plant: 5 10 15
Carpet: 5 5 10
Decoration: 5 10 10
Total (low): 109 coins
Total (high): 210 coins
(Yes, that means visiting the last area was optional.)
Whatever your choices, once you're done with the bedroom the chick comes back to inform you that you can leave.
Exit the house and leave through the red door to end the game.
Thanks again, KK. awesome as always.
Update