
 Hi everybody, this is Halloween Special Weekday Escape 4!
BOO! Yep, it's this time of a year again and yep, the whole year is almost over, already! This is the fourth Halloween Edition and as in previous specials, all games are more or less focused on Halloween theme. The first comes Amajeto with their luxurious hotel with non-functional lift. Then you find yourself in Detarame Factory's apartment locked up together with several cats and from some reasons, cats are prominent feature of this WE. In retro Esklavos's you need to get rid of the spell casted on your cat, and in Chizu's game you deal with the whole pack of cats. Inconspicuous game by Springman Haruoroom turns out to be quite long and funny, and the last comes Nicolet. Yay! No escapist needs to introduce their games, right? We got another awesome game from them. At the end you find two bonus games, by Yuri and by Minoto. Happy playing and happy Halloween!
Have a good time and enjoy!
Amajeto trapped you in a hotel room and even if you succeed and find the right key, you haven't won yet. You need to escape a hotel corridor, too, not just your room, where the hotel lift apparently doesn't work properly. Other hotel guests - if there are any staying on your floor - won't help and so you're on your own in a hunt for missing lift button. Can you find it?
The cursor is not changing, no save button, one ending.
In Detarame Factory's game you meet a kitten or two in every scene, and one cuter than the other, all wearing those tiny Halloween costumes. Authors certainly know how to create a visually attractive and fluent game but not an oversimplified one. The game is bigger than seems and offers a good solid portion of clever puzzles. Very playable!
The cursor isn't changing, no save button, two endings.
P.S. Here is a loose prequel: Nightmare Escape (Detarame Factory). Much fun too.
Your goal in Esklavos' game is to turn your cat alive. Well, it had been alive, originally, but then the evil witch came and turned it into a stone! Whether the reason was pure hatred or felinophobia we don't know but it doesn't make a difference - you want your cat back. Luckily, you get into the witch's place while she's out and after a brief survey of books you find the correct spell in one of those. Can you get all ingrediences?
The cursor is changing, no save button, one ending.
Lovely game by Chizu is easily playable without the slightest knowledge of Japanese. It doesn't seem so since all the kitties you meet do wish to tell you something and you don't know what! Well, click away the dialogues and play - you aren't missing any crucial hint by doing so and clues are quite obvious (if you think about them long enough). Just one thing. One item, pale blue rectangle, is not a mirror or a sheet of glass as I thought; it's an empty cellophane sack.
The cursor isn't changing, no save button, one ending.
Original Springman Haruoroom's room brings much more fun than it seems. New windows and hidden compartments emerge from empty walls by a charm, new areas to explore are being opened, and puzzles often surprise you by their wit and freshness. In order to set magical actions in motion the correct code has to be entered or the right item used - the small helpful ghost appears then and conjures a window or so up. Clever. Can you get your hat and catch the Halloween feast?
The cursor is not changing, save button, one ending.
The game is available for Android too.
Nicolet invites you to a moles' house into the middle of preparations for Halloween. Suddenly, the doorbell rang and the first neighbour in a costume comes in with very specific idea of the candy he hopes for. You need to help your host to find it and solve few puzzle during the search. After the satisfied trick-or-treater leaves and gives you something in return, the doorbell rings again and the whole proccess repeats. Oh well. The moles from some reason hid treats at quite unexpected places. Will you make happy all the visitors?
The cursor is not changing, autosave, one ending.
P.S. The game is available for Android and iOS, too. Here is a coffee button.
Bonus game 1: Lovely game by Yuri: (not exactly halloweenish but features a merry ghost) Puzzle Escape 8.
Bonus game 2: Poetic and surreal game by Minoto. It's Child Alien. We've run out of Halloween games by them.
We love escape games, and our readers love talking about them and sharing hints! How about you? Let us know what you think, ask for clues, or help out other players in the comments below.


cant wait for these.
I noticed you link to the Japanese iOS Nicolet Collection.
The US one is here: https://apps.apple.com/us/app/escape-game-collection/id1453288010
I had a problem with the 4x4 grid in the Amajeto one. I knew I had the correct solution, but I had to re-cycle though the colors of all of the tiles again before it would let me click the arrow.
hope the walkthroughs are not far off
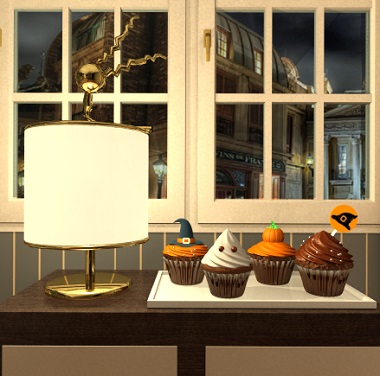
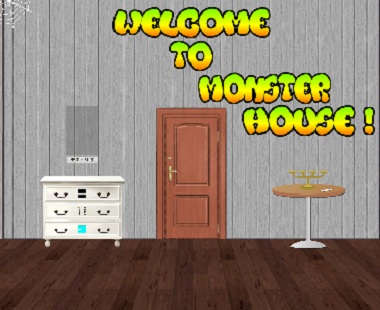
Hotel Halloween Escape
Welcome to Hotel Halloween! (Finally.) There's no trick-or-treating allowed here, so you'll just have to occupy yourself with escaping.
You might find this game a bit longer than usual, but there's a save button you can use.
Exploration
Even without arrow buttons, you get three whole walls (and a corner with two doors) to look at.
Left wall: a TV above some cupcakes you can rotate.
Front wall: two locked compartments.
Right wall: a picture missing no tiles, and a pair of locked compartments.
Piece together
Solve the picture by rotating the tiles until they align:
3 1 1 2
2 2 1 3
3 2 3 2
1 3 1 2
This gets you a key.
Also, use the clue from the cupcakes to unlock
the four-digit compartment
The bottom (front) and top (back) parts combine to form the code
8305
Take another key and a candy corn.
Unlock / Exploration 2
Use the bronze key on the left door, and the silver key on the right door.
The bathroom (left door) has a pattern above the sink and a candy cane beside the basin, as well as a locked drawer with vertical bars. The shower has a light switch that makes a glowing pumpkin appear.
Push the switch again to turn it off, and then you can leave.
The hotel corridor (right door) features a wide carpet to the elevator, but let's explore first. The pumpkin bucket is decorated with candy corn that you can't take.
On the left wall, a weird picture between two doors shifts when you click its corners.
On the right wall are two locked drawers.
Push the button to enter the lift. One of the buttons is missing, so let's try the others.
4, 3 and 2 look very alike, except for the designs of the huge pumpkins, and a candy corn hanging from the ceiling at 3. You can't go anywhere on those levels.
After you're done with your tour of the place, push 1 and exit the lift to return to the corridor.
Bathroom drawer
Use a clue from
the elevator
to unlock the bathroom drawer:
The fence decoration on the back wall has four posts which are higher. To match their heights, click the bars
2 0 1 3 times.
Take a candy corn from it.
Corridor drawers
Clues:
The jack-o-lanterns on each floor, and the bathroom lights.
For the top drawer:
The pumpkin eyes on levels 1 to 4 are
Down-triangle, Diamond, Circle, Up-triangle.
▼◆●▲
For the bottom drawer:
The yellow, red, blue, green parts of the K point
Up, Up-right, Down, Down-right
Take 2 candy corns and a remote control.
Screen
Return to the room and turn on the TV to view a clue.
Use the remote on the TV again to view another clue.
Picture
Use the clue from the
TV
to unlock the picture in the corridor:
In the direction of the arrow, the orange window panes are on the
⌟ ⌞⌜⌟⌝
Behind it is a mysterious clue.
Room puzzles
Clues:
the bathroom, the TV and the back of the corridor picture.
For the right compartment beside the door:
Push once for white and twice for light brown.
1 0 0 1
0 1 2 0
0 2 1 0
0 0 0 0
Take another candy corn.
For the bedside table compartment:
The picture clue translates to B + ONE, which is
BONE
Complete
Now that you have all 8 candy corn, place them in
the bucket beside the elevator entrance
which flashes a clue for the remaining compartment in the room:
The eyes flash LRRRL but they point down instead of up, so after rotating the clue you get
RLLLR
Take the G button and attach it to the elevator panel to win!
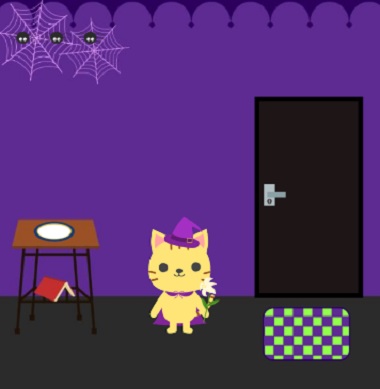
Cat and Halloween
Give the cat sweets to escape!
Menu reminder
Buttons on the page before you start:
Start game
Continue from save data
Play in app
View and send comments
View author's other games
Buttons in the game menu:
Save
End game
Continue from save
View and send comments
Hint please
Cancel
This hint button requires the app, so you should be using the button (circled i) in the game instead.
Exploration
The cat in the witch costume asks for a cupcake, and the door requires a key. You can read the book on the left, and shift the doormat to find a coin.
Turn right. The dead tree needs an apple, the crow on the grave needs a necklace, and Frankenstein's cat needs a chocolate cake. The bats above shift slightly when clicked.
Turn right. A mummy cat holding a ladle blocks the door and asks for cookies. There's a picture of a spider on the left. Take a dart from the dartboard above an empty wineglass.
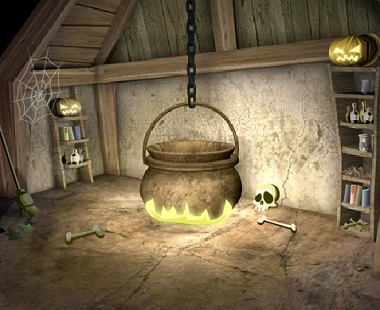
Turn right to face a grid of cabinets and a cauldron full of water. Don't forget that if you're stuck on any of those cabinets the in-game hint button can help you out.
(Hint 1) Dip
The arrangement of buttons on cabinet 6 match
the bats
which gives you the code
LCRCL
Take an apple, and give it to the tree to make it more gnarly.
(Hint 2) Flat
Use the coin to unscrew the spider drawing, and remove it to find a key taped to the back.
Use that to unlock cabinet 2, which contains a packet with a flame drawn on it.
(Hint 3) Curled
Use the clue from the tree to unlock cabinet 4:
The branches curl towards the RLLRR, but the matching spirals are on the
LRRLL buttons.
Take the plate of cookies, and give it to the mummy to get its ladle.
The mummy also stands aside to let you access the door.
Exploration 2
A ghost cat asks you for a donut. There's also a green pumpkin, a jumbled picture, and a skull balloon.
Turn right to find a coffin with face buttons.
(Hint 4) Full
Fill the ladle in the cauldron, and then use it to fill the wineglass.
Ooh, floating eyes! Use them to unlock cabinet 3:
LDR
Take the cake and give it to the monster cat to get a candle.
Use the candle to light a fire under the cauldron.
Also use it to heat up the packet to get a clue.
(Hint 6) Word
Enter the code from the packet into cabinet 1:
reatTake the jar of konpeito candy.
(Hint 7) Feed
As the drawing tells you, give the candy to the spiders by putting it on the plate.
After you turn around and turn back, you see each spider holding a piece.
Enter the clue from the spiders into cabinet 8:
Middle Bottom Top
Take the donut, and give it to the cat in the second room to get a skull and bones.
As instructed by the book, add the skull to the cauldron to make a ghost appear.
(Hint 8) Face
Unlock the coffin using the clue from the ghost:
happy, sad, sad, happy, sad
A vampire cat asks for a lollipop.
Sharp / Hard
Use the dart to pop the balloon, and a scratch card falls out.
Use the coin on the card to reveal a number.
Messy
Solve the picture by rotating each tile to put the white border on the outside, and then the middle tile to match.
A number appears.
(Hint 5) Math
Use the number clues to unlock cabinet 7:
Half the star = 50
Heart = 203
Add them up to get the code
253
Take a lollipop and give it to the vampire to get a necklace.
Then give that to the crow to get a feather.
(Hint 9) Blend
Add the feather to the cauldron to turn its contents purple.
Then scoop it up with the ladle and drip it on the pumpkin in the second room to make it into a bigger jack-o-lantern that flashes different colors.
Use that clue to unlock cabinet 9:
White Blue Green Yellow Blue
( ⌜⌟ ⌞⌝⌟ )
Take the cupcake and give it to the witch cat, who gives you a flower.
Lay the flower on the grave (or rather, in the vase), and a bloodied hand pops out of the ground to give you a key.
At this point, if you try to leave the confirmation screen recommends that you save the game. Detailed instructions for doing this:
Open the menu from the bottom right button, then choose the top option, then press OK and choose the bottom option to return to the game.
After you confirm your escape (and get the Normal End screen), do not save again. Either choose the second menu option, or reload the page.
Now that you're back at the game description, make sure you choose the second option to load your game.
Now for the other ending:
Unlock the door but don't leave. Explore again to find
a green apple on the tree
the crow wants a green apple
a new balloon in the second room
monster cat wants cake
So give the apple to the crow, and release it at the balloon to find a crumpled note.
Hint 10 is now available.
The note tells you to find a grid of squares:
The cupboards are light-colored when closed and dark when open.
So open cabinets 2, 4, 6, 8, and then you can open cabinet 5.
Take the cake and give it to Frankencat, who punches the coffin aside.
This reveals a new door. Leave through it for the Happy End.
Thanks KK. walkthroughs were awesome as usual. Keep up the good work.
Gatuno in Halloween
Item combination in this game might depend on order. If you can't use one item on another, try it the other way around.
Initial exploration
After the short explanatory intro, you get to explore. Don't forget that you need to select the hand or deselect your current item in order to pick things up.
Start with the dried leaves in the bottom left, which you can click to clear out until you can pick up a small key and pair of scissors.
There seems to be a lot of junk around, but you can still take the blank book from the left shelf, as well as bat wings and an empty jar from the right shelf, as well as
a mouse from the darkness on the sides, if you wait where the eyes appear and click at the right time
and
fangs from the skull.
Turn around to find your precious petrified cat next to the door, and a helpful spell next to it on the table. You can take the hat on the left closet, and something else that I'll tell you later.
You may have noticed that each pumpkin speaks in a different text color. These are three quests!
More items
Since you need "Harry Frogger", go and examine that frog picture next to the door. Hmm, it get more real the more you look at it.
After enough clicks, you manage to pull a frog out of it.
Use the small key to open the closet (second screen), and take the old camera and barbie student in it.
Use the scissors to collect some horse hair next to the bookshelf.
Ratcula
(If you've picked up too many items, you can use the arrow at the right of the inventory to scroll it.)
Use the join button to put the wings on the mouse, and then the fangs.
Give the completed vampire-rat to the pumpkin beside your cat, and you get a seed of caramel tree in return.
Manover
Use the scissors on Barbie to remove her glasses, then give her the hair instead.
Hand your completed Barber doll over to the pumpkin beside the spider web, and you get a male stone as "retribution".
Hopwarts
That hat is way too huge for a frog!
Use it in the cauldron to shrink it.
Place the glasses on the frog, followed by the hat. That's certainly Harry Frogger, but the pumpkin has no interest in the real thing.
Use the camera on the frog, and stick the picture onto the book.
Give your completed Harry Frogger book to the pumpkin on the tall shelf, and you get the sweat of Ungo as a reward.
Awaken
Place all your rewards into the cauldron, and use the jar to collect the Stone to Flesh potion.
Feed it to your cat to save it.
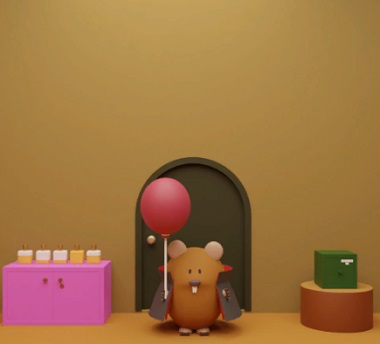
Welcome to Monster House!
As the game page says, the hints and animations may be a bit slow in this game. Please be patient, and save your game regularly!
Exploration
The title is written on the wall once you get the first ghost out of the way. On the left, an empty space on the wall is labeled "Mona Lisa", and under it is a chest of three drawers. To the right of the locked door is a candle holder next to a piece of chalk.
Turn right to find three coffins hanging from the ceiling. There is a ghost wall panel with three buttons.
Turn right to find another ghost wall panel, and four spiders that slowly descend on their strings.
Turn right to find yet another ghost wall panel. There's incomplete traces of some geometric design on the floor.
Creatures / Lights
Use the clue from the
spiders
to unlock the slider wall panel:
Middle Top Bottom Bottom
A ghost appears, casts a spell to materialize seven windows, and then vanishes.
After you change screens and come back, a happy-looking ghost carries a lantern past the bottom windows.
Use the clue from the
bats
to unlock the top drawer:
Bottom-left, Bottom-right, Top-right
Take some colorful candles.
Then use the clue from the
lantern ghost
to place the candles
(on the candle holder.)
Through each window, the lantern appears
Orange Yellow Red Blue
(4th 3rd 1st 2nd candles)
After looking around the room a bit, the candles burn down different amounts.
Enter the clue from the candles into the wall panel under the spiders:
IV V I III
A ghost casts a spell to make a safe and a stone coffin appear.
Numbers / Exploration 2
Use the clue from the
hanging coffins
to unlock the stone coffin:
Insert the mathematical operators where the question marks are to get
50 + 100 × 40 + 30
= 50 + 4000 + 30 (multiplication is done first!)
= 4080
Through the doorway is a dimly lit stone room which features two treasure chests on platforms with combination locks, next to Mona Lisa.
There's also a set of stone semicircles along the left wall.
Beauty
Place the Mona Lisa above the chest of drawers. Nothing happens.
But if you zoom in on the painting you'll find that she's now crying.
Use that clue to unlock the safe:
LRLRRL
Take the key. As you back out, the eye pops out as well.
Unlock the door to the outside, and you'll see a zombie across a patch of leaves.
Floors
Use the chalk to fill in the pattern on the floor, then click it to make a broom appear.
Use the broom to sweep the yard, revealing a path of stones.
Use that clue to unlock the wall panel under the hanging coffins:
CLCRCLC
A ghost conjures up more windows for you.
Eight
Use the clue from the
windows
to unlock the middle drawer:
Note that your solution should be a sequence of the four buttons in the right column.
I couldn't solve this by interpreting the clue normally, so there's another detail you should look out for!
The lantern ghost also passes through the new set of windows, with the color sequence: orange red yellow blue.
The layout as seen from the entrance door:
Blue Orange
Yellow Yellow
Red Red
Orange Blue
Click the
4th, 2nd, 3rd, 1st
buttons in the right column.
Take the lever.
Place the lever in the slot in the second room, and as you leave you find the three coffins lowered to the floor.
Opening the coffins only lets out some bats that combine at the opposite side of the room to form a vampire.
Unseen
This last step didn't give you any clues, or did it?
Face the coffins and select the eye to view some colored numbers.
Use that clue to unlock the platform under the right treasure chest:
Connecting the pink numbers by lines forms an upward-pointing triangle.
Following the same logic for all three colors gives the code
Up-triangle, Down-triangle, Star
You get some bandages.
Use the bandages to cover up the zombie. He's still dangerous, but now you can
select the eye again to view a clue on his body.
Use that clue and the clue from
the first screen
to unlock the platform under the left chest:
The mummy drawing represents the letter O, of which there's exactly one in each row.
Directly to the left of each letter O, you find the letters:
C T M H
You get some garlic.
Victory
Use the garlic to defeat the vampire, and then use the clue from
his face
to unlock the bottom drawer:
Click each button twice.
Take the hat.
Leave through the door again to win the game!
Halloween (Nicolet)
Mole is all dressed up and ready for the trick-or-treaters. Here they come!
Exploration
Vampire Rat may be quite scary, but this one simply wants a lollipop.
Back out to find five white-and-yellow things on the locked pink cabinet. The tree stump on the right has a green safe on it.
Turn right to face the kitchen area. The freezer has a box bolted shut, and the fridge has several cupcakes and a ghost decoration over a compartment you can't open.
The sink is missing a handle, and the cabinet under it has its handles tied together. The dishes on the holder have different patterns around their rims.
Turn right to find a wall shelf with some decorations above a chest of locked drawers.
Turn right to find another locked door. The left wall shelf with the green box is too high to reach, while the pumpkin on the right covers a hexagonal box with something shiny on its front.
Vampire
Use the clue from
the yellow-and-white things
to unlock the top drawer:
Middle Bottom Bottom Top Middle
Take the scissors.
Use the scissors on the sink cabinet. Inside is a locked box and a lollipop.
Give it to the mouse, who leaves and is replaced by a ghost who wants ice-cream.
Ghost
Use the clue from
the ghost's pumpkin bucket
to unlock the middle drawer:
The carved mouth is made of five rectangles arranged around a central line.
Alternatively, you can view it as one large carved rectangle with four squares left intact:
O_OO_

_O_O_
Take a key, and use it to unlock the pink cabinet. Inside, yet another locked box and an unusual-shaped tool.
You'll also need clues from
the dish rack and the cupcakes.
For the locked box in the pink cabinet:
Six wooden pieces form the dish rack, with the gaps between them holding the dishes.
The 2nd and 5th pieces are wider than the others, so click those two buttons to make their green stripes wider.
Take the hat ornament.
For the locked box under the sink:
the orange parts of the cupcakes are on the top (smaller) or bottom (larger):
Small Small Large
Large Large Small
Take the coffin ornament.
Use the clue from
the dishes
to place all three ornaments in the wall shelf:
Matching the white markings to the dishes, you find that the ornament order is
Ghost Hat Coffin
The ornaments light up, so use that clue to unlock the bottom drawer:
4 2 1 5 3 1 5
Take a spanner.
Use the spanner to open the freezer box and get the ice-cream.
Then give that to the ghost, who leaves and is replaced by a mummy. It can't tell you what it wants, but it can show you with a donut note.
Mummy
Use the clue from the donut note to unlock the green safe:
The purple, green, yellow, pink, red hats are on
Orange Red Blue Green Gray faces
(3 4 1 0 2 clicks)
Take another key, and use it to unlock the door at the back of the room.
It's another room! This one has a large locked wardrobe.
Turn right to find a trapdoor under a wide window. That black triangle… is the hat of a jack-o'lantern outside! There are lots of pumpkins in the yard, and your two previous visitors are already there.
Turn right to face the doorway back, flanked by two side tables with locked drawers. On the left one is a mouse statue holding a clue, and on the right is a stone urn holding three colored balls.
Turn right to face a table with a pencilcase that contains an eraser. The left armchair has a locked box on it.
Use the tool to pry open the trapdoor, which contains a matchbox and a panel secured by screws.
Also use the eraser on the note to remove most of it.
You have clues from
the note and the mouse figurine.
For the right drawer:
Replicate the pattern on the note by clicking the buttons
2 _ _ 0

3 _ 0 1
Take the wire cutters from inside.
For the wardrobe:
Divide the mouse clue into four parts. The odd square out in each part is on the
Bottom-right, Bottom-left,
Top-right, Top-left.
(2 1
3 0)
Inside, there's a ladder leaning against a stack of large drawers.
You'll need to use the wire cutters on the ladder before it can be extended to reach the high shelf in the first room.
Once you do, you can open the green box, take the donut inside, and give it to the mummy.
Next up, we have a knight who wants candy.
Knight
Use the clue from the knight
to unlock the top wardrobe drawer:
Match the pattern on the knight's armor by clicking the buttons
0 2
1 1
2 0
times.
Take a screwdriver.
Unscrew the panel in the trapdoor to find a crowbar.
Then use that crowbar on
the can under the pumpkin near the ladder
to reveal a candle, then light that candle
by clicking the matchbox and using the resulting flame on it.
This attracts some bats. (And you didn't even let those in!)
Use the clue from the bats to unlock the left drawer in the second room:
⌜⌝⌟ ⌞⌝ ⌜
Take the candy, and give it to the knight, who is replaced by a rather well-dressed monster who wants some cake.
Monster
You'll need the clues from
the monster and the yard
In the wardrobe, unlock the middle drawer:
The row of pumpkins face
R R C L R L
(where the hat pumpkin facing the front is represented by the dot in the center.)
Take a small circular handle.
And also the bottom drawer:
The scar on the monster's face is stitched up:
\ / | \ /
Take the bucket.
Attach the handle to the sink, and fill the bucket there.
Then pour all that water into the urn in the second room to make a clue appear!
Use that clue to unlock the box on the left armchair:
Blue Pink Yellow Blue Yellow Pink
(L R C L C R)
Take a white handle from it.
Attach the handle to the compartment in the fridge, then open it and take the cake!
Give it to the monster, who leaves and is replaced by a stack of pumpkins wearing a combination lock.
Pumpkins
Use the clue from the yard to unlock the pumpkins.
Match the glasses that your guests are holding by clicking the buttons
1, 1, 2, 0, 0 times.
That's the last visitor, so you finally get to leave. A happy ending for everyone!
Thanks KK. Will the Neko Chan game be coming too? in either case thanks for your hard work as usual.
I almost missed it completely but yes, it's coming.
ok KK. looking forward to it. As well as the others you;ll do. Appreciate you.
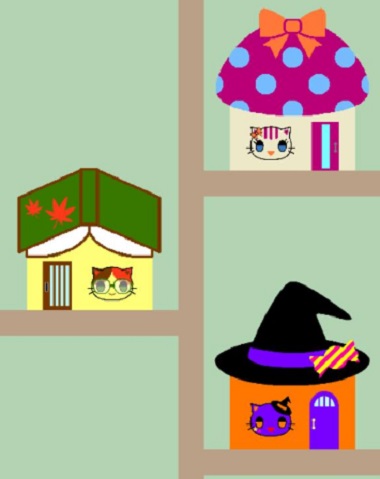
Neko-chan, autumnal errands
What are these autumnal errands? Let's check with Neko's friends. (Due to the -chan suffix, I'll conveniently assume that all of these cats are female.)
Take note that this game is quite particular about viewing all the clues.
Exploration
Let's start from the bottom of the screen and work upwards. Since we're going to move around a lot, I'll give each screen a name.
In the house with the witch hat is Kuro-chan, who is preparing for Halloween. Since you're already here… trick or treat! You've got to find some candy.
[A1] There are two jack o'lanterns. The cupboards and door here all have locks on them.
[A2] Turn right to find triangular flags and another locked cupboard. The table has some "colorful candy" but the package is too hard to open. Leave the house through this door.
Next house is Mike-chan (pronounced as two syllables). She's reading a really long book and can't put it down until you find her a bookmark.
[B1] Maple leaf patterns above some locked shoji doors.
[B2] Turn right. There's a bookshelf with books about a sports meet and a locked box, next to a desk with a reading light. Leave the house through the door.
The mushroom house at the top is Tora-chan, who's making dinner and needs you to find her ingredients.
[C1] The oven is empty, and beside it are three mushrooms over a locked compartment. The entire cupboard has only one lock.
[C2] Turn right. The cupboard here has a compartment with a keyhole, an rice cooker, and another compartment that's too high to reach. There's a locked box on the table. Leave the house through this door.
Initial clues
You have three clues to use immediately:
Pumpkins (A1), Wallpaper (B1), Mushrooms (C1)
For the bookshelf box (B2):
The pumpkin eyes are
Up-triangle Heart Star Square
You get a key.
For the left cupboard (A1):
The mushrooms are
Tall Short Medium
You get a some flags. When you examine them, the game tells you that something is faintly written on them.
For the oven cupboard (C1):
Match the sizes of the maple leaves by clicking the circles
3 0 1 2 times
You get a pair of scissors, for things you can't open by hand.
Use the key at C2 to open the cupboard compartment, which contains a fruit basket from which you can take the ribbon and look at the fruits.
Use the flags on the lamp at B2, which makes symbols appear on them.
Use the scissors on the package at A2. Some candy spills out onto the table.
Now to use the clues from the fruits, flags and candy.
For the right cupboard (A1):
The numbers on the fruit from 1 to 6 appear on
Violet Green Orange Green Orange Indigo
backgrounds.
(4 2 1 2 1 3)
You get a clear bag.
For the kitchen cupboard (C1):
The symbols tell you to count the indigo, orange, violet flags, which gets you the code
7 2 6
You get a saury fish.
For the paper door (B1):
The button patterns match the candy wrappers which are
Orange Aqua
Indigo Violet,
which is
2 3
0 1
That's a nice garden! There are some colorful cosmos flowers and a pile of fallen leaves.
The next time you visit Mike, you'll find that the room at B2 is filled with dragonflies.
Nature
Use the flower clue at B1 to unlock the box at C2:
The blue, red, green petals are at the
Top-left, Right, Bottom-left
(7 2 5 clicks)
You get some chestnuts!
And use the clues from B2 to unlock the cupboard at A2:
If you imagine the dragonflies having a race, the one winning is on the right.
The silver, gold, bronze medals (2nd, 1st, 3rd place) would go to the dragonflies facing
Down-right, Up-right, Right
↘↗→
You find a stepstool.
Back to the kitchen
At C1, give Tora the saury, and she puts it in the oven.
Give her the chestnuts, who cooks up some chestnut rice.
Use the stepstool on the top kitchen cabinet (at C2), which contains a long plate.
The next time you return, she asks you for a plate to hold the cooked fish.
Give her the plate, and she sets the table, and tells you that the next dish is miso soup!
Check the rice bowl at C2 to find a clue for the cabinet at A1:
The grill marks on the fish read
3095
It contains a broom. Bring that to B1 and use it on the pile of leaves.
Among the leaves, you find a sweet potato!
Give it back to Tora at C1, who rewards you with what she just bought while shopping.
It's a keyholder (keychain).
Gift
Examine the keyholder to remove the chain from it.
Instead, you can tie a ribbon, but only after you've cut it in half with the scissors.
Give your completed bookmark to Mike (at B1), who gives you some cookies she was planning to eat before reading.
Put the cookies in the clear bag, and seal it with the other half ribbon.
Give it to Kuro (at A1), who suggests a Halloween party in this sweet room.
Congratulations, you win!
Thanks again,KK.
Update