
 Hi! Wishing you happy Wednesday! Escape time is here!
Amajeto's game comes the first with their empty...well, not so empty room. Then you find yourself in black and white Akatsuki no Yado's world with minimalist graphics - puzzles are far from simple, though. TomoLaSiDo wants you to bake a bread - of course, first you need to find the ingredients - and collect six key parts. Neat Escape lets you to try your escape skills inside an escape cafe - are you ready for a challenge?
Have a good time and enjoy!
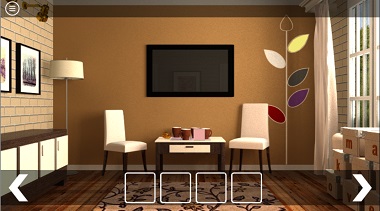
Hmm, Amajeto's empty room is a bit different from what the others mean by saying empty...recently it looked more on spot (WE N°230)...whatever, furnishings isn't important, we got another quality game with still improving graphics and relaxing puzzles.
The cursor isn't changing, no save button, one ending.
You've already met Akatsuki no Yado some time ago and this week they are back with an interesting and original game again, with a small language barrier again too. Not a big deal though - the barrier relates to one puzzle with three unknown characters (the hint you find below). Otherwise it's clever and intuitive game which we, sadly, don't meet these days as often as we would like.
The cursor is changing, no save button, one ending. The hint: Did you know that a home is more than a present which is more than a bread?
This TomoLaSiDo's game is few weeks old but wasn't posted since there were others that week. Its time came, though. You are trapped in a small house and need do make a bread - of course, the key parts are more important, but without bakery product of your own you won't get them. Don't worry about baking procedure, they'll tell you. Your task is to solve a chunk of puzzles. And when the bread is done and all six capsules collected, the door opens and you can run with your bread into the endless green field.
The cursor isn't changing, no save button, one ending.
Neat Escape locked you in an escape cafe and the reward for clearing the challenge is a nice meal. The cafe is small without any hidden areas and not so much to explore - just several coded boxes and few items. Since there's one ending only don't hesitate to try any key you find at any place. Smooth jazz tune accompanies your searching for hints while you're looking forward to the promised lunch. Who would resist?
The cursor isn't changing, save button plus autosave, one ending.
P.S. Escaping café is a favourite sport - no wonder, it's a good place to escape. Here are some tips from JiG archives: Escape from Dr. Ichie's Cafe (by Bianco Bianco) and SoFu Café (by Detarou).
We love escape games, and our readers love talking about them and sharing hints! How about you? Let us know what you think, ask for clues, or help out other players in the comments below.


can;t wait for these.
Wow! TomoLaSido has 3 rooms! With lots of stuff.
I was confused by a couple of the puzzles. Looked up the video walkthrough after struggling and still didn't get it.
Over all 5 stars. It was a nice change from an already nice game developer.
I can see that a lot of people will want a text walkthrough for TomoLaSido Room #110 because some of the riddles are very subtle and video walkthroughs on youtube don't do a good job explaining them. So here is my text walkthrough.
Escape Challenge 110: Room with Homemade Bread
In this walkthrough, we will race to make the bread first and find the key fragments later.
Television Set and Gaining Access
The TV cabinets
The rightmost cabinet under the TV has a lock. The lock features three square buttons, with the middle button slight lower than the other two. Have you seen this configuration before?
Open the other cabinets under the TV. The door of the leftmost cabinet opens to the left. The door of the second cabinet opens downwards. The door of the third opens to the right. The leftmost cabinet has "12" printed inside, the second one has "34", and the third has "56".
Hence the answer is "left, left, down, down, right, right". Go back to the rightmost cabinet. Click the left button twice, and then click the middle button twice, and then click the right button twice.
After the rightmost cabinet is unlocked, you will find a red button inside. Push it.
TV and the bottom drawer
After solving the TV cabinets, the TV should now become powered. Click on it to turn it on. Now the TV should be showing the ingredients of the bread.
The man with an afro and sunglasses is Ken Matsushiro, a character in the "Yakitate!! Japan", a manga/anime about baking bread and making ridiculous reactions out of it.
Now go to the white chest of drawers (with a potted plant on top) and examine the bottom drawer. There is a color-coded lock. You have seen the answer already.
Watch the TV again. Take a look at the bottom right corner.
The answer is "red, green, blue".
After the drawer is unlocked, you should find a yellow key inside. Take it, use it to unlock the door, and go to the second room.
Another yellow key
Another yellow key is hidden in the middle drawer of the utensils shelf (the shelf with three cups on it). The lock has five round buttons marked 1, 2, 3, 4, and 5. Look around for the clue.
Turn on the water at the hand-washing sink and it shows the number "3, 4, 5". Sadly, it doesn't work. The only other object with the relevant numbers is the clock (above the ladder).
The clock has half of its face covered. Since the clock's hand sweeps through "1, 2, 3, 4, 5" in that order, one is tempted to try this on the lock. Sadly, it doesn't work. Take a look again at the numbers on the clock.
The numbers 2 and 4 on the clock is only half-filled.
Halving "2 and 4" gives you "1 and 2", but if you input "1, 1, 3, 2, 5" in that order, it sadly doesn't work. Look harder at the clock. Are "1, 2, 3, 4, 5" the only numbers on the clock?
The clock's hand actually also sweeps through a half-covered "6". Halving "6" gives "3". So, the answer to this puzzle is "1, 1, 3, 2, 5, 3".
After the drawer is unlocked, you can find another yellow key. Use it to unlock the door to the third room.
The Ingredients of the Bread
Flour
The flour is locked behind the cabinet with nine compartments. One of the compartments has a miniature toilet seat in it. The lock involves a grid of nine boxes which can be marked with a brown color. This puzzle requires a leap of logic.
Of course this puzzle is related to the sliding doors of the cabinet. One may try all 8 combinations of the sliding doors but none of them will work. Maybe it is not about the boxes that "can" be brown, but about the boxes that are "always" brown?
The middle compartments of the top two rows are always covered. The bottom left compartment is also always covered unless you solve the puzzle. So the answer is:
. X .
. X .
X . .
with the X boxes marked brown.
After it is unlocked, you can take the flour inside.
Mix
The mix is in the cabinet under the clock, above the ladder. The lock has three buttons, marked "1, 2, 3", and you can change the marking to circles of three sizes.
Where is the clue?
Look over the window. There are three round tables. A table has 1 chair around it, another has 2 chairs around it, and the third table has three. What are the sizes of these table?
In 3D perspective, things farther away should look smaller.
It looks like table 1 and table 2 have the same diameter, but since things farther away should look smaller, table 1 is actually larger than table 2. And obviously table 3 is the largest.
The answer is "medium-sized circle, small circle, large circle".
After unlocking the cabinet, you can take the mix.
Butter
The butter is in the fridge in the third room. It is a three-digit lock. There is a drop of water sketched on the fridge. Where is the clue?
Turn on the water at the hand sink and see the numbers "3, 4, 5" appear. This is the answer.
After unlocking, take the butter inside. The bottom-right key fragment is also here.
Water
It is in the first room, in the cabinet above the sofa/bed. There are buttons marked with a circle, a triangle, and a square. Where is the clue?
In the third room, there are some cubes and spheres. The answer is right there, which reads "square, circle, triangle, circle, circle, square" in that order.
After unlocking, take the water inside.
Making the Bread
Grey table
The procedure of making the bread is explained above the grey table. With all four ingredients of the bread, put the ingredients on the table and you will make a dough. Then, put the dough on the black tray (in front of the cubes and spheres).
Bread proofer
Now you have to make the dough rise. This is done in the bread proofer, the machine next to the fridge. But the bread proofer is locked.
Go to the utensils shelf with three cups on it. Open the rightmost drawer. Following the black arrows, it reads "left, right, right, left". This is the answer.
After unlocking, put the dough into the bread proofer. And then you will have the risen dough.
Painting and baking
Now put the risen dough on the grey table and you will automatically paint a face on the dough. Now it is ready for baking.
The face comes from Anpanman, a children's picture book and cartoon hugely popular in Japan.
After you painted the dough, you should put the dough inside the oven. But the oven is locked!
Under the first digit, there are two vertical lines. Under the second, three vertical lines. The last one has four. What is it hinting at?
How many legs does a ladder have?
Look at the ladder. There is one ladder, four chairs, and a BBQ grill.
The ladder has two legs, the grill has three, and the chairs have four. The answer is the amount of things which have two/three/four legs. The answer is "1, 1, 4".
After unlocking the oven, put the dough inside.
After a short while, a perfectly baked bread will appear. Congratulations!
But the face on the bread has changed into the clown face that often appears in TomoLaSiDo's other games. Boo!
Key Fragments
Top-left fragment
The top-left fragment is in the top drawer in the first room. It looks like a three digit combination lock.
Explore the possible options on the lock.
The first digit has "1" after "0", "2" after "1" etc. But after "4", it becomes "3" again, and it goes back to "0" afterwards.
The second digit has "x" after "4".
The third digit has "8" after "4".
Hence the clue is "3x8" and the answer is "024".
After unlocking, the key fragment is inside.
Top-middle fragment
The top-middle fragment is in the middle drawer under the potted plant, in the first room. The lock features three rectangles and you can change the sizes of the rectangles.
What do these rectangles look like?
These rectangles look like the oven, the bread proofer, and the fridge. The bread proofer in the middle is the largest, the oven is smaller, and the fridge is the smallest. So the answer is "medium-size, large, small".
After unlocking, the top-middle key fragment can be found inside.
Top-right key fragment
The top-right key fragment is in the left drawer of the utensils shelf, in the second room. It is a three-digit lock.
The clue is under the window, where the brown bottles and yellow bottles are.
Draw a vertical line that pass through the trunk of the rightmost tree. Then, draw a vertical line that pass through between the brown and yellow bottles. You should now see the numbers "2, 3, 6".
After unlocking, you will get the top-right fragment.
Bottom-left fragment
The bottom-left fragment is in the bottom compartment of the utensils shelf in the second room. The lock has three rectangles which you can change the height.
The clue is actually visible while you are operating the lock.
It's the cups. The top cup is the tallest. The cup at the middle is the shortest. The cup at the bottom is of a medium height. So "tall, short, medium" is the answer.
After unlocking, the bottom-left fragment will appear.
Bottom-middle fragment
This requires completing the bread. (That's why I save the capsule-hunting to the last.) This also requires the screwdriver.
The screwdriver is under the table with cubes and spheres, in the third room. Always look under the tables when you play a TomoLaSiDo game.
Unscrew the blue rubbish bin in the first room. Where should you put it?
Put the rubbish bin on the pressure pad near the front door in Room 3.
The pressure pad is not activated. Maybe it isn't heavy enough? Maybe you should put something into the bin?
There is a lot of rubbish on the grey table, which you can only collect after finishing the bread. Put the rubbish into the bin, and you will get the bottom-middle fragment.
Bottom-right key fragment
You should already have bottom-right key fragment if you have completed the bread. If you have the bread but not the key fragment, check the fridge. Otherwise, complete the bread first.
Now you have all six key fragments, you can open the front door and escape. Congratulations!
Almost Empty Room 2
Seems quite bold to call this room "almost empty" when it's packed with the normal quantity of Amajeto puzzles.
Exploration
You start off facing a television screen (turned off) over a table (with two chairs) which has four coffee cups on a grid next to a golden snail where you can pick up a square tile. The drawer has a four-letter lock. On the right side of the wall, you see an arrow with colored leaf shapes on it.
Turn right to face large windows and some lettered boxes.
Turn right to face two doors. The picture in between has numbers marking each of its missing tiles. Under that, there's some colored wooden blocks. The left drawer has four vertical bars next to a snail, while the right drawer has four dials.
Turn right to face four framed photographs, which you can turn over to find dots. The drawers beneath have a grid of buttons, four symbol buttons with color markings, two white buttons, and four digit buttons.
Between the doors
You'll need the clues from
the table under the TV, and the backs of the photos.
For the left drawer:
The cups, from left to right, appear in the 4th, 1st, 3rd, 2nd rows from the bottom.
Click the bars 3 0 2 1 times.
For the right drawer:
The groups of 1, 2, 3, 4 dots appear on the top-left, right, left, bottom-left sides of their photo frames.
Click the dials 7 2 6 5 times.
Take 2 square tiles.
Table drawer
Use the clue from
the boxes and blocks
to unlock the table drawer:
The boxes spell out
make over, but if you only read the letters indicated by the dark-colored blocks it becomesmoveTake a square tile.
Leftmost compartment / Unlock
Use the clue from
the table
to unlock the leftmost compartment under the photos:
Since the snail mark is at the bottom, you'll need to rotate the clue.
- - B -

- B - -

- - - B

B - - -
Use it to unlock the left door.
Surprise! There's no second room here, just a storage shelf with paint cans and a remote control in front of some playing cards taped to the wall.
Screen
Use the remote on the TV to view a clue with colored stripes.
Then use it on the TV again to view some white and gray squares, with numbers on the white ones.
Three compartments
You'll need the clues
from the TV and wall beside, and the storage shelf and picture beside.
For the second compartment under the photos,
The colors blue, yellow, red, green appear from right to left in the shelf, and in the same direction the cards are the aces of
Diamond Spade Heart Club
(1 5 3 7 clicks)
For the fourth (second-right) compartment,
The white, yellow, purple, red, gray (green) leaves appear on the
LRLRR
For the rightmost compartment,
The second TV clue tells you to read the middle squares of the picture (in counterclockwise order from top right):
4356
Take the last 3 square tiles.
Complete
Place all eight square tiles into the picture, and rotate its tiles until they align:
3 1 1 20 2 1 3
3 2 0 2
1 3 1 2
Take the gold key, use it to unlock the right door, and escape!
Icon Font Large Set
(It's not the icons that are large, it's the collection of them!)
As usual, there's lots of author commentary under the game (and a bit in the walkthrough video).
Part of that is about a surprisingly helpful interface change in this game: examining items is now automatic when you select them!
Exploration
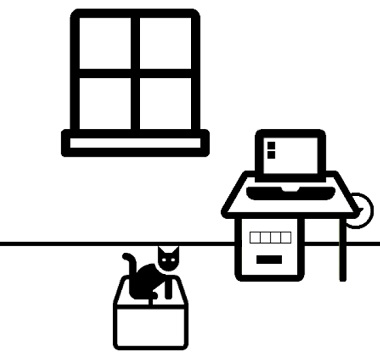
A cat sits firmly on a cardboard box. Outside the window, you see a lot of icon things, including a sign that's too far to read. The desk has a four-digit lock with plant clues, and there's an arrow button behind it that changes a grid somewhere.
The computer has two icons, an internet/Chrome(ium) one telling you that
Unable to connect to the internet.
Wi-Fi reception is in poor condition.
Try changing where you put the router.
and a picture that includes a suitable router position.
Turn right to find a grid of (sets of four) triangles, a screw panel, a couch, and a four-letter box that only has one button activated.
The left side of the couch hides an alarm clock that's just out of reach.
Turn right to face a three-symbol lock, a checkerboard with six rectangular color buttons, a triangle button you can't reach (unless you have something to throw at it), and a locked door. You can pick up the hockey stick from the floor, as well as check the mailbox to find six buttons which cycle through symbols with exclamation marks.
Turn right to find someone sleeping in bed. Depending on what item you have selected, the game either shows him snoring or tells you not to hit him. The treasure chest has four pizza buttons. The microwave has four digits on top of four symbol buttons, and the fridge has four digit buttons next to the letter H. Pick up the Wi-Fi router on the floor.
Scenery
You'll need the
view out of the window.
For the desk drawer,
Count each type of plant outside the window to get the code
7451
Take the binoculars from inside, and use it on
the sign outside the window
to read a clue. This clue unlocks the mailbox near the door:
Bulb(2) Triangle(6) Circle(1)
Square(4) Pointer(3) Star(5)
Inside, you find a note. (You can read it in the top right of the screen.)
Math
Use the clue from
the note
to unlock the microwave on the fridge:
Filling in the blanks on the note, you find that the numbers 9, 6, 0, 1 are obtained from two 3s by the operations
× + − ÷
Inside, there's a tennis ball, which you can use to throw at the triangle button near the door.
Wake up and find food
Use the hockey stick to retrieve the alarm clock behind the couch.
Then use that to wake up the sleeping person, who greets you.
Now you can unlock the fridge:
HELLO starts with H, while the fridge code needs to end with H.
You can fix this by turning HELLO upside-down, which looks like
0773H
The game tells you that this cheese is for cats!
After taking the cheese, click the triangle button that remains.
Give the cheese to the cat, who moves away. In the box, you find a robot, or more precisely, an Android.
Intelligent / Unscrew
Use the clue from the android to unlock the checkerboard.
Blue Red Yellow Blue Green Red
(3 1 4 3 2 1)
Behind, you find a screwdriver. Use that to unscrew
the panel near the couch
to reveal an triangle button, and then push that.
Triangular
Now that you've pushed all four triangular buttons, you should be able to use the clue from
the grid above the couch
to unlock the box near the couch:
Each triangle button makes triangles of the same direction appear on the grid, in the shape of letters.
(It would be a lot easier if you identified and wrote down the letters when they appeared earlier, but you can still search the grid for specific triangle directions and read out the letters that way.)
The triangles pointing up, left, right, down spell out the code
FONT
Take the door key, and use it to open the door.
Exploration 2
The door in front doesn't seem to have buttons, just four empty boxes. There's a phone on the right you can't use, as well as a crack in the wall on the left.
Placement / Baked
Following the clues on the computer, place the router
below and to the left of the window.
Now you can read the other clue on the computer:
Home > Present > Bread loaf
About breadcrumb lists:
They show where you are in a website.
They express the hierarchical structure of the website.
The term comes from Grimm's fairy tale "Hansel and Gretel", in which the older brother used bread crumbs to form a landmark to not get lost on the way back.
What an unusual article. And what's with all the pizza marks?
You'll need the clues you just read on the computer.
For the chest near the bed:
The small pieces of the pizza appear in the
top-right, bottom-left, top-left, bottom-right
(7 3 5 1 clicks)
Inside, you find a hammer.
For the wall panel under the checkerboard:
The article on the computer starts with
Home > Present > Bread
(3 2 5 clicks)
Inside, you find a loupe (magnifying glass).
Defective detective / Math 2
Use the hammer to smash the cracked section of wall, revealing some tiny text.
Then use the magnifying glass to read it. It's another clue!
Use the clues
from the wall and phone (and note and window)
to unlock the door:
Recalling the note/oven puzzle, you find that the top row represents
1 9 0 6
and recalling the window/desk drawer puzzle, you find that the bottom row represents
5 7 1 4
and those two numbers add to
7620.
How do you enter that into the door?
If, as the bottom of the wall clue suggests, symbols can be represented by items, then the numbers can also be represented by other items!
Matching the phone keypad to your inventory layout, you find that the digits 7620 correspond to the items
Android Screwdriver Ball Key
Place those items in the door.
Open the door and leave!
Thanks Pulsaris and KK for the walkthroughs. Can;t wait for the last one with Neat Escape.
Escape from the Cafe
Sometimes all you need is an offer of free food.
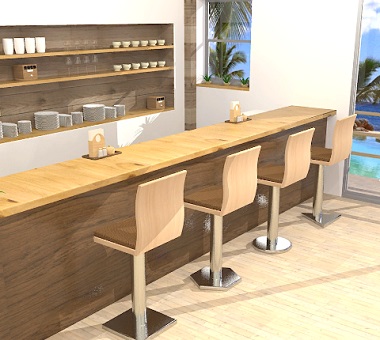
Exploration
You start off facing a wooden counter and four chairs. The bottoms of the chairs are particularly interesting. Clicking the wooden trays on the tables, you find that the right one has some powder in its bowl.
(Let's not go over the counter yet, we'll come back to that later.)
Turn right to face a window and a table with a box that offers you a toy for a price.
The window pane has a cloudy smudge at its bottom left.
Turn right to face another table, with a box that offers a cheaper hand towel.
Click the top right of the screen to enter a corridor ending at the locked door. The welcome mat has colored letters.
Back out and turn right. This puts you facing the cash register (locked), a potted plant (the game really wants you to look at the pot), and a three-color box labeled CEO.
Turn right once more, and this time climb over the counter to reach the kitchen area. On the left, there's a box with four shape buttons and a box with four letter buttons. On the right, there's a white four-digit box next to the sink with a bottle of water in it.
The sink drain has something stuck in it.
Shapes / Coin
Use the clue from the
chairs
to unlock the four-shape box:
The bases of the chairs have shapes:
Square Hexagon Circle Triangle
Take the red key, then use it to unlock the cash register, getting 100 yen.
Then use it to buy the wet towel. That's right, the hand towel is already wet when you get it.
Clean / Picky
Use the wet towel to clean the dirty spot on the window, revealing a word.
Enter that code into the box at the end of the shelf:
DUSTto get a pair of tweezers. Use those on the
sink drain
to get a needle.
Top position / Big coin
Use the clue from the
welcome mat
to unlock the CEO box:
The letters C E O are
Yellow Blue Red
(6 4 1 clicks)
Take the spoon, and use it
on the bowl at the end of the counter
to get 500 yen.
Then use that to buy the toy, which turns out to be a dart with no tip.
Hydrate / Shoot
Use the water bottle on the plant pot to make a clue appear.
Then enter that code into the white box beside the sink:
4726
This reveals a red button, which you can push to make a dartboard appear.
Complete the dart by attaching its tip (the needle) and then throw it at the dartboard above the right table.
This reveals a blue key which you can take from the corridor before using it to unlock the door and leave!
(Your reward is all you can eat, but all you want is pasta.)
Update