
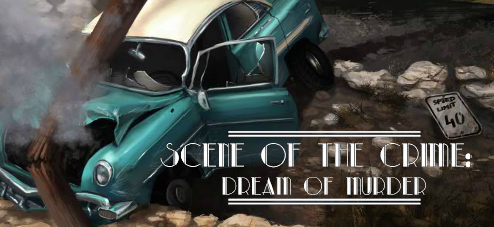
![]() A detective's best weapon is their finger. You can level it at someone in an accusatory fashion. You can use it to tip up the brim of your fedora whenever the situation calls for extra suaveness. And of course, most importantly, you'll use it to point-and-click your way through Pastel Games' latest murder mystery adventure, Scene of the Crime: Dream of Murder. When a body is found in the trunk of a car that crashed off the highway, you and your finger are called in to solve the case. Whodunnit and why? You'll need your eyes, your wits, and a magical board in your office that does all the hard work of tying evidence together for you to find out!
A detective's best weapon is their finger. You can level it at someone in an accusatory fashion. You can use it to tip up the brim of your fedora whenever the situation calls for extra suaveness. And of course, most importantly, you'll use it to point-and-click your way through Pastel Games' latest murder mystery adventure, Scene of the Crime: Dream of Murder. When a body is found in the trunk of a car that crashed off the highway, you and your finger are called in to solve the case. Whodunnit and why? You'll need your eyes, your wits, and a magical board in your office that does all the hard work of tying evidence together for you to find out!
Play all of the Scene of the Crime games:
 When your cursor changes to show you can interact with something, just click! Inventory items can be used by selecting them at the bottom of the screen, and then clicking wherever you want to implement them. Largely, you'll be using your keen detective instincts to find all the evidence in each area before you proceed, and your map will allow you to hop to new locations as they're unlocked. Dream of Murder's main flaw, however, finding all of those interactive zones is a chore and not as visually intuitive as it could be. It's also a shame that the game connects all the evidence for you, instead of doing it yourself. These flaws won't keep you from enjoying the game, however, and with gorgeous artwork and a more involved story than the previous games, it's a fine way to keep your keen detective mind sharp for the next case... especially considering there's a whole lot left unexplored at the end of this one.


Walkthrough Guide
(Please allow page to fully load for spoiler tags to be functional.)
Scene of the Crime: Dream of Murder Walkthrough
Crime Scene
Approach the police men standing by their squad car.
Click the officer with the notebook to speak with him.
Walk towards the blue car crashed over the side of the hill.
Click the license plate on the ground beside the wooden post to find Evidence 1/8.
Open the trunk, then click the trunk again to look inside.
Click the bag on the victim's head to find Evidence 2/8.
Click the rope tied around the victim's feet to find Evidence 3/8.
Use the Fingerprint Brush from your inventory on the fuel tank cap to uncover the fingerprints and find Evidence 4/8.
Back out once, then click the left area of the scene to view the front of the car.
Open the driver's door and click it again to look inside.
Use the Fingerprint Brush on the lower left side of the steering wheel to find a set of fingerprints and Evidence 5/8.
Click the bottle of bourbon on the driver seat to find Evidence 6/8.
Click the prescription note on the passenger seat to find Evidence 7/8.
Examine the glove compartment at the right side of the dashboard.
Open the compartment and click the identification card to find Evidence 8/8.
Click the Map in your inventory and use it to travel to the Police Station.
Police Station
Click the middle door to enter the morgue, then examine the body on the table for clues.
Use the Fingerprint Brush on the body's hand to get his prints and find Evidence 1/4.
Click the tattoo at the top of the should to find Evidence 2/4.
Click the large wound in the victim's neck to find Evidence 3/4.
Click the victim's face to take a photo and find Evidence 4/4.
Exit the morgue to go back out to the main office, where a police officer will be waiting for you. Speak with him, then go through the right door into the evidence room.
Click the shelves to examine the evidence from the car crash.
Use the Fingerprint Brush on the plastic bag to find Evidence 1/2.
Click the small pharmacy CVB note to find evidence 2/2.
Leave the evidence room and open the left door to enter your office.
Click the cork board on the back wall to view the evidence.
When you view the board, a new location will be added to your Map.
Click the Map and use it to travel to Nova Cars.
Nova Cars
Go through the front door to enter the building.
Speak with the secretary at the desk, which will automatically return you outside.
Click the right side of the area to turn and face the three cars parked at the side of the lot.
Open the trunk of the red car in the middle and take the Tire Spoon inside.
Move back to the left side of the lot.
Click the window on the green building for a closer look.
Use the Tire Spoon to pry open the window and enter the building.
Take the Paperclip from the corner of the secretary's desk.
Inspect the door to the manager's office at the back of the room.
Use the Paper Clip on the door knob to pick the lock, then go through the open door into the office.
Pick up the crumpled Resignation Letter on the floor.
Examine the Resignation Letter in your inventory, then click the name at the bottom right corner of the note to find Evidence 1/3.
Click the large notebook on the desk to zoom in.
Open the book and click the number 015790 under the registration number column to find Evidence 2/3.
Click the name of the seller, Emil Kovac, on the same row as the highlighted registration number to find Evidence 3/3.
Use the Map to return to the Police Station.
Police Station
Go through the left door to enter your office.
Speak with the FBI agent sitting at the desk.
Go back out, then enter the morgue through the middle door.
Talk to the coroner by the operating table to learn that the victim died by suffocation and was a diabetic.
Exit the morgue and then return to your office.
Examine the cork board on the back wall to view your evidence and receive a new map location.
Use the Map to travel to CVB Pharmacy.
CVB Pharmacy
Go through the front door to enter the building.
Talk to the pharmacist behind the counter to receive a new map location.
Use the Map to travel to James Kane M.D. Office.
James Kane M.D. Office
Pick up the 5 Cent coin on the right side of the floor.
Inspect the door on the right for a closer look.
Use the 5 Cent coin on the screws at the corner of the name plate on the wall to remove it.
Back up and pick up the Name Plate that has fallen on to the seat of the bench.
Click the door again to zoom in.
Use the Name Plat on the gap at the center of the white doors to unlock it and enter the office.
Examine the pulled out drawers on the floor at the right side of the overturned chair.
Pick up the Paper Knife on the ground by the large stain.
Remove the back of the framed picture beside the tipped over trashcan, then take the revealed Small Key.
Back up and then click the top of the desk to zoom in.
Take the Pencil beside the note pad. Use the pencil on the note pad to reveal the writing.
Click the top page to remove it from the note pad, adding the List Of House Calls to your inventory.
Inspect the empty drawer at the lower left side of the desk.
Use the Paper Knife to lift the false bottom inside the drawer, revealing a lockbox.
Unlock the box with the Small Key and then take the List Of Abma Patients inside.
Use the Map to return to the Police Station.
Police Station
Go through the middle door into the morgue.
Speak with the coroner, who will offer to leave you a report in the evidence room later.
Exit the morgue to find an officer waiting for your outside.
Talk to the officer to receive a new map location.
Use the Map to travel to the Second Crime Scene.
Second Crime Scene
Walk towards the truck parked at the back of the alley.
Click the exhaust pipe at the side of the truck under the logo to find Evidence 1/6.
Examine the back of the truck and lift the cover to look inside.
Click the victim's torso to find Evidence 2/6.
Click the tattoo on the victim's shoulder to find Evidence 3/6.
Pick up the Wallet on the floor of the truck beside the cardboard box.
Examine the Wallet in your inventory and click the photograph on the ID card inside to find Evidence 4/6.
Move left to return to the side view of the truck and then open the driver side door to look inside.
Open the small compartment at the bottom of the dashboard,then use the Fingerprint Brush on the cigarette buts to find Evidence 5/6.
Click the plastic bag on the seat to find Evidence 6/6.
Speak with the FBI agent in the alley - he's taking over the case again.
Use the Map to return to the Police Station.
Police Station
Enter the evidence room through the right door.
Examine the large notebook the coroner has left for you on the desk.
Turn the page, then click the phrase at the top "Diabetes mellitus 250" to find Evidence 1/5.
Inspect the evidence on the shelves from Dr. Kane's office.
Click the Diagnosis Code "250" on the white sheet of paper to find Evidence 2/5.
Click the note "Sick leave, house call 02.10" on the right column of the same paper to find Evidence 3/5.
Select the same number "02.10" on the pencil shaded note to find Evidence 4/5.
Click the name "Epfret" on the same note to find Evidence 5/5.
After all the evidence has been discovered, a new location will be added to your map.
Use the Map to travel to Epfret's Apartment.
Epfret's Apartment
Move towards the door to apartment number 10.
Pick up the Door Key on the floor beside the left potted plant.
Use the Door Key to unlock the apartment door and enter the room.
Click the broken shards of glass by the blood-stained floor to find Evidence 1/6.
Pick up the Post Box Key on the floor beside the cabinet.
Take Epfret's Photo (1/2) on the seat of the couch, then inspect it in your inventory.
Click Epfret's face to find Evidence 2/6.
Note the position of the three dials on the safe in the photograph.
Pick up the Nova Cars Flyer on the floor at the right side of the room, then inspect the flyer in your inventory.
Click the center of the flyer to find Evidence 3/6.
Examine the framed painting on the wall for a closer look.
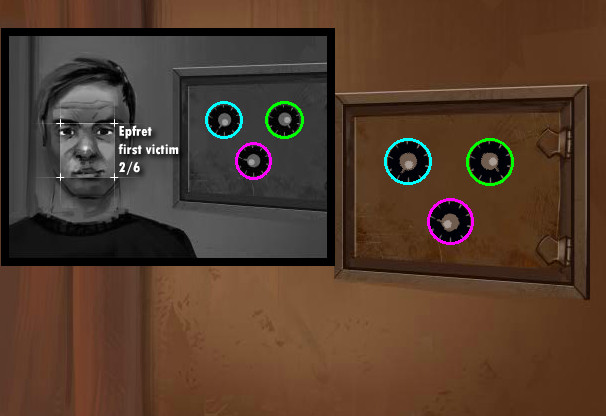
Click the painting to remove it, revealing a hidden wall safe.
Turn the dials so that they are in the same position as seen on Epfret's Photo to open the safe
Screenshot.
Take Epfret's Photo (2/2) and the ABMA Group Photo from the opened safe.
Inspect Epfret's Photo (2/2) in your inventory.
Click Epfret's face to discover Evidence 4/6.
Next, inspect the ABMA Group Photo.
Click the two faces on the left to find Evidence 5/6.
Exit the apartment and move back once to view the hallway.
Use the Post Box Key on mailbox number 10 to open it, then take the two envelopes inside: the Letter and the Invitation.
Open the Letter to read it.
Click the name at the bottom of the letter to find Evidence 6/6.
Next, open the Invitation to view an anonymous note.
Use the Map to return to the Police Station.
Police Station
Go through the left door into your office.
Examine the cork board on the back wall to receive a new map location.
Use the Map to travel to ABMA.
ABMA
Go through the front doors to enter the building.
Speak with the security guard sitting at his station.
Move forward twice towards the white door at the end of the hall to enter Professor Werner von Braun's office.
Talk to the professor to be allowed access to the warehouse, then leave the room.
Go through the large doors beside the door to the professor's office to enter the warehouse.
Inspect the body lying on the ground beside the crates.
Take the Car Keys from the victim's shirt pocket.
Use the Fingerprint Brush on the victim's right hand to find Evidence 1/4.
Exit the building to return to the street, then open the gate to enter the parking lot.
Walk towards the green car and then use the Car Keys to open the trunk and the driver's side door.
Click the license plate at the back of the car to find Evidence 2/4.
Take the Bayonet from the opened trunk.
Use the Fingerprint brush on the steering wheel inside the car to find Evidence 4/4.
Writer's note: I was not able to find Evidence 3/4 if it exists (it may be that the Bayonet is intended to be a piece of evidence, but is unlabeled), although it is not necessary to complete this scene. If someone is able to find it, please leave a comment in the section below and I will add it to the walkthrough!
Use the Map to return to the Police Station.
Police Station
Speak with the police officer waiting for you at the station to have him run the license plates for you.
Go through the left door to enter your office, take a look at the evidence on the cork board, then leave the room again for the police officer to return to the station.
Talk to the officer again to get his information on Nina Kovac.
Return to your office and look at the cork board a second time to receive a new map location.
Use the Map to travel to the Apartment.
Apartment
Take the Kovac Photo from the fireplace mantle, then examine it in your inventory.
Click the faces of the couple in the photograph to find Evidence 1/7.
Note the time of the clock at the upper right side of the image, which is about 4:30.
Pick up the Scissors on the floor beside the sofa.
Open the closet door for a closer look.
Move the pieces of clothing hanging on the rack to reveal a taped cover on the back wall.
Use the Scissors to cut through the cover and reveal a secret door.
Move the hands on the clock to change the time to the match the image from the Kovak Photo.
Screenshot.
Back up once and pick up the Key that fell from the clock to the floor.
Look inside the closet again, use the Key to open the secret door, then continue forward to enter the basement.
Inspect the large board on the back wall to zoom in.
Click the newspaper headline to find Evidence 2/7.
Select the photograph of the group of people in the concentration camp to find Evidence 3/7.
Click the schematics to find Evidence 4/7.
Click the man on the left in the photo of the three officers to find Evidence 5/7.
Select the face of the man in the portrait to find Evidence 6/7.
Click the lower page covered in writing to find Evidence 7/7.
Click the board one more time to view the final cut scene.
Posted by: Trinn |
March 22, 2013 1:46 PM
|
March 22, 2013 1:46 PM