
Room W&R
By Jess
|
July 22, 2008
Comments (48) | Views (6,444)
 Room W&R places you into what seems to be a girl's bedroom, complete with vanity mirror, photographs of animals and cheerful retro-ish couch. It's a well-made, if fairly standard room escape game; the graphics are nice, the puzzles interesting but not unintuitive. The game does not contain anything terribly out of the ordinary, but is nonetheless a pleasant fix for any point-and-click craving.


Walkthrough Guide
(Please allow page to fully load for spoiler tags to be functional.)
Walkthrough:
Click on the dresser drawers. Click on the top drawer. Get the pen. Close the drawer.
Click on the middle drawer. Click on the left-most towel to get the towel. Close the drawer and exit the dresser.
Click on the top of the dresser. Click on the shortest bottle to get the cold cream. Exit the dresser top.
Click on the stand with the mirror on it. Open the drawer by clicking on it.
Examine ("about item") the cold cream. Click on the top once to open it. Again to fully open it.
Examine the towel. Click on the cold cream jar and then click on the towel. The towel should gain a blob of cold cream.
Use the towel to wipe the pink spot in the drawer. This will reveal the word "anagram."
Exit the mirror stand.
Click on the bed's headboard near the pillow.
Click on the small item sticking up between the headboard and the bed near the wall.
You have retrieved the spray pump. Examine it to find "Near the Wall" written on it.
Exit the bed.
Turn Right, facing the wall with the door.
Click under the bed. Retrieve the box. Exit from under the bed.
Turn Right, facing the wall with the bookcase.
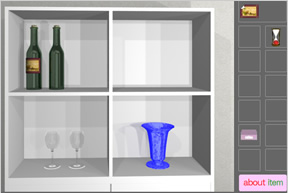
Click on the upper part of the display case (with the bottles and glasses). Click on the turned down corner of the wine label to retrieve the label. Exit the shelves.
Click on the lower cabinet. Click on the top left corner of the right-hand door to open it. Get the pitcher. Exit the cabinet.
Click on the low bookcase. Click on the second-from right box on lower shelf. Click on the item inside and retrieve the hourglass.
Click on the space between the two cabinets.
Examine the pen. Near the writing end you can see where it telescopes. Click there to extend it.
Use the extended pen to get the item you can see between the cases. You now have the screwdriver blade. Exit the bookcase entirely.
Turn right, facing the couch.
Click on the couch. Lift the right-hand cushion and click on the fuzzy lump which is revealed. You have retrieved the screwdriver handle. Exit the couch.
Click on the pictures.
Examine the wine label in your inventory. Click on the turned down corner. A word is revealed on the back, "monochrome". Click once more to turn the label back over. Close the wine label.
One of the photos is not colored, is, in fact, monochrome. It's the top center photo. Click on it.
Click on the top left corner. Click on the top right corner. Retrieve the key and exit the photos entirely.
Turn right towards the dresser again.
Click on the wastebasket under the mirror stand.
Examine the screwdriver handle in your inventory. Click on the screwdriver blade and then click on the handle to combine the pieces. Close the screwdriver.
Use the screwdriver on dark spot in the center of the lid of the wastebasket. Get the bottle from inside. Exit the wastebasket.
Click on the mirror stand. Use the gold key on the lock on the upper drawer. Retrieve the paper.
Turn to the right, facing the wall with the door again.
Examine the pitcher in your inventory. Click on its lid to reveal it's full of water.
Examine the hourglass. Click on the top of it once to pop off the "lid" and then click again to discard it.
Examine the bottle. Click on the spray pump and put it on the top of the bottle. Click on the sprayer to remove it from the bottle. Click on the pitcher and then click on the bottle to fill the bottle with water. Click on the hourglass and click on the spray pump to remove it, and then click on the bottle to add the red powder to the water.
Using the water bottle, spray the wall above the bed to reveal a message: "sing escape." Exit the message.
Examine the blue paper in your inventory.
It shows a leaf, an ambiguous symbol which could be anything and I couldn't match to anything, but we'll pretend it means "blue albums", and a wine glass.
This is the combination to the box you found under the bed. So, count the leaves on the wine label, the number of albums in the bookcase, and the number of wineglasses.
Examine the box and enter "8 3 2". Get the red item from within the box.
Examine the red item, click on it. It shows you a shiny end, and then if you click again, it gives you an entry screen. Click once on that.
The red box is looking for a single character. You will enter the character and click on the black button on its side.
Remember the word "anagram?" Yep. The writing on the wall is an anagram that represents the single character. Give it a shot.
Me either. Turns out the anagram is "peace sign". A "V", capital letter. Enter that and click the black button. Whaddya know, it's a key. Exit the key examination screen.
Click on the door. Use the key on the handle.
And you're done!
Posted by: Roger | July 23, 2008 1:09 AM