
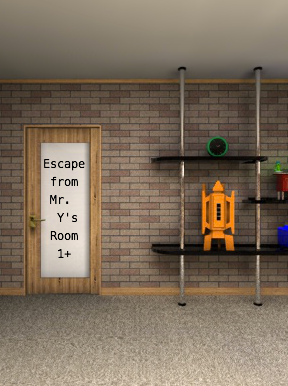
![]() By any real-life standards, the titular Mr. Y of Tesshi-e's Escape from Mr. Y's Room 1+ would be a very weird host. After all, if you were a typical person and someone invited you to get locked into a room so he could make you escape from it, chances are you'd call the police instead. Which is a shame, because you'd be missing out on a very entertaining experience.
By any real-life standards, the titular Mr. Y of Tesshi-e's Escape from Mr. Y's Room 1+ would be a very weird host. After all, if you were a typical person and someone invited you to get locked into a room so he could make you escape from it, chances are you'd call the police instead. Which is a shame, because you'd be missing out on a very entertaining experience.
You know what to expect from Escape from Mr. Y's Room 1+ if you've played Tesshi-e's past games: click around the room, solve puzzles, pick up items and use them (or examine them with "About Item"), and ultimately get the door open and escape. Or stay for a bit longer and find the Happy Coin that'll grant you the better of the game's two endings.
If anyone knows how to follow a tried-and-true formula, Tesshi-e does; they've gotten a lot right in the past, and they don't change any of it. As usual, the graphics are nicely photo-realistic yet never distracting, and the puzzles are logical and just challenging enough. There's some construction to perform as in many of Tesshi-e's past works (Escape from the Brick Room and Escape from Mr. K's Room 2 come to mind), but thankfully you've got some in-game instructions this time. The game is colorblind-friendly, with significant colors identified with text prompts when the cursor is over them. The music's an odd choice (seriously, it almost sounds like it belongs in a barnyard rather than in a brick-walled lounge), but you can mute it if it gets annoying, and with everything else so fine it's hard to complain.
But I've rambled for long enough. Feel free to go ahead and let Mr. Y lock you up. ...Wow, that came out sounding VERY wrong.


Walkthrough Guide
(Please allow page to fully load for spoiler tags to be functional.)
Walkthrough: Escape from Mr. Y's Room 1+
Exploration, Gathering Clues and Tools
You begin facing a locked door; there's a little table on the left and a funky shelving system on the right. First, examine the corner with the little table:
Get the METAL TUBE from inside the flower vase.
Next, examine the items on the shelves:
The green clock doesn't appear to be working (dead battery?) but note the time anyhow. Turn it around and open it up:
Get the BATTERY out of the back of the clock.
The robot-like wood ornament has four buttons, top to bottom. You can change the colors on these buttons from Green, to Cyan, Red and Yellow.
The blue box has four shapes across its top. Below each is a button to change its number.
A red Mr. Birdies box has the word TEAR written on it. Click on the birdies and they change expressions.
Turn right to face the window:
You can't open the table's drawer because it's screwed closed.
There is a bottle of blue liquid clamped into a red bottle stand; it needs a card and a 4-digit code.
Turn right again to face the sofa:
Lift up the right cushion on the sofa to see...
a SYRINGE. Take it.
Look behind the left cushion to see a clue...
Make a note of the shape and number.
Next to the sofa is a magazine rack. Examine the green book:
Inside are instructions on how to make a Pon Pon Boat.
Also note another shape and number in the bottom right corner of the page.
To the right of the magazine rack is a big plant:
get the BOTTLE OF YELLOW LIQUID from inside its leaves.
Turn right to face the fourth wall where you see a safe, a picture, a very narrow door and a Mr. Hippo suspended from a rope:
You can't reach Mr. Hippo, so it appears you need a key for the narrow door to help him.
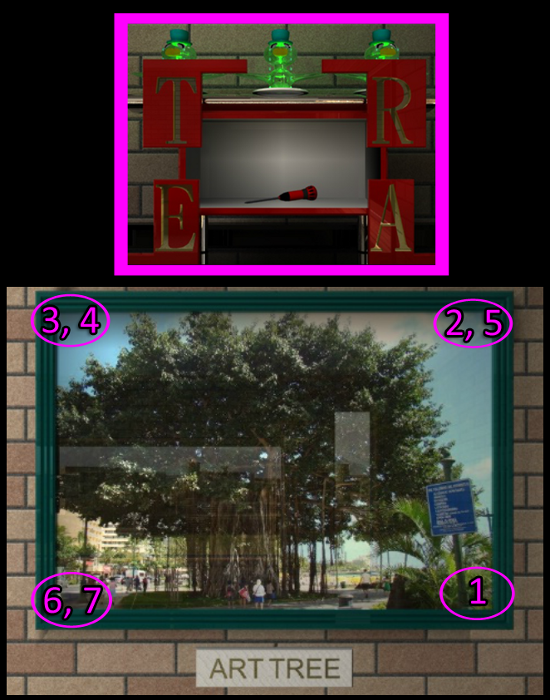
The picture is wobbly! It says "ART TREE."
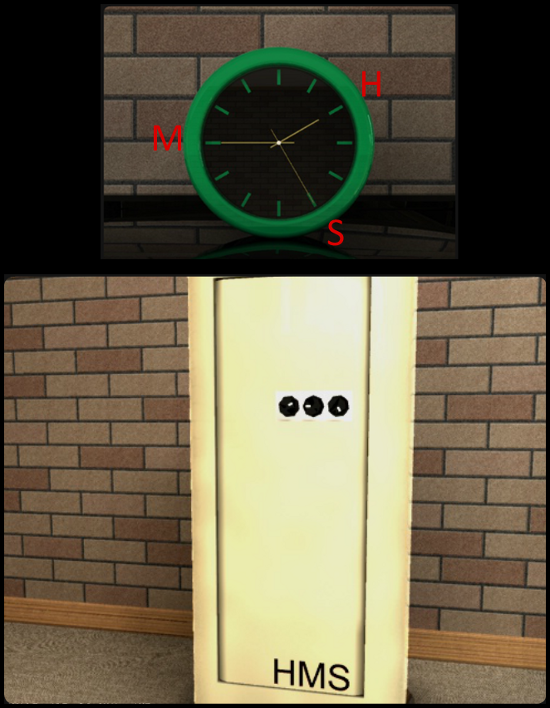
The safe has three dials and is marked with a "HMS."
With the explorations complete, you're ready to solve puzzles.
The HMS Safe
Examine the safe.The clue to opening this safe is in the markings "HMS." What could that refer to?
Hour Minute Second.
Going by where the hour, minute and second hands are pointed, turn each dial...
hour = 2; minute = 9; second = 5
(If you start with the dials pointed up, that's 2 clicks, 9 clicks and 5 clicks respectively.)
Screenshot: Safe Solution
Set the dials to match the clue, then click on the safe's door to open it. Inside you'll find...
a CARD (take it)
and a device with a glass pipe.
Back up and turn right to face the shelves by the exit door.
Mr. Birdies' Box and the Wobbly Picture
Examine the Mr. Birdie's display:
Click on each Mr. Birdy until they're all crying a stream of tears (3 clicks each).
This will cause their box to open, sending each letter to a different corner. Now you can get...
a SCREWDRIVER.
Also make a note where each letter is located.
Back up and turn left to examine the wobbly picture:
Use the information from the Mr. Birdies to click the corners of the picture and open it up:
Each letter on the opened Birdies' box represents a different corner. Spell out "ART TREE" to open the wobbly picture:
BR - TR - TL - TL - TR - BL - BL
Screenshot: Wobbly Picture Solution
When you've clicked the corners in the correct sequence, the picture will open and you will see...
a BOTTLE of GREEN LIQUID. Take it.
a piece of WOOD. Get that also.
another clue; note the shape and number.
and a hole (but the metal tube won't fit in there).
Turn around twice to face the windows.
Table by Window and 4-digit code for the Red Bottle Stand
Use the SCREWDRIVER (from Mr. Birdies) to open the drawer. You'll get:
a SCREW.
Look inside the drawer to get...
A CANDLE
and another shape and number.
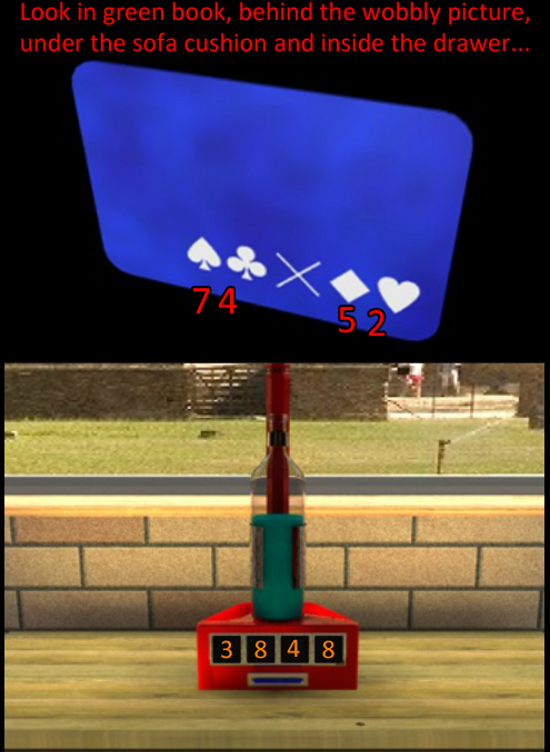
Take a look at the back of the CARD in your inventory, then insert it into the card slot on the 4-digit bottle stand.
Using the clues from the back of the card and seen around the room, you can solve this code:
According to the card, you need to multiply spade club x diamond heart.
spade 7 (in the green book)
club 4 (behind wobbly picture)
diamond 5(under the sofa cushion)
heart 2 (inside the drawer)
That means 74x52=
3 8 4 8
Screenshot: Bottle Stand Solution
Enter that code to release the BOTTLE OF BLUE LIQUID so you can take it.
Turn around twice to face the safe again.
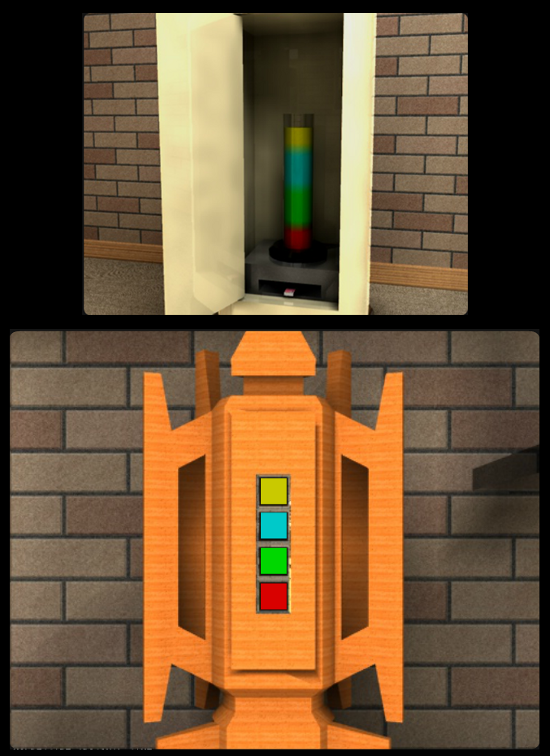
The Stacked Colors
Open up the safe and pour each of the three colored liquids (blue, green and yellow) into the tube.
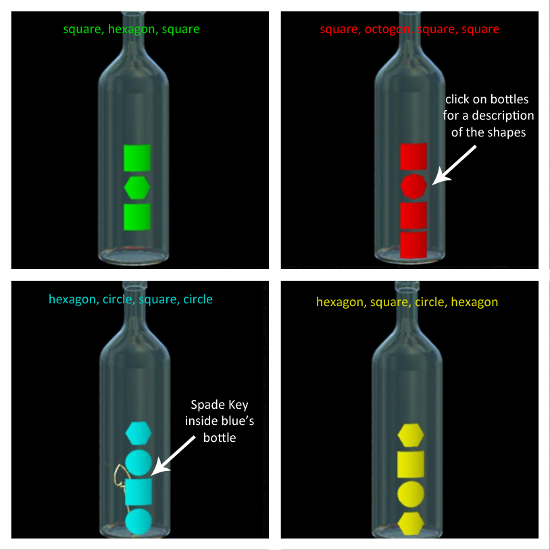
Now examine the bottles in your inventory:
Get the SPADE KEY from the empty blue bottle.
Back up and use the SPADE KEY to open the narrow door next to the safe. Directly inside this narrow alley you can get:
a BOTTLE OF RED LIQUID
and a LEVER.
Go back to the safe and pour the red liquid into the pipe.
Now you have four colors stacked from top to bottom.
Also another empty bottle to examine.
The liquids caused something to drop out of the bottom of the tube's stand:
some MATCHES. Take them.
Back up, turn right, and zoom in on the wooden robot thingy:
Enter the colors as seen in the tube of liquids:
From top to bottom:
YELLOW
CYAN (blue)
GREEN
RED
Screenshot: Stacked Colors Solution
When you have the colors correct, the wood ornament opens up:
Get the SAW.
Back up.
Blue Box with 4 Shapes
Examine the blue box with the shapes on top of it:
Use the information from the bottles in your inventory to come up with a 4-digit code.:
Count up the number of hexagons, circles, octogons and squares.
Green Bottle = square hexagon square
Red Bottole = square octogon square square
Cyan Bottle = hexagon circle square circle
Yellow Bottle = hexagon square circle hexagon
Squares 7
Octogons 1
Circles 3
Hexagons 4
This gives you a 4-digit code:
4317
Screenshot: Bottle Shapes
Use the buttons below each shape to change its number. When you enter the correct code, click the handle and the box opens:
get the ELECTRIC DRILL (it's already charged!)
Turn back to the wall with the wobbly picture.
Pon Pon Boat Building
Look behind the wobbly picture again:
Insert the LEVER into the hole and click on it.
Now the alley way will fill up with water.
Go over to the watery alley way. It's time to build a boat so you can rescue a hippo.
The Green Book in the magazine rack gives you these instructions:
First, cut the wood into the shape of a ship. Second, put holes in the stern of the ship. Third, screw a screw from the bottom of the ship. Fourth, stick a candle into the screw. Fifth, insert a coiled metal tube into the holes. Sixth, fill the tube with water. Last, light the candle.
Examine the WOOD board in your inventory.
Use the SAW to cut it.
Then use the DRILL.
Insert the SCREW.
Add the CANDLE.
Then put in the COILED TUBE.
To coil your metal tube:
Use that BATTERY to wrap the thin tube around it and make a perfect springy coil. Then take the battery out so it's not in the way of things.
Fill the tube with water.
Get the water from...
Use your SYRINGE on the water in the alleyway. Then use the SYRINGE OF WATER on the tube.
Finally, light the candle with your MATCHES.
Set the boat in the water and it will propell to the string at the back of the alley, burning it.
Back up and now you can see Mr. Hippo has fallen from the ceiling:
Pick up the hippo and look inside its mouth for a HEART KEY.
Normal Ending
After getting the HEART KEY from the hippo's mouth, turn to face the exit door.
Go into "Function" and select "SAVE" then "Yes" to save your place.
Then, if you want to go back for the happy coin, you can restart and choose "LOAD" instead of starting all over from the beginning.
Use the HEART KEY in the door and click it to exit.
Congratulations!
Happy Coin Ending
After getting the heart key, examine Mr. Hippo and turn him around:
Here you see an upside down "CLOCK."
Go back to the safe:
Use the information from the hippo and the clock to set the dials to a new position:
Just turn the clock upside down and the hour, minute and second hands point to new numbers...
hour = 8; minute = 3; second = 11
Screenshot: Happy Coin Solution
Now when you open the safe, you'll see something else has dropped out of the base of the tube:
A HAPPY COIN. Pick it up.
Turn back to the door. Use the HEART KEY to unlock it. Then, with the HAPPY COIN in your possession, step outside.
Happiness to you!
Posted by: elle |
November 16, 2012 2:55 PM
|
November 16, 2012 2:55 PM