

The Cave of Heroes
Alexia Crow winds up falling, literally, into adventure (of the point-and-click kind!) when she winds up trapped in an ancient cave that was once used as a training ground for heroes of myth and legend. To escape, she'll need to explore and solve all sorts of puzzles in a captivating mythic environment filled with mysterious mechanisms and magic.
Read More33 Comments
Finished with no walkthrough! That may be a first for me. I liked the puzzles - some seemed quite original.

Excellent, interesting puzzles. Great artwork. Cutscenes are a bit slow-paced, and words stay on the screen way too long, but overall, great!
OK Here's a tip I could have used :S
To turn one of your keys gold you don't have to use a pot or anything, just combine items.
Good game, hope the sequel comes soon!
The Cave of Heroes Walkthrough
-
Many of the puzzles in this game have multiple possible solutions. The following solutions in this guide are intended as examples of one way, but not the only way, to solve these puzzles.
Sandy Cavern
-
Turn towards the pair of female statues at the right side of the room.
-
Take the PLATE (1/2) from the left statue.
-
Next, turn to the large cube under the statues on the left.
-
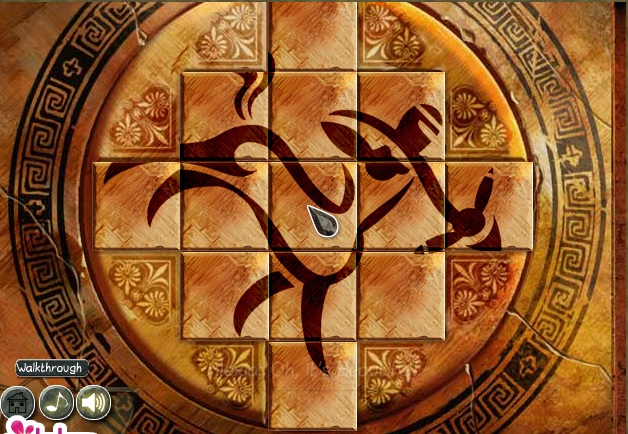
Insert the PLATE (1/2) into the round space on the left side of the cube, then click the plate to start a puzzle.
-
To complete the puzzle you must arrange the tiles within the plate so that they all combine into a moving picture.
-
Click and drag a tile to move it, then release it over one of the squares at the center of the plate to set it in place.
-
After the puzzle is solved, turned towards the right to see that the pattern on the left side of the stone door is now illuminated.
-
Now you can take the PLATE (2/2) from the hands of the right statue.
-
Turn back to the left side of the room and insert the PLATE (2/2) into the circular space at the front of the cube.
-
Click the plate to start the next puzzle.
-
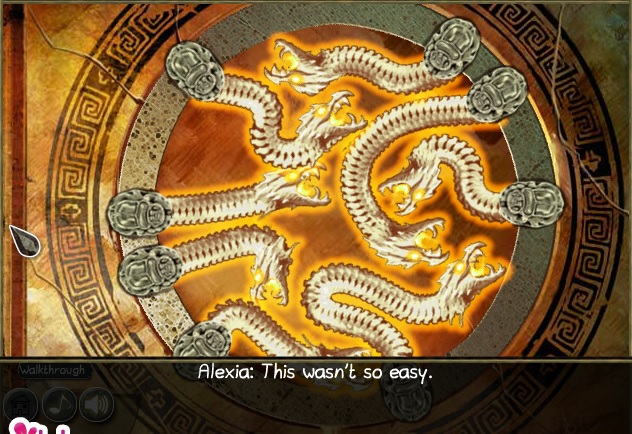
Position the dragons around the ring so that none of them are overlapping.
-
If a dragon intersects with another dragon, it will remain unlit. However, if a dragon is not overlapping with any of the others, it will glow yellow.
-
There are a few possible solutions and the dragons' placements don't need to be perfect. So long as it's glowing, it counts!
-
Face the right side of the room again and click the stone door to travel to the next room.
Pegasus' Dome
-
Take the ROSE from the vines on the wall beside the right door.
-
Click the patterned floor tile to the left of the Pegasus statue to start a puzzle.
-
Move the three heads to the middle tile at the top of each board.
-
Click a head to select it, then click an adjacent tile to move it into that space.
-
If a space is occupied by a block the head will push it off in whichever direction it is moving, but only if there is a space for that block to move into.
-
The head cannot push more than one block at a time.
-
To solve the left board, select the left head and move:
-
Right, Up, Left, Up, Up, Up, Right, Up, Up, Left, Up.
-
To solve the center board, select the middle head and move:
-
Up, Up, Left, Up, Up, Right, Up, Right, Up, Left Up.
-
To solve the right board, select the right head and move:
-
Right, Up, Down, Left, Left, Up, Right, Up, Up, Up, Left, Up, Right, Up, Right, Up, Left.
-
The left and right doors will open as soon as the puzzle is completed. Go through the door on the right to reach the Gorgon's Glowing Tree.
Gorgon's Glowing Tree
-
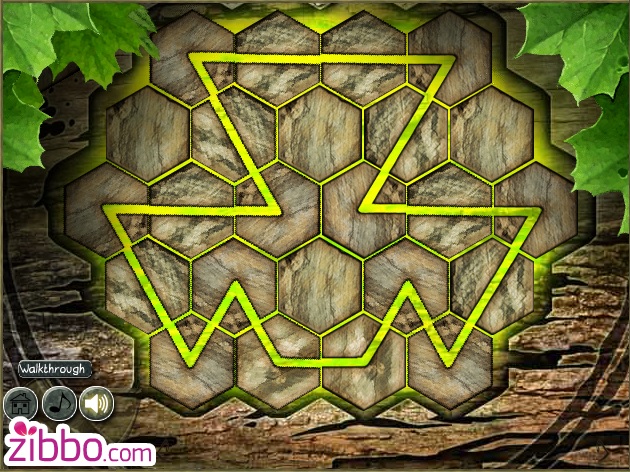
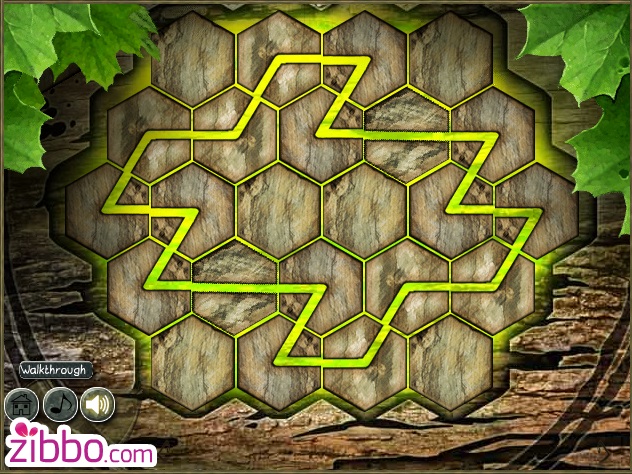
Look up the tree to see a honeycomb-shaped object on four of the branches.
-
One is at the middle of the upper left branch, another is on the lower left branch, a third is on the upper right branch, and the last is on the lower right branch.
-
Click each one to start a new puzzle.
-
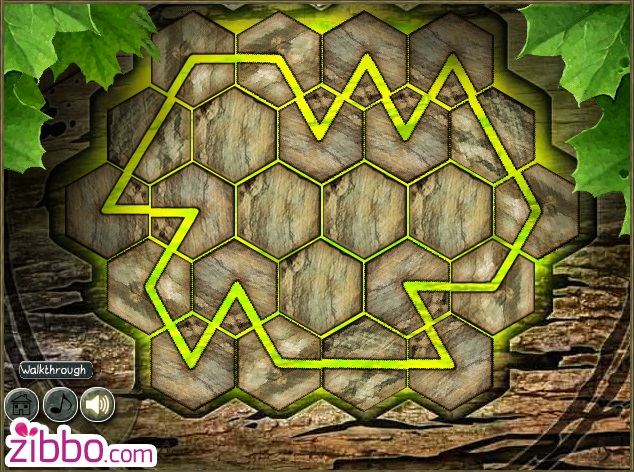
Click the hexagonal tiles to rotate them so that all of the green lines are connected in an uninterrupted path.
-
Once you've solved the puzzle you can take a SILVER KEY (1/2) from the tree hollow.
-
Go through the tunnel across the water to enter Poseidon's Machine Room.
Poseidon's Machine Room
-
Click the SUN at the top of the green banner to take it.
-
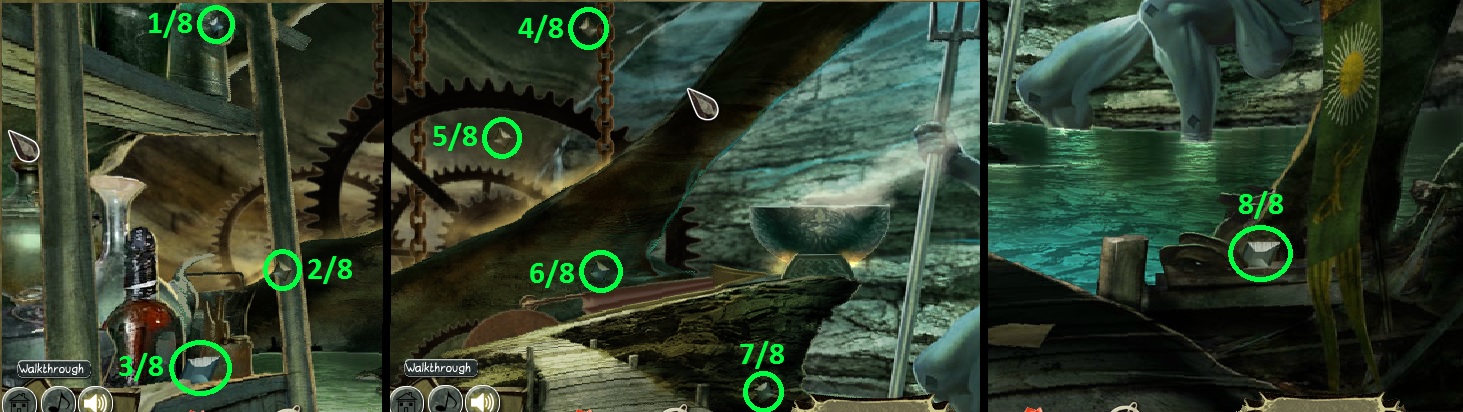
Collect all 8 RHOMBUS STONES hidden around the room.
-
Place the RHOMBUS STONES into the 8 rhombus-shaped spaces on the statue of Poseidon.
-
There is on space on his forehead, one at the center of his chest, one at the elbow of his right arm, one on his left shoulder, one at the middle of his left arm, one on his right knee, one on his left knee, and one on his left shin.
-
Take back the CHARGED RHOMBUS STONES from the statue once they start to glow.
-
Also note the four letters that appear on the statue's chest: Beta (B), Epsilon (E), Zeta (Z), and Omicron (O).
-
Open the top drawer under the bottles of potions to start another puzzle.
-
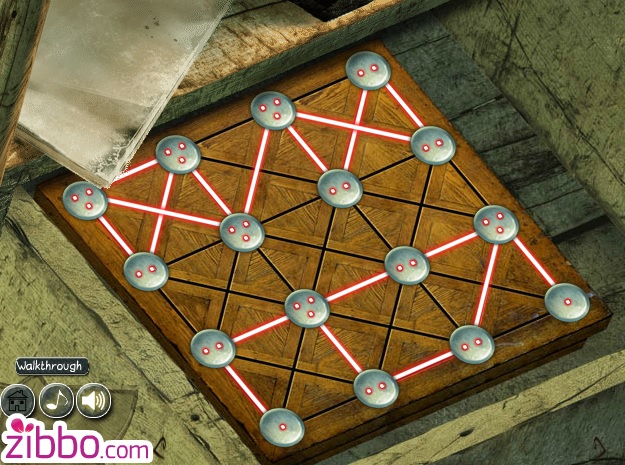
Click the paths on the board to draw a line between the round stones.
-
The number represented by dots at the center of each stone indicates how many other stones it must connect to (e.g. a stone with 2 dots must be connected by a line to 2 other stones).
-
You will receive a SWORD once the puzzle is complete.
-
Click the paper on the ground to the right of the metal cauldron to read the note.
-
The page includes instructions for creating a Music Stone. You'll need a flower, a living animal, and something with light.
-
Fortunately, we already have two of the three ingredients!
-
Put the ROSE and the SUN into the large stone pot at the end of the path.
-
Now read the second paper, found just to the right of the ingredients list.
-
This note lists additional ingredients for another recipe: "part of a human body and a bit of luck."
-
Walk back twice to return to Pegasus' Dome, then continue through the left door into Hermes' Column Chamber. From there, continue through the doorway into Kronos' Mosaic Room.
Kronos' Mosaic Room
-
Pick up the FISHING ROD leaning against the left wall.
-
Note the three holes at the top, left, and right sides of the painting of Kronos.
-
The hole on the left is shaped like a fish, the one on the right is shapes like a star, and the one at the top is an odd geometric shape.
-
Go all the way back to the Gorgon's Glowing Tree.
Gorgon's Glowing Tree
-
Cast the FISHING ROD into the pool at the bottom of the waterfall to catch a FISH (1/2).
-
Go through the tunnel into Poseidon's Machine Room.
Poseidon's Machine Room
-
Use the FISHING ROD on the water to catch another FISH (2/2).
-
Place one of the FISH into the cauldron, where you previously put the Sun and the Rose ingredients.
-
Now that all three ingredients are in the cauldron, you will receive a WEIRD STONE.
-
Go back twice and through the left door to return to Hermes' Column Chamber.
Hermes' Column Chamber
-
Click the cracked column ten times to expose the puzzle board inside the column, then click the board to begin a new puzzle.
-
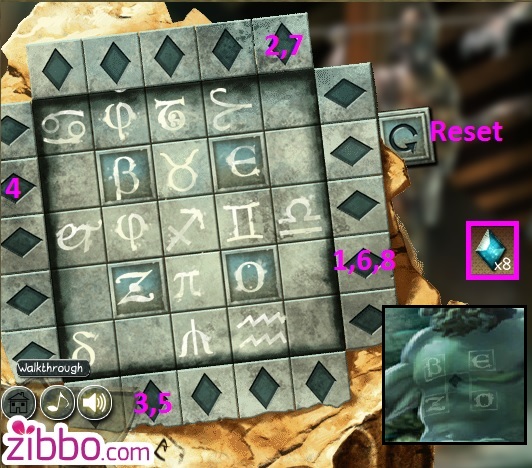
Arrange the letters so that Beta (B), Epsilon (E), Zeta (Z), and Omicron (O) are correctly positioned in the darker squares, just as you saw them on the statue of Poseidon.
-
You must insert a CHARGED RHOMBUS STONE from your inventory into the rhombus-shaped holes along the sides of the board to move the letters.
-
Placing a stone on the left side will push all the letters in the adjacent row on space to the right.
-
Stones placed on the right side will move all the letters in the row beside it one space to the left.
-
Stones placed at the top of the board will move the letters in the column below that stone one space down.
-
Stones placed at the bottom of the board will push the letters in the column above the stone one space up.
-
Your number moves is limited by the amount of charged stones in your inventory, up to a maximum of 8 moves.
-
To complete the puzzle, the B tile must be at the upper left dark square, E at the upper right square, Z in the lower left square, and O in the lower right square.
-
The SILVER KEY 2/2 is automatically added to your inventory once the puzzle is solved.
-
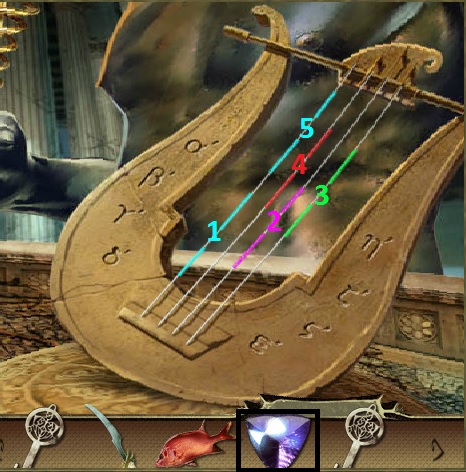
Click the WEIRD STONE in your inventory to hear a short song consisting of 5 notes.
-
Now click the strings of the lyre. You'll hear that each string plays one of the same notes heard by using the WEIRD STONE.
-
Play the song on the lyre by clicking the strings in the correct order:
-
First the outer left string, then the inner right string, then the outer right string, then the inner left string, and finally the outer left string again.
-
Pick up the CADUCEUS STAFF that the statue of Hermes drops by the base of the cyclops' pillar.
-
Go back to the Gorgon's Glowing Tree.
Gorgon's Glowing Tree
-
Use the CADUCEUS STAFF on the frozen stone figure to shatter it.
-
Click the pile of rubble from the broken figure to take the STONE ARM.
-
Use the FISH (2/2) from your inventory on the glowing pair of eyes in the gorgon carving to turn it into a STONE FISH.
-
Go up the stairs into the Underwater Room.
Underwater Room
-
Place the SWORD from your inventory into the empty hand of the left triton warrior.
-
This will activate the orb pillars around the room. Click one of the pillars to begin a puzzle.
-
The orb at the top of each pillar is a specific color, activate the pillars to identify their colors from left to right: Yellow, White, Green, Red, Purple, Blue.
-
While a pillar is activated, one of the matching colored geometrical shapes in front of the tritons will be come unlocked (e.g. the blue orb activates the blue shape, the yellow orb activates the yellow shape, etc.).
-
Arrange the shapes into the tangram puzzle space carved into the shell so that none of the shapes overlap and all of them fit perfectly within the tangram.
-
Once the puzzle is solved, an ODDLY SHAPED STONE will be added to your inventory.
-
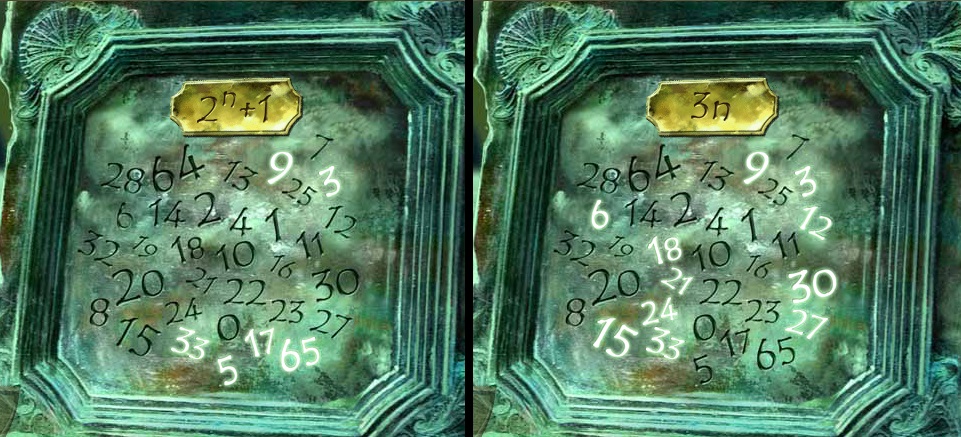
Examine the stone slab covered in numbers to start another puzzle.
-
Simply follow the instructions of the equation at the top, then click to highlight all of the numbers that are true solutions to the equation.
-
Solve at least 2 of the equations to complete the puzzle.
-
2 to the power of n + 1 is:
-
3, 5, 9, 17, 33, and 65.
-
3n is:
-
3, 6, 9, 12, 15, 18, 21, 24, 27, 30, and 33.
-
The golden plaque at the top of the stone slab will fall off once you've solved the puzzle, revealing a CLOVER in the cache behind it.
-
Return to Poseidon's Machine Room.
Poseidon's Machine Room
-
Place the STONE ARM and the CLOVER from your inventory into the large stone pot at the end of the path to receive a PHILOSOPHER'S STONE.
-
Use the PHILOSOPHER'S STONE on one of the SILVER KEYS in your inventory to turn it into a GOLD KEY.
-
Go back twice to return to Pegasus' Dome.
Pegasus' Dome
-
Click the large dial at the middle of the golden pegasus statue to examine it.
-
Insert the SILVER KEY into the left lock and the GOLD KEY into the right lock to start a puzzle.
-
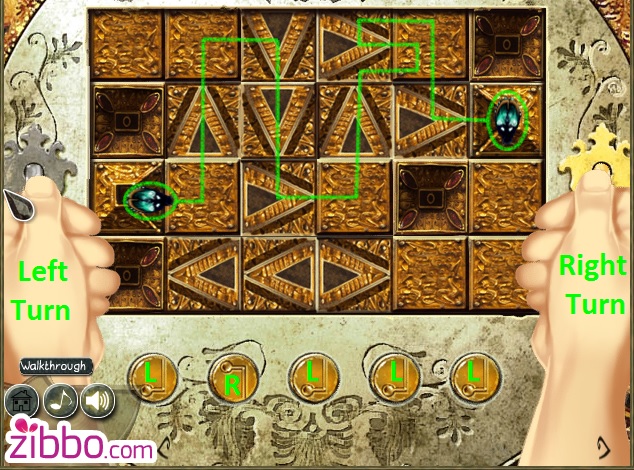
Turn the keys to operate the small beetle and move it towards the end point safely.
-
The beetle will always move forward towards whichever direction it is facing and then stop to turn when it reaches a blank tile.
-
If you turn the left key, it will make a left turn when it arrives at the blank tile. It will turn right at the blank tile if you use the right key instead.
-
The beetle automatically follows the direction of any arrow tile it walks over.
-
Click the keys in the following order to set the beetle on the correct path:
-
Left, right, left, left, left, left.
-
You will receive a STAR SHAPED STONE after the puzzle is solved.
-
Walk left twice to return to Kronos' Mosaic Room.
Kronos' Mosaic Room
-
Insert the STONE FISH into the fish shaped space at the lower left section of the Kronos painting.
-
Place the STAR SHAPED STONE into the lower right space.
-
Lastly, put the ODDLY SHAPED STONE into the matching space at the top of the painting.
@Trinn: Thanks for the walkthrough! The in-game video walkthrough wasn't much help.
[You're very welcome! Glad it helped :) - Trinn]
running into an issue of a black screen, with only the 'zibbo' and language choice on it... the black screen eats my curser. gonna try a few things.
@ashiel: Running into the same problem. Refreshing the page, updating chrome (and therefore automatically flash)has not helped. If you find a solution please share :-)!
In the second room, the puzzle shown in the review with the three demon heads and the push blocks, what the heck is the objective?
(I'm not having a good experience with the embedded video walkthrough. I can't do anything except invoke it and dismiss it. None of the other interactive bits are functional, which means I can't pause it or view it in YouTube proper, which means that every time I hit a bump, I have to re-watch the video from the beginning.)
Hi Ashiel and Marjolijn! Sorry to hear you're having issues. Have you made sure any AdBlock programs are turned off? In addition to hurting the site, they also tend to interfere with games loading and cause other odd behaviour with them. Otherwise, try clearing your cache in case it got corrupted.
Hi ray9na! The objective is
to move the lion heads in each rectangle to the arrow at the top of the box they're in. Clicking on an adjacent square will move the lit-up lion head into it, and if there's nothing on the other side of a block, you can push blocks out of the way by moving into them. If you get stuck, the circular arrow button resets you.
Thank you, Dora and Trinn. :)
Looks promising ... I'll have to comeback when I have more time. A lot of watching long scenes play out.
Could someone please post the audio solution? This machine has no sound.
Shudog,
Sorry the screenshots in the walkthrough aren't uploaded yet! It should be just a few more minutes, hopefully. I also added some additional instructions to the walkthrough to clarify the solution. If you were to picture the strings on the lyre labeled A, B, C, and D from left to right. You'd need to hit them in this order:
A, C, D, B, A
Hope that helps!
Thanks a ton, Trinn! (Their video walkthrough is indeed turrible, ought to have broken it into two vids.)
Well, besides the game desperately needing a Steadicam and not having every single new item turn into a three hour tour, this is a neat game. As a closet Classicist, tickled by the references sprinkled throughout. The randomness comes off as more esoteric than historical, though.
The art is really stunning. (Except for this one room with the 8-bit PC game throwback. That was odd.) It's too bad the nutty inventory interferes with what would otherwise be a SOP for a point-and-click, namely all the stuff that is nearly out of the screen. Pop the motion sickness pills and enjoy.
I think the rhombus puzzle is broken... There doesn't seem to be a solution that I can see below nine moves
There are actually a couple possible solutions to that puzzle. Try this one:
-
On the right side of the board, click the second lowest rhombus.
-
At the top of the board, click the farthest right rhombus.
-
At the bottom of the board, click the second rhombus from the left (the farthest left one is mostly obscured by the button to turn off the sound).
-
On the left side of the board, click the second highest rhombus.
-
Re-click the rhombus at the bottom from the board that is second from the left.
-
Re-click the second lowest rhombus on the right side of the board.
-
Re-click the far right rhombus at the top of the board.
-
Click the second lowest rhombus on the right side of the board a third time.
Let me know if you need any additional help! :)
Ugh, the camera flew around like crazy on me... I could barely select anything.
I'm getting nothing but a white area where the game should be, everything else on the page loaded.
This hero is quite the hottie! :)
Nice game.
I remember learning that
Chiron was supposed to be a handsome, beloved, immortal. Then the game zoomed in on his spooky-lookin' face and I learned that this was not that Chiron.
Won't run for me in Chrome. I get to the title screen with the "Start Game" button and "Language Selector" with no languages to select and no mouse cursor for the game. I can get "Start Game" to light up as if I'm over it with a cursor, but clicking doesn't start the game.
Chrome is up to date, I'm not running an ad blocker on this machine, and clearing the cache did nothing.
And for what it's worth, the exact same thing happens with the game over at Kongregate.
Incidentally, is this serving as the Weekday Escape entry or has that feature been discontinued?
Ugh. Given the really bad camera control, that tangram puzzle is *awful*.
Great puzzles. Great art. Never got stuck for too long. Only major complaint is that the text... was... so... slow... It would benefit from an option to speed up certain sequences (like when you find a new item).
I had to give up too due to controls and camera. I didn't understand the point of the weird camera if it added nothing to gameplay?
Shame, obviously a huge amount of effort went into this.
I gave it 4 out 5 mushrooms because of the lack of a changing cursor.
I was stumped on two puzzles. One I would probably never have solved without the walkthrough, but the other I definitely would have solved if I had an inkling that I could interact with something.
Otherwise, very fun and I'm looking forward to the next one.
What do you break the statue with?
I found the amount of transition time was annoyingly long. Whenever a new object was discovered, my gameplay would be interrupted with the object being shown on the screen. The way things are placed on the screen is also frustrating.
Same issue in Firefox as Tenzhi reported earlier. Same steps taken. Same result. Fail.
A problem I had with the game was the automatic cutscene skip. One click and you immediately go to the next area. Granted, there's only one (where Chiron appears) mid-game but because I unintentionally skipped it, I had to do the first two puzzles again.
Even with that minor annoyance, I finished it and was well satisfied by everything else.
While I usually like audio puzzles, I had to input the solution multiple times before it would take. Not to mention, if sound is going to be an integral part of a game, then it would be nice if the soundtrack wasn't incessant industrial buzzing or droning insects. There were seriously times I almost quit the game because the sound was grating and didn't seem to contribute to the immediate puzzle~ I initially thought there was a way to turn it off until I realized that the industrial buzzing would occur even while navigating through rooms. Don't know if maybe this was a glitch, or....
What infuriated me was
the stone slab puzzle in the Underwater Room: when x^n and n=0, x=1. So in all the exponent problems (x^n +1), regardless of the value of x, 2 was always a correct answer and, yet, was never accepted!! Infuriating!
Unless, of course, I'm wrong (I am awfully tired). Correct me if I am, please! :) Otherwise, infuriating! :D
From a technical perspective, I'm impressed that QuestTracers managed to get camera motion that, um, fluid in a Flash game. From an aesthetic perspective: what were they thinking? All it did IMO was distract from the gameplay and the art, which were otherwise quite nice. This would almost certainly be unplayable for a friend of mine who's especially susceptible to motion sickness.
Good puzzles, though, and a promising first stab at point-and-click from the developer. They could be a serious player, especially if they rethink their game engine a bit.
Leave a comment [top of page]

Game of the week

Walkthrough Guide
(Please allow page to fully load for spoiler tags to be functional.)
The Cave of Heroes Walkthrough
Many of the puzzles in this game have multiple possible solutions. The following solutions in this guide are intended as examples of one way, but not the only way, to solve these puzzles.
Sandy Cavern
Turn towards the pair of female statues at the right side of the room.
Take the PLATE (1/2) from the left statue.
Next, turn to the large cube under the statues on the left.
Insert the PLATE (1/2) into the round space on the left side of the cube, then click the plate to start a puzzle.
To complete the puzzle you must arrange the tiles within the plate so that they all combine into a moving picture.
Click and drag a tile to move it, then release it over one of the squares at the center of the plate to set it in place.
Solution.
After the puzzle is solved, turned towards the right to see that the pattern on the left side of the stone door is now illuminated.
Now you can take the PLATE (2/2) from the hands of the right statue.
Turn back to the left side of the room and insert the PLATE (2/2) into the circular space at the front of the cube.
Click the plate to start the next puzzle.
Position the dragons around the ring so that none of them are overlapping.
If a dragon intersects with another dragon, it will remain unlit. However, if a dragon is not overlapping with any of the others, it will glow yellow.
There are a few possible solutions and the dragons' placements don't need to be perfect. So long as it's glowing, it counts!
Solution.
Face the right side of the room again and click the stone door to travel to the next room.
Pegasus' Dome
Take the ROSE from the vines on the wall beside the right door.
Click the patterned floor tile to the left of the Pegasus statue to start a puzzle.
Move the three heads to the middle tile at the top of each board.
Click a head to select it, then click an adjacent tile to move it into that space.
If a space is occupied by a block the head will push it off in whichever direction it is moving, but only if there is a space for that block to move into.
The head cannot push more than one block at a time.
To solve the left board, select the left head and move:
Right, Up, Left, Up, Up, Up, Right, Up, Up, Left, Up.
To solve the center board, select the middle head and move:
Up, Up, Left, Up, Up, Right, Up, Right, Up, Left Up.
To solve the right board, select the right head and move:
Right, Up, Down, Left, Left, Up, Right, Up, Up, Up, Left, Up, Right, Up, Right, Up, Left.
Solution.
The left and right doors will open as soon as the puzzle is completed. Go through the door on the right to reach the Gorgon's Glowing Tree.
Gorgon's Glowing Tree
Look up the tree to see a honeycomb-shaped object on four of the branches.
One is at the middle of the upper left branch, another is on the lower left branch, a third is on the upper right branch, and the last is on the lower right branch.
Click each one to start a new puzzle.
Click the hexagonal tiles to rotate them so that all of the green lines are connected in an uninterrupted path.
Upper Left Solution.
Lower Left Solution.
Upper Right Solution.
Lower Right Solution.
Once you've solved the puzzle you can take a SILVER KEY (1/2) from the tree hollow.
Go through the tunnel across the water to enter Poseidon's Machine Room.
Poseidon's Machine Room
Click the SUN at the top of the green banner to take it.
Collect all 8 RHOMBUS STONES hidden around the room.
Stone Locations.
Place the RHOMBUS STONES into the 8 rhombus-shaped spaces on the statue of Poseidon.
There is on space on his forehead, one at the center of his chest, one at the elbow of his right arm, one on his left shoulder, one at the middle of his left arm, one on his right knee, one on his left knee, and one on his left shin.
Take back the CHARGED RHOMBUS STONES from the statue once they start to glow.
Also note the four letters that appear on the statue's chest: Beta (B), Epsilon (E), Zeta (Z), and Omicron (O).
Open the top drawer under the bottles of potions to start another puzzle.
Click the paths on the board to draw a line between the round stones.
The number represented by dots at the center of each stone indicates how many other stones it must connect to (e.g. a stone with 2 dots must be connected by a line to 2 other stones).
Solution.
You will receive a SWORD once the puzzle is complete.
Click the paper on the ground to the right of the metal cauldron to read the note.
The page includes instructions for creating a Music Stone. You'll need a flower, a living animal, and something with light.
Fortunately, we already have two of the three ingredients!
Put the ROSE and the SUN into the large stone pot at the end of the path.
Now read the second paper, found just to the right of the ingredients list.
This note lists additional ingredients for another recipe: "part of a human body and a bit of luck."
Walk back twice to return to Pegasus' Dome, then continue through the left door into Hermes' Column Chamber. From there, continue through the doorway into Kronos' Mosaic Room.
Kronos' Mosaic Room
Pick up the FISHING ROD leaning against the left wall.
Note the three holes at the top, left, and right sides of the painting of Kronos.
The hole on the left is shaped like a fish, the one on the right is shapes like a star, and the one at the top is an odd geometric shape.
Go all the way back to the Gorgon's Glowing Tree.
Gorgon's Glowing Tree
Cast the FISHING ROD into the pool at the bottom of the waterfall to catch a FISH (1/2).
Go through the tunnel into Poseidon's Machine Room.
Poseidon's Machine Room
Use the FISHING ROD on the water to catch another FISH (2/2).
Place one of the FISH into the cauldron, where you previously put the Sun and the Rose ingredients.
Now that all three ingredients are in the cauldron, you will receive a WEIRD STONE.
Go back twice and through the left door to return to Hermes' Column Chamber.
Hermes' Column Chamber
Click the cracked column ten times to expose the puzzle board inside the column, then click the board to begin a new puzzle.
Arrange the letters so that Beta (B), Epsilon (E), Zeta (Z), and Omicron (O) are correctly positioned in the darker squares, just as you saw them on the statue of Poseidon.
You must insert a CHARGED RHOMBUS STONE from your inventory into the rhombus-shaped holes along the sides of the board to move the letters.
Placing a stone on the left side will push all the letters in the adjacent row on space to the right.
Stones placed on the right side will move all the letters in the row beside it one space to the left.
Stones placed at the top of the board will move the letters in the column below that stone one space down.
Stones placed at the bottom of the board will push the letters in the column above the stone one space up.
Your number moves is limited by the amount of charged stones in your inventory, up to a maximum of 8 moves.
To complete the puzzle, the B tile must be at the upper left dark square, E at the upper right square, Z in the lower left square, and O in the lower right square.
Solution.
The SILVER KEY 2/2 is automatically added to your inventory once the puzzle is solved.
Click the WEIRD STONE in your inventory to hear a short song consisting of 5 notes.
Now click the strings of the lyre. You'll hear that each string plays one of the same notes heard by using the WEIRD STONE.
Play the song on the lyre by clicking the strings in the correct order:
First the outer left string, then the inner right string, then the outer right string, then the inner left string, and finally the outer left string again.
Solution.
Pick up the CADUCEUS STAFF that the statue of Hermes drops by the base of the cyclops' pillar.
Go back to the Gorgon's Glowing Tree.
Gorgon's Glowing Tree
Use the CADUCEUS STAFF on the frozen stone figure to shatter it.
Click the pile of rubble from the broken figure to take the STONE ARM.
Use the FISH (2/2) from your inventory on the glowing pair of eyes in the gorgon carving to turn it into a STONE FISH.
Go up the stairs into the Underwater Room.
Underwater Room
Place the SWORD from your inventory into the empty hand of the left triton warrior.
This will activate the orb pillars around the room. Click one of the pillars to begin a puzzle.
The orb at the top of each pillar is a specific color, activate the pillars to identify their colors from left to right: Yellow, White, Green, Red, Purple, Blue.
While a pillar is activated, one of the matching colored geometrical shapes in front of the tritons will be come unlocked (e.g. the blue orb activates the blue shape, the yellow orb activates the yellow shape, etc.).
Arrange the shapes into the tangram puzzle space carved into the shell so that none of the shapes overlap and all of them fit perfectly within the tangram.
Solution.
Once the puzzle is solved, an ODDLY SHAPED STONE will be added to your inventory.
Examine the stone slab covered in numbers to start another puzzle.
Simply follow the instructions of the equation at the top, then click to highlight all of the numbers that are true solutions to the equation.
Solve at least 2 of the equations to complete the puzzle.
2 to the power of n + 1 is:
3, 5, 9, 17, 33, and 65.
3n is:
3, 6, 9, 12, 15, 18, 21, 24, 27, 30, and 33.
Solution.
The golden plaque at the top of the stone slab will fall off once you've solved the puzzle, revealing a CLOVER in the cache behind it.
Return to Poseidon's Machine Room.
Poseidon's Machine Room
Place the STONE ARM and the CLOVER from your inventory into the large stone pot at the end of the path to receive a PHILOSOPHER'S STONE.
Use the PHILOSOPHER'S STONE on one of the SILVER KEYS in your inventory to turn it into a GOLD KEY.
Go back twice to return to Pegasus' Dome.
Pegasus' Dome
Click the large dial at the middle of the golden pegasus statue to examine it.
Insert the SILVER KEY into the left lock and the GOLD KEY into the right lock to start a puzzle.
Turn the keys to operate the small beetle and move it towards the end point safely.
The beetle will always move forward towards whichever direction it is facing and then stop to turn when it reaches a blank tile.
If you turn the left key, it will make a left turn when it arrives at the blank tile. It will turn right at the blank tile if you use the right key instead.
The beetle automatically follows the direction of any arrow tile it walks over.
Click the keys in the following order to set the beetle on the correct path:
Left, right, left, left, left, left.
Solution.
You will receive a STAR SHAPED STONE after the puzzle is solved.
Walk left twice to return to Kronos' Mosaic Room.
Kronos' Mosaic Room
Insert the STONE FISH into the fish shaped space at the lower left section of the Kronos painting.
Place the STAR SHAPED STONE into the lower right space.
Lastly, put the ODDLY SHAPED STONE into the matching space at the top of the painting.
Posted by: Trinn |
August 28, 2013 1:00 PM
|
August 28, 2013 1:00 PM