
![]() Last time in this whimsically surreal and remarkably beautiful point-and-click adventure series, our stalwart hero Triton found the legendary magic of the ancients and passed through a space-time hole. But this has deformed the neighboring universe, disrupting phases of the moon and other important bits. Now, in Jacek Szleszyński's Kveendolnitza 2, will Triton be able to use the kveendolnitza to restore the old order? Eh. Who knows? Why don't you give the little fellow a hand: explore the world around you, search strange surroundings to uncover useful objects and use them in the correct order, solving riddles and other puzzles, and you'll find the answer at the end.
Last time in this whimsically surreal and remarkably beautiful point-and-click adventure series, our stalwart hero Triton found the legendary magic of the ancients and passed through a space-time hole. But this has deformed the neighboring universe, disrupting phases of the moon and other important bits. Now, in Jacek Szleszyński's Kveendolnitza 2, will Triton be able to use the kveendolnitza to restore the old order? Eh. Who knows? Why don't you give the little fellow a hand: explore the world around you, search strange surroundings to uncover useful objects and use them in the correct order, solving riddles and other puzzles, and you'll find the answer at the end.
 Played mainly by hovering your cursor around the intricately detailed landscape, looking for when it changes to a pointing finger (for selecting items) or footprints (for moving). The caveat is, you can only use certain items or move some places after completing the proper tasks. This trial-and-error creates a leisurely progress as you're toying with and testing reactions or, for the life of Triton, looking for an active spot and trying to make it work. You don't have pockets, so items you pick up will float glowing on the same setting as where you need to use them. Gameplay is very similar to Haluz, Samorost, and Hapland but you'll find more mini-game-style tasks here, some requiring dexterity, careful listening or sharp eyes. In fact, much of your success, both in the main game and the optional quest for jjgsaw pieces, will depend on your ability to spot shapes at just the time they're usable.
This sequel earns its 2.0 markings with snazzier graphics and harder puzzles, but certain flaws are more apparent, too. Rules of protocol tend to seem arbitrary, so it feels like there's more pixel hunts. Additionally, there are a couple aspects to the gameplay that feel unfair and this can be alienating to otherwise endeared fans. Those flaws won't entirely spoil enjoyment, though, if much of your enjoyment comes from exploring the amusingly gorgeous artwork, which is so well-rendered you can zoom your browser to full scale and it still looks good. All I can say is I want it framed on my wall or perhaps on a t-shirt so that everyone will stop me on the street and say, "I love your shirt!" That's how it feels to play Kveendolnitza 2 and dig into the artwork. Not a fan of this kind of art or of seeking out tiny objects in an elaborately detailed scene? Take a peek at least; see if you can change your opinion after playing a bit. If those two parts don't put you off, Kveendolnitza 2 is not to be missed. It's a lovely addition to the series and it will make you look forward to the next.
EDIT: the game has been revised, including significant changes to some puzzles. The above review refers to an earlier version of the game.


Walkthrough Guide
(Please allow page to fully load for spoiler tags to be functional.)
Kveendolnitza 2 Walkthrough
Get the Entrance Gate Open
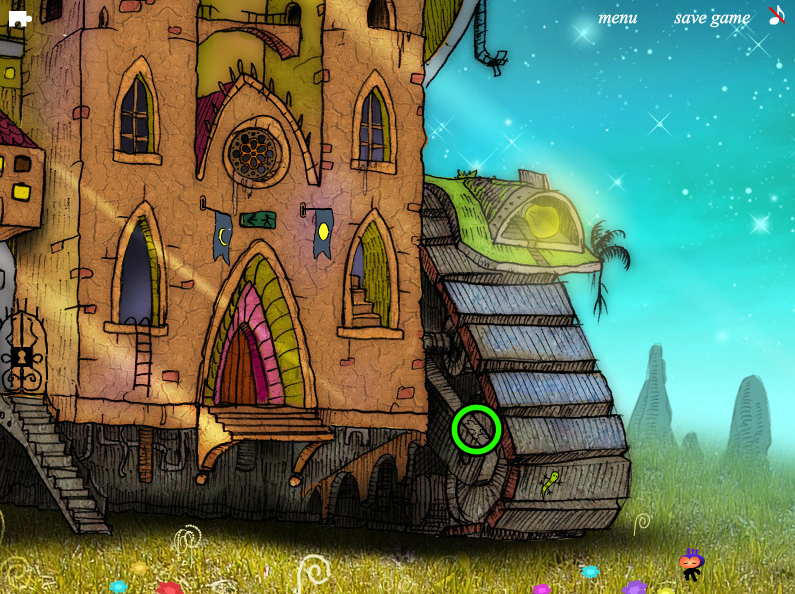
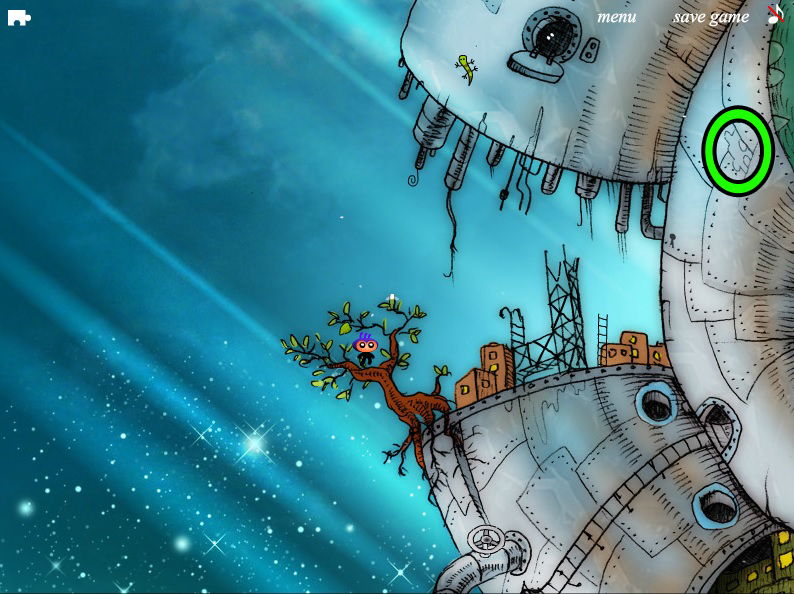
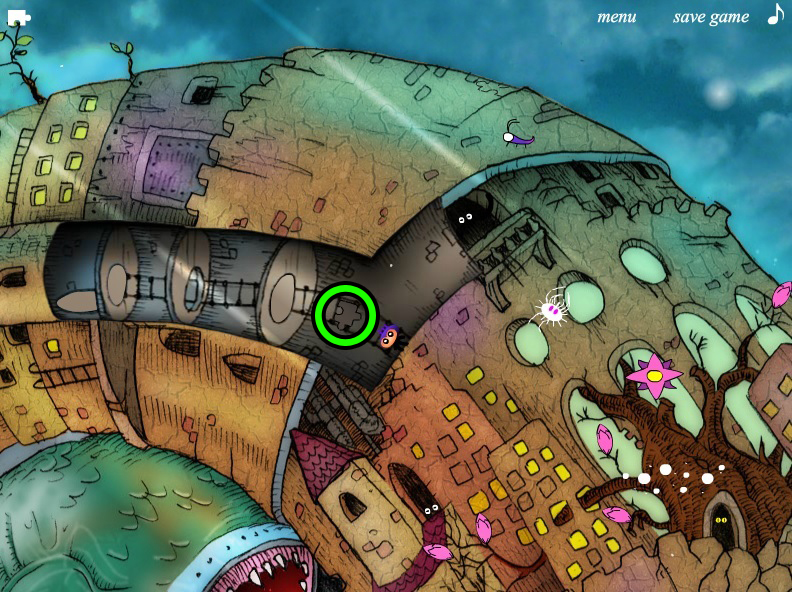
Collect the first PUZZLE PIECE at the top of the axle near the bottom of the giant tank tread.
There are many similar puzzle pieces hidden throughout various locations in the game.
Some are easy to find, some you only have a split second to click before they're passed forever, and some require a bit of work to uncover.
For a list of screenshots that show where to find them, please refer to the "Puzzle Piece Locations" section of the walkthrough.
Click the left side of the scene to move towards the stairs.
Pick up the KEY in the grass at the bottom left corner, then click the gate at the top of the stairs to unlock it.
Click the opened gate to climb up the stairs.
Sneak Past the Green Monster
Click the blinking light bulb beneath the small tree to turn it off.
The green creature will leave its book and move to the light bulb for only a few seconds.
Quickly click the ladder that the creature was blocking to walk through the houses and out to the other side before the monster returns.
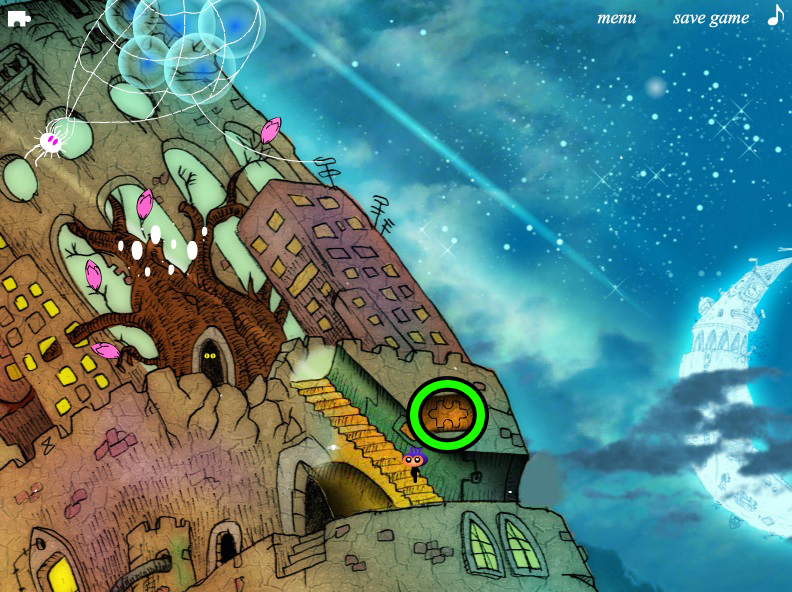
As you're moving through the buildings, you'll only have a few short moments to click the second PUZZLE PIECE on the wall in the yellow room.
Feed the Monster in the Sausage Building
Click the FORK at the top of the tall, green haystack to select it.
Click the sausage sign in front of the building by the haystacks to look inside.
Click the glowing FORK again to give it to the hungry green creature who's unsuccessfully trying to eat its sausage with a spoon.
With the fork from the hay out of the way, you can click the tall haystack a second time to drop down next to the sausage building.
Repair the Ladder
Click the smaller bundle of hay to push it down to the fuzzy, white creature.
The white creature will move over to eat the hay, exposing a COGWHEEL on the ground where it was first standing.
Pick up the COGWHEEL on the ground, then click the matching gear at the top of the ladder to attach the one you have selected.
Next, click the HANDLE sticking out of the side of the well to remove it.
Connect the HANDLE to the two cogwheels at the top of the ladder.
Now you can click the raised ladder to climb up it.
Getting Past the Upside-Down Buildings
Above your character's head you'll see three round, unlit windows with three levers underneath.
You can pull the levers to change the colors of the round windows, but first we need to find the correct color order.
Open the front door to the building beside the one with round windows to find a hidden switch.
Pull this switch then carefully watch all of the windows nearby. Three of them will briefly change colors, one at a time.
The color pattern of the windows is randomized each game, so pay close attention!
If you missed it the first time, click the orange hatch at the bottom of the building with the round windows. If the currently selected colors of the round windows are incorrect, clicking the hatch will close the door to the room with the hidden switch and reset the puzzle.
After resetting the puzzle, you'll have to reopen the door, click the hidden switch again, and watch a new randomly generated color pattern.
Once you've memorized the pattern, click the levers under the round windows to match their colors to the same pattern you just saw.
For example, in my game the windows that lit up were Purple, Teal, and then Purple again.
Therefore, I had to click the levers to change the left round window to Purple, the middle window to Teal, and the right window to Purple.
Click the orange hatch at the bottom of the building (the same one you can use to reset the puzzle). If the color order is correct this time, a ladder will drop down out of the hatch.
Click the top of the ladder to move on to the next area.
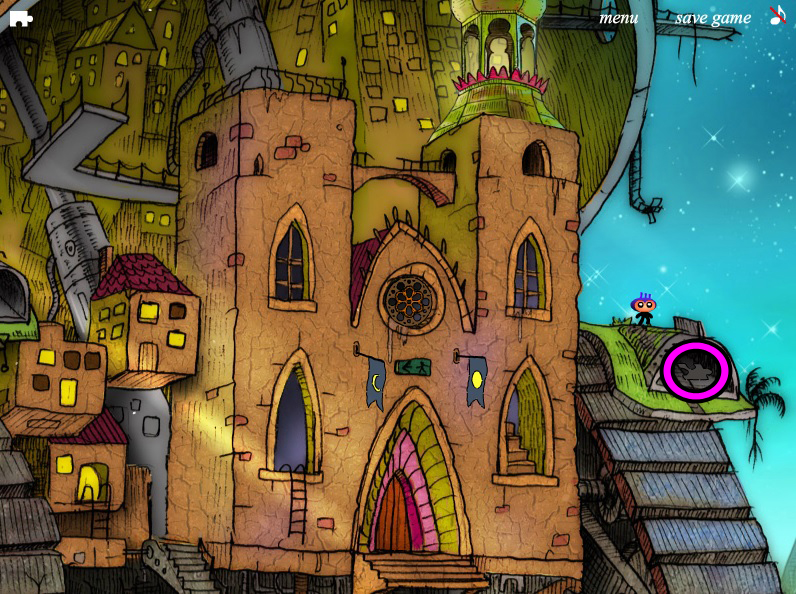
Safely Crossing the Frog Creature
The goal here is to move from the right porthole to the left porthole without getting sucked up by the frog creature.
Don't click the left porthole yet! If you do, you'll be sent to a mysterious room full of melting clocks and a Dali-esque cook.
Wait for him to flip the clock out of the frying pan and into the air, then quickly click the clock while it's mid-air to grab it.
Click the clock a second time to "travel back in time" which will return you to the right window.
Instead, click the VALVE in the middle of the building above the one with the round window puzzle you just solved.
Attach the selected VALVE to the small bar sticking out of the drain pipe beside the bottom of the ladder.
Click the valve once it's attached to turn on the flow of water through the pipe, then click the lurking frog creature to lure him away.
Now you can safely enter the left porthole and continue to the next scene.
Find and use the Key
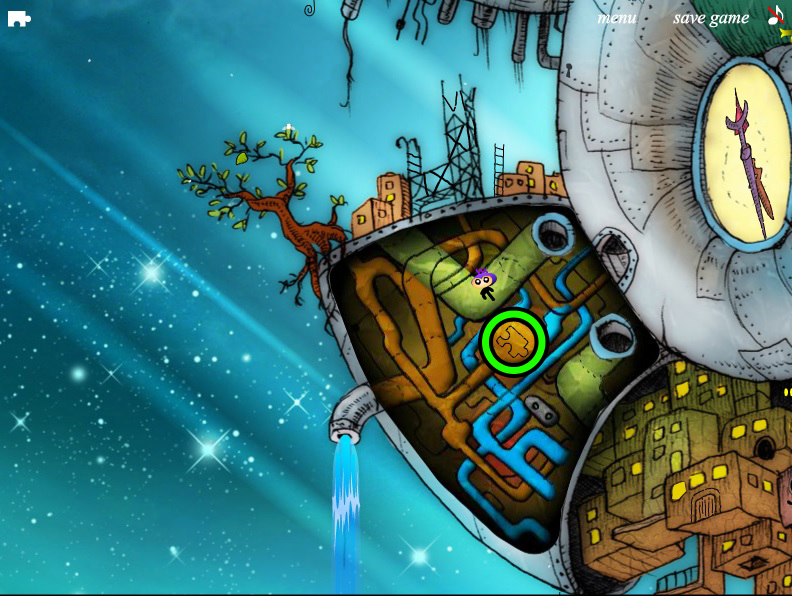
Click the largest leaf in the tree just above your character's head to start a minigame.
Drag the key all the way through the worm's throat and out its tail.
Carefully move your cursor along the path of the worm's body. Don't let the point at the tip of your cursor go outside the fuzzy outline of the path or the puzzle will reset.
Once you've freed the KEY from the worm's belly, use it to unlock the small keyhole on the left side of the curved metal wall that goes around the clock.
If you're having trouble seeing the keyhole, just click the white moth in the tree. The moth will fly over the keyhole and land just a couple inches to the right of it.
After the lock is opened, a small platform will appear below the keyhole. Click the platform to climb up to it.
Fix the Clock
Now that you can get a good look at the clock, you'll notice something is missing...
There are no numbers on the clock! But you don't need to find all twelve of them, you only have to locate the Roman numerals for 3, 6, 12, and 9.
Search the bars in the black metal structure to the left of your character for the numbers you're looking for.
Things get just a little confusing at this point, because you can only place the numbers on the clock in this specific order:
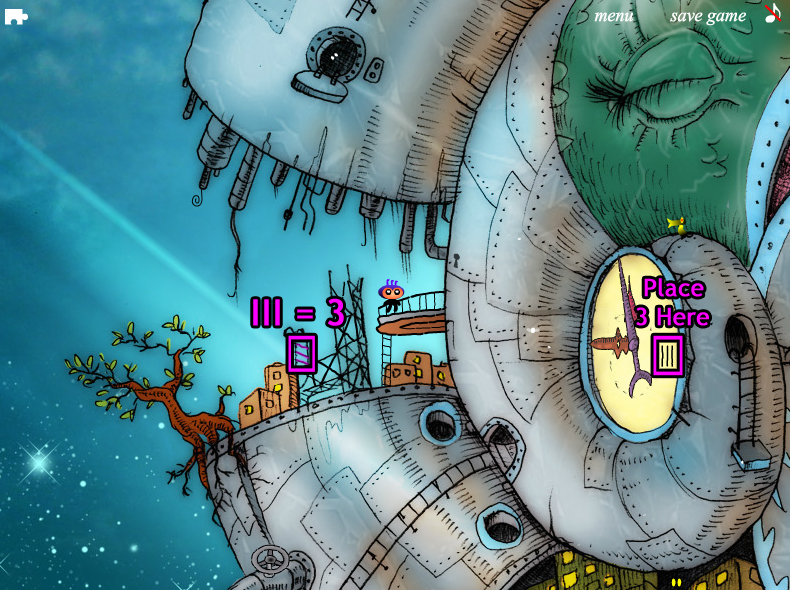
The first number is III (the Roman numeral for 3) at the top of the ladder.
Click the space at the right side on the face of the clock to place the number III.
Screenshot
The next number is XII (the Roman numeral for 12) which is found in the middle of the tall upper section of the black metal structure.
Click the space at the top of the clock face to place the number XII.
Screenshot
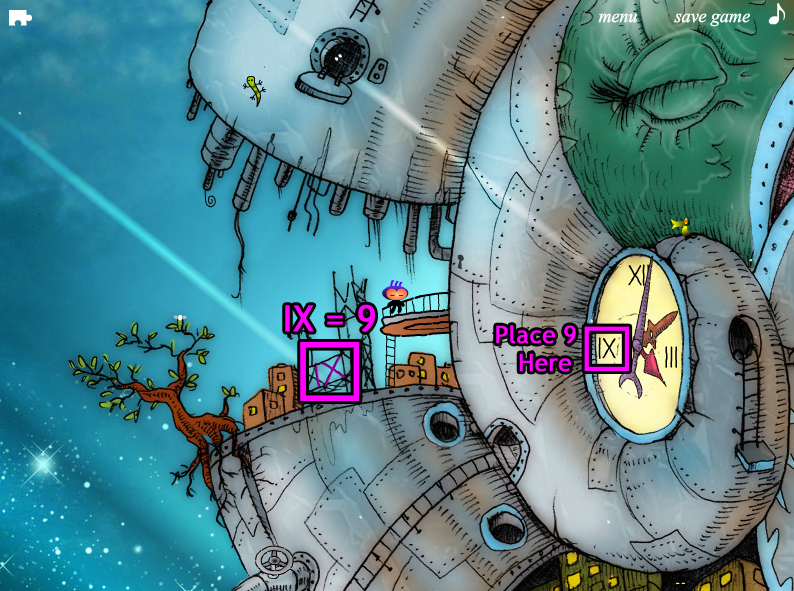
The third number you can find is IX (the Roman numeral for 9) in the middle of the long lower section of the metal structure.
Click the space at the left side on the face of the clock to place the number IX.
Screenshot
The last number is VI (the Roman numeral for 6) at the very top of the tall upper section of the metal structure.
Click the space at the bottom of the clock face to place the number XII.
Screenshot
And the clock is complete! Click the ladder to the right of the clock to climb through to the other side.
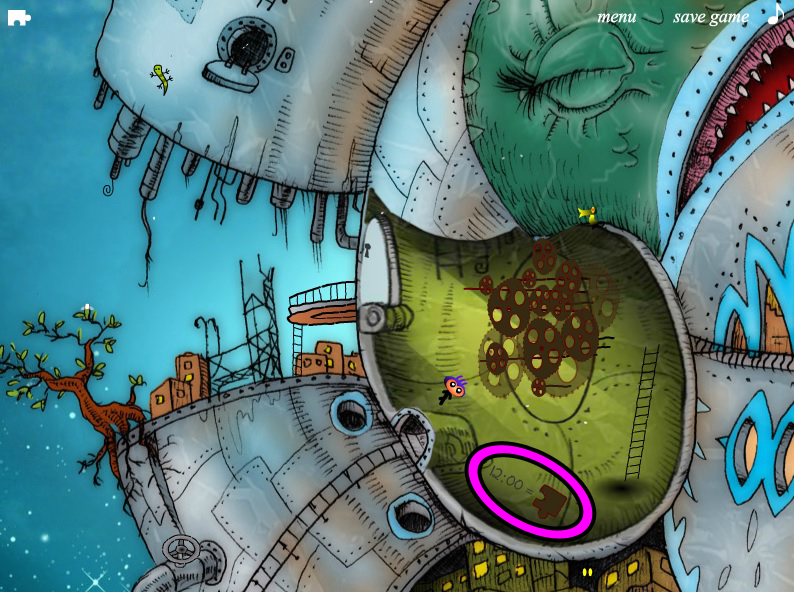
As you're moving through the mechanism of the clock, you'll see a message on the floor inside the room that says 12:00 = Puzzle Piece.
This means that the puzzle piece in this area is only available if you walk through the room at exactly noon or midnight.
If you don't want to wait until then, save your game now and quit to the menu. Change the clock on your computer to 12:00, then return to the game and load your save.
Wait a few seconds for the clock hands to adjust to 12:00. Go through the clock tower, then click the now filled Puzzle Piece on the floor to collect it.
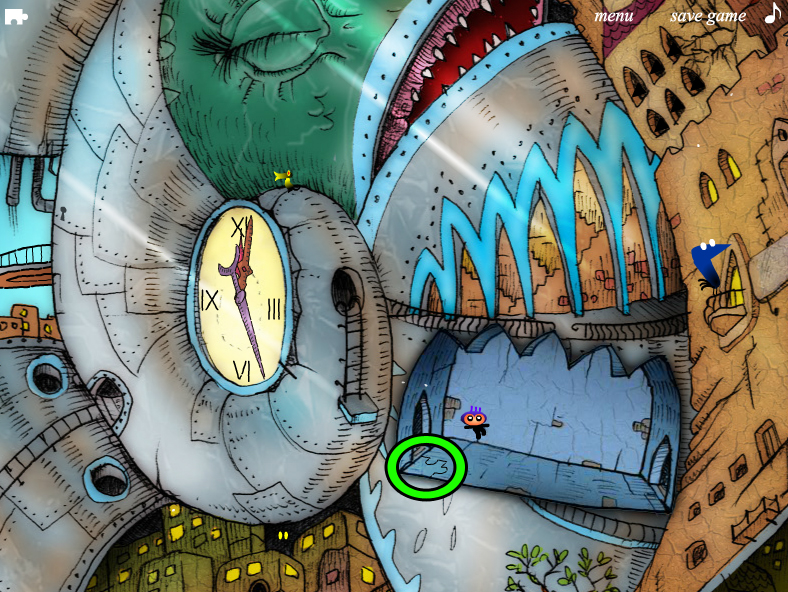
Up the Ladder and Solving the Blue Bird's Puzzle
Click the shadowy figure standing between the blue archways.
Down the ladder below the figure is a platform with a blue door. Click the blue door to make the shadowy figure move to it.
Click the door opened by the shadowy figure to travel through it and up the ladder.
Click the blue bird perched on the balcony to turn on the monitor.
On the screen you'll see six flashing symbols. You can click each symbol to set it to either a dot or a dash, but first you'll need to know the correct order.
At the top of the wall above the blue bird are six windows with six black beaks sticking out.
Click each window and listen to the sound the bird at the window makes.
Each bird will make either a long chirp or a short chirp - it's a morse code clue! A short chirp indicates a dot and a long chirp indicates a dash.
Memorize the pattern of the six chirps, then click the six symbols on the monitor to match the pattern you heard.
This pattern is randomly generated each game. You can also reset the puzzle, which will give you a brand new pattern, if you click the blue bird when the wrong answer is on the monitor.
In my playthrough, the birds chirped in this order:
Long Chirp - Long Chirp - Short Chirp.
Short Chirp - Short Chirp - Short Chirp.
Therefore the code I had to enter into the monitor was:
Dash - Dash - Dot.
Dot - Dot - Dot.
Your solution may be different, but the method to solving the puzzle is always the same.
Once you believe you have the correct solution, click the blue bird. If the answer is correct, the bird will nod its head and open the door.
Repair the Fan
Click the door at the top of the ladder to the right of the monitor to climb down to the fan below.
Pick up the WRENCH in the middle of fence near the lower right section of the scene.
Use the WRENCH on the small peg above your character's head to turn on the fan and blow away the pile of leaves.
Click the bucket of water that the raccoon creature is using to wash its laundry to drop it down on the fan.
Click the far left archway above the fallen bucket to move right towards the guard's post.
Get Past the Guard
Click the guard to start the minigame.
Locate the three objects that the guard has randomly selected for you to find around the scene.
There are many possible stones, windows, pipes, and other such objects that the guard will show you a piece of. All you have to do is spot where the item is, then click it.
Do this three times in a row and the guard will let you pass.
Example
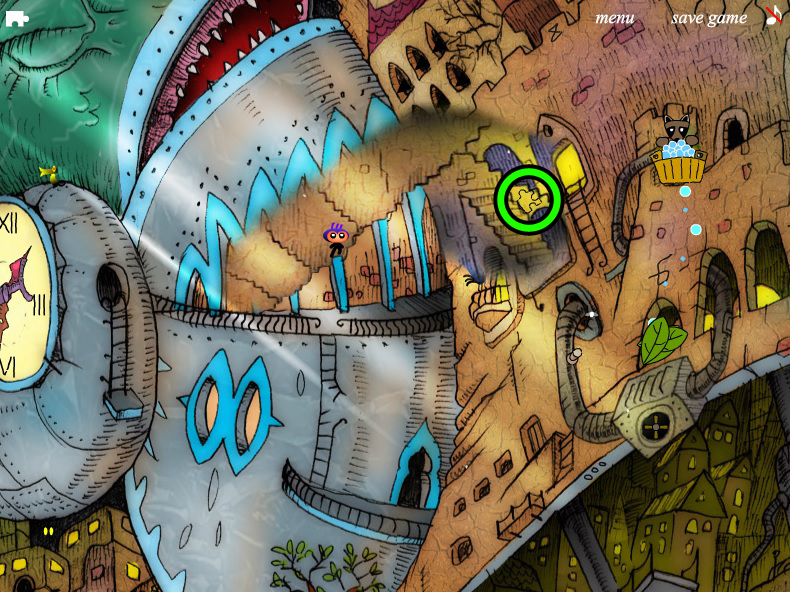
Click the door directly above the stone arches to climb up the stairs to the cat.
Feed the Cat
Click the SAUSAGE in the pink bird's mouth to take it.
Now guide the sausage towards the cat's mouth to feed it.
Although the movement is very disorienting, all you have to do is point your cursor directly on top of the white moth that's on the wall just to the left of the cat.
Click the hollow at the bottom of the tree to follow the cat up to the next scene.
Ride the Spider's Bubbles
There's a loose thread hanging from the right side of the spider's web. Click the end of the thread that's attached to the antenna to drop it down to your character.
Click the spider to make it let go of the web, which will cause your character to be lifted into the sky.
Quickly click doorway behind the balcony, where a shadowy figure is beckoning you, to hop to safety.
There is a curtain on the balcony that reveals the right moment during Triton's spider web flight; you have to click the balcony when it is revealed.
If you don't make the jump, you'll be returned to Dali's clock room. Just click the clock when he tosses it into the air, then click it again to return to the beginning of the spider's scene.
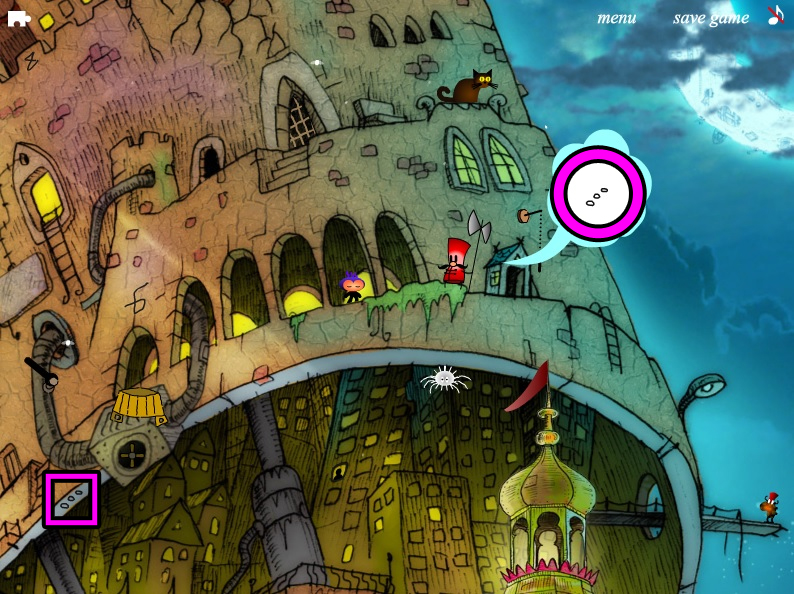
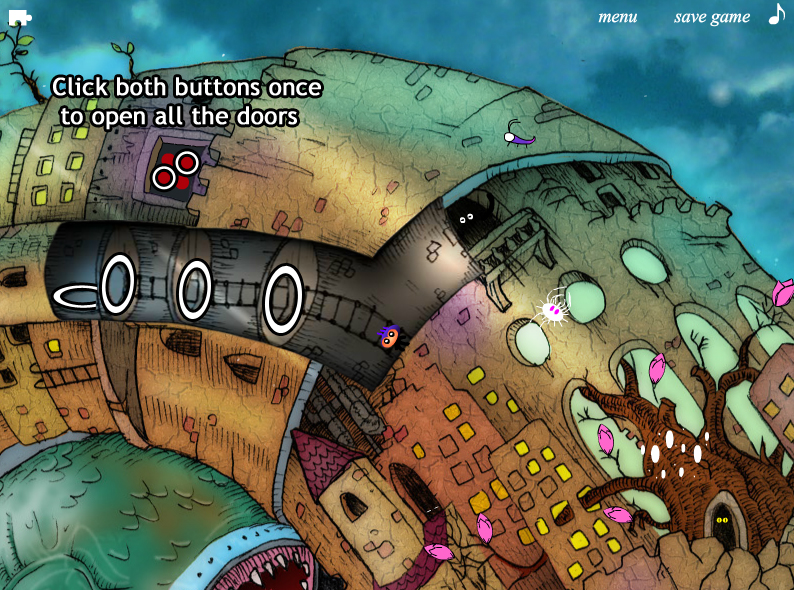
Open the Sliding Doors
Click the purple bug on the roof above your character to make it move to the left.
Just a little further left of where the bug stops, you'll find a square metal panel in the wall. Click the panel to open it, which will reveal four bright red buttons.
These buttons control the four doorways blocking your path up the ladder.
The upper left button controls the far right door.
The lower left button controls the two left doors.
The upper right button controls the two right doors and the far left hatch.
The lower right button controls the two right doors.
To solve the puzzle, click the upper right button once and the lower left button once.
Important Note: It's possible that this puzzle is also randomized like the other puzzles were, although this solution worked for me on multiple playthroughs.
If the following example does not work for you, please keep in mind that only the starting positions of the closed and opened doors will have changed. The buttons that correspond to the doors will always remain the same.
Solution
Once all the doors are open, click the far left hatch to walk down to the whale.
Solve the Whale's Puzzles
Click the whale's eye to open it, which will start the first minigame.
Drag the glowing copy of your character along the paths of light and to the letters of the Greek alphabet.
Just like when you were moving the key through the worm's body, you must use the point of the cursor to guide your character without moving outside of the lines.
Move your character to the letters in this order to complete the puzzle:
First go to alpha (?), then to beta (?), gamma (?), delta (?), epsilon (?), zeta (?), and finally to eta (?)
Solution
After the puzzle is solved, your character will move down on to the whale/fish's face...
The big creature will ask for music automatically when you have completed the greek alphabet labyrinth.
Note the color of the pupil, which will be a randomly selected color out of the possibilities of red, blue, yellow, or green.
A speech bubble with a music note also briefly appears from the whale's mouth, indicating the whale wants to hear a song.
Click your character to play the guitar. The whale will stick out its tongue and eat you, sending you to back to the Dali room.
Go out the window to exit the building, then click the top porthole to enter the music room.
In this room you'll see four album covers in four different colors: red, blue, yellow, and green.
Pick the album that matches the color of the whale's eye you saw a moment ago to learn the song on your guitar.
Climb up the ladder and go back into the Dali room of melted clocks.
Click the yellow clock whel Dali flips it out of the frying pan to catch it, then click it again to return to the whale scene.
Click the whale's eye one more time to wake it up. Next, click your character again to play the whale the song it wants to hear.
If you picked the album color that matched the whale's eye, the whale will send you to the astronomy tower.
Light the Astronomy Tower
Remove the LADDER from the window at the far right side of the room.
Place the LADDER up against the bottom of the stairs beside the left window.
Click the hole in the middle of the wall to climb up the ladder and go outside.
Next, click the blinking light bulb to get rid of it.
Now click anywhere on the astronomy tower building to go back inside, where the room should now be illuminated.
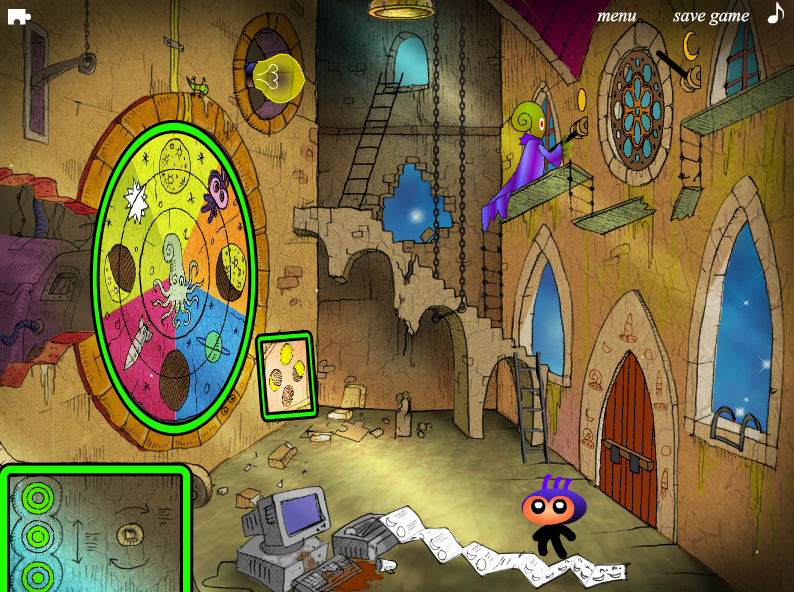
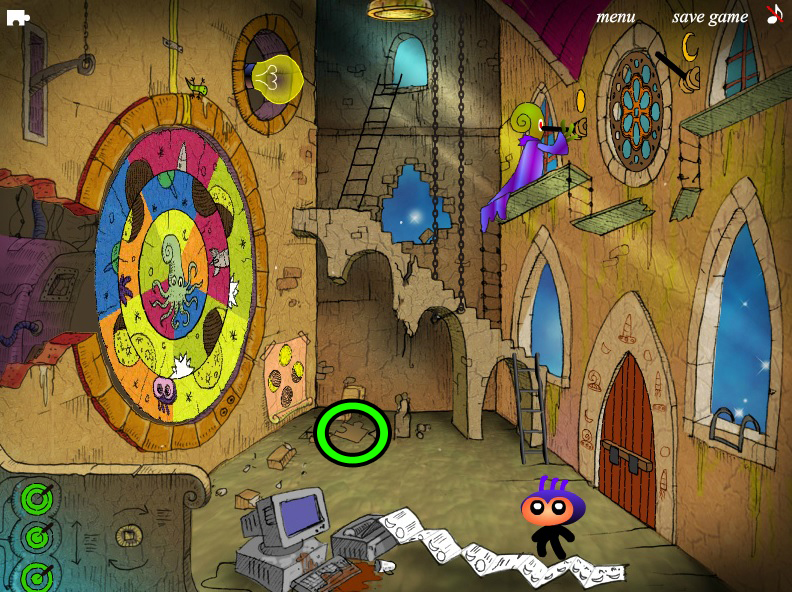
Solve the Wheel Puzzle and Escape!
First, examine the lunar calendar on the poster at the lower right corner of the back wall.
You'll see a full moon at the top, a waxing moon at the right, a new moon at the bottom, and a waning moon at the left.
Turn the discs of the large circular puzzle to match the image on the lunar calendar.
To move the discs, click any of the three green button on the short stone wall at the lower left corner of the room.
The top green button turns the outer and middle discs.
The middle green button turns the small center and middle discs.
The bottom green button turns the small center and outer discs.
The starting position of the discs is randomly arranged each playthrough, but the final solution will always look like this:
Solution
Click the bar blocking the door to remove it, then open the front door.
Select your character to send out a bright star, which will knock down a VALVE from the window and on to the floor.
Click the socket at the right side of the short stone wall near the lower left corner of the room to attach the VALVE.
Now click the valve once to turn it, which will lower a spaceship from the ceiling.
Click the ladder leaning beside the hole in the wall to move it under the window to the space ship, then click the window to climb inside.
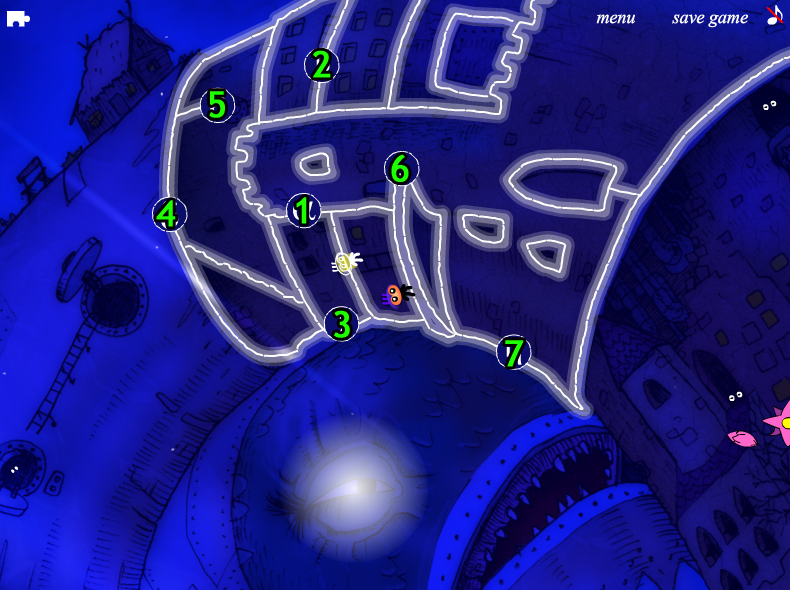
Puzzle Piece Locations
Puzzle Piece 1
Puzzle Piece 2
Puzzle Piece 3
Puzzle Piece 4
Puzzle Piece 5
Puzzle Piece 6
Puzzle Piece 7
Puzzle Piece 8
Puzzle Piece 9
Puzzle Piece 10
Puzzle Piece 11
Puzzle Piece 12
Puzzle Piece 13
Puzzle Piece 14
Puzzle Piece 15
Puzzle Piece 16
If you find any pieces not listed here, please mention them in the comments section below!
Walkthrough by Trinn—all thanks go her way!
Posted by: elle |
November 20, 2013 1:57 PM
|
November 20, 2013 1:57 PM