
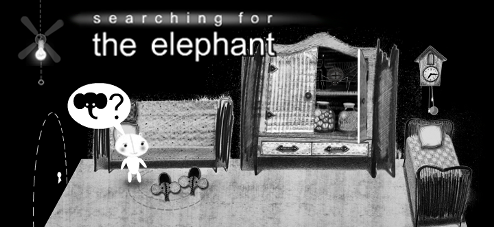
![]() Bear and elephant are tea time friends and roommates. In the darkness of one night, elephant goes missing. So out into the wide, whimsical world, bear goes Searching for the Elephant, encountering and wordlessly interacting with numerous winsome characters in their own predicaments. So do you, as you manipulate elements, decode codes, utilize found objects and generally be a great help to everyone—moving bear along and gaining a big grin in return. Searching for the Elephant is a point-and-click puzzle adventure from Astep, Bidyod, and Nexter, brought to weird and wonderful life by the artistry of marvelmate and the swanky tunes of vhava.
Bear and elephant are tea time friends and roommates. In the darkness of one night, elephant goes missing. So out into the wide, whimsical world, bear goes Searching for the Elephant, encountering and wordlessly interacting with numerous winsome characters in their own predicaments. So do you, as you manipulate elements, decode codes, utilize found objects and generally be a great help to everyone—moving bear along and gaining a big grin in return. Searching for the Elephant is a point-and-click puzzle adventure from Astep, Bidyod, and Nexter, brought to weird and wonderful life by the artistry of marvelmate and the swanky tunes of vhava.
 Your goal in every stage boils down to fixing whatever needs righting, removing whatever is impeding bear from going further, just by pointing and clicking when or where needed. Oftentimes you'll need to acquire and utilize objects which stay in your paws until they're used (because bears have no pockets!) These goals are remarkably well-communicated, even without any narrative or text, through imagery and symbolism. A changing cursor as well as a "?" icon also help clarify interactive areas and objectives although logic is not lacking here.
Considering this is a Flash game, it's a nice discovery to realize your Searching for the Elephant won't end after only a few stages and, because it automatically saves your progress, if you can't set aside an unrushed 15-20 minutes to play, everyone will still be where you left them upon your return. Each scene has an effervescence that comes from the charcoals sketch art and upbeat story that makes this a very engaging experience, and that gives a lot of motivation to work through the minigames even when they're sometimes rather unappealing in their banality. In fact, for some of us, Searching for the Elephant loses points for including the off-sync dials and sliding blocks puzzles.
If there are any disappointments, though, they are more than offset by an adventurer fulfilling length, an effusive Machinarium vibe and, in fellow JIGite Trinn's words, "the Yann Tiersen-esque musette." Full of content, charm and a sweet warm your heart and give out a chuckle ending, Searching for the Elephant is truly a happy find.


Walkthrough Guide
(Please allow page to fully load for spoiler tags to be functional.)
Searching for the Elephant Walkthrough
Level 1 - The Bedroom
Click the pullstring hanging from the right side of the ceiling to turn on the lights.
Open the left large door at the top of the wardrobe.
Pick up the corkscrew on the lower shelf and place it inside the keyhole in the door.
Click the pullstring hanging from the ceiling fan three times to drop the fan on to the floor.
Grab the fan from the ground and attach it to the corkscrew stuck in the lock to open the door.
Level 2 - The Backyard
Climb up the ladder to go on top of the roof.
Click the pipe two times so that the steam is blowing to the right, then climb back down the ladder.
Move the pile of leaves on the ground to uncover the stick.
Pick up the stick and use it on the beehive.
The swarm of bees will chase away the bird, which will fly towards the pipe and be hit by the steam and then knock over the ladder.
Climb up the ladder to enter the tree hollow.
Level 3 - Inside the Tree
Pick up a leaf from the pile on the ground.
Use the leaf on the Squirrel to momentarily chase it away.
Take one of the acorn shells from the pile at the lower right corner.
Fill the acorn shell with the water dripping from the pipe.
Pour the water in the shell on top of the mushrooms at the lower left side of the room to help one mushroom grow.
Grab a leaf again from the pile on the ground.
Place the leaf on the anteater's back to make it drop through the floor, then follow it down the hole.
Level 4 - The Music Room
Search through the pile of rubbish on the floor under the middle lantern to uncover a record.
Place the record on the gramophone to wake up the anteater.
Follow the anteater down to the lower level through the hole on the left side of the floor.
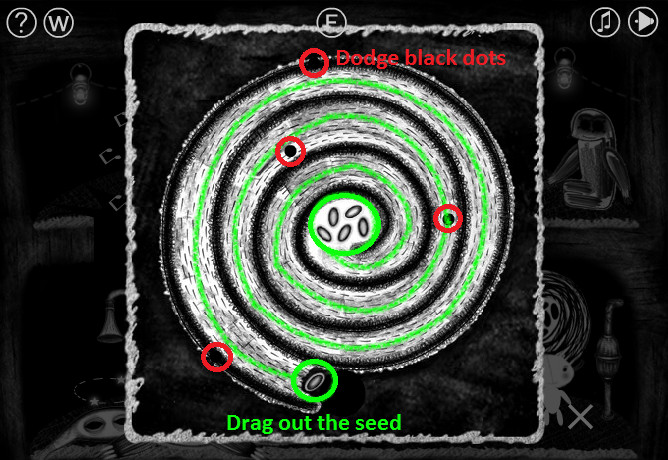
Click the large swirl pattern on the wall (to the right of the dripping pipe) to start the puzzle.
Drag one of the seeds from the circle in the center, through the spiral, and out to the hole at the end without letting it be hit by any of the moving black dots.
Solution.
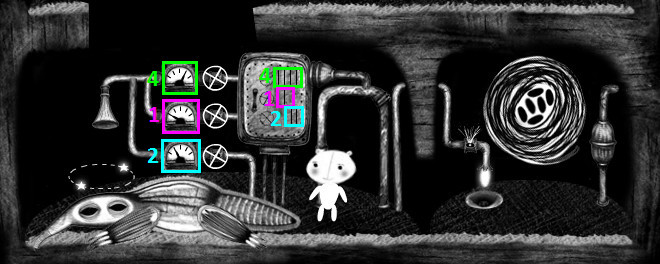
Pick up the seed that appears on the ground and put it inside the dripping pipe.
Click the valve to remove it from the plugged pipe, then place it on the socket under the other two valves.
Turn the three valves to the correct settings to wake up the anteater.
Note the image on the metal box to the right of the valves.
The top row has 4 lines, the middle row has 1 line, and the bottom row has 2 lines.
Click the top valve three times to point the arrow on the meter to the fourth line.
Don't click the middle valve to keep the arrow on the meter at the first line.
Click the bottom valve once to point the arrow on the meter to the second line.
Solution.
Follow the anteater through the hole in the wall at the lower left side of the room.
Level 5 - The Crane Room
Click the elevator platform to start the puzzle.
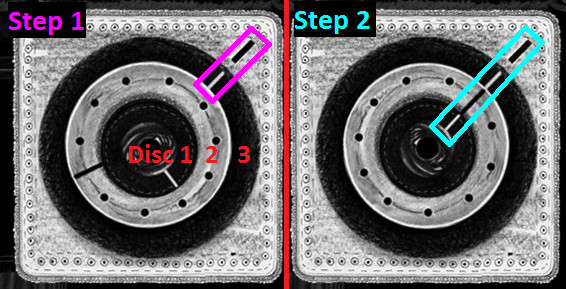
Rotate the three discs so that the stripe on each disc is aligned with the stripe at the top right corner.
Click and drag a disc to rotate it, which will also move any adjacent disc. Therefore:
Moving disc 1 also moves disc 2.
Moving disc 2 also moves discs 1 and 3.
Moving disc 3 also moves disc 2.
This puzzle is actually a lot easier than it seems and can be solved in two easy steps.
Step 1: Rotate disc 3 counter clockwise so that the white stripe on the outer disc is aligned with the black stripe at the upper right corner.
Step 2: Rotate disc 1 counter clockwise to align the stripes on discs 1 and 2 with the black stripe at the upper right corner.
Solution.
After the puzzle is solved, you can ride the elevator down to the lower level.
Go to the button panel and push the left arrow button, then the right arrow button, and then the left arrow button again to adjust the crane.
When the crane is positioned over the curtain, push the down arrow button to drop the hook and lift the curtain.
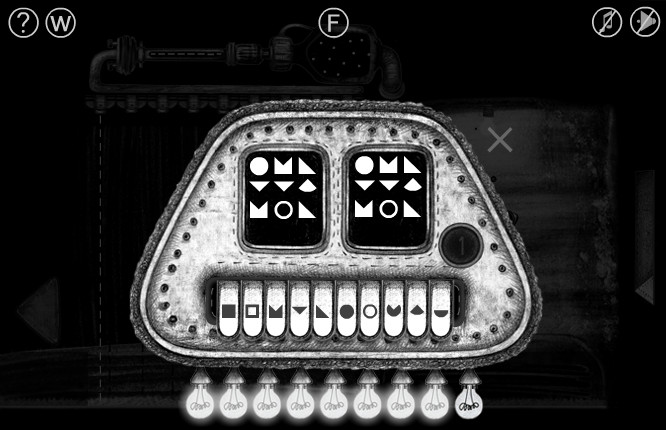
Click the padlock at the lower right corner of the revealed case to start the next puzzle.
Trace the lines from the row of squares at the top to the row of squares at the bottom.
Click each button on the bottom row to match its symbol with whichever square it is attached to on the other side of the line.
The symbols are randomized each game, so please refer to the following screenshot as an example and not a definitive solution.
Solution.
Follow the butterfly out the window in the left wall.
Level 5 - The Laser Room
Click the robot standing on the platform to zoom in on its chest panel.
Click the play button to start the puzzle.
Watch and memorize the symbols that appear on the left screen.
You start out with 1 second on the clock plus an additional second per symbol. When the time runs out, the symbols will disappear from the left screen.
Push the buttons at the bottom of the panel to enter the symbols in the correct order on the right screen.
If you enter in all the matching symbols correctly, you will move on to the next round (indicated by the glowing light bulb under the bottom of the panel). Each subsequent round will have 1 more symbol than the previous round.
The order of the symbols is randomized each time you start the puzzle.
Example.
Once the puzzle is solved, the laser wall blocking the exit will disappear.
Go left to enter the next scene.
Level 6 - The Laboratory
Open the door to the cupboard beside the teapot contraption.
The jar on the top shelf holds water, the jar on the middle shelf holds coffee, and the jar on the bottom shelf holds a hypnotic fluid.
Select the hypnotic jar and the water jar to pour the contents into the left teapot.
Click the panel at the end of the pipe to start the puzzle.
Rotate the pipes to create an uninterrupted path from the arrow at the lower left corner to the arrow at the upper left corner.
Click a pipe (or set of pipes) to rotate them.
Pipes that are connected to the entry arrow at the lower left corner are highlighted with a white border.
Solution.
After the puzzle is solved, push the button underneath the left teapot to heat it.
The mixture of hypnotic and water will put the robot guard to sleep.
Click the bear on the table to free it, then follow it through the open door on the left.
Level 7 - The Conveyor Belt
Click the left robot for a closer look.
Take the wrench from the robot's left hand and use it to remove the upper left and lower right bolts.
The bars above the tool count down the amount of seconds remaining to use the item.
Next, take the screwdriver from the robot's right hand and use it to remove the lower left and upper right screws.
Once all the screws and bolts are gone, the panel will automatically disappear on the next turn.
Screenshot.
Remove the white square from the left robot's back, then insert it into the white box that's feeding orbs into the middle robot.
Click the right robot's sphere-shaped lower half to lift the lids into the torso.
Pick up the orb that fell on the ground beside the right robot, then put it inside the right robot's body.
The right robot will lift the cage door to release a mouse, which will switch the direction of the conveyor belt.
Climb up the ladder to ride the conveyor belt to the next scene.
Level 8 - The Animal Crates
If you approach the robots, they will lock you inside the cage in the air.
Quickly remove the lens from the right robot's head and place it on top of the left robot's head to incapacitate both robots before they have a chance to throw you in the cage.
If you weren't quick enough and got put inside the cage, then click the small moon in the planet mobile hanging from the ceiling to swing the key towards the cage.
Take the key and use it on the keyhole to unlock the cage.
Now you can approach the robots again and use the strategy mentioned before to get rid of them.
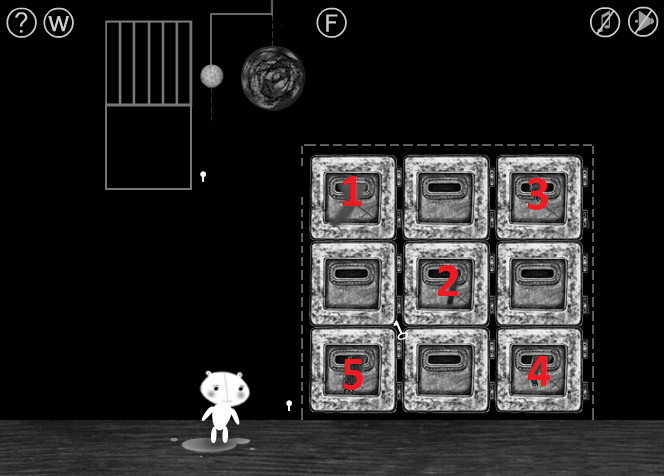
If you click the crates, the animals inside will stick out their hands to help you move the key from the upper left corner of the crates to the keyhole at the lower left corner of the crates.
You must click the correct crates quickly (the animals will only wait outside of the slots for a few seconds to catch/pass the key) or the minigame will reset.
First click the top left crate (1) to take the key.
Quickly click the center crate (2) to pass the key to the next animal.
Click the top right crate (3) to pass the key again.
Next, click the bottom right crate (4) to catch the key before it drops on the floor.
Lastly, click the bottom left crate (5) to pass the key and open the lock.
Screenshot.
Level 9 - The Bridge
Click the manhole cover to remove it from the ground, then climb down the ladder to go to the lower level.
Avoid the robot and do not go anywhere near it.
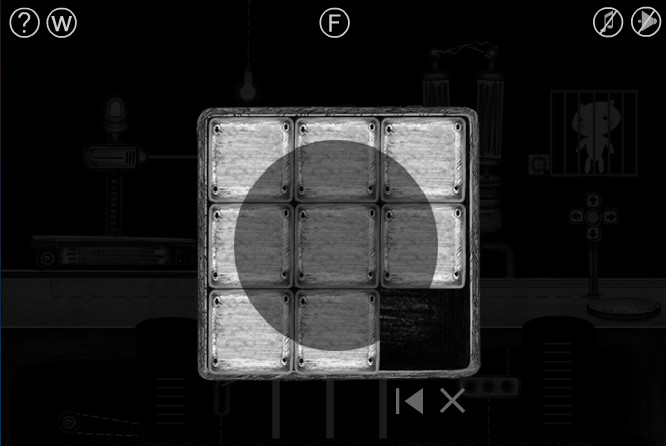
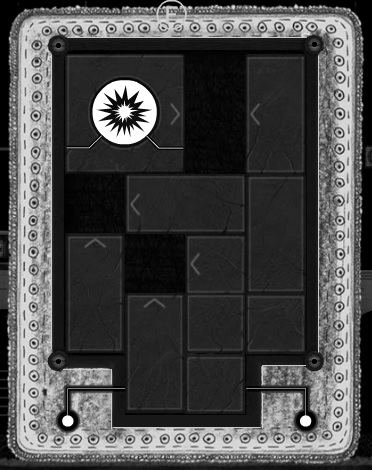
If you are caught by the robot and thrown in the cage, click the small panel at the lower left corner of the cage to start the puzzle.
Arrange the blocks to complete the image of the circle.
Click a block to move it into an adjacent empty space.
Solution.
Once you are down at the lower level, press all three buttons on the panel beside the ladder in order from right to left.
The buttons raise the three white walls in the same order as they are pressed.
Click the small conveyor belt to break it, then pick up the wheel that falls to the floor.
The bear will automatically add the wheel to the claw machine.
Climb up the right ladder and use the arrow button panel to control the claw machine.
Press the down arrow twice and the right arrow twice to aim the claw at the bottom right socket.
Push the center button to unplug the robot.
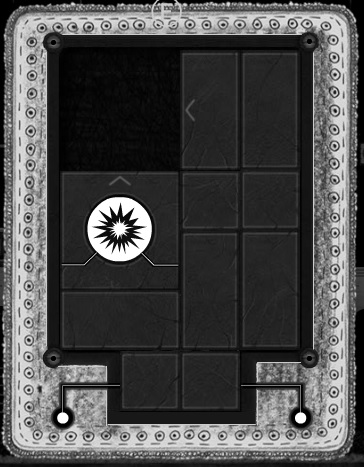
Click the sparking machine between the robot and the cage to start the puzzle.
Arrange the blocks so that the large square block at the top is positioned in the square space at the bottom of the board.
First you want to move away the other blocks so you can get the square block on the left side of the board.
Solution Part 1.
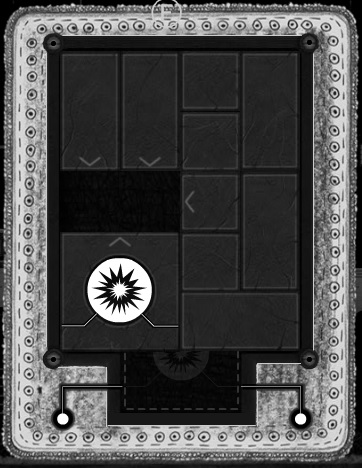
Keep the square block on the left side and start to move it downward.
Solution Part 2.
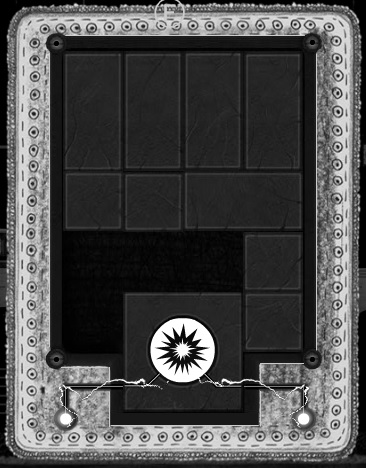
Next, clear the blocks to move the large square block down to the bottom corner of the left side.
Solution Part 3.
Then move the large square block to the center and finally down into the square outline.
Solution Part 4.
Posted by: Trinn |
March 21, 2013 9:51 AM
|
March 21, 2013 9:51 AM