
 Hello escapers, welcome to the new Weekday Escape!
TomoLaSiDo locked you in their apartment and after you escape it, you need to find some gas in Selfdefiant's morgue which is not just abandoned but also contaminated with evil forces. Actually it's one ghost only and it's quite weak - one would expect more from a maorgue, rIght? Neat Escape wants you to test a new security system and Rinnogogo tests your combination skills and an attentiveness.
Have a good time and enjoy!
TomoLaSiDo locked you in two rooms apartment, neatly tiled, with the same goal as ever: to find the six capsules (and 11 packs of noodles (?)...not sure about the translation). Puzzles are many and some of them really challenging - can you escape?
The cursor isn't changing, no save button, one ending.
Since long time we didn't get any asylum from Selfdefiant. This escape is similar to those though there aren't any floating orbs to collect neither the small shop where you may change them for interesting items. You got stuck in front of the old morgue and need to get some gas for your car - maybe you can find any inside? The simple task turns out to be more complicated than seemed...will you get away?
The cursor is changing, no save button, one ending.
One of Neat Escape's many friends installed a new security system in his house and wants you to test it. With pleasure! It's well thought-out and clever; however, prevents only analphabet intruders from enetering the house. Or very dumb ones. Whatever, you find yourself in front of the friend's house and you need do figure out how to get inside. Ahead are many puzzles, probably few unsuccessfull attempts and two ways how to enter the house. The second ending brings more content and more fun, don't miss it!
The cursor isn't changing, save button plus autosave, two good endings + several bad ones.
The game is available for Android too.
Right at the beginning of the latest Rinnogogo's game you meet a playful creature, perhaps a soul mate of the little old men you met few weeks ago, a rodent of some kind in a polka dot costume who wants to play: "Come to my house, let's play together!" it said but immediately after the door closed disappeared, and you ended up trapped in sombody else's house. Again. Your new little friend is weird. Seems that you need to solve many puzzles completely on your own to get out of the house and of the garden, too.
The cursor isn't changing, autosave, one ending.
We love escape games, and our readers love talking about them and sharing hints! How about you? Let us know what you think, ask for clues, or help out other players in the comments below.


Security
I had trouble with the Stars puzzle. I found the hint above the front door and then realized there is an arrow pointing to the left.
There are 4 stars in the puzzle. The hint has five stars at various levels. Following the direction of the arrow, I got the following:
Star 3, 5
Star 1
Star 4
Star 2, 6
That worked!
Security
Use the
Saw on the Wood to get 4 pieces of Wood.
Things still to do:
Where to use the wood?
Where to find a screwdriver handle?
Where to use the hammer?
Security
In the scene with the star puzzle, there are two vertical poles that look suspiciously like a ladder with no rungs. I wonder if the wood goes here?
I have the wood and a hammer but no nails.
Security
I don't know why there is a delicious looking hamburger in a cage in the left scene. I am not sure if there is a proper way to get it without dying.
I am really looking forward to other peoples comments (help) real soon.
Security
The blue key can be used in two places hence ending 1 and ending 2.
Ending 2
Just go through the front door.
Ending 1
Go back to street view. Before you have the blue key, the vehicle is not available. Now it is. Use the blue key on the door and it will start. I think you may have to click it again to make it move. Now there is a new scene.
When I finished the other ending, I realized I had not solved a final puzzle. The item you just found will be the item you need to solve the final puzzle.
TomoLaSiDo
Can't have a TomoLaSiDo without my old friend the Potty. :)
I had to find a video walkthrough on YouTube, and
yes, there is a way to reach the hamburger without getting trapped
It is not really "Room with Chilled Chinese Noodles", but "Room with Banners Announcing That the Sale of Chilled Chinese Noodles Has Begun". Restaurants will only start to sell chilled Chinese noodles when summer is coming.
Thanks. I was suspicious about the translation and thought there must be something wrong with it but didn't find better. Tried 3 translators...
I finally decided to join in on the fun in the comments section! I've been lurking here since the days when a new Submachine episode would generate hundreds of comments.
This week I was able to finish three of the puzzles on my own, but as usual , I needed a lot of help with tomoLaSiDo.
4red3s, I would like to ask you to please put more of your comments in spoilers. I stopped reading the puzzle descriptions until after I play because even a comment like "be sure to examine items in your inventory closely" is too big a hint for me. Thank you.
chrpa, thank you for your introductions to the puzzles. I always enjoy reading them.
kktkkr, thanks for your wonderful walkthroughs. They are the best!
Thanks to all the others who post comments, hints, and translations. It makes coming here even more fun.
can't wait for the walkthrough to these :)
Thank you for your kind words :-)
Hello, I have almost finished Summer Night, but I'm stuck on what I think is the last puzzle. I've used the hint but I'm not getting anywhere with it.
I've tried
looking at the direction of the dolls' faces and their feet
Can anyone give me a further nudge in the right direction?
Gary
Try pairing that clue with another clue
Try looking for something of similar shape/sequence elsewhere
Pennants decoration mean anything?
Nah, I've done that!
I
put the dolls in order of the pennants and pressed the arrows in that order according to the way the feet were pointing and then according to where the faces were pointing. Neither worked!
Am I being really dense and have I missed something out even more obvious?
Yes I am dense, sorry. I've got it now
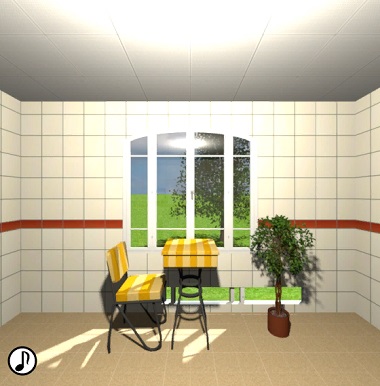
Escape Challenge 115: Room with Chilled Chinese Noodles
Room with Chilled Chinese Noodles Have Begun
may sound like an unusual title, but see Pulsaris' comment above for an explanation of what these things really are.
Exploration
Window, table, chair, potted plant… this time, there's nothing to do on the first screen.
Turn right to face a locked door, a wall clock that looks very normal (but it's still stopped), a fridge with three shape buttons and a window looking into the next room. Mmm, you're already getting excited for the hiyashi chūka.
Turn right to face another locked door! The wall box here has one white and one red button, but the white button changes color when you push it. There's also a three-digit drawer here, the top having three digit buttons and the bottom having three buttons with colored bars that get thicker when clicked.
Turn right. A wall panel has buttons next to platforms of different lengths, with a capsule resting on the top platform. (Also, something about a red button and an arrow.) There's something white on the floor in front of it. You also find a key in the blue bin, and each of the posters above can be peeled slightly back at its lower left corner.
Use the key you picked up to unlock the door near the wall clock, then enter the next room.
There are four red banners here.
Turn right to find a banner next to some wall boxes. The top box doesn't have any visible lock, but you can't open it anyway. The other boxes have three color buttons, three digit buttons and three white buttons that gradually fill down with gray when clicked.
Turn right to find another banner next to a framed picture next to the window. The picture has a jagged arrow and some numbers.
Turn right to face three windows, a table and a potted plant. This time around, the table does have something on it, which very loosely translates to:
Chilled Chinese Noodles —
Dish formed by topping boiled then chilled Chinese noodles with cucumber, strips of thin egg omelette, ham etc. and then a sour soy sauce or sesame sauce.
— Meikyou Japanese Language Dictionary
Drawers in first room
You'll need clues from
the banners remaining in the second room, and the posters above the blue bin in the first room.
For the top drawer:
The red banners form the roman numerals for
1 1 5.
For the bottom drawer:
Each poster is divided into purple, black, green, in the ratio 3∶1∶2.
Click the buttons 2, 0, 1 times.
You get 2 key pieces and a clue with a grid of squares, some of them divided diagonally into halves.
You can now go back to the second room, and pick up the banners that you used to unlock the drawer.
One of them is a banner (item) you can select, while the others just add 3 banners to your collectible total.
Ball drop
For the wall panel beside the blue bin, you'll need to click the white buttons in the correct order to prevent the puzzle from resetting. But if you'll do that, you'll find that the
capsule just falls straight off the bottom of the panel.
Instead (reset the puzzle by backing out), the trick is
the red button, which extends into a platform when you
click the red stripe on the wall to the left of the panel.
Putting those steps together:
Push the red stripe, then the
1st 5th 3rd 4th 2nd buttons (from the top).
This gets you a key piece, and makes the buttons colorful.
Wall boxes, boxless wall, wall boxes
You'll need
the banner, and clues near the windows in the second room.
First, let's use that banner to
block the light from the right window, making the clue on the table redder.
For the right wall box,
the buttons represent the windows in the second room. Since the windows are aligned at their top edges, they are represented by the gray areas.
Click the buttons 3, 3, 2 times.
You find a key piece!
For the bottom wall box,
On the table now in the banner's shade, the text is dark an unreadable except for some parts which form the code
472
You find a button. Push it!
Now you can turn left to face the blank wall, which has three colored lights shining onto it.
Click the bright spot where the lights overlap, and you'll finally find
the toilet.
Next, you'll need the clues from
the lights you just turned on, and the sliding window panel.
For the left wall box,
the lights coming from the floor are
Red Green Blue
(4 2 3 clicks)
This gets you another key piece.
For the top wall box,
The numbers on the window panel can be grouped as
9 6 3 6 12
and those numbers appear (as roman numerals) on the clock:
LDRDU
Open those wall boxes. You'll know it's correct when the top box opens.
Inside, there's the last key piece.
You've already completed the key, but there's more to do!
Single wall box
(You'll need to pick up the banner item again, if you've left it somewhere else.)
Remember the wall panel in the first room? Place the banner into the holder in front of it, then look at it again to get a clue for the wall box in the first room:
The non-red colors, in the direction of the arrow, are
Yellow Green Yellow Blue Blue.
Push the
L R LL R LLL R LLL R R
buttons and then the big button.
Inside, all you find is a poster.
Internal window / fridge
Move the panel (inside the second room) beside the window that connects the rooms:
Following the jagged arrow, click the
UDUD
edges of the frame.
Now you can
go back to the first room and read a shape clue through the window.
Use that clue to unlock the fridge:
Circle, Diamond, Down triangle
Inside, you find a poster.
Wall posters
Use the clue from
the bottom drawer in the first room
to remove the posters from the wall in the first room:
The edge of the drawer tells you to read the columns of the grid from left to right:
Bottom, Top, Middle, Top twice, Bottom
(Left, Center, Right, Center twice, Left)
If you have trouble getting it to work, make sure you're not clicking faster than necessary.
As you've probably already figured out, that's an additional 4 posters.
That's everything! Open the door and leave with all your chilled noodle promotional materials!
Item list
6 key pieces:
(Top pieces are in the first room, bottom pieces are in the second.)
Top left: Top drawer
Top middle: Bottom drawer
Top right: From wall panel
Bottom left: in top wall box
Bottom middle: in right wall box
Bottom right: in left wall box
12 banners / posters
6 red banners are in the second room, and 6 purple posters are in the first room.
1 banner item, opposite doorway
3 banners, opposite doorway
1 banner next to four wall boxes
1 banner next to sliding window panel
1 poster in single wall box
1 poster in fridge
4 posters on wall above blue bin
and one other item:
Second room key, in blue bin
Walkthroughs might take very long this week, but I'm working on them. Thank you for the comments!
Just practicing my spoiler usage as I have offended someone here.
BEWARE Huge Hint
Be sure to examine items in your inventory closely.
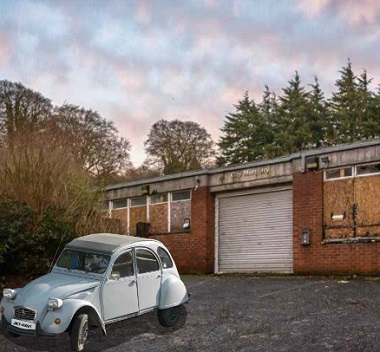
Abandoned Morgue Escape
According to the intro, you're here after being abducted for a few days. Hopefully this doesn't take as long!
Exploration
You're outside a brick building (the City Mortuary). You can read the license plate on the car, and the crate on the right has a stuck lid.
Go north (by clicking the up arrow at the top of the screen). This corridor is quite boring, but it has doors on the left and right with gold and black keyholes.
Go north. Looking carefully at the wheelchair in this stairwell, you find a three-digit box.
Go north. Under the large number on the wall, you can take a map. You can also play the piano, kind of.
Go north. The game tells you there's something in the drain.
Go west. Hidden on the left radiator is a five-letter box.
Following the map, make your way to F, where you see a spooky ghost.
Letters / Black
Use the clue from the
car (at A)
to unlock the five-letter box (at I):
Just read the letters:
JKHXT
Take a black key.
Use the key to unlock the east door at D to get to E.
There's another number here! Take the magic cross on the wall and read the book on the chair (you can click the right edge of the page to read it better).
Music / Gold
Use the clue from
the book (at E)
to play the piano properly (at H):
The circles are horizontally aligned with the letters
C E G B D F A
(You might notice that the next piano key to be pressed is always slightly longer than the others.)
Take the gold key.
Use the key to unlock the west door at D to get to C.
A blue number stands out on the tiles here, but don't let that and the open door distract you from the hidden screwdriver at the bottom of door 7.
Go west to B. The only thing you'll need to see here is the box near the right edge of the screen, missing three things in its round slots.
Defeat / Unscrew
Use the cross to
remove the ghost at F
then pick up a yellow gemstone.
Use the screwdriver to
remove the drain at J
then pick up a red gemstone.
(You still have the screwdriver; we'll use that again later.)
Numbers
Use the clues at
C, E, H, J
to unlock the three-digit box (at G):
The code starts with the yellow number (5) and ends with the blue (2), which means the middle digit must be the red number. Putting that all together, you get
592
Take a blue gemstone.
Complete
Place all three gemstones into the box at B (any order is okay), then take car keys from it.
But the car is still out of gas!
Use the screwdriver to open the crate (at A), then take the gas can.
Fill up the car and use the keys on it to escape!
kktkkr
Thanks for the walkthroughs! It's a lot of work and you do a great job.
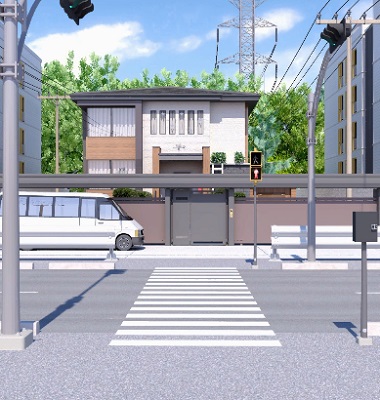
Security
The text above the game tells you that this is a a reverse escape game. So for the first time in a long while, your goal is to get into the house!
Exploration 1
You start quite far from the house, across the road in fact. Just one careless click will put you into the path of unseen traffic, for an instant Game Over!
(Click restart from the game over screen. You won't lose any in-game progress. And besides, you don't have any progress yet!)
There are only two spots you can safely click: the box in the bottom right that's bolted shut, and the bottom of the traffic light on the left. The reason you're looking at that is because
a wrench is hidden behind the base of the post.
Crossing / Exploration 2
Use the wrench on the control box, then open it to reveal a button that turns the lights green permanently.
Cross the road, and you're now standing in front of the house. A van is parked on the left, and the nameplate on the right ("Escape") has a keyhole.
The door is unlocked, leading you to an entrance surrounded by hedges. Directly ahead, there's a fountain with a screw in the top of its central sculpture. The front door is locked, and the red mailbox beside holds a flat screwdriver tip.
From the fountain, click the weather vane above the door to get a closer look at the windows.
Let's check out the left side. In this wooden wall, a compartment has a lock with four bars that fill up with different colors.
Between the wall and the fence on the left, there's a single plank of wood.
The white thing on the right side of this wooden wall is a planter box with some flowers in it, and you see a cage with a burger in it. But before you can put it in your mouth, a pressure plate activates and the cage locks you in, Game Over!
Return to the fountain and go right. Some sunflowers are planted in the shade of the fence. The garage door is locked.
Click the white ladder visible over the hedge. It has no rungs you can reach! There's a round table in this corner, and the box on it has four star-shaped buttons.
Heights
Use the clue
from the sunflowers
to unlock the panel on the wooden wall:
The bars (from left to right) are green, white, light-blue, yellow.
To match the heights of the sunflowers, you'll need to click them
1 4 2 3 times.
Inside, there's a key chained to a pole.
Stars / Unlock 1
Use the clue
on the upstairs windows
to unlock the star box (near the ladder):
In the direction of the weather vane (right to left), the stars appear at the
2 4 1 3 1 4
positions, where 1 is the top.
Take the red key. The only place it can unlock is
the garage.
Exploration 3
The wall directly ahead has a push button labeled Do not push!, but feel free to try it anyway for a quick Game Over.
The left wall has a red padlocked toolbox you can pick up. Examining the bicycle, you find that you can lift up its seat and take a cross-shaped screwdriver tip.
The right wall has a cupboard with handles tied together and a push button labeled Push it!. What does it do?
The entire wall of the garage slams down to reveal a cupboard with its handles screwed shut and a six-letter box (between two mysteriously healthy-looking potted plants).
Tools
Bring the toolbox to the wooden wall you unlocked earlier, and use it on the chained key to unlock the box.
Inside it, you find a saw, but you might also notice
that the toolbox has tiny handle loops on the left and right sides.
Click either handle to remove the false bottom and reveal a hammer.
Use the saw to
convert the long wooden plank into four short planks
and then you can
use the short planks to prevent the burger cage from closing.
With that trap defused, you can finally enjoy your burger- hmm, there are metal nails hidden under the plate!
Retrieve the wood once you're done, and the cage stays shut.
Use the nails and hammer to repair the ladder, then climb up to find a number clue and an electric drill.
Unscrew 1 / Floral
Attach the [+] part to the electric drill, then use it to open the front cupboard in the garage.
The TV inside shows a green forest, but the switch to its left changes the screen to a letter clue.
Use the clues
on the roof and on TV
to unlock the six-letter box in the garage:
Read the TV clue in the order of the rooftop clue:
FLOWER
Inside, you find a silver pyramid that the game calls a toy.
Unscrew 2
Remove the [+] part and put in the [-] part, then use the drill to remove the screw on the sculpture in the fountain.
You can now
place the toy pyramid where that screw was, and it pops open to reveal something golden.
Open that up to find a blue key.
Save your game, because now you can access the
Normal End:
Use the blue key to unlock the door and enter the house!
Unlock 2
If you search for other places to use the blue key, you'll find that
the game now lets you zoom in on the van.
Use the blue key there, and the game screen momentarily turns black, disorienting you. What changed?
The van has moved to the right. You can now look at the back of the van, and you can look at the ground where the van was.
Take the bright orange pliers from there.
Then use the pliers to open the cupboard at the right of the garage.
Inside, there's a four-digit box and a safe with a keypad of blue buttons that don't represent the digits you might expect.
Wrong way
Use the clue from the
back of the van
to unlock the four-button box:
Read LOEO upside-down to get
0307
Inside, you find a towel. Use that to
clean the rear window of the van
and get another clue.
Then use that clue to unlock the safe:
If you've been playing with the safe buttons, you'll know that 9 is the bottom-right button and 1 is the top-right.
In fact, the buttons are
321

478

569
and rotating the clue to match that reveals that you need to enter the code
987654321Inside, you find a yellow key.
Good End
Use the key to unlock the nameplate beside the house gate, revealing a PUSH button.
Pushing the button makes a large elevator appear. Enter it to end the game!
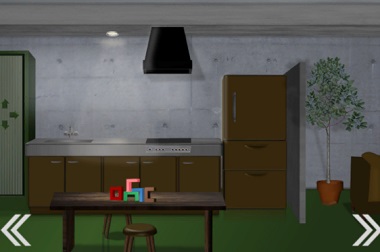
Summer Night
Exploration
After the super short intro, you're free to look around the mouse's house.
There's something colorful on top of the air-conditioner that you can't reach. The couch has a drawing on the carpet in front of it, as well as
an empty space behind the couch.
Turn left to face the kitchen area. You can use the sink here. The table here has four colored shapes. The green cupboard on the left has four arrow buttons.
Turn left to face a door with four circle buttons, a basketball hoop with something stuck in it, and a tall yellow thing you can poke.
Turn left to face a goldfish bowl, a chain of numbered small triangular flags (pennants!), a puddle of blue paint and a panel with four color buttons.
Click the left side of the screen to walk towards the closet. It looks large, but has a lock panel behind a transparent cover secured with screws.
Turn around (using the arrow in the bottom right). The bed has a note on it. The shelves on the wall have numbers on some of their compartments. And the chest of drawers on the right has colored fish buttons on the top drawer.
Drawers
(I'll write the names of hints you can read in the hint menu in game. If you don't want to, reading this walkthrough is enough.)
💡 Gold fish, bottom drawer
You'll need clues from
the fish bowl and the bed.
For the top drawer,
The plants in the bowl have different numbers of stems:
1 stem: red fish facing left
2 stems: blue fish facing right
3 stems: red fish facing right
4 stems: red fish facing right.
Click the top-left, bottom-right, top-right, top-right buttons.
Inside, there's some clothes and a battery you can take.
For the bottom drawer,
The note clue tells you to open and close the top drawer twice.
Inside, you find a toy cat holding a screwdriver.
Closet
Use the screwdriver to unscrew the panel on the closet door. Now the game gives you a hint.
💡 closet
Use the clue from the
shapes on the kitchen table
to unlock the four-digit closet lock:
If you imagine stacking the green block on top of the blue block (without rotating), they will form the shape of the digit 9.
Doing the same for all four digits gives you the code
9268
The left side of the closet hides a basket locked with a grid of four buttons.
You can also open the right side, and take a basketball and mop.
High
Use the basketball to dislodge a letter note from the hoop.
Also use the mop to retrieve the toy with colored balls from the air-conditioner.
Circular buttons
💡Door to the storage, 4 colored buttons
You'll need the clues from
the letter note and the toy.
For the door beside the basketball hoop,
One thing is common to all four words on the note!
The letter O appears in each word in the
2nd 4th 1st 2nd positions.
Take the empty bucket and a locked box.
For the panel beside the goldfish bowl,
Clicking the ball toy pulls its strings from left to right, which are connected to the
Red Yellow Blue Green balls
(0 3 2 1 clicks)
You find a gold key.
Use the key to unlock the box (in your inventory) and get a bottle of detergent.
Stain remover / Letters
💡 Dirty floor
As the hint says: you'll need to fill the bucket in the sink and add the detergent, then use the mop on it and then the stain in front of the fishbowl.
This reveals a clue with a grid of letters.
💡 box in the closet
Use the clue from the letter grid to unlock the box in the closet.
The other clue is on the box.
The (fake) entry button reads
Start, and those five letters appear on the⌝ ⌞⌟ ⌜⌞
squares of the clue.
Take the toy car, and flip it over to find an empty battery compartment.
Passage
Place the battery into the car, and place the car on the marking in front of the couch.
Now the game gives you a hint:
💡 entrance
Following that hint, pick up the fork behind the couch, and use it on the big yellow balloon.
Exploration 2
The entrance has a locked door with a card reader. You can pick up a note with a mathematical clue.
Turn around (click the arrow at the bottom left). There's a shelf with five dolls hanging from it.
Directions
💡 cupboard
Use clues from the
dolls and pennants (flags)
to unlock the cabinet beside the kitchen sink:
The pennant numbered 1 is on the left, and the doll in that position is facing right.
Following the same logic (and paying attention to the boots) you find that the pennants numbered 1 to 5 match dolls that face
RLRDU
Inside, there's a box with numbered lines and a golden bar.
Also check behind the left door to find a clue behind the large dish.
Numbers
💡 Number scale
Use the clues
from the number note and kitchen cabinet
to unlock the gold bar device in the kitchen cabinet:
Starting from -2,
Add 4 to get 2,
Add 2 to get 4,
Subtract 7 to get -3,
Add 3 to get 0.
Click the lines numbered
-2, 2, 4, -3, 0
Pick up the IC key card that comes out, then use it on the card reader.
💡 Entrance Door
Before you can leave, you'll need to use the clue from the
shelf near the bed
to unlock the keypad that unexpectedly blocks your way:
The shelf is shaped like the digit buttons on the keypad, and the compartments numbered 1 to 5 represent the code
20684
Exploration 3
Yes, there's more to the game. You can't go back inside, and you won't need to. For this part, you may want to read the hint first:
💡 garden
Beside the locked red door, you find a black pedestal with three round slots. The picnic table has colored cushions and also some leaves on it.
(And there's something hidden that we'll leave for later.)
Go right, and you see something behind the crate of flowers. But on closer look, you just see a mound of dirt. Backing out, you see the mouse on a slide.
So climb up the slide to find a red shovel, and a clue on the slide, but the mouse has vanished!
Soil / Leaves
Use the shovel on the dirt mound to get a red gem.
Also, use the clue from the table to unlock the wall panel:
The clumps of 1, 2, 3, 4 leaves appear next to the colors
Blue Green Red Orange
(⌝⌟ ⌜⌞)
Take the green gem and a box with nine buttons.
Grid
Use the clue from the slide to unlock the box. Hint:
There's an arrow pointing up the side of the slide. What does it tell you?
When you look down from the top of the slide, the top of the slide (where you are) is at the bottom of the screen and vice versa.
But if you were trying to climb up the slide itself (the metal part), things are reversed, and therefore you have to read the clue upside-down (and still read it in the direction ending in the square).
As for the clue itself: Each button on the box is represented by the lines adjacent to it.
So the first symbol (which is Γ ) represents the bottom-right button.
Applying the same reasoning gets you the code
Bottom-right, Top, Right, Top-left, Center
Take the pliers.
Hidden
If you haven't looked there yet, the mouse will show up on the tree beside the table. Of course, the moment you look up, there's just a white gem and no mouse.
You'll find it resting to the right of the slide. Clicking it, you find a black bus… wait, this is a fire engine with a wooden ladder chained to it!
Use the pliers to release the ladder, and then place it at the base of the tree (beside the table), then climb up and take the white gem.
Complete
Place all three gems into the black pedestal, which opens the red door. Click it to escape!
I agree, thx
Abandoned Morgue Escape
Nice graphics! It's eerie.....
I miss the first clue, the rest comes along easily. :D
Update