
 Hi, time for a break is here, it's Wednesday!
This week we get a chance to compare Amajeto with their predecessor TomaTea, stylish black and white room with a room in soft pastel colors, a perfect coffee break game with a regular escape. Interesing. Emotional Gs Studio's game takes you to the past, and then tomoLaSiDo wants you to figure out how to handle their special devices designed for the only purpose, to confuse escapists.
Have a good time and enjoy!

Welcome in Amajeto's elegant room, with a bathroom this time, where you're supposed to figure out several codes to open locked cabinets and find eight tiles for completing the final jigsaw puzzle. Can you?
The cursor isn't changing, no save button, one ending.
Gs Studio's game is a short escape with a story. You find yourself in your father's neglected room and need to collect few fragments from his sad past (which relates to yours too) and get the key from exit door. Notice, that you can click and drag the game screen with a cursor in order to see other parts of the room. Also notice, that you can combine or dismantle items in your inventory and it's possible to dismantle even the items you haven't combined before...
The cursor isn't changing, no save button, one ending.
Getting blue and white capsules in tomoLaSiDo's blue room seems to be tough this time. It is. Devs show us how cunning they are, particularly in designing strange devices and placing red herrings. Patience, good attentiveness and careful examination of devices and objects (from all sides!) are necessary. However, you may get out without figuring out one device. For happy escape, you need one standard noodle (white), one green and one pink.
The cursor isn't changing, no save button, one ending.
The original game is almost six years old but we can't compare it to the remake since it's inaccessible now. As far as I remember the remake is quite accurate, just slightly simplified and a tune was changed. Otherwise it's Tomatea at their best - clever puzzles with reasonable difficulty and interesting twists, and clean and good looking graphics. Here is one advise from the original review: "In most cases when you're stuck, it's probably you haven't examined your inventory as much as you could, since the uncluttered area design doesn't offer much room for things to hide". Can confirm. Was stuck exactly at the same point as years ago because of that.
The cursor isn't changing, no save button, one ending.
We love escape games, and our readers love talking about them and sharing hints! How about you? Let us know what you think, ask for clues, or help out other players in the comments below.


these look cool. can't wait for these.
Looks like an original Tomatea, but with Amajeto influence. I really loved the original Tomatea games. Cool music and each set of puzzles different. I still like Amajeto as well, but the earlier games were so much more absorbing. To be honest, as far as the developers go, I don't know if they're different, but the games are. Really looking forward to playing this.
One day has passed since these games were posted. I remember when there would have been discussion and hiding of
spoilers
and probably at least one walk through by now.
I am not complaining at all just observing. I am not sure what has happened. The only pattern I see is that Flash died. I never thought I would be that person but ... I miss the good old days.
I'm lost in the TomoLaSido game.
I don't understand what the yellow slidey thing is supposed to do. Then what looks like a fountain comes up from below and the wire / stick / ?? bends and falls into the hole.
I give up. I watched the walk through video to see what happens and it still doesn't make sense.
Mark's Rooms???
I made it to getting the origami animals on the wall based on the clue from the TV. Did the math according to the clues from the book. Followed the order of operations and got the answer. But the answer didn't work.
145
Found a walk through video and they got the same answer and the safe opened.
I have tried backing out, looking at the origami hanging on the wall, and reading the book again, but the correct answer will not open the safe.
I would like to finish this since I'm almost to the end.
4red3s
RE: math in Mark's Rooms - think about what part of the equation you are solving first.
hint: right to left or ???
RE: math in Mark's Rooms - think about what part of the equation you are solving first.
hint: right to left or ???
I am in the same position as you, have you noticed that the colour order varies from game to game. The walkthrough has a different order than the game I am playing. I doesn't matter what order I do the maths in, it doesn't open the box.
The safe in Mark's rooms:
the clue from the TV (in my game) is blue, green, yellow, red
hang the origami in this order, i.e. a dinosaur, a rabbit, a lion, a pig
find in origami book which number corresponds to each animal
8, 1, 3, 6
the math is 8 + 1 x 3 x 6
do the math and notice that there are no braces
it's 26
enter 26
what an ugly bear you get!
You can escape without solving this one. I did it twice but don't know how...was pushing here and there and suddenly did it.
in mark's rooms, did anyone see
the little girl in the tv static for a minute? i think it appeared when i put in 5:30 instead of 3:50 by accident
Yes, and then I could never make it happen again. Made me think of Cube Escape...
hope walkthroughs will be here soon.
Black and White
There's enough color in this room to distract you from the black and white.
Exploration
The shelves on the first screen have two plain buttons and four shape buttons.
Turn right to face the windows. The left cupboards have a grid of buttons and four digit buttons, while the right ones have four colored bars and four letter buttons.
Turn right to face two locked doors. In between them there's a picture missing eight square tiles, and under that is a pile of stuff among which you see a light blue square tile and a digital clock.
Turn right to face a television screen between two framed pictures. The right picture can be flipped over to reveal a list of four words.
Two buttons
You need a clue that I haven't mentioned earlier:
On the table with the digital clock, there's some stacks of wooden beads behind the wooden man and potted plant.
This unlocks the top compartment on the first screen:
The tops of the stacks are arrows pointing up.
Two stacks are visible, and (from bottom up) they have brown-colored beads on the
RRLRL
Take the remote control and square tile.
Screen
Use the remote control on the TV to view a clue with a picture divided by a grid.
Then use it on the TV again to view another clue with some unusual international clocks.
(Take a screenshot of the first grid clue so you can use it later.)
Left compartments
You'll need the clues
from the TV and tile picture, and from the clock.
For the leftmost compartment under the window,
The missing tiles from the picture are those on the diagonals.
Click the eight squares along the diagonals.
For the second-left compartment,
Clicking (and holding) the digital clock makes its colon turn into a single dot.
In this case, the middle dot represents multiplication, so work out
21 ⋅ 58 = 21 × 58 = 1218
You find 2 square tiles, a key and two shape clues.
Unlock / Exploration 2
Use the key to unlock the left door.
It's a bathroom! The towels at the top right are certainly not black and white. Under those towels, there's two drawers, one with a clue showing numbers in a square, and the other locked with four dials.
Dials
Use the
other clue from the TV
to unlock the bottom drawer in the bathroom:
The red hands of the clocks point towards the
Bottom left, Bottom, Right, Top right
(5, 4, 2, 1 clicks)
Take a square tile.
Right compartments
You'll need clues from
the towels, right picture frame and top cupboard on the first screen.
For the second-right compartment under the windows,
The blue towel is on top, followed by red, yellow, green.
Click the bars (from left to right)
1 2 3 0 times.
For the rightmost compartment,
the clue in the top cupboard tells you to read the second letter of each word, which gives you the clue
OPEN
You find two square tiles and more shape clues.
Bottom cupboard
Use the clues from the
top bathroom drawer and compartments under the windows
to unlock the bottom cupboard on the first screen:
The drawer tells you to read the symbols in the
top-left, top-right, bottom-left, bottom-right
and comparing those to the compartments, you find that they are
Circle Heart Star Square
Take the last square tile.
Complete
Place all eight square tiles into the picture between the doors, and rotate the tiles until they align.
I'm not giving you the solution this time. Just follow the TV clue you noted down earlier!
Once you're done, take the gold key and use it to open the door.
Mark's Rooms (demo)
(In case you're wondering about the aesthetic: yes, there's a tiny bit of scare factor in this.)
Since I got stuck on this point for way too long, I'm putting it first: drag to move the screen!
Exploration
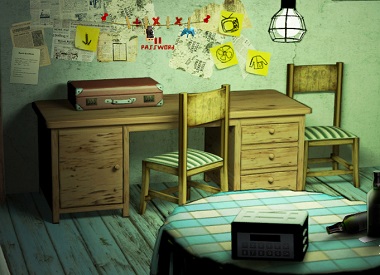
Desk and closet
After clicking the bear to start the game, it zooms out from a torn photo to reveal the screen.
The wall has some yellow stickers surrounding a clue with clothes pegs that hold a torn photo and blue origami rhino.
The table itself has a suitcase with two three-digit locks, a pair of pliers in its left cabinet as well as a red origami pig and a small key in its drawers.
Looking left from the table (drag the screen!) you find a death certificate and then a breakup note on the closet, which contains a dirty jacket, the wire hanger it was on, and a mysterious poster.
Bed and table
There's something stuck in a cobweb in the corner. Under that, look at the bed to find a pillow that looks like it's been torn and stitched back. The pillow hides a yellow origami lion, but you can also take a green origami rabbit from the bed, and read through the origami animal book.
The book has a birthday card in the front and a scrap paper clue in the back.
The round table in the middle of the room has a locked box with a digital keypad, as well as an alcohol receipt under the empty bottles.
TV and door
At the right end of the room is a TV that's missing one of its tuning knobs. In front of some artificial flowers, a blue card tells you the judgement time. Both of the drawers here are locked.
The room door is also locked. Beside it is the chair and ventilation fan, which is held in place by screws.
It's worth opening the inventory to see your options:
Click once to select an item, and click USE to use it around the room.
Click a selected item to examine it. Using this, you can
flip the yellow origami over
to find Alex.
Click Combine to combine the selected item with another.
Click Dismantle to dismantle the selected item. You can do this to
the jacket
to find a screwdriver handle.
Unlock / Unscrew
Use the key on the top drawer under the TV. This reveals a screwdriver bit.
Combine that with the screwdriver handle, and use the resulting screwdriver to unscrew the ventilation duct. Ew, more cobwebs.
A longer tool
Combine the pliers and hanger to get a long metal wire.
Then use it on the cobwebs in the ventilation duct to get access to another small key.
Also use it on the cobwebs in the corner of the room, which gets you another piece of scrap paper.
Unlock 2 / Slice
Use this key to unlock the bottom drawer under the TV, which contains a pair of scissors.
Use that to open up the pillow, which contains a news article.
Two numbers / Two more numbers
Enter the codes from
both pieces of scrap paper
into the suitcase:
Left: 571
Right: 624
This gets you a knob. Fit it on the TV, and use the clue from the
blue card
to tune it:
3:50 is represented by the hour hand pointing to 3 and the minute hand pointing to 10.
So turn the top knob to 3 and the bottom to 10, then turn on the TV.
(If you turn on the TV before tuning, something unusual may happen when the bottom knob reaches 5.)
This gives you a clue of colored stripes.
Four parts
You'll need
the origami pieces, and clues from the TV and book.
For the keypad box on the table, you'll need to
follow the randomized clue on the TV to place the origami pieces on the pegs, which forms a clue for the box.
Each origami piece represents a number according to the book:
Green = 1, Yellow = 3, Red = 6, Blue = 8
These fill in the blanks in the formula
_ + _ × _ × _
Since multiplication is performed before addition, you'll need to multiply the last three numbers before adding the first.
The result depends only on the first color:
Blue first: 8+18 = 26
Red first: 24+6 = 30
Yellow first: 48+3 = 51
Green first: 144+1 = 145
(Even though the keypad takes 6 digits, you should only enter 2 or 3 digits.)
After entering the code, you get a dirty teddy bear.
Escape
Combine the teddy bear with the scissors, then dismantle it to get the escape key. Use it on the door to escape!
Collectible list
Torn photo: on clothes peg
News article: in pillow
Birthday card: in book
Alex: on yellow origami
Breakup note: on closet
Receipt: on round table
Death certificate: on wall
Blue card: beside TV
Escape Challenge 114: Room with Somen Noodles
With a few hints, your chances of victory won't be as slim as the noodles.
Exploration
You start off facing a large window and a small window. The large window has "curtains" of very thin lines, and where those lines end on the left you can zoom in to find a clue. Under that, there's a thin box which dispenses a single strand of uncooked white somen (item).
Turn right to face two machines and a framed picture with numbers and colors. The left machine has some pink areas, and it contains a blue-and-white capsule. The right machine has arrows pointing to a square, a platform moving over a red button, and a tiny hole.
Turn right to face a locked door. A wall clock has no hands, but it has three additional squares drawn on it. The drawers under it have three digit buttons, three color buttons and two buttons with pairs of lines.
Turn right. A weird ceiling decoration hangs over a machine so huge it sits directly on the floor. The wall box here is locked, and the blue bin under it is empty.
Enter the corridor leading to the toilet, where you can take a somen strand above the toilet bowl. Of course, you can also sit down, look right, look up and look left to find a drawing of someone excited about somen.
Wall with framed picture
(If at any point you lose the somen item, you can retrieve another from the box by the window.)
The left machine
lets you attach the somen to the holder in the right pink area, but it falls out before doing anything.
The trick is to
check the right side of the machine to find a switch that will move the holder to the bottom.
Now the somen won't fall out, and the holder will punch the capsule out.
As you probably already know, the capsule contains a key piece.
The right machine
lets you put the somen in the hole. But push it at the wrong time and it will just get washed away!
The correct timing is to push it when the platform stops in the middle.
For example, the first lit triangle points right, so you need to push it while it has moved rightwards into the middle position, and before it continues moving right.
For the second and third triangles, you need to do the same except it's left.
Not happy with literally winning nothing on the right machine?
Check the left machine again (and wait a while) to get a strand of pink somen.
Wall with wall clock
You'll need
somen, the clue from the window, and the clue above the huge machine.
First, let's deal with the wall clock:
Add the somen to it.
For the top drawer,
On the clock, the short end of the somen stops on the top, middle, bottom squares when the long end lies on
4 3 2
For the middle drawer,
The window clue is
Yellow Green Blue
(1 2 3 clicks)
For the bottom drawer,
Matching the lengths of the lines (in pairs!) to the buttons, you get the sequence
RLRRLR
This gets you 3 key pieces.
Wall with blue bin
For the wall box:
You don't have a key, but you could try picking the lock with somen…
Nope, it just fragments into many pieces.
Hmm, three of those pieces look like an arrow pointing up.
Check the top of the wall box to find a switch that unlocks the box.
You find a key piece.
For the huge machine, some hints:
You'll need the clue from the framed picture. (Maybe looking at the clock will help.)
There are no hidden controls. Somen goes in the top, and you have two buttons and a dial that you can turn left or right.
If you see X and MISS, you've already failed and need to retry (by backing out).
The dial is red, so focus on red.
The 0 button resets the dial. It's not required in the solution.
Solution:
(Use the somen on the blue triangle.)
Each row of the clue represents a direction of rotation and an end position. For example, the top row has red two to the left of green, which indicates the 10 o'clock position.
In short:
Left until 10 (click 2 times)
Right until 3 (click 5 times)
Left until 10 (click 5 times)
Right until 1 (click 3 times)
Click the LLRRRRRLLLLLRRR sides of the dial, then push the blank button.
This gets you the last key piece!
Escape
You can now leave through the door, but there's one more collectible if you've done every single puzzle:
Try to get one last piece of somen, and the box will give you a strand of green somen instead!
Item list
6 key pieces:
Top left: in top drawer
Top middle: in middle drawer
Top right: in bottom drawer
Bottom left: in wall box
Bottom middle: from left machine
Bottom right: from huge machine
4 noodle strands:
Item from box
White, from toilet
Pink, from left machine
Green, from dispenser
(Only the strand from the toilet counts towards the end screen.)
i struggled a lot with the 3rd one. but overall,great walkthroughs. Can't wait for the last one.
SALVADOOR remake
This isn't any longer than its original, but you may still want to make good use of the save button in the menu. (Amajeto has it too!)
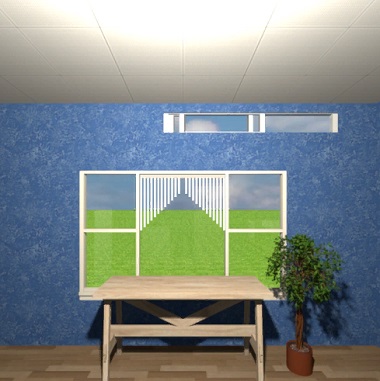
Exploration
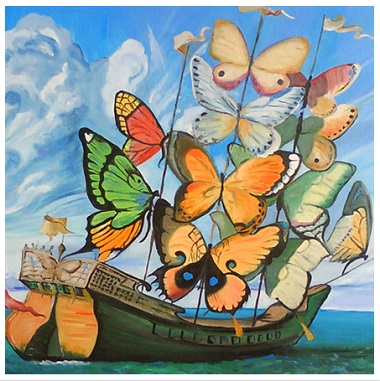
This screen with windows has some hands holding eggs on the left, as well as an unusual clock beneath them. There's a square tile next to some chess pieces on the window sill, as well as a black pawn among white pieces on the right. The ship of butterflies in the middle has a circular keyhole. The cupboards here have four letter buttons and four shape buttons.
Turn right to face round windows with another clock on the right. The small table in the middle has a grid of buttons.
Turn right to face the locked door and a ladder that's screwed to the wall. There's more hands holding eggs here, but the top one (yellow) has a square tile next to it.
Turn right to face an easel with a painting that's missing several parts. The cupboards have two blank buttons and four color buttons.
Two buttons (twice)
You'll need the clue from
the clock on the first screen.
For the clock near the flowers,
Set the time to the same as (mirror image of) the first clock:
Click the left button until the short hand points to 7.
Click the right button until the long hand points to 3.
This makes four dots light up around its edge.
For the cupboard to the left of the easel,
Following the markings on the clock, click the buttons on the
LLRRLL
Inside, you find a square tile, white king and purple pencil.
Look inside
Examine the chess pieces in your inventory.
The white king has a ring of small dot buttons on it, which you can solve by
entering the code from the clock.
(Click the top, bottom, left, right dots.)
That gives you something that looks like a screwdriver, but let's also examine the black pawn, which has a square hole in it.
Assemble the pieces in your inventory to make a proper screwdriver.
Also examine the square tiles you have picked up. There's a clue on the back!
Use it unlock the cupboard to the right of the ship:
The clue is made of four concentric shapes, and the white markings tell you to read from the outside in:
Square, Circle, Up triangle, Down triangle
Take the yellow pencil, square tile and key.
Going up / Exploration 2
Use the screwdriver to release the ladder from the wall.
Now you can climb it to find a padlock on the trapdoor.
Use the key to unlock it!
This room has loads of paintings! You can zoom in on three of them, and find
a winding key on the left painting.
Going from left to right, you also find a orange pencil, square tile and eraser.
The window above has a lock involving a grid with some colored symbols filled in.
Four colors / Four letters / Small grid
You'll need
the winding key, the eraser, and something from the upstairs painting.
Use the items by
erasing the name on the bottom-right painting, and
inserting the winding key into the boat downstairs.
This gets you two clues. Let's use them!
For the cupboard to the left of the boat,
Enter the unerased letters:
ADOR
For the cupboard to the right of the easel,
The butterflies on the boat stop flapping in the order
Yellow Blue Red Green
(0 6 2 7 clicks)
And for the drawer under the large flower vase:
The upside-down faces on the top-right painting are in the top-middle position and bottom row.
You get the red, green, blue pencils as well as 3 square tiles and a pair of binoculars.
Big grid / Distant
The grid with colored boats and lighthouses requires you to
You'll need to connect each boat with its matching colored lighthouse. Needless to say, the paths cannot cross or go beyond the grid.
The only solution will fill the entire grid. Solving the puzzle may be easier if you assume this, but I will not do so.
Logic:
I'm going to use chessboard numbering: the rows are (from bottom to top) 1 to 6, and the columns are (from left to right) a to f. For example, the red sailboat is on b5.
I'm also going to follow the convention that each square on a path is colored the same as the path's endpoints. Each non-endpoint square has at least two neighbors of the same color. I'll refer to the path connecting the red symbols as the red path, and so on.
Consider the green and yellow paths, which must pass through some of the three empty squares e2, e4, e5. Green cannot route through e2, because then it would occupy f2 and isolate the yellow lighthouse. Yellow cannot route through e2, as it would force red to pass through d5, separating the green symbols. Therefore the yellow and green paths must pass through e4 and e5 respectively.
This forces d4 and f4 to be yellow, so c5, d5, f5 are green.
Therefore c6 and d6 are purple, c5 and d5 are green (completing the green path).
Apply similar logic to the red and purple paths to complete the purple path, then to the red and yellow paths to complete the puzzle.
The "colors" are as follows:
ppppPG

pRgggg

prGyyy

prYyRy

prrrry

ppppYy
But what we need are the sections of path.
Solution:
511100205113
220516
220302
241132
411003
You can finally open the window and look out at a lighthouse.
Examine the binoculars and
flip the colored lenses up,
then use them on the open window upstairs to view a clue.
Complete
Place all eight square tiles into the incomplete painting downstairs.
Then restore the painting using
clues around the game, and your complete set of 6 colored pencils.
(Select the pencils, then click on each blank area until it's the correct color. Using the eraser on a colored area will reset it.)
Solution:
Butterfly: the odd one out is purple (4 clicks)
Clock face: clock faces in the room are yellow (1 click)
Clock tower: The chess rook/castle on the windowsill is orange (2 clicks)
Eggs: The lighthouse shows (yellow) symbols that appear on the
Blue Yellow Red Green eggs
(5 1 3 6 clicks)
Take the coin that appears.
Victory
Place the coin into the clock near the easel. This doesn't seem to do anything, but pushing the coin now reveals a lock with four roman numeral buttons.
You haven't seen the clue for this yet. To find it,
examine the binoculars and push its lenses back down
and then
use them on the colored painting.
Enter that code
V I X I
into the clock to get a key, then use it on the door to leave!
Update