
 Welcome everybody, it's gaming Wednesday today!
Hi, new Weekday Escape just arrived with four new games!
Coconuts Park wants you settle small dispute over a lunch. After it's done, Amajeto locks you in their cosy apartment and wants you to complete the picture to get the key. TomoLaSiDo's room - quite cosy this time - hides seven sand barrels. Some people keep in their living rooms unexpected things, really. The last comes Pixelkobo with another chapter of their Reoda series - very nice 3D game indeed.
Seems that Coconuts Park decided to release other episodes about Booca, and so we get this week an episode about food and mystery ways how appetite works. It's again one scene game with several puzzles and again cute and sweet.
The cursor is changing, no save button, one ending.
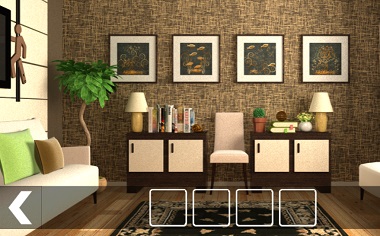
You visit another Amajeto's stylish two-rooms apartment this week, with mannequin decorations and comfy armchairs, which hides eight tiles. Well some of them aren't hidden just lie around but you know what I mean. Puzzles are usual...but some may slow you down a bit, they're clever. Can you escape?
The cursor isn't changing, no save button, one ending.
To recognize the things you are supposed to collect again is quite difficult. I though they were much smaller and (not trying to be funny) that they could be paperboard cores of toilet paper. However, TomoLaSiDo wants us to find seven sand barrels (also use one of those) and six capsules with key parts. Will you?
The cursor isn't changing, no save button, one ending.
Note: the game needs time to be loaded
In the previous chapter of Pixelkobo's series (WE N°251) you managed to find a Micro SD Card insinde an Italian gallery - now you're supposed to get another one in technical facilities of some building, needless to say, highly secured. The security measures are arguable though - any escaper, patient and observant, is able to overcome them...
The cursor isn't changing, autosave, one ending.
P.S. Let me remind you of excellent Haretoki. Their rooms are packed with strange devices and very clever puzzles which may not be easy but always intuitive, logic and original, and feeling after you solve them is so rewarding. Sometimes Sunny Reverse won annual JiG competition in 2012 and their other games (no exeption) are top quality too.
We love escape games, and our readers love talking about them and sharing hints! How about you? Let us know what you think, ask for clues, or help out other players in the comments below.


I forgot about Haretoki and those wonderful contraptions! Thanks so much for the reminder.
can;t wait for these.
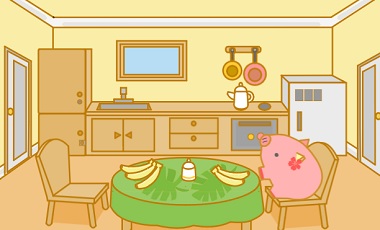
Booca in the Southern Island:
Episode 2 I Want to Eat a Lot!
After a short intro where Booca convinces you that she definitely can eat three, you start looking around for another banana.
Exploration
The game is still one screen. There are doors on the sides but they don't work. You can move the chairs (and Booca) away from the table, as well as cover the bananas by flipping the tablecloth up to reveal a number.
On the left side, the top cupboard is locked and the bottom is screwed shut. The cabinet under the sink is locked and has triangular handles. The drawers beside contain a bottle opener and note with numbers.
On the right, two pots hanging on the wall can be moved to uncover some numbers. The oven has a small yellow button and a large pink button, and the fridge on the right can't be used yet.
Oven and two cupboards
Use the clue from the
note
to open the oven:
The numbers 2 and 3 are hidden behind the pink and yellow pots.
So the number 233322 on the note tells you to push the RLLLRR buttons.
Take the bottle from inside, and open it with the bottle opener to get a key.
Then use that key to unlock the top cupboard, which has a clue with arrows and a screwdriver.
Then use that screwdriver to unlock the bottom cupboard, which has a cup. You can't do anything with the cup except
look at its bottom to find a clue.
Cabinet and fridge
Use the clue from the
top cupboard
to unlock the cabinet under the sink:
The right-ward pointing arrow is shaped like the right-ward pointing triangle, which is attached to the left door.
Click the triangles pointing RLRRLR, which are attached to the LRLLRL doors.
The lever inside activates the three-digit lock on the fridge, so use the colored number clues
from the pots, cup and table
to unlock the fridge:
Yellow: 3+4=7
Green: 5
Pink: 2
Take the banana from the fridge and give it to Booca.
Golden Brown
This game introduces a new puzzle which is quite different, so I'm just going to warn you beforehand to pay attention to the clues given.
Exploration
That's a really weird chair placement! The left cupboards have four card suit buttons with color markings and two white buttons. The right cupboards have four dials and four letter buttons. The second picture above can be flipped to reveal a heart on a pink background.
Turn right to face two chairs under windows. On the table in the middle, you can take a square tile from the flower pot.
Turn right to face two doors. Under the words and the picture with missing tiles, there's some stick figures and the drawer has a grid of buttons that change from gold (?) to brown.
Turn right to face a television screen (turned off) surrounded by two stick figures on vertical rails.
Two buttons / Exploration 2
Use the clue from
the stick figures
to unlock the second cupboard from the left:
The figures face RLRRL, but comparing that to the TV you find that they're the
LRLLR
halves.
Take a square tile and key, then use the key to unlock the left door.
This bathroom is all gold and brown. The sink has some weird clues on and in it. On the right, the left drawer has four bars that grow taller when clicked, while the right has four digit buttons. Around the drawers, the bathroom tiles are a bit different.
Grid
Use the clue from the
unusual bathroom tiles
to unlock the drawer under the grid picture:
The clue comes in two halves, and the five dark squares appear in the following spots:
- B B -

- - - -

B - - -

B - - B
Inside, there's a square tile and a clue.
Bathroom drawers
You'll need the clues from
the grid drawer, the sink, and a decoration.
For the right drawer:
Matching the drawer clue to the numbers above the sink, you find that the circles land on
5792
For the left drawer, a hint:
You're looking for four things at different heights.
Solution:
Follow the golden decoration under the windows by clicking the bars
1 0 3 2
times.
You find 2 square tiles, a remote control and a star on a yellow background.
Screen
Use the remote to turn on the TV, which just shows two columns of squares with a white one in each column.
You don't need any other clues for this, just
drag each figure beside the TV until their arms point at the white squares.
The TV now shows a letter clue.
Remaining cupboards
You'll need the clues
from the TV, in the bathroom, and around the first room.
For the leftmost cupboard:
Each color has a different shape on it:
Gold sink = flower
Pink picture = heart
White cup = diamond
Yellow rectangle = star
8 7 1 2
Take a square tile. For the second right cupboard:
Bearing angles are read clockwise from north, which means
45 270 90 225 =
↗ ← → ↙
(or 45 degrees per click = 1, 6, 2, 5 times.)
For the rightmost cupboard:
After removing the letters on the TV from the letters on the wall, all that remains is
GOWN.
Take the last two square tiles.
Complete
Place all the tiles in the picture, and solve it by rotating the tiles:
3 1 1 20 2 1 3
3 2 0 2
1 3 1 2
Take the gold key and use it to open the exit door!
Thanks KK. cab;t wait for the last 2.
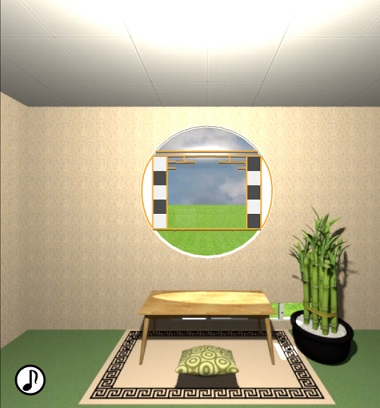
Escape Challenge 113: Room with Sand Barrels
In this case, 砂子 (sunago) is just small decorative metallic particles, and 筒 is a (bamboo) tube.
Exploration
The window is both circular and rectangular! Under it, you have a low table with a flyer telling you how useful this item is. The potted plant on the right is bamboo, and it has some colored tags hanging from it with unusual text. Pick up a tube from the base of the bamboo.
Turn left to find a pentagonal three-digit wall box and a table that tells you to try out this decorative technique, as well as a machine with a blue-and-white capsule that seems to have a sensor built in it.
Turn left to face the locked door. The wall clock has a weird clue on it and a tube hanging from it. The machine beneath has a sensor and a button that looks like it would control the hammer next to the capsule.
Look under the machine to find another tube.
Turn left to find another wall box with three wooden tags hanging from it. The blue bin is empty, and the drawers on the left have four color buttons, three colored sliders and two blank buttons.
Enter the corridor leading to the toilet, where you can look right, up and left to find a drawing of four tubes with different-sized meshes on their ends.
Wall boxes
You'll need clues from the
flyer and wall clock.
For the square wall box:
(The kanji on the tags are just more tedious ways of writing the numbers 1 to 3.)
Each tag has a different number of circles on it.
Following the order of circles on the flyer, click the tags
1 3 1 2 1 3 1.
Take the key piece and tube.
For the pentagonal wall box:
Mirroring the clue on the clock, you get the code
324
Take the tube (item).
Glitter
Use the tube on the table under the pentagonal wall box.
You get a nicely decorated card!
Scan
Use the card on the machine nearby to get its capsule, which contains a key piece. That was easy!
(You can continue to tap the card here as much as you want, but it doesn't help you other than to get a closer look at the card.)
For the other machine:
Using the card on the sensor activates the button, which now makes the hammer fall to the right!
So use it on the sensor again to switch the direction to the left, then push the button.
You get another key piece.
Drawers
You'll need the clues from
the card, bamboo and window.
For the top drawer:
The dots on the corner of the card are
Yellow White Yellow Blue
(1, 0, 1, 3 clicks)
For the middle drawer:
The blue, yellow, pink tags on the bamboo are
highest, lowest, middle.
For the bottom drawer:
The white squares on the window appear (from top down) on the LRLRL.
But the buttons turn gray when clicked, so the game wants you to fill in the gray squares:
RLRLR
Take 3 key pieces and 3 tubes.
You have a complete key, so open the door and leave!
Item list
6 key pieces:
Top left: in top drawer
Top middle: in middle drawer
Top right: in bottom drawer
Bottom left: in machine under wall clock
Bottom middle: in machine near pentagonal wall box
Bottom right: in square wall box
and 8 tubes:
(Item) in pentagonal wall box
From bamboo plant
From wall clock
Under hammer machine
In square wall box
In top drawer
In middle drawer
In bottom drawer
Thanks Killo. Can;t wait for Reoda.
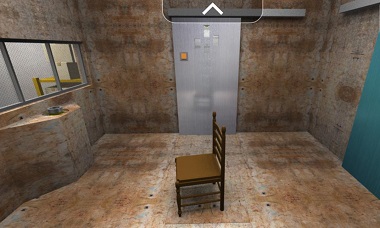
Reoda: Chapter 7
Chapter-07: America
(If you see a page with lots of Japanese text, don't panic! That's the story, and you can find the start button (and some English info) at the bottom of the page.)
Intro story
Your visit to America features additional protective face wear, despite there being no trace of humans around. (Tika isn't physically here.)
In a surprising change of pace from the previous game, the GPS tracker has led you to nothing but a manhole cover in the ground, but you've got to get in there. As Tika fiercely reminds you, it's "just business".
Game help and reminders
For Firefox users, the game might not automatically start. You can still use the same workaround of opening the console with Ctrl+Shift+K, and then typing
init()and pressing Enter.There is a warning about the game freezing (shown to you when you start the game). If you have a tendency to change views a lot and guess some codes, you may have to refresh and continue more than once.
Items are automatically used, so you don't need to select them.
When the game tells you about an autosave, that actually means you will spawn on that screen if you Continue from the title screen.
Exploration
You appear to be in a wooden room with a single chair in the middle. Before you go anywhere, use the arrow at the top of the screen to look at a grid of lights on the ceiling.
The lights change if you wait long enough.
Click the door in front to move towards it. The door itself has four small rectangular windows through which you can see something with green dots.
While standing in front of the door, look down at the chair. You can move the chair aside and open up the floor to find a panel with three green buttons.
Return to the shiny door and turn right to face blue and green doors. You can see a bit through the gaps, but there's nothing you can do.
Turn right to face the exit ladder (you can't leave!), and click it to find a symbol clue on the wall behind.
Turn right to face a wooden door with a handle that won't open. You can look out of the window on the right, and then look down to find a console with only a weird socket.
Green
Use the clue from
the shiny door
to unlock the floor panel. Hint:
You'll need one button push per horizontal stripe on the clue.
Solution:
There are a total of six stripes, but you don't see green dots on the 2nd, 3rd or 5th ones.
Since the panel suggests that green dots appear on the left, center or right, you can use the process of elimination to deduce where they are!
For example, the 2nd stripe doesn't have a green dot on the center or right (because you'd be able to see it through the windows), and therefore its dot is on the left.
Inserting those deduced positions into the sequence, you find that the code is
CLCRRC
The big button now says OPEN, which means you can just open the door by pushing its orange button!
Exploration 2
You're now facing the green dot clue you just solved. When you zoom in, you find that two of the dots have particularly long shadows, and they hide a triangle clue and a red T-shaped tool.
Turn right, go down the stairs and turn right again to face a door with a keypad lock.
As you make your way back to the main room, you notice
an extra panel on one of the stairs that hides a key, and
a gray piece taped to the inside of the door, covering a symbol clue.
Grid
Enter the code from
the ceiling of the first room
(To view it, turn around to face the metal door, then press Back and look up.)
into the keypad door to unlock it:
5381
Exploration 3 / Unlock 1 / Exploration 4
After entering the doorway, you get a choice between turning left or right.
Turn right. At the end of a corridor is a panel with two familiar colors and a squarish hole.
Back up and look up to see something with those two colors.
Turn right to face the closed door, then turn right again to face red doors that won't open.
Since you have the
red tool
you can use it on the two-colored panel (automatically by clicking the panel).
You can see what this does by
looking up at the ceiling. Those two doors are now open!
Climb back up to the first room and open the double doors. Here, you can look through the floor to see the corridor you were just in.
The path forward is blocked by a gate with four square buttons, each cut diagonally into one dark and one light triangle.
Back out and turn left to view a clue on the left (teal) door. The right (yellow-green) door has no clue.
Variables / Unlock 2
Use the clues
behind the ladder, on the inside of the shiny door, on the teal door, and behind the green dot clue
to unlock the gate with four square buttons:
The ■ and # buttons both appear at the end of one clue and the start of another.
Aligning the clues accordingly and reading only the letters, you get the code
XW YX ZZ
Referring to the triangle clue, you find that the matching (dark) triangles appear on the
UL LL LR UL UR UR
buttons.
Open the gate, walk to the end of the corridor, and pull the red lever there.
Then go back to the downstairs corridor. After the keypad door, turn left and open the red door.
There's nothing in here but another locked door! Thankfully, you've already found the hidden key required to unlock it. (Click the keyhole to use it.)
Exploration 5 / Unlock 3
It's just an underground lake outside, but that doesn't stop you from stepping out the door and diving into the water. The green glow is scary but you don't have to do much here.
Take the handle floating in the water on the right side.
Turn right, click the screen to go forward, then turn right again.
Click the ladder, then the up arrow to climb, then the up arrow to look up, then the doorway to climb in.
You've arrived at a rusty door.
Since you have the handle, you can unlock and open the door, which puts you in a familiar-looking room.
The door on the left is too high to reach, and the shelf of boxes on the right is no help.
Turn right to face another door, leading back to the main room.
Turn right once more to face the rusty door. Something's unusual about this side of the door.
Open the door at the top of the stairs to return to the first room, then use the handle on the console in front of the window to make stairs appear!
Go back into the tall room and climb the new stairs to reach a pair of gates with extra orange handles you can turn.
Tilt
Use the clue from
the rusted door
to unlock the gates:
The circles on the rusted door contain rectangles that are aligned in the same way as the markings on the
LLRLRR
handles.
Open the gate, then pick up the microSD card to end the game!
Ending
The clue on this SD card is just as sparse as the others, but since you have three cards you can combine the clues into a ring of digits.
That's still not much info, so the two of you conclude that there's one more SD card, and that it doesn't show up on the GPS tracker because it doesn't have a tag.
Dr. Reoda had such an elaborate plan, he couldn't have simply forgotten to tag the card. Therefore, he must have left out the tag in order to protect the card.
And it makes sense that he would have safekept the card on that well-protected island base from Episode 2.
At this point, Tika tells you that while you were exploring she was rechecking the first card with the doctor's message, and found a hidden file that had been overlooked earlier.
It's another message from him!
Update