
 Hi, it's Escaping Wednesday, this time including one beautiful adventure game!
Amajeto's locked you inside their living room from which you escape directly to the middle of Selfdefiant's enchanted forest. You may keep wandering around magic forests for a while if you want (links in P.S.), until you arrive to Fantasyland. The cure you need is hidden far in an old tower; however, the journey across Thomas Lean's word doesn't take long, sadly. The last escape is a bit dramatic - Spiceapp traps you in a cabin and threatens with a bomb...
Have a good time and enjoy!
In Amajeto's pleasant light room you find several variations on usual four letters/digits/shapes/colors puzzles which we are used to, and the playability is again excellent thanks to the new layout. Colorful lights you'll find later. Can you escape?
The cursor isn't changing, no save button, one ending.
You got lost in Selfdefiant's forest - or precisely, you aren't lost, just the only way out is barred by obstacles which you need to overcome. The personification of obstacles are a huge caterpillar (which doesn't speak, naturally, so you need to figure out what kind of bribery would convince it to move) and a troll who does speak and isn't afraid to tell his price. Will you get what he wants and would he let you out?
The cursor is changing, autosave, one ending.
P.S. If you enjoy being lost in forests, you can repeat it in Magic Forest Escape 4 or Magic Forest Escape 5. Links to previous three Esklavos' magic forests can be found in WE N°219 in P.S.
In awesome Thomas Lean's adventure you journey through beautiful landscape in mountainous part of Fantasyland. On your way you'll meet several less successful adventurists who gave up already - but you won't, you are tougher than the rest! After you solve few (very few) puzzles - not difficult ones, the other adventurers just aren't trying I guess - you'll obtain the cure you came for. The only flaw of the game is its lenght - wish it was much much loger.
The game is controlled by arrows, your secret flame by a mouse. For a dialogue press E key.
Spiceapp (Gotmail earlier) remade another gem from their rich archive (link to the original you find below) and this time they haven't changed neither puzzles nor codes; just upgraded graphics and added their generic soundtrack. You may play both games simultaneously - each have cons and pros, and if stuck in one maybe you find solution in the second (worked for me). Your goal is to escape ocean liner cabin where they locked you in with warning that the whole place will explode...there's no timer though...a hollow threat probably...but do you dare to rely on that?
The cursor isn't changing, autosave, one ending.
P.S. Here is original Dangerous Luxury Liner 2.
P.P.S. Here is bonus little game by Daniel Moreno, Tiny Fragments. 10 cute levels.
We love escape games, and our readers love talking about them and sharing hints! How about you? Let us know what you think, ask for clues, or help out other players in the comments below.


can;t wait for these.
Colorful Lights
Exploration
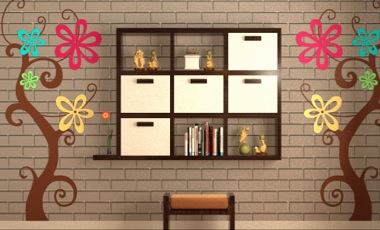
You start off facing a shelf with nine compartments flanked by flowering trees. Zooming into the left of the shelf, you can access the left three compartments. The bottom left compartment has four dials, the middle left compartment has four digit buttons and the middle compartment has four shape buttons with dots above each button. Zoom out and zoom into the right half of the shelf. The top right compartment has different coloured squares (left to right: yellow, blue, red, green) that increase in size as you click them. The middle right compartment has two buttons.
Turn right to face the glass doors and windows with a great view of the garden. Zoom into the pink boxes, which are strangely patterned. Pick up the square tile to the left of the boxes.
Turn right to face a row of lights, a framed picture and a table underneath. You can zoom into the lights, the picture is missing eight of its tiles and the table has weird shapes on it. Clicking the left side of the table reveals a hole in its side. The locked door is also on this side, next to a light switch.
Turn right to face two framed pictures, a shelf and a laptop sitting atop a desk. Behind the left picture is a grid of brown squares that light up and behind the right one are four letter buttons. Zoom into the desk and pick up the pencil from the wooden figure next to the laptop. Ooh, cute wooden doggy.
Top right shelf compartment
Use the clue from the flowers on the trees.
The flowers from smallest to largest are: green, blue, yellow, red.
Click the buttons 2, 1, 3, 0 times and click the arrow to find a square tile and a thumbdrive.
Middle right shelf compartment
Use the clue from the pink boxes.
The yellow strips from the boxes, from top to bottom, are either on the left or the right box.
Click the buttons LRRLL and the arrow to find a square tile.
Middle left shelf compartment
Use the clue from the pink boxes.
The yellow strips on the boxes show four numbers when put together.
Click the buttons 2, 8, 1, 5 times and the arrow to find a square tile.
Middle shelf compartment
Use the clue from the table with weird shapes.
Use the pencil on the weird hole on the left side of the table under the lights. The shapes on the table now have dots and stripes on them.
The dots show the orientation of the shapes and the stripes show the order the shapes should be in: triangle pointing down, triangle pointing up, diamond, trapezium.
Click the buttons 8, 5, 0, 4 times and the next arrow to find a square tile.
Bottom left compartment
Use the clue from the laptop.
Insert the thumbdrive into the laptop. The sun symbol has rays that light up orange in the order top right, bottom right, bottom left, top left.
Click the dials 1, 3, 5, 7 times and click the arrow to find another square tile.
Left picture frame
Use the clue from the shelf with nine compartments.
Notice the grid has a bit jutting out that looks eerily similar to the shelf with nine compartments that the flower in vase sits on. In fact, if you rotate the compartment shelf clockwise, it shows you the pattern to unlock the grid!
Click the squares marked O to light them up.
O O X
X O X
X O O
Open the frame to find a square tile.
Right picture frame
Use the clue from the lights and the laptop.
Turn the light switch on and zoom in on the lights to find them green, blue, red and yellow (looky it’s the game’s title).
Return to the laptop and look for the correspondingly coloured letters: H, O, P, E.
Change the picture frame buttons to the letters and click the arrow to find the last square tile.
Ending
Put all the square tiles into the picture and rotate the tiles until they align and form a proper picture.
Take the gold key once you’ve solved it and unlock the door to escape!
Square tiles
1. Beside the pink boxes
2. Top right shelf compartment
3. Middle right shelf compartment
4. Middle left shelf compartment
5. Middle shelf compartment
6. Bottom left shelf compartment
7. Left picture frame
8. Right picture frame
lol help I forgot to put the walkthrough itself in spoiler tags
Enchanted Forest Escape
Exploration
The starting area has a bench with a tiny box on it. Four stones are engraved with lines.
Go right to find a caterpillar blocking an empty space in the hedge. Some shiny flowers are on the left and right, and you see a gold egg behind the left one.
Go right to find five colored orbs on pedestals.
Go right to find a tree with a gold egg perched on its branch. You can't reach it.
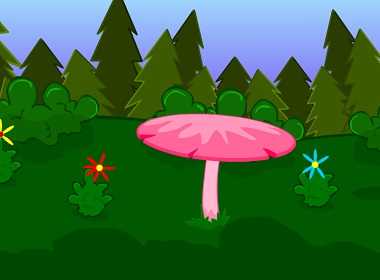
Go right to find a huge pink mushroom among some colored flowers.
There's also a wet spot just to the right of the bright blue flower.
Rainbow
Using the clue from the
flowers around the pink mushroom,
solve the orb puzzle by touching them in the correct order:
The yellow flower has fewest petals, followed by blue, red, white, purple.
Click the 2nd, 1st, 4th, 5th, 3rd orbs.
A small magic mushroom grows from the ground! Use it on the
caterpillar
to unlock the next area.
Exploration 2
After climbing up, you find a locked house. Under the tree on the right, you see a shovel.
Go right to find a table with a pink three-tiered cake on it. Its candle is unlit. The front of the tablecloth has two black squares, and clicking them zooms you in on an outlined portion of the cloth.
Also, you can move the bushes on the left to find a chest with four arrow buttons.
Go right to find a stone wall blocked by a troll asking for three gold eggs.
Dig / Unlock
Use the shovel on the
wet spot near the pink mushroom
to find a black key. Use it to unlock
the house
which contains a ladder. Use that to
climb the tree
and get another gold egg.
Remaining puzzles
The clues you have are
on the stones on the first screen, and on the tablecloth.
To unlock the chest near the cake,
click the buttons 2 1 2 3 times to make them point the directions indicated on the stones.
Inside, you find a potion. Use it to
enlarge the box on the first screen, which turns out to have nine color buttons
and then unlock it
by entering the pattern from the outlined section of tablecloth. You'll need to click the buttons
1 0 2
0 1 0
2 0 1
times.
Inside, you find a lighter, which you use to
light the cake
and make a gold egg appear!
Ending
Give all three gold eggs to the troll, who moves aside so you can leave.
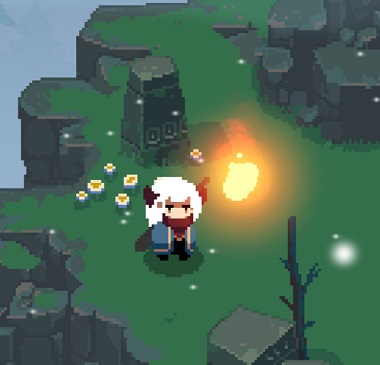
I'm skipping over The Secret Flame because it's basically only three or four puzzles, and going straight to
Dangerous Luxury Liner
As mentioned, the gameplay is almost exactly the same as Dangerous Luxury Liner 2 (the previous Flash version), which I find slightly easier because of the text descriptions and better inventory handling. Indeed, the one place where I got stuck in the new version (because of a bug!) I managed to figure out the issue by playing the old one.
The storyline is similar too, only the threat is getting kidnapped on the ship rather than a bomb.
Gotmail's blog post includes the starting story text (in Japanese), walkthrough video and screenshot comparisons.
Exploration
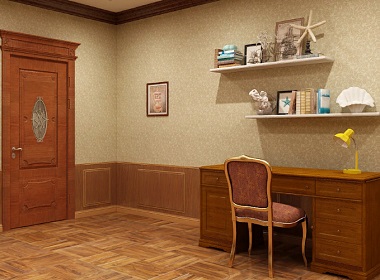
You start off facing a door with a projector screen on the left, but the game won't even let you look at those. Instead, you can zoom in on the desk, then open the left cupboard door and take the visitor pass from it.
Examining the pass, you find a different clue on the back. (If you're curious, the codes shown are actually Morse code for
AUV456BDNT.)Turn right. There are a lot of objects here, but you can zoom in on another locked door, a wine barrel secured with some tiny but sturdy chains, and the tiny white section of the cabinet on the right. That white stuff is actually glue holding the left glass door shut.
Turn right. Beside the tall wine cupboard, you see a safe with an unusual-looking dial. A large metal box has a keypad on the left and a rusted metal cap on the right, and directly above it near the ceiling is a pair of binoculars hanging out of reach.
To the right of that is a small trolley with wine, but on further look you find a weird green piece. As the original game says, it's a label remover.
Click the mannequin to face it directly. Clicking its torso zooms in on its pink nails, while clicking to the left or further down zooms in on the back of the mannequin, where you can pull out a stick from its back.
The window behind the mannequin's hand has a display of seven stars, while the section of wall below that is slightly different from the others: it's a hidden compartment that hides a pair of reddish lenses!
Finally, there's the couch and table that the mannequin seems to be pointing at. Clicking the carpet zooms in on a corner, where you find a nail file under it.
Pointy
Use the
nail file
on the mannequin's hand, which makes patterns appear on the nails.
Use that clue to open the safe:
Click the URULD sides (or holes).
Inside, you get a knife. Use it
to cut the glass of the wine cabinet.
(Actually, you're just cutting through the glue.)
You find a key. Use it to open the door beside the pegasus statue.
Exploration 2 / Puzzles in second room
Hmm, this room is full of alcohol! The game lets you zoom in on three spots:
Between two barrels on the left, you can pick up a hook hidden in the shadows.
On the stack of two boxes, you see a flat wooden case with a keypad lock.
The wooden crate on the right seems to have several small holes at its corners. Will those help you open it?
You'll need
the clue from the visitor pass, and the knife again.
For the keypad on the flat wooden case:
Enter the code from the pass (1253).
Inside, you find a flare gun whose only use is the key that you find in it.
For the crate:
Use the knife to pry it open.
Inside it, you find a pair of pliers.
Puzzles near windows
In this section, you'll need
the pass, the lenses, the stick, the hook, the second key, and the knife again.
Combine
the hook and stick
and use it to get the binoculars. Now combine
the binoculars and lenses
and then use that
on the starry window behind the mannequin's hand
to see a clue with lights (and thankfully, you're still at the dock).
This lets you unlock the keypad on the metal box:
Based on the back of the pass, the patterns seen through the binoculars represent 9457.
As for the other part:
Use the knife to pry up the rusted metal cap, revealing a keyhole.
Then use the key on the keyhole.
After doing both, a red light lights up on the metal box. What did that do?
Looking around the room, you find that the projector screen is now raised, revealing some snowflake-like shapes on the wall.
You can now zoom in on the room door, which has a card reader next to it.
Wine and puzzles on the door screen
Based on what's left in the inventory, you need
the pass again, the green label remover, the pliers, and the binoculars again.
For the small wine cabinet,
use the pliers to cut the chain.
Take a wine bottle. The label on it seems backwards.
Use the
label remover on the wine bottle to get the label
and flip it over to find a snowflake clue. Use that to solve the wall beside the door:
Each pair of symbols you click will be swapped. Simply swap symbols until the pattern on the wall matches that on the label.
(Don't back out of the wall, as that will reset the puzzle. You can still examine the label while facing the wall.)
The bottom-left panel opens up to reveal a keycard. Scan it on the reader beside the door, and it presents a four-digit lock.
Use the binoculars
on the same window behind the mannequin's hand
to view a different clue, and use that to unlock the four-digit lock:
Using the pass to translate once again, you get the code
1981.
The door is now open and you can leave! After the story ends happily with a moral about things too good to be true, click the doorway again to get some congratulations.
Update