
 It's Wednesday, it's escape time!
Amajeto locked you in their room and wants you to escape, and TomoLaSiDo as well. Puzzles aren't hard so it doesn't take long to leave to enjoy the lovely weather outside. In Spiceapp's escape you need to find your way out from a parked train, and possible breakout depends on (very) careful exploration of it. In the last game, Masa changed an ordinary office into an interesting place where almost every piece of equipment plays its role.
Have a good time and enjoy!
Amajeto presents the second game in the new layout this week. The interior's design moved one more step closer to TomaTea's games, and the graphics is even more polished than it used to be. Puzzles as usual, but don't underestimate Amajeto - you still may get stuck. Can you escape?
The cursor isn't changing, no save button, one ending.
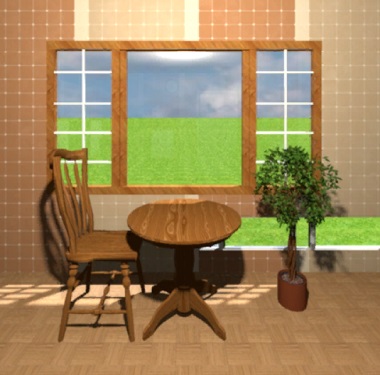
The TomoLaSiDo's latest creation is actually a little lighter, no catches and pixelhunting, with no mathematics involved - just a room with standard pot plant and a bathroom with huge window and fantastic view at endless grass field. Don't get me wrong, there are as many puzzles as usual, and also six capsules with key parts, but the first attempts to solve codes are usually correct (which is rare). Can you escape with all seventeen shuttles?
The cursor isn't changing, no save button, one ending.
We got another remake, this time from Spiceapp (Gotmail earlier). On your way home from work, you fall asleep in a train and woke up later when it's parked in a depot. The driver has left already, the door is locked and seems you need to figure out how to leave only by yourself since there isn't any emergency number or instructions for the passangers who got overlooked and stayed locked inside. Really not very thoughtful! Well, you can complain later - now is time for escape!
The cursor isn't changing, autosave, one ending.
P.S. Here is the original from 2013: Closed Train.
On your journey around Masa's office building, right after successful escape from a small lounge (WE N°251), you got imprisoned in an empty computer office. No one bothers you with with questions like ''What, exactly, are you doing here?'' or ''May I see your employee card, please?'' and so you can explore the well arranged office in peace. Puzzles are good and clever, and don't require any extra knowledge though some of them seem more complicated than they really are. Don't give up too soon!
The cursor isn't changing, autosave, one ending.
P.S. The game is available for Android too.
We love escape games, and our readers love talking about them and sharing hints! How about you? Let us know what you think, ask for clues, or help out other players in the comments below.


Looking forward to these.
problem in train escape:
the code
FGHMS
for the letters under the seat isn't working.
i checked the walkthrough video and it should be correct
i'm using firefox btw
You're correct about the code, but the game won't let you open the door until you've found the clue for the fourth letter, which is well hidden.
since i had already found that one, i went around and made sure to zoom in on every letter. after that the code worked!
hope this is allowed but no one posted the ESC 04 walkthrough from last week. I hope thats coming soon. If not let me know.
Just as an aside, I really wish more game developers would include separate controls for music and sound effects. A few do, and it's wonderful to be able to turn off the (usually) bad music and still hear the helpful sfx.
April Afternoon Escape
Hinthrough/Walkthrough
Exploring
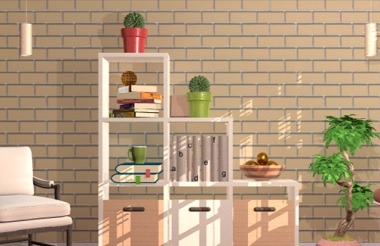
Bookshelf
You start out facing a white Ikea-looking bookshelf. It holds two small plants in different colored pots (red on top, green on second shelf), and a set of books in the middle with their spines lettered a-g at different heights. There are three doors at the bottom, two of which (the pink ones) are locked.
The left door has a lock with four shape slots, and each slot can rotate through 9 different shapes.
The right door has a lock with four colored squares, yellow red white green. When you click on the squares, they get taller like little skyscrapers. There are four possible heights.
Sofa
To your right is a large sunny window taking up most of the wall. The sofa in front of it has two drawers at the bottom that are both locked.
The left drawer lock takes a four-digit code.
The right door lock has four color slots, which you can rotate to any of nine different colors.
Entry
Turn right again to face the entry area. There is a door and narrow cupboard. On either side of the cupboard on the floor are two more of those little plants, in white pots.
Above the cupboard is a square-piece puzzle picture (of pink flowers), with 8 pieces missing. Four of the empty squares have notches on them, pointing in different directions.
The cupboard has five golden snails on top of it, facing different directions, and two locked doors in front.
The left door lock has right and left buttons to click.
The right door lock has four letter slots, rotating to any of the letters A-G.
Flowers and Houses
Turn one more time to face a cabinet. There’s another cute little plant on the chair to the left, this time in a yellow pot.
Above the cabinet are four framed pictures of flowers. Clicking on them flips them over to reveal a shape behind each one, diamond hexagon pentagon triangle, and the code 5364.
On top of the cabinet sits a line of model houses with different-colored windows/doors. If you zoom in, you see that four of them are numbered 19, 28, 54, 63. In front of house 28, there is a screw in the cabinet.
The cabinet has two doors. As we’ve noticed, the left is held shut from above by a screw. The right is locked, and the lock code has four dials, that you can turn clockwise to any of 8 positions.
Solving puzzles
Phase 1 (you can solve these four puzzles in any order, as all the clues for them are visible in the room upon initial exploration)
Right-left (snail cupboard, left door)
Hint:
The golden snails atop the cupboard. Look at the directions they’re facing.
Code:
RRLRL
Collect puzzle piece.
Dials (mini-houses cabinet, right door)
Hint:
The missing puzzle slots next to the entry door, four of them have notches. They’re in left-right order.
Code:
9:00, 6:00, 3:00, 4:30
Collect puzzle piece and note music note code.
Skyscrapers (Bookshelf, right door)
Hint:
The colored pots of those cute little plants around the room
2 different colors on bookshelf, one on chair, and two (same color) on floor. Four colors, each at a different height.
Code:
Yellow- 2 squares high
Red – 4 squares high
white – 1 square high
Green – 3 squares high
Collect puzzle piece and note code Blue+ (Orange x Yellow) + Pink
Shapes (Bookshelf, left door)
Hint:
The four flower pictures on the other wall with the shapes behind them, and the number 5364 on the triangle.
Which shape (pictured on the wall) goes to which digit?
Code:
pentagon, upright triangle, hexagon, diamond
Collect puzzle piece.
Phase Two
You can now solve these puzzles (in either order)
Four Letters (snail cupboard, right door)
Hint:
Books on the bookshelf plus the music note code from the dial lock.
Seven letters, at seven different heights. And seven lines on the music staff, but the only ones with notes are the first, fifth, second, and fourth, in that order.
Code:
f a c e
Collect puzzle piece.
Four Digits (sofa, left drawer)
Hint:
The colored equation from the skyscraper lock, and the model house windows.
Only 4 houses have numbers on them, and their windows correspond to the equation colors. Remember to multiply first, then add.
Code:
19+28(54)+63= 1594
Collect screwdriver and puzzle piece.
Phase Three
Left door, mini-house cabinet
Zoom in on the mini houses, and zoom in again. Use the screwdriver on the screw in front of house 28 to unlock the left door.
Collect puzzle piece.
Colors (sofa, right drawer)
This is the most challenging puzzle in the game. You’d think those four pillows on the sofa would be the hint, since all four of those colors appear on the drawer lock. You’d be wrong.
Hint:
The mini-houses and their window colors. Again. The ones with the numbers.
Only this time, you split those numbers in half, and only use the digits 1 through 4. So 19 becomes 1, 28 becomes 2, etc.
Code:
(1)blue, (2)orange, (3)pink, (4)yellow
Collect puzzle piece.
Pink Puzzle
You now have all 8 missing pieces for the flower puzzle next to the entry door. Insert them into the puzzle, and solve.
Solution: On the 4x4 grid, click each piece the given number of times:
3 1 1 2
0 2 1 3
3 2 0 2
1 3 1 2
Aha, the golden key. You can now unlock the door anytime… but maybe after a nap in the warm sunlight on that cozy sofa.
Firefox too. I found I had to zoom in on each of the clues and then the code worked
April Afternoon
This April, any time can be afternoon if you want it.
Exploration
You start off facing a stack of display shelves. Particularly interesting among them are a set of seven books with letters on their spines. At the bottom are three drawers but the middle one can't be opened. The left one has four shape buttons and the right one has four colored bars that grow vertically when clicked.
Turn right to face the windows.Clicking on the couch zooms you in on two small drawers. The left has four digit buttons and the right has four color buttons.
Turn right to face the locked door. The picture is missing eight of its tiles, but four of the remaining eight tiles have lines on them. Under that, there's a row of five golden snails on a cabinet with two white doors. The left door has a two-button lock and the right door has a four-letter lock.
Turn right to face a cupboard where the left door jiggles a bit but doesn't open, and the right door has a lock with four dials. Four small framed pictures around the book shelf each flip over to reveal clues. Under them, the row of houses has some of them numbered. Clicking the houses shows you a previously-hidden screw just above the left cupboard door.
Polygon
Use the clue from the backs of the pictures to unlock the left drawer under the shelves.
Counting the sides on each shape, you find that the shapes with 5, 3, 6, 4 sides are the pentagon, triangle, hexagon and rhombus.
Click the buttons 4, 5, 1, 0 times and open the drawer to find a square tile.
Heights
Find some things in the room that are yellow, red, white, green, then use that clue to unlock the right drawer under the shelves.
The cactus pots are those colors, and they're all at different heights.
Click the bars 1, 3, 0, 2 times and open the drawer to find a square tile and a clue with colored squares.
Math
Use the clue you just saw and the clue from the houses to unlock the left couch drawer.
Work out
19+28×54+63=1594
(remembering that multiplication is done first), then enter that into the drawer and open it to find a square tile and a screwdriver.
Unscrew
Use the screwdriver to remove the screw next to the houses. Now you can open the left cupboard door underneath to find a square tile.
Dials
Use the clue from the incomplete picture to unlock the right cupboard door under the houses.
From left to right, the pieces have lines running from their centers to the left, bottom, right, bottom-right.
Click the dials 6, 4, 2, 3 times and open the cupboard to find a square tile and a clue with musical notes.
Named
Use the musical note clue you just found and the clue from the books to unlock the right cupboard door.
There are seven lines on the clue and the notes are drawn on the 1st, 5th, 2nd, 4th lines from the top.
Similarly, there are seven books and therefore seven letters, and those which are 1st, 5th, 2nd, 4th from the top spell out the code FACE.
Enter that into the cupboard and open it to find a square tile.
Two buttons
Use the clue from the snails to unlock the left cupboard under them.
From left to right, the snails face RRLRL.
Push those buttons and open the cupboard to find a square tile.
Four colors
Use the clue from the houses to unlock the right couch drawer.
The houses on which the digits 1, 2, 3, 4 appear have blue, orange, pink, yellow windows.
Push the buttons 6, 1, 3, 0 times and open the drawer to find the lastsquare tile.
Complete
Place all eight square tiles into the picture, which activates a puzzle where you need to rotate the tiles until they align. (Is it still randomized? I got lazy to check.)
Once you've solved the puzzle, take the gold key that appears, then use it to unlock the door and escape!
Escape Challenge 108: Room with Shuttles
This game will send you back and forth like a shuttle.
Exploration
As usual, you start off facing a window, table, chair and potted plant. After taking the shuttle from the table, you can look at the potted plant to find a capsule with a key piece on the smaller window behind it.
Turn left, where you feel a breeze through the slightly open window. A picture on the wall tells you four ways to write shuttle (but that's only two ways of saying it). On the table, the left machine has a shuttle moving back and forth the wrong way, activating columns of lights on the edges, and it also has three color buttons between a circle and a square. The right machine has a stack of shuttles that can be moved back and forth. (You can also check under the table but there's nothing there.)
Turn left to face the locked exit door. The wall clock has no hands but instead is covered in a weave of horizontal and vertical lines. You can open the wall box to look at the contents, but its lid falls back down before you can take any of it. The big standing machine has two white buttons with signs that control a shuttle, but it seems to be trapped in a box with two red buttons on its bottom.
Check under the box to find a key piece.
While using the machine, click the left edge of the screen to find a switch.
Turn left. Three shuttles hang from a rack above your head, and the blue bin beneath is empty. There is a chest of drawers here. The top has three digit buttons covered by lines, the middle has three color buttons in different sizes, and the bottom has three sliders that are very large relative to their grooves.
The corridor on the left leads to the toilet, which has a huge window you can't close or leave through, which means all you can do is sit down, look right, look up and look left to see a drawing of a pretty normal weaving process.
Numbers
Use the clue from the clock to unlock the top drawer.
The lines on the buttons match some numbers on the clock which aren't covered in both directions.
In ascending order, they form the code 135, so enter that into the drawer and open it to find a key piece and shuttle.
Sizes
Use the clue from the framed picture to unlock the middle drawer.
Ignoring the black text (the buttons don't turn black) the smallest text on the picture is red, followed by blue, followed by yellow.
Click the buttons 4, 3, 1 times, then open the drawer to find another key piece and shuttle.
Levels
Use the clue from the hanging shuttles to unlock the bottom drawer.
Following the positions of the shuttles, set the sliders on the drawer to the top, middle, bottom positions, then open the drawer to find a key piece, shuttle and long rod.
Prop
Use the rod on the wall box to hold it open, then take the last key piece and shuttle from it.
You've completed the key and can now leave, but there's more you can do here!
Pickup
Use the rod to retrieve 3 shuttles from above the blue bin.
Trapdoor
On the standing machine, the top white button lowers the shuttle and the bottom white button turns it sideways.
You might notice that the sideways shuttle only hits one red button while lowered, which isn't enough to get it out.
Flip the switch on the side of the machine, if you haven't already done so.
The only thing this does is open up the left glass pane. You can then push the left button to fully open the trapdoor, but still the shuttle immediately bounces back upon hitting the bottom…
Instead of struggling to manipulate the shuttle, you can just rotate and then click it. Easy!
Bounce
Use the clue from the left machine on the table to do something with the right machine.
Since the 2nd, 3rd, 6th lights from the top light up on the left edge and the 1st, 4th, 5th lights do so on the right edge, the shuttles on the right machine need to be moved (from top to bottom) to the RLLRRL positions.
Click them 2, 1, 1, 2, 2, 1 times, then push the button at the bottom to make a colored pattern appear.
Enter that code (yellow white yellow) in the left machine by clicking the buttons 1, 0, 1 times.
The lights on the left machine change, and you get the shuttle.
That's not all! Using the new clue from the lights, you figure out that the shuttles on the right machine need to be in the LRCLRC positions.
Click those shuttles 1, 2, 0, 1, 2, 0 times and push the button at the bottom, which gets you all 6 shuttles and reveals a colored pattern on the rod.
And finally, enter that colored pattern (red yellow green) in the left machine by clicking the buttons 4, 1, 2 times, then push the big button to make a shuttle descend within reach.
(Note that this clue runs from the ball to the platform on the right machine, and therefore needs to be entered from the circle to the square on the left machine. Very conveniently, those directions are top-to-bottom and left-to-right so no additional effort is necessary.)
It seems that's everything, so just unlock the door and leave through it.
Item list
6 key pieces:
Top left: in top drawer
Top middle: in middle drawer
Top right: in bottom drawer
Bottom left: in wall box
Bottom middle: behind potted plant
Bottom right: under standing machine
17 shuttles:
1 on table
1 in standing machine
1 in top drawer
1 in middle drawer
1 in bottom drawer
1 in wall box
3 above blue bin
2 in shuttle machine (left side of table)
6 in stack (right side of table)
and 1 other item:
A wooden rod from the bottom drawer.
Closed Train 2020
The excessive overtime at work is getting to you, and you fell asleep on the train home, only to wake up alone. And of course, trapped.
(Make sure you zoom in on clues as far as possible. This game is quite particular about it.)
Exploration
Note: To avoid confusion, I'll give each screen a letter-based name.
[F]
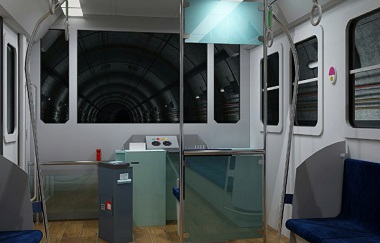
You start off facing the empty conductor's seat. On the left, the doors won't open and the OPEN button doesn't work. The ticket machine has a slot on top, a dispensing tray in front and a four-digit lock on the side. The wall behind it has a red flashlight that (after clicking a few times) turns out to not have batteries, a blue box with a screw panel and a circular protrusion on the left (and also a slot), a grayish tray with a triangular keyhole, a small panel behind that with green and yellow buttons (that don't work) between screws, and a bottle in the corner with something red in it. Also, the conductor's seat has a four-digit suitcase on it.
[RF]
Turn right to face a set of seats. Clicking the pictures in the corner, you see a letter/number clue on one of the handgrips, and behind it a weird story about lavenders.
[RB]
Turn right to face more seats, but this set has a five-letter lock under it. The mirror here has a circular keyhole.
At the top right, you find that the last handgrip has a clue on it.
While looking at that handgrip, you can also zoom in super closely on the left handgrip.
[B]
Turn right to face the back door of the car, where a small painting hangs from one screw. You can't do anything with the two panels on the sides, but you can look up at the fan to find a roll of something stuck on top.
Click the corners of the train (to the left and right of the striped line) to look in them. It's too dark to do anything.
[LB]
Turn right. On this side, the picture and handgrip have slightly different clues. One of the seats bulges upwards.
[L/LF]
Turn right, and click the door to look at it straight on. There's a locked compartment on the left, and the slot outlined in red on the right has a ticket in it.
Back out and click the handrail on the right to view its clue.
While zoomed in on that handrail, click the window at the lower right.
Then click it again to see a tiny red button at the top of the window.
After pushing the hidden button on [LF] and backing out, you find a glow outside its window: the tunnel outside is lit up.
The pink button behind the handgrip is also lit up, and clicking it reveals a winding key.
Math
Use the clue from the ticket to unlock the suitcase at [F].
Adding the numbers on the flower pictures and doubling the result gives you 7928, so enter that into the suitcase, which opens to reveal a pair of batteries.
Light
Place the batteries in the flashlight (and click until it shines a beam).
Then use it on both corners at [B] to find a letter clue and a smartphone.
Examine the smartphone and click it until only the pin remains.
Also use it on the lit section of tunnel at [LF] to find an additional clue outside the window.
Letters
Use the letter clues you've seen to unlock the chair panel at [RB].
(Make sure you've zoomed in all the way on each clue.)
The clues are:
[LB]: 1=F
[RF]: 2=G
[LF]: 3=H
[B]: 4=M
[RB]: 5=S
Putting them in order, you get FGHMS. Enter that into the lock, and the drawer opens up to reveal a conductor's hat.
Pin
The hat has a badge on it, which has a hole on the back, and the badge breaks when you use the pin on the hole, revealing a coin.
Coin
The coin is definitely suspicious, so you get rid of it by putting it into the blue box at [F], which dispenses a key.
Unlock
Use the key to unlock the panel at [L], and push the button there. Hmm, nothing new seems to happen.
(It's a game bug. This is where you would check the pink button and get the winding key, but the other red button already did it for you.)
Round
Use the thing that looks like a winding key on the mirror to remove it.
Unlucky
Examine the mirror and click to break it, then click again to pull out just one glass shard.
Use the shard to cut open the bulging seat at [LB], and remove a screwdriver from it.
Also use the shard to cut off the handgrip at [RB]. Hmm, it has an ink stain on it.
Unscrew 1 / Math 2
Use the screwdriver to remove the painting at [B].
The painting is now on the floor and you can pick up the wallet from it. Inside, you find a different ticket with more information printed.
Use the clue from that ticket (and the tunnel outside) to unlock the four-digit lock on the fare collection box at [F].
(I got this code from the video walkthrough, and it seems that you have to do math wrongly for this.)
Apparently the values printed on the new ticket are the train ride date and your birthday.
To get the difference between them, just blindly subtract the numbers:
2020 − 1988 = 32
915 − 823 = 92
Enter 3292 into the box, which unlocks, then open it to find a quadcopter drone and remote.
Fly
Click the drone set until you're zoomed in on only the remote.
Use the pin on the remote to open its battery compartment, then remove the batteries from the flashlight and insert them into the remote.
Zoom in on the fan at [B] and use the drone to bring the towel down where the drone lands.
Wipe / Unscrew 2 / Dots
Use the towel to clean up the handgrip you got earlier, revealing a row of colored dots.
So use the screwdriver to remove the guard from the colored buttons, and then push the LRRLR buttons to unlock something.
(If you mess up the sequence, back out and try again.)
Still at [F], you can now open the plastic cap from the corner and remove a mysterious bottle from it.
Examining the bottle, you click it to remove only the red cap.
Cap / Unscrew 3 / Unbound
Place the red cap on the blue machine at the left of the control panel, then use the screwdriver to remove the panel from it.
You see a wire coiled inside, so use the glass shard to cut it off.
Now click where you placed the red cap to turn the handle and eject a train card.
Alight
Zoom in on the fare collection machine. Instead of the coin slot, use the card on the light blue area to make it dispense a handle with a triangular mark in its cross-section.
Place the handle in the keyhole nearby, and you hear something unlock.
None of the doors are open, so you decide to push the OPEN button near the front again.
This doesn't work either, but when you click the doors beside that button they immediately spring open!
Or as the ending text says, you manage to pry the doors open, and make your way through the tunnel looking for the exit.
(Click the doors once again to end the game.)
Hi!
Cannot play Amajeto games in Firefox
@Roberto:
I use Firefox, too, but don't have any problems with Amajeto games. Maybe you need to deactivate FF's Do Not Track feature (FF calls it Enhanced Tracking Protection). Klick on the bluish shield sign left to address bar (left of the lock) and deactivate for the Amajeto page. This usually does the trick for me if I have problems loading games online.
Computer Office Escape
Stop looking for the Escape key!
Exploration
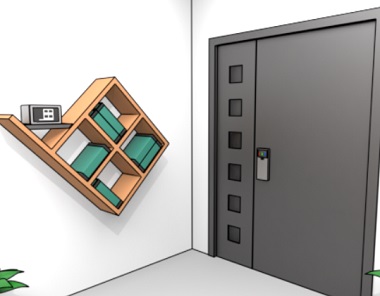
The door here has a USB port under a screen with three padlocks. On the left, a tilted shelf holds some green books, and it has a locked box that looks very similar.
Turn right to face some shelving cabinets. Three of the doors have padlocks and USB ports. Above the green one, there's a box showing a wheel of buttons that turn brown. Under the blue one, there's a box showing a flower that tilts when you click its buttons. On top of all that, a coffee machine sits next to half a QR code printed on the wall.
Turn right. A desktop computer asks you for a four-letter code, and the bright green thing behind its screen is a USB stick you can't remove yet. There's a shelf with a solar-powered flower next to a box with lines that change when clicked. Above that, you can open some window blinds to view a clue, but it seems to be dark outside.
Turn right to find a green carpeted area with some tables shaped like quarter-circles. The screen on one of them shows something similar but you can't control it by tapping, and the red USB stick and USB hub on the right are held extra tightly with screws.
Turn right to face a locked door. Through the frosted glass, you can faintly see another computer table.
Books
Use the clue from the tilted bookshelf to unlock the device nearby.
Mentally tilting the clue sideways shows you that the top row of buttons needs to have two horizontal and two vertical lines, while the bottom row needs one vertical and one horizontal line.
Click the buttons
1 4
3 0
times to open the device. Take a button with a USB cable attached.
Linear
Use the clue from the blinds to unlock the box underneath.
The patterns on the blinds are:
Dots (1)
A line (0)
Dashes (2)
Both (3)
Click the lines on the box that many times to open it and find another button with cable.
Command
Place both buttons into the hub with the red USB stick.
Now you can push the left button to rotate the tile under the cursor, and the right button to move on to the next tile.
Based on the arrangement of the tables, you find that you need to click:
Upper left: The left button twice
Upper right: (The right button twice and then) the left button thrice
Lower left: (The right button once and then) the left button once
Lower right: (The right button once and then) the left button once.
Altogether, that's LLRRLLLRLRL. Once you're done, take the red USB stick, and the screen displays a number instead.
Red
Place the USB stick into the cabinet door with the red padlock, which opens it so you can take a coffee cup.
(You get to keep the USB stick, and the door shuts after you leave.)
Brown
Place the coffee cup into the machine to fill it.
Then examine and drink the coffee to leave an unnatural coffee stain at the bottom.
Then use that clue to unlock the box directly beneath the machine.
As indicated by the stain, click the 2nd, 3rd, 5th, 6th, 8th buttons clockwise from the line.
The box opens and you find a key. Use it to unlock the interior door!
Exploration 2
Now you're facing a wall shelf with a dollar sign, on top of which a box with a grid of 16 symbols has three strips of paper attached to it. Next to that, a set of shelves mixes brown and white, and you notice that it has a tablet on top with four letters joined by lines, a locked compartment, and a device showing a blue number at the bottom.
Turn right to face the computer, which asks you to adjust diamond shapes in the four quadrants of the screen. The smartphone on the table has a QR code scanner active, and has a blue USB stick you can't remove. There's also a webcam set up in front of a question mark on the table.
Turn right to face the door, which has a number/pound sign on it. The stained glass on the right has an exclamation mark.
Turn right, and you find that under the exclamation mark there's a whiteboard on a stand that lets it flip over.
Turn right to return to the shelves, and then look up. In addition to the weird ceiling fixture, you see a projector screen on the left that you can't reach.
Flip
Use the clue from the whiteboard stand to unlock the computer across the room.
As the locations of the circled symbols on the whiteboard's sides and on the screen indicate, the clue on the ⊕ side is upright and the clue on the ⊖ side is inverted.
(The stand suggests that the latter is vertically flipped rather than upside-down, but it doesn't matter here.)
The top halves of the diamonds (from ⊕) need to be present in the top left and bottom right quadrants, while the bottom halves (from ⊖) need to be present in the top left and top right quadrants.
Click the diamonds
0 2
3 1
times, and the screen changes to a number clue.
Sixteen
Use the clue from the blue light device leaning against the stack of shelves to unlock the grid puzzle on the wall shelf.
(Computer geeks may want to try solving this without touching the device.)
Here's how to do it the hard way:
The light device converts binary to hexadecimal. The letters
atofrepresent the numbers 10 to 15, and in this system each light adds a different power of 2 when lit (and subtracts it when turned off):8 4 2 1
So for instance, the top paper strip has the first three lights lit, representing 8+4+2=14, which is
e.You can also perform this computation by looking at the grid. The first dot tells you whether the answer is in the top or bottom half, the second whether it's on an odd or even row, the third whether it's in the left or right half, and the fourth whether it's on an odd or even column.
For example, the top paper strip tells you that the symbol it represents is in the bottom half and on an even row (therefore the 4th row), and on the right half and on an odd column (therefore the 3rd column), which means it's
e.And for the normal way: copy each paper strip clue onto the blue light device by clicking the lights corresponding to the blue dots. The three patterns given cause the device to display the symbols
e, a, 4.
Click those on the puzzle to unlock it and find a sheet with a red clue.
Alphabet
Use clues from the sheet and keyboard to unlock the computer beside the window (that has the green USB stick).
Each square on the sheet represents a key on the keyboard. But you don't have to strain your mental powers because you can actually place the sheet on the keyboard!
The keys marked ⅰ to ⅳ form the code MJKL, so enter that into the screen, which lets you remove the green USB stick, and after you do so it changes to another clue.
Green
Place the USB stick into the cabinet door with the green padlock, and you can take another smartphone from it.
This one has a screen lock with five symbol buttons.
Symbols
Use clues from the inner room to unlock the second smartphone.
As indicated by the computer you just used, the center of the grid should represent the exclamation mark.
Following the layout of the room, you find that the symbols to the left and right are # and $, while the symbol above is &.
That leaves the question mark, which is indeed in the bottom of the camera's view:
. & .

.#!$.

. ? .
Enter those symbols to unlock the phone, which has two apps you can use.
Flash
Use the second smartphone (that you just unlocked) on the potted plant near the window blinds, which moves left and right. (Turning on the flash is optional.)
Then use that clue to unlock the box under the blue cupboard door.
The flower moves towards the LRRRL directions, so push those buttons to open the box and find a metal key.
Use this key to unlock the shelf to the right of the $ wall shelf.
Inside, you find a box with several ports connected by colored cables, as well as a stick with a hook.
Reach
Use the stick with hook to pull down the projector screen (extending it is optional), which just shows a large number.
Connected
Use the clue from the colored cables to unlock the tablet above.
The cable connecting A to B is blue, that connecting B to D is yellow, that connecting D to C is green, and that connecting C to A is red.
Click the buttons
A1B

0-3

C2D
times, and the tablet sends an email!
Receive the email with your (second) phone to find it password-protected.
Six digits
Use all three number clues from the computers to unlock the email on the second phone.
Each computer is on a table of a different shape.
As indicated by the background above the phone keypad, you need to look at the computers on the green carpet area, inside the second room, and beside the window.
Those computers show the numbers 39 57 43, so enter those six digits into the phone, which changes to show half a QR code.
Scan
Place the second phone beside the half QR code (next to the coffee machine) to complete it.
By the way, this is an actual QR code. Regardless of which language you're playing, it tells you in English to
Scan this code in the game.
After using the first phone to scan the code, you can pull out the blue USB stick from it.
Blue
Insert the USB stick into the blue cabinet door, which opens so you can take a screwdriver.
Escape
You may have noticed that the room door only has one port, and it won't unlock unless all three USB sticks are plugged into it.
Use the screwdriver to unscrew the USB hub from the computer at the green carpet area.
Plug all the USB sticks into the hub and plug the hub into the door (in any order). The door unlocks and ends the game!
Update