
 Hi! The week is over and the brand new Weekday Escape here!
Amajeto helps you to enjoy your stay at home and suggests some activities like looking for lost remote controller in coded drawers and finding ways how to open them. Masa wants you to cope with vending machine and discover secrets of a small lounge, and Pixel Kobo takes you to a nice Italian gallery and wants you to study the pictures they present very carefully. The master of emotional and magical games, Rinnogogo, made another beautiful one for us, touching story with clever puzzles, original art and fitting sweet and sad tune.
Have a good time and enjoy!
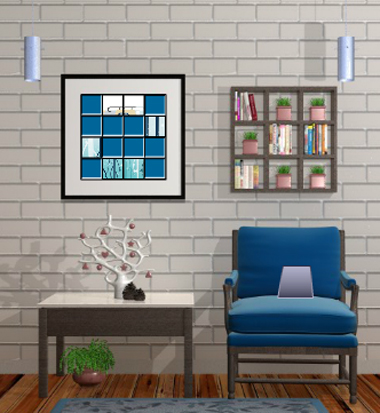
Amajeto is back and their premiere in 2020 has appropriate name indeed. As usual, you are trapped in their comfortable and tidy living room hiding ten tiles needed for completing the final jigsaw puzzle. There are more puzzles of course - you need to get into those locked cabinets and also find the tv controller. It's a good short game, you get what you came for.
The cursor isn't changing, no save button, one ending.
At the starting screen you can choose a language (English or Japanese) and right then you find yourself in Masa's small lounge, and no need to say that the exit door is coded. Time to explore the room - do that properly as some areas can be zoomed and the game doesn't indicate that, also the black and white floor and wall tiles are a bit distracting. Just click everywhere. Luckily, you aren't able to get lost there and spots where to click aren't so many. Can you escape?
The cursor isn't changing, autosave, one ending.
The cursor isn't changing, autosave - saves (after certain actions only), one ending
With Rinnogogo you find yourself at a very special place - a place where certain wishes come true and where you may meet those who...well, who you can't meet anymore cause they left forever. There are some conditions though. You have to prove your determination, show your combination skills and how observant you are. Lots of puzzles are to be solved before you open the big gate leading to a secret garden where happy souls live.
The cursor isn't changing, autosave, one ending. Notice, that once you can click and drag an item.
We love escape games, and our readers love talking about them and sharing hints! How about you? Let us know what you think, ask for clues, or help out other players in the comments below.


In HOME SWEET HOME I have 8 panels. I cannot figure out the for letter word puzzle or the wobbly picture. I know it probably has something to do with the TV hint but I'm flabbergasted.
For the wobbly picture, you may have overlooked something small
in the couch view
under the basket.
For the word puzzle, do the wobbly picture first!
Ah ha!! I've looked at that silly basket so many times. Back of picture ha a 4 digit code but I need a 4 letter word. I'm stumped again
looking forward to these.
Home Sweet Home
Exploration
Chair Screen
1. On this screen, you should see a chair with a grid of shelves above it and a table with a picture frame with several missing pieces above it.
2. Click on the tile to pick it up, then click on the table to get a close-up view of the decoration: a tree with some shapes hanging from it.
3. Back up, and turn right.
Sofa Screen
1. On this screen, you should see a sofa, a coffee table, a small cabinet, and some windows with their blinds at varying levels.
2. Click on the coffee table to zoom in. Pick up the second tile and the piece of paper underneath it and the basket. Back up, and turn right again.
Door Screen
1. On this screen, you should see a tall shelf, a chest with a bunny on it, and a door.
2. Click on the bunny to zoom in. Pick up the third tile.
3. Back up, and turn right again.
TV Screen
1. On this screen, you should see a TV between four colored picture frames, a cabinet with the words "Home Sweet Home" above it, and two chairs on either side of the cabinet.
2. Click above the cabinet to zoom in, and pick up the fourth tile.
Now that we've explored a bit, let's see what puzzles we can solve.
Puzzles
These are structured so folks can easily find hints for the puzzle they're stuck on, rather than narratively.
Sofa Screen Cabinet
1. This puzzle is four colored squares, which cycle through yellow, orange, red, blue, pink, and green, in that order.
2. The hint for this puzzle is on the TV screen.
The picture frames provide the solution here!
The color and placement of the notches provide the solution:
Blue | Green
Pink | Yellow
For color-blind folks, press the buttons:
3 | 5
4 | 0
3. Inside the cabinet, you'll find another tile.
Bottom Bunny Screen Cabinet
1. This puzzle is four roman numerals, cycling from I to IX, in order.
2. The hint for this puzzle is on the TV screen.
The chairs provide the solution here!
The backing of the chairs provides the solution here: II V I VI
3. Inside the cabinet, you'll find another tile.
Wobbly Picture Frame
1. The four corners of the picture frame wobble when you click on them.
2. The solution for this puzzle uses a hint from the sofa screen and a hint on this screen.
The colors from the piece of paper from the sofa screen match up with the colors on the bunny below the picture frame.
Using the order provided by the piece of paper, click the bottom right, top left, bottom left, top right, and bottom right corners in order.
3. Once you've used the hints, click on the picture frame again to flip it around.
4. On the back, you'll find another tile and see a set of four numbers: 6457.
Left TV Screen Cabinet
1. This puzzle is four squares which cycle through circle, star, square, heart, diamond, pentagon, and triangle, in that order.
2. The hint for this puzzle is on the chair screen.
The decoration on the table provides the solution!
Counting the shapes on the tree, you can see there is one heart, two stars, three triangles, and four circles. Enter in the code: heart star triangle circle
3. Inside, you'll find another tile.
Right TV Screen Cabinet
1. This puzzle is nine squares that cycle back and forth between white and brown.
2. The hint for this puzzle is on the chair screen.
The shelves above the chair provide the solution!
Mark the squares with potted plants in them as brown.
| W | B | B |
| B | W | W |
| W | B | B |
3. Inside the cabinet, you'll find another tile and a TV remote.
Top Bunny Screen Cabinet
This puzzle can't be completed until you have the TV remote.
1. This puzzle is four squares, which cycle through A, C, E, H, I, L, M, N, O, S, T, and W, in that order.
2. The solution for this puzzle uses a hint from the TV screen and the wobbly picture frame.
Use the TV remote on TV. It shows a code: 1234 56447 1234
Combine this with the "home sweet home" below the TV to get the following cipher:
1 = H
2 = O
3 = M
4 = E
5 = S
6 = W
7 = T
Combine this cipher with the hint from the back of the wobbly picture frame to get the code: 6457 translates to W E S T
3. Inside the cabinet, you'll find another (and likely your last) tile.
Picture Frame with Missing Pieces
Obviously, this puzzle can't be solved until you have all 10 tiles.
1. Use the tiles on the picture frame to add in the missing pieces.
2. Click on the picture to rotate the pieces and put the picture in its proper order.
3. Under the picture frame, you'll get the key.
4. Use it on the door to unlock it!
Congrats! You've escaped!
@bankroller, you need to combine the 4 digit number with
the TV hint and something else in the TV view.
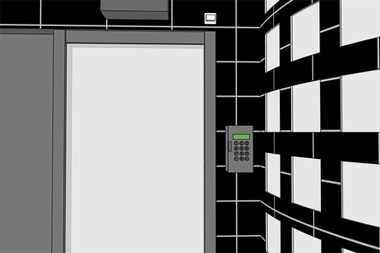
Vending Machine Room
Be sure to switch your language to English if you don't understand Japanese!
Exploration
Door Screen
1. On this screen, you can see a door, a switch we can't reach, and a small door needing a code.
2. Nothing to do here yet, so turn right.
Capsule Screen
1. On this screen, you'll see a capsule machine, a cabinet below it, a locked door, and a DVD player with a cactus above it.
2. Click on the cabinet below the capsule machine to open it. Inside is the TV remote. Back up, and click on the DVD player area.
3. Click on the cactus, and pick up the black key below it.
4. Before backing up, click slightly below the DVD player to look under the shelf, where you'll find the pliers.
5. Back up, and turn right.
TV Screen
1. On this screen, you'll see a different view of the cactus and DVD player, part of a TV, and part of the titular vending machine.
2. Unfortunately, the TV remote still lacks batteries, so there's nothing to do here.
3. Turn right.
Vending Machine Screen
1. On this screen, you'll see the other half of the vending machine, two waste bins, and a table a stool.
2. Click on the vending machine to view it properly. Unfortunately, no coins come out of the slot, so back up.
3. Click below the vending machine and you'll find a 500 yen coin. Back up.
4. Click on the waste bins and you'll find that one of them is empty while the other one is locked. Unfortunately, the key doesn't work on it, so back up and turn right.
Tables Screen
1. On this screen, you'll see a different table, three (well, two and a half) stools, and a foot mat.
2. Click below the table to zoom in on one of the stools. Underneath it is the CD (though it feels like it'd be a DVD). Back up, and click on the foot mat.
3. Under the corner, you'll see a hole with something in it, but you can't reach it. Back up.
Now that we've explored, let's see what puzzles we can solve.
Puzzles
Big Spender
1. Use the 500 yen coin on the vending machine to get a bottle of water. Be sure to hit the coin return to get your change, 380 yen.
2. Use the change on the capsule machine three times. Doing so gets you three capsules, which contain a piece of paper, battery, and silver key, respectively.
Cleaning Up the Place
1. Use the black key on the locked door by the capsule machine to get the broom.
2. Use the bottle of water on the hole underneath the foot mat to get the bottle.
3. Use the pliers on the bottle to get some sandpaper.
4. Use the silver key on the red waste bin. Be sure to use it on both keyholes - there's one under the label as well as on the lid. Pick up the soda can.
Electric Escape
1. Use the CD on the DVD player. It will start playing.
2. Use the on the TV remote, and then use it to turn on the TV.
3. Use the piece of paper to figure out the code from the TV.
Using each pair, the code becomes 3 8 9 0.
4. Use the code from the TV on the small door, where you'll see one of the wires for the automatic door sensor has been cut.
5. Use the sandpaper on the soda can to help it conduct electricity, and use the newly exfoliated soda can on the gap in the wire.
6. Use your broom to turn on the sensor, and then click on the door to leave!
Congratulations, you've escaped!
Thanks Thomas. Appreciate you. Can;t wait for the last 2 :)
Working on a walkthrough for Momo. Sorry, it takes some time, there are just soooo many puzzles in it!
Found a MILDESCAPE ARCHIVE!
https://archive.org/details/www.mildescape.com.7z
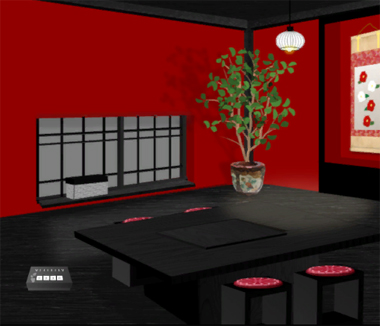
MOMO
You are in a beautiful place in which it is magically possible to meet those you cannot see anymore. You would very much like to meet Momo, your cat.
Puzzles you have solved will no longer be interactive. That saves you a lot of fiddling in places where there is nothing more to do.
You can turn the music off by clicking on the house icon in the bottom right corner, then using the "BGMON" slider. It's pretty and soft though, and just a tad melancholy.
Exploration (1): The main room
Start: Dinner table view
To the left of the table, a box sits on the ground. Pick it up. It has a leaf symbol on its lid. You cannot interact with it yet.
On the ledge behind the table is another box. You can push its buttons, but there's no clue yet. To the right of it is a folder symbol.
On the table is a panel, secured with screws.
On the right wall is a wall scroll with red and white flowers, their leaves pointing either left or right. Two arrows at the top point upwards.
Turn right: Sliding door view
Ahead, there is a sliding door, made up of 8 panels. You can interact with the blue panel, but to no effect yet.
Step back. On the left is a flower basin. A stick sits in it, take it.
To the left of the vase is a narrow green stripe. Click it to see a green box with four pink flowers and the word "cat" on it. You can press the flowers, but there is no clue yet.
Step back. On the right, there is a sideboard with a dish on it. Note the position of the green balls on the skewers.
There is also an arrow, pointing left.
Following the arrow hint, drag the dish to the left to reveal a small pink plate.
Also, click on the red cloth above the dish to reveal a knife.
Turn right: Counter view
On the counter sits a bell panel with four bells, red and white. In the middle is a flower symbol. Does it remind you of something?
On the left side of the counter is a door with a color-coded lock. Four stripes (yellow, blue, pink, white) can be extended downwards in three positions.
Behind the counter, you can see a picture and a black door, but you have no access there yet.
Turn right: Sofa view
On the small table is a cup of tea. You can interact with it, but nothing happens yet.
On the wall, on the left side, is a locked hatch with a keyhole.
From the ceiling hangs a horizontal bar you cannot touch.
To the right, there is a bathroom door.
Puzzles (1)
Escape from the bathroom!
Enter the bathroom. If you turn around, you will notice that you cannot leave, the doorknob is missing! Luckily, all you need to escape is right there.
Note the pentagon on the sill on the far wall.
Also note the little box to the right of the door.
Click the heart-shaped leaves in the right order.
It won't open? Perhaps you missed a detail.
Note the silver marking on one of the leaves on the box. Compare it to the pentagon on the ledge.The silver dot is where the 1 is! Press the leaves in this order: bottom right, top, bottom left, top left, top right.
Take the doorknob and put it on the door. You can leave now.
Wait, was that all? Nothing to help me in the bathroom?
There is, indeed. Take a step back from the door and look at the sink. Pick up the small green plate.
Ring the bells.
Use the clue from the flower wall scroll in the Dinner table view to ring the bells on the counter.
Note which direction the leaves point. Combine that with the color of the flowers. Also note the arrows!
"Read" the flowers on the scroll from bottom to top and push the buttons accordingly:
Red/right - red/left - white/right - white/right - red/left.
The aide appears.
Don't forget to take the key from her hand.
Unlock the hatch.
You need to have solved: Ring the bells.
Unlock the hatch with the key the aide gave you.
Set the coloured balls right...
... using the clue from the dish on the sideboard:
g - w - g
w - w - g
g - g - w
A mobile now hangs from the ceiling.
Unlock the counter door.
You need to have solved: the hatch by the sofas.
Use the clue from the mobile.
Drag the coloured stripes to the correct positions:
pink: down
yellow: middle
white: top
blue: middle
Take care, the colours sit in a different order on the door panel!
Exploration (2): In front of the office
You can now click the black office door, which is locked.
The red picture next to the black door is wobbly. You have no clue for it yet.
To the right of the office door are some flower pots.
To the right of the flower pots is a glass cylinder. Take it.
Puzzles (2)
Open the box in your inventory.
You need to have solved: The counter door.
Use the clue from the plants near the office door.
The leaves form groups of 1 - 3 - 2 - 2.
Apply that to the markings on your box: V I I I I I I V.
If you group them into 1 - 3 - 2 - 2 markings, you find that they represent Roman numerals.
V - III - II - IV, which means 5 - 3 - 2 - 4.
Enter that in the box to find a screwdriver.
Unscrew the table panel.
You need to have solved: the box in your inventory.
Screw the panel open with the screwdriver to find a roll of adhesive tape.
Open the glass cylinder.
Your hand is too large to fit in and your chubby fingers are too short to reach the key!
Also, the cylinder can't be smashed.
Or turned around.
You will need something slender enough to fit the hole.
Use the stick from the flower bowl in the sliding door view.
Of course, the key won't stick to it, what can you do?
Stick some tape to one end of the stick and use it to get the office door key.
Exploration (3): The office
Note the cat clue on the shelf.
Take the kettle from the shelf below it. An electric cord is missing.
To the left, the lemons in the tree are all green.
On a whiteboard to the right are two clues.
Turn around:
A water dispenser left of the door is missing a part.
Behind a small grating to the right of the door is a round thingy.
There is a desk with three drawers and a computer on top.
To access the computer, you need a password.
In the top drawer, you find a letter clue.
The middle drawer is locked, it has two buttons.
In the bottom drawer, there is a colour clue.
Above the desk, there is a funny clock.
Puzzles (3)
Access the computer.
Use the letter clue from the top drawer.
Look at it in different ways.
Try to read it in different directions.
Especially from top to bottom.
You discover four numbers: FIVE - ZERO - FOUR - NINE.
Enter that as password: 5049.
You find two folders: One gives you a recipe for lemon tea, the other contains a clue the shape of a grid.
Open the cat drawer.
Open the middle drawer of the desk using the cat clue.
Note which way the cats are looking.
l r r l r. You find a tea bag.
Unwobble the picture.
You need to have solved: the office door.
Use the clue from the whiteboard in the office.
The square represents the picture.
The numbers in the corners tell you in which order to click the corners of the picture.
Click: ┏ ┛ ┒ ┏ ┕ ┛
You have uncovered a small recess.
Wait, there is something more! Look at the picture again, which is now leaning against the wall.
You find a bottle of fertilizer.
Find a lemon.
You need to have solved: the office door, the wobbly picture.
Alas, all the lemons on the lemon tree in the office are green!
And also, look at that picture again! See the wobbly picture solution.
Pour the fertilizer into the pot of the lemon tree.
Now, let it work. Step back and return. PIck the yellow lemon.
Great, a grate.
There is a grating in the office wall. You can't reach through it with your big, clumsy fingers.
You need something slim again. How about that stick?
But it's to thick with that tape on it.
Peel the tape off again.
Push the round object with the stick further into the recess.
You can pick it up from the other side once you have access to it. (For that, you need to solve the wobbly picture puzzle first.)
Take it and open it: You find a PUSH-button.
Repair the water dispenser.
You need to have solved: the wobbly picture, the grating in the office.
The dispenser is broken, you need to find the missing part.
Use the PUSH button from the grating with the water dispenser. Now you got it working.
The box on the ledge (main room).
You need to have access to the office.
You need two clues from the office to open this:
1: the coloured clue from the whiteboard.
2: the clue from the bottom desk drawer.
The drawer clue assigns colours to the buttons of the box: green, yellow, black, red (from left to right).
The whiteboard clue tells you in which order to push the buttons: 1 green, 2 red, 3 green, 4 black, 5 yellow.
So push the buttons on the box in this order. 1 - 4 - 1 - 3 - 2.
You find an electric cord.
Tea time!
You need to have solved: get the knife (sideboard), the box on the ledge (main room), the wobbly picture, the office door, the middle desk drawer, the water dispenser, the lemon tree.
Put the tea bag and the lemon in the cup and pour hot water on top.
Oh, the lemon won't go in!
Did you ever put a whole lemon in your tea?
Cut a slice off with your knife and put it in the teacup.
Now wait for a while (take a step back and return), then take another look at the slice!
Open the sliding door.
You need to have: the knife, access to the office, access to the computer, had tea.
Use the clue from the computer to interact with the sliding door.
The clue is a sketch of the sliding door. It shows you which panel to cut.
Cut the blue panel with your knife.
There is now a wheel that can be turned in two directions.
Don't know which way to turn it? Relax and have some more tea!
Look at that tea again.
On the lemon slice, arrows have appeared.
But in what order should you read the arrow pattern? You need another clue!
Have a look around the office, there is something you haven't used yet.
The funny clock on the wall. The numbers on it correspond to the markings on the lemon slice.
Some of the arrows point up, some down. Don't let that confound you. Only consider if they show a right turn or a left turn.
Turn the wheel in this order: right, right, left, right, left, left, right.
Exploration (4): The secret room
Ahead, there is a gate, firmly shut by a heavy bolt. A large vase (not important) stands on its left, and a small pedestal to its right. It has four coloured rings on top where objects can be placed.
On the front of the pedestal is a large brown stain (somewhat hard to see).
Turn around. Look down: you sea a low table with a panel on it. It has 6 grey and white sections and some black lines.
Behind the table is another panel where something can be entered.
Further back, to the right, stands a large cat statue
To the right of the cat, you see a paravent with pink flowers. (Does that ring a bell?) An arrow near the bottom points down.
To the left of the door is another wall scroll with a flower on it. Lift it up a bit to discover an arrow, pointing up and left.
Click in the upper left corner of the screen to discover a hatch in the ceiling, which you cannot reach yet.
Puzzles (4)
Open the green flower box (main room).
Return to the green flower box. Remember? It's in the sliding door view, well hidden to the left of the flower basin. You have to zoom in to the basin and then click the green stripe on the left of the screen.
To solve the puzzle, use the cat-and-flowers clue from the secret room.
The flowers on the paravent are arranged in four columns.
The arrow says that the clue must be read from top to bottom.
So if we number the columns 1-4, that gives us:
2 - 1 - 4 - 2 - 3 - 3 - 4 - 1.
But the flowers on the box are not arranged in columns. What to make of it?
Note the word "cat" written at the bottom of the box.
It refers to the cat statue.
The cat statue sits left of the flower paravent. So the word "cat" must be thought of as left of the flowers on the box, too.
Looking at the box, tilt your head to the left. Now the word "cat" is left of the flowers. If you look at the box this way, you have four "columns", with one flower in each. The bottom flower is now column one, the second from the bottom is column 2, and so on.
Press the flowers on the box in the order you found on the paravent:
2 - 1 - 4 - 2 - 3 - 3 - 4 - 1.
You find a panel clue.
Unlock the low table.
You must have solved the flower box (main room).
The panel on the low table looks a lot like the clue you found in the flower box. Compare the two.
The alternating grey and white fields are the same. The black lines are different.
Combine the lines.
Since the game won't do it for you, it's best to grab a paper and pencil, jot down the six fields and fill in the black lines from both the table and the clue. The black lines will spell out a word.
L I T T L E.
Enter it into the console behind the low table. You can type it in ALL CAPS or all lower-case letters, but not a mixture.
You find a small blue plate.
As you step back, take another look at the low table. A walking stick has appeared, take it.
Open the hatch in the ceiling.
You must have solved: the low table.
Obviously, you need something long to reach the hatch.
What about the walking stick?
It's too short! But wait...
Give it a closer look.
Click on the lower end (the silver tip). Voila! Now open the hatch with it.
Exploration (5): The attic
In front of you is a machine with two ends of a chain. You can click on the rings to let them down through a grid in the floor.
Look at the grid. Mark the butterflies in some of the squares.
Step back and turn around.
On the left side of the wall, you can zoom in to a child's drawing depicting "Dad".
On the right is a panel with three rows of four squares each. Do you recognize the pattern?
Puzzles (5)
Open the yellow button panel.
What does the arrangement of the buttons remind you of? It's not far away.
It's the grid in the floor on the other side of the room. So, turn around and look at the grid again.
Look at the butterflies!
One of the squares of the grid has 1 butterfly, another has 2, another 3, then 4, then 5.
So, press the corresponding buttons on the panels in that order.
- 1 - 3
- - 5 -
4 - 2 -
You find a small yellow plate.
Coloured circles
By now, you should have collected four small plates.
Put all four plates on the circles. A panel opens to reveal some levers and a towel.
Don't waste time using trial and error with the levers. They won't work unless you have found all the clues xou need.
You are probably missing one clue yet, and you probably have haven't used your towel. Time to do that now.
It's made for cleaning. So use it to remove the stain on the front of the pedestal.
Mh, that stain is persistent... What could you do to enhance your towel's cleaning power?
Use water...
... from the water dispenser in the office. Soak your towel, then remove the stain.
Now it says
A
D
(A on top, D at the bottom.)
Haven't you seen the letters a and d before?
There was something the attic.
The drawing that said "Dad".
So if A is on top and D is at the bottom, how do you set the levers with the help of DAD?
Right: Down, Up, Down.
And that's it! You won! The gate opens and there is Momo, just as happy to see you as you are.
As the credits appear, Momo grows transparent. I think she's a cat ghost, living in a lovely animals' paradise now.
Thank you!
problem with Momo
can't figure out the flower code. i tried it and it didn;t work. help.
There's more than one flower code. Which one do you mean?
If it's the one for the bells on the counter:
The clue is the wall scroll with the red and white flowers on it. Look where the green leaves point, either left or right. That gives you a combination for each flower: red or white flower, green leaf pointing left or right.
Also, note the arrows on top of the wall scroll! They point upwards. So you need to start with the bottom flower and work your way up to the top.
Now apply that pattern to the pairs of buttons on the counter:
red/right (push the red button on the right side)
red/left (push the red button on the left)
white/right (push the white button on the right)
white/right (again)
red/left (push the red button on the left).
Wonderful! Thank you!
Since Flash Player support will be shut down this year, you will need a local swf player to keep playing Tesshi-e's lovely games. Here's one I'm just testing, it works well for me on Windows 10:
http://www.swffileplayer.com/
Just open the .swf files in the mildescape archive with SWF File Player and you're good to go! (The .html files are not needed.)
One thing I've been using for years is Adobe's own standalone player aka projector, which may run some games differently. I haven't downloaded the game archive to do testing yet.
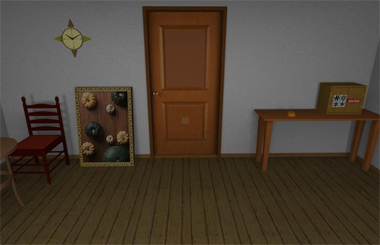
Reoda: Chapter 6
Chapter-06: Venice
This game is hosted the same way as Chapter 4. If you have trouble loading it in Firefox, try the same
init()workaround from there.Also, the same warning applies about not getting a puzzle wrong repeatedly: even clicking an object too many times can freeze the game, so try to keep guesswork on puzzles to a minimum.
Intro
After finding one of the stolen SD cards, your tracker leads you easily to the second one in Italy. But there's no time for sightseeing, as Tika insists that you get straight to work.
The card is somewhere in this room, but before you can even get in you have to deal with a padlocked door and narrow rectangular shutters, and breaking the padlock down would attract way too much attention.
Thankfully, there's already a small hole in the window. It's drone time!
(Tika gets a bit upset about you acting so smug about what was originally her idea.)
Exploration
Let's go from left to right. The round table on the left has a cup full of water on it. After examining it, back out and click the chair, which you can lift the cushion from to find a blue piece (click to zoom for a short while). Next to that is a pumpkin picture with a fancy frame, and above that on the wall is a clock surrounded by four triangles. The two lighter triangles on the left and right are buttons.
Click the top-left corner of the picture to find a clue.
You can't open this door, but you can zoom in on the top part to find the middle area unnaturally light. Click that false panel to reveal a clue on a torn piece of paper. You can also zoom in on the bottom part to find a brown piece. As for the table beside, you find a red button in some weird holder that slides aside to reveal a purple piece, and the safe to the right has four star-shaped buttons.
Turn right (you don't have to back out first) to face a wall with more framed pictures. They all behave about the same so I won't describe them, except for the wineglass picture on the right which has a keyhole at its top.
Look closely and you'll see something on the back of the chair, so click it to get a different view!
Here you see a red piece on the chair, and can zoom in on the table to find a yellow piece.
Turn right, and the game autosaves. Ignoring the tourists outside, you can zoom in on the door, which has a hanging purple piece of paper that you can flip over to find a clue completely covered in yellow paint. You can also zoom in on the potted plant, which has a green piece in its pot.
And just under where the light from the right window lands on the floor, you see a golden keyhole. You can zoom in only if you click the hole.
Turn right to find four more framed pictures.
Pointer
Use the clue from the potted plant to unlock the wall clock.
From top to bottom, the leaves of the plant are on the RLLRLRRLR sides. (You can see this more clearly by considering where the leaves join the stems of the plant.)
Click those buttons on the clock. You should hear a click and the clock opens up to give you a key. (If the key doesn't appear, refresh the page and retry.)
Unlock
(Use the key to) unlock the wineglass painting by clicking on it, and it falls forward to reveal a clue on a torn note next to a letter painted on the wall.
Clicking the note makes it fold out from the wall to reveal a tissue box.
Wipe
Dip the tissue in the water cup, and use it to clean the clue hanging from the front door.
Flakes
Use the clue from the front door, torn notes and colored tiles to unlock the safe.
The colored squares on the notes form the sequence
Red Yellow Green Brown Blue Pink
and the pieces with those colors have symbols that match the
1 4 2 3 1 2
lines of the note on the door, which means you need to push the
⌞⌝ ⌜⌟ ⌞⌜
buttons on the safe.
Inside it, you find a picture frame that shifts aside to reveal a letter clue.
Obscure
You can now access a hidden spot, but it's no ordinary pixel hunt!
While looking in the open safe, click the arrow at the right of the screen.
You turn right slightly and your gaze stops on the right door of the safe, which has an oddly-shaped ring taped to it.
Attach the ring to the hole in the floor, which opens up the hidden floor panel.
You see a picture of tasty sushi as well as the letter R.
Click on/near the R to find a panel with three buttons having different-shaped rectangles.
Framed
Use the clue from the picture frames to unlock the button panel hidden under the floor.
Each picture has a different number of objects in it, and the buttons tell you to pay attention to the orientations of the frames.
Square: 4 dumplings, 6 sushi, 9 acorns
Tall: 2 sunflowers, 8 pumpkins, 10 roses, 11 tulips
Wide: 1 tree, 3 shells, 5 fish, 7 wineglasses
Following these from 1 to 11, you need to push the RCRLRLRCLCC buttons (slowly!), which opens up the panel to reveal a round robot.
Bee
Place the robot on the red button on the large table, and it flashes a green keyboard onto the wall.
Use the letter clues from the game to solve this puzzle.
Just as in the previous puzzle, every picture has a different number of objects, and every picture also hides a letter near/behind it. (For the large pictures, you need to click a particular corner/edge of each picture.)
Following them from 1 to 11, you get the code
GSFKBRWCVPJ
Click those letters on the projected keyboard, and once you have it correct the ceiling telescopes down so you can take the SD card!
Ending
(If for some reason you choose to go Back on the ending screen to explore the room more, you can still finish the game by clicking the red button on the table.)
Placing the SD card in your reader watch, all you get is another pattern of lines. Looks like the doctor is not making this easy for his adversaries.
So you check your tracker, and the next destination is America! This is really turning into a world tour. Tika asks if you're going to sneak any leisure into the mission, and you respond…
Not at all, it's just business.
for some reason reoda never loads. is anyone having this issue as well?
i figured it ouut. earlier it was said in a different Raoda game that if it dies not load do the following
press CTRL+SHIFT+K then type init() then hot enyter and the game will start playing.
Update