
 Hello and welcome, regular Weekday Escape arrived!
Amajeto's rooms are so pleasant that you don't mind to stay there for a while - even a bathroom is here this time! - but with all the experience you have with their games it usually doesn't take long to escape. Then Maroya locks you too in a small room (without any cat) and wants you to find your way out. Escape challenge by tomoLaSiDo has nice round number and is special indeed - you aren't escaping one or two rooms, it's a house with two floors. No round windows, however. At the end you can spend a good time with Rinnogogo's and their beautiful and delicate winter story.
Have a good time and enjoy!
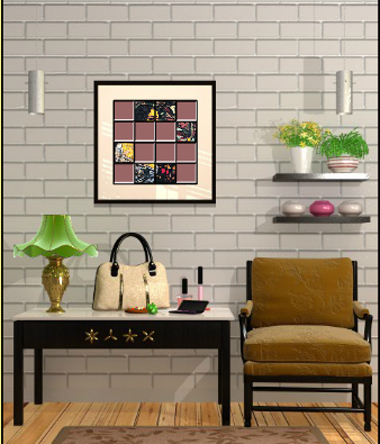
Amajeto have locked you in their living room again, this time with an access to a bathroom hiding some useful (and cunning) hints. For escaping you need to collect ten tiles and complete pretty painting of yellowish woman. Can you escape?
The cursor is changing, no save button, one ending.
To many players' relief, Maroya switched to Unity from well known reasons (and so we can start looking forward to their kittens' next adventures) and this game (as the name suggests) is just a test. Such a nice test we would welcome with opened hearts every week! The room you're trapped in has only two scenes but the devs made quite a lot from little and created nice game with the strong retro vibe so typical for them.
The cursor is changing, no save button, one ending.
This tomoLaSiDo's challenge is numbered 100 and the creators put in it as much effort as it deserves. It's bigger than usual and puzzles are many (some so simple you can't believe it) and various. The solution always depends on your observation skills so if you don't know how to continue try to revisit the places you've seen before and check it again - maybe you're overthinking clues or overlooked some hint. Your goal is to collect 100 lottery tickets. Not winning ones, sorry.
The cursor isn't changing, autosave, two endings.
Surprisingly, the story in this lovely game begins similarly to the last week's Nicolet. So, one winter day, you went for a walk in Rinnogogo's woods and suddenly got lost. You woke up then (not wounded) in a comfortable bed with hazy memories of what happened, how did you get there...and about kind white lady with antlers. From this moment you are on your own. If you prefere to leave the house - there is another option, ask the snowman, he'll explain - you need to solve several enjoyable puzzles. The hints for them can be found in the house but they often aren't direct and using combination skills is neccessary. Will you stay or leave?
The cursor isn't changing, autosave, two endings.
P.S. The latest game by InkaGames is Youtubers Saw game 3. Big portion of patience is r̶e̶c̶o̶m̶m̶e̶n̶d̶e̶d̶. r̶e̶q̶ui̶r̶e̶d̶ neccessary. No puzzle with time limit this time, but many traps (and deaths in them), evil enemies (and deaths by their hands) and huge amount of items without clear hints where and how to use them. Did I mention deaths?
We love escape games, and our readers love talking about them and sharing hints! How about you? Let us know what you think, ask for clues, or help out other players in the comments below.


can;t wait for these :)
I tried to play "WhiteLove" yesterday but had to leave before finishing. I was stuck with the shower curtain. It won't move.
So I restarted today. I am at the same place. The shower curtain will not move, no matter how many times I click it nor where I click. It would seem clicking on the "A" would work but it does not.
Anyone else have this problem?
Also, because I kept my notes from yesterday, I solved the 4 digit puzzle without removing the clock, and I still have the screwdriver.
Escape Challenge 100: Room with a Lost Lottery
That was fun.
These developers have done well with Unity.
This is not a clue but a really unexpected funny:
I was reluctant to go through the door when I had a key piece missing since there are two endings. But it is okay. It's an out house (out side bathroom).
I played in Edge and tried in Firefox now and in both the curtain puzzle works without any problém so maybe retry in another browser?
click the curtain
click A on your keyboard
the curtain moves to the left and reveals a hint
About the clock puzzle and a screwdriver
the screwdriver is under one of the pillows - edit: no, it isn't. Sorry. It's in the upper drawer
remove the clock with it
on clock's backside is a hint
it's the hint for lower drawer
after you open the drawer the screwdriver disappears from your inventory
The real issue with the curtain puzzle is the unexpected
requirement to use a keyboard to interact with it. No amount of clicking the A will help.
To be honest, I got stuck there because I was saving the clue in anticipation of some grand keyboard-based password safe appearing later.
(Walkthroughs coming up, don't panic!)
I was stuck on this puzzle more than 30 minutes. I had to leave the game be and when returned to it luckily I had a bright moment. Not an easy one.
In a Hurry
We haven't got all year!
Exploration
You start off facing the classic combo of an armchair and a picture with missing tiles. Zooming in on the table, you find some stuff placed messily as well as a pink square tile just above four golden star-shaped decorations.
Turn right to face the bed, which has a square tile among four colored cushions with buttons at their corners. To the left of the bed is a colorful lamp divided into four tiers, and to the right is a side table you can't use.
Turn right to face two locked doors. In between them is a framed picture that tilts when you click its corners, and under that picture there's a small two-button cupboard topped with a vase of flowers.
Turn right to face a turned-off television screen (surrounded by less-useful picture frames) over an instruction to hurry up, over three posable figurines doing weird things with their arms, where you find a square tile between the left two. The cupboard beneath has four compartments whose locks have:
four shape buttons,
five identical buttons,
four colored bars that grow vertically when clicked,
and four squares each divided into top and bottom color buttons.
Heights
Use the clue from the bedside lamp to unlock the third cupboard door under the TV.
The colors on the lamp are, from bottom up: green, red, pink, white.
So click the bars 1, 0, 3, 2 times, then open the cupboard and find a square tile.
Pose
Use the clue from the figurines to unlock the cupboard between the locked doors.
From (our) left to right, the six figurine arms point DUUDDU, so push those buttons and open the cupboard to find a square tile.
Shapes
Use the clue from the table to unlock the left cupboard.
The stars on the table have 6, 3, 5, 4 points, so you need to enter shapes with those numbers of corners.
Click the buttons 5, 4, 3, 1 times, then open the cupboard to find a square tile and remote control.
Screen
Use the remote to turn on the TV, which shows a row of five lettered squares.
Then use the remote on the TV again to make it show a row of colored squares.
Five colors
Use the second clue from the TV to unlock the tilty picture.
The circles on TV are blue, yellow, yellow, red, green, and the cushions of those colors have buttons in their
⌜⌟⌟ ⌞⌝
corners, so click those corners of the picture to make it come loose, then flip it over to find a square tile.
(Contrary to what you'd expect based on the previous games, unlocking the picture doesn't affect the other frames.)
Five squares
Use the first clue from the TV to unlock the second cupboard beneath.
Following the order of HURRY UP, click the buttons in the order 4322531, where 1 is the leftmost button.
Then open the cupboard to find a square tile and a key.
Unlock
Use the key to unlock the left door, which of course leads to the bathroom… but all you get to see is the mirror over the sink. The shelf in between has four colored bottles of colored liquids as well as a square tile.
Eight colors
Use the clue from the bathroom to unlock the rightmost cupboard under the TV.
Hint: don't overthink.
The colors on the bottle tops and insides are
Blue Yellow Red Green
Yellow Red Green Blue,
so click the buttons
0 1 3 2
0 1 3 2
times and open the cupboard to find the last square tile.
Complete
Place all ten square tiles into the picture on the starting screen, which activates a randomized puzzle that requires you to rotate the tiles until they align.
This puzzle has a high difficulty so the only hint I can give is to start from the top and leave the corners for last.
Once the puzzle is complete, it slides up to reveal a gold key. Use it to unlock the door and escape!
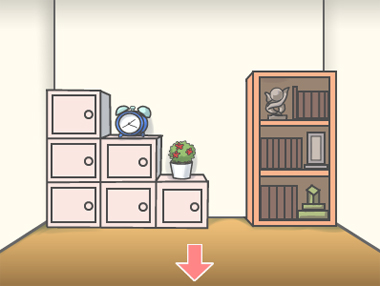
Test Game
I guess it should really be Exciting Upload Test, which… let me explain a bit.
First up, the game is running on enchant.js, not Unity! Maroya has been trying out HTML5 technologies for a while now, and one of the big issues to test is whether games in these formats can load correctly over the internet, hence the need for upload tests with the same type of content as the full games.
You can play some other test uploads in the Others section of her site, including a rather problematic (for me) TyranoBuilder-based version of the same game.
Maro and Komaro talk a bit about this in the intro, which is all the screen time they're getting today.
Exploration
The apparently surprised face this room makes is just a locked door and two windows. The table on the left has a glass case with some square holes in its base. The plant on the right has its pot full of slightly soft soil.
Turn around. On the left, you see some cupboard compartments. Reading row by row:
Top: three colored symbol buttons
Middle 1: unlocked and empty
Middle 2: three shape sliders
Bottom 1: two round buttons
Bottom 2: three digit buttons and a shape clue
Bottom 3: something round above the handle
There's a smaller potted plant with red flowers, and an alarm clock next to that, which you can turn over to remove the batteries. The bookshelf on the right has three sculpture ornaments.
Click near the floor between the cupboards and the bookshelf to find a clue hidden on the side of the last cupboard.
Numbered
Use the clue from the clock to unlock the bottom-middle compartment.
As the game tells you, "the hand positions seem unusual", which is because the hands all point directly at the numbers even though mathematically they should not.
But that's convenient for you, as you can easily tell that the circle, triangle, and square hands point at 8, 1, 4.
Enter that in the cupboard and open it to find a crescent moon panel.
Geometric
Use the clue from the ornaments to unlock the cupboard (compartment) directly under the clock.
The circle, diamond, triangle shapes appear on the ornaments in the top, bottom, middle shelves.
So click those sliders 1, 3, 0 times and then open the cupboard to find a small button box.
Wireless
Examine the box you just picked up, flip it over and insert the batteries. If you close and open it again, the game now tells you that it's a remote control.
But what could you use it on? You haven't seen any appliances around.
Most devices have infrared sensors which are small and round.
So zoom in on the bottom-right cupboard and use the remote on the dark spot there, then open it to find what the game calls a millstone? panel.
Symbols
Use clues from the room to unlock the top-left cupboard.
There are only three options on each button, which means you only need to look at the three matching objects in the room. Paying attention to their color, you find that the red object is a flower, the blue one a clock and the green one a cuboid (ornament).
Click the buttons 1, 2, 0 times, then push the OK button and open the cupboard to find a gardening trowel.
Earth
Use the trowel to remove the soil from the large potted plant, revealing a star panel.
Ladder
Use the hidden clue on the side of the cupboards to unlock the bottom-left cupboard.
The highlighted path follows the rules of amidakuji, which you don't need to know here, but it means the downward lines are uninteresting and you should focus on horizontal shifts.
Along the direction of the path those shifts are RRLLRR, so push those buttons on the cupboard to open it and find a rabbit panel.
Collection
No puzzle here! Just place all four panels into the base of the glass case, and they should automatically fit where they need to be.
Open the case, take the key inside, use it to unlock the door, and escape!
Perhaps this is an unfair comparison, but the performance difference between this test game and the next two Unity games is huge. This is one criticism against Unity that I find justified.
those both were cool games. Can;t wait for the last 2. good job as always KK.
The second game is unaccessible from Saturday as Maroya's site is down. Probably technical issue, they should be back soon.
Escape Challenge 100: Room with a Lost Lottery
You're going to lose a lot, but at least this game doesn't involve "surprise mechanics".
Exploration
You start off facing a small table next to a potted plant with three square windows above. Looking at the table, you find a flier that tells you about lottery slips being sold. Your next one could be a ticket out of here!
Turn left to face a chest of drawers. The top drawer has a three-digit lock with four other digits on it, the middle has a three-digit lock in the center of a circle, and the bottom has a two-button lock with numbers on each button.
Turn left to face a couch with 8 losing slips on it. The left wall box has vertical and horizontal sliders controlling a rectangular display, while the right wall box has three different-sized circular buttons. (There's also something else on this screen but I believe it's a red herring.)
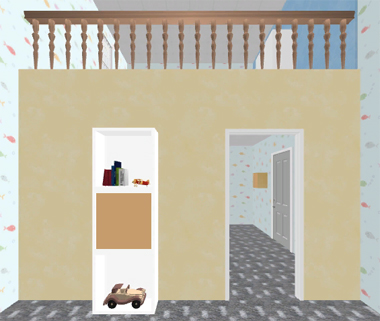
Turn left to face a painted wall with a doorway and a shelf divided into three compartments. The top one has books and a toy plane, the middle one can't be opened, and the bottom one has 8 losing slips on an antique-looking toy car. You also see a railing above, so clearly there's a second floor to this house.
In front of the books, you spot a darker grayish area, which is actually a switch!
After flipping it, you can open the middle compartment to find another 8 losing slips.
Pass through the doorway to the second room, where you face a staircase leading up and another chest of drawers. The top drawer has three buttons labeled with different numbers of vertical lines, while the bottom drawer has three vertical sliders.
Turn right to find a locked door. The wall box on the left doesn't seem to be openable, but there's a picture on the right that seems to offer a clue.
Turn right to face the doorway back. This side of the wall has been painted pink, and two wall boxes are stacked and mounted together, the top having three colored sideways digit buttons and the bottom having two buttons one on top of the other.
Turn right to face another locked door, this one having a grid of nine buttons that can be turned gray. The wall next to it has three small identical paintings of something.
Turn right and click the stairs twice to climb up. At the top, you find 8 losing slips on the railing.
Turn right to find a blue wall with an unusual wall clock over a machine showing a capsule blocked by a dartboard. Pushing the bottom-right button releases an arrow that bounces off the dartboard. Each stack of buttons beneath the glass is a different color and can be set to a different height.
Turn right to face the railing you saw before, which has three colored rectangles along it on the floor. Clicking it gives you a good overhead view of the starting area, where you might find even more clues.
Turn right to find two tall windows above a blue bin with 12 losing slips. Looking out the window, you find some fences and a narrow green building.
Bullseye
Use the clue from the clock to unlock the machine under it.
The clock tells you that green is 1, pink is 2 and yellow is 3.
So push the green (left) stack once, pink (middle) twice and yellow (right) thrice, then push the button to release an arrow which gets stuck in the dartboard.
Shooting more arrows doesn't help, so you'll need to adjust the machine again.
The hands on the wall clock have changed colors, and now the green, pink, yellow hands point to 2, 1, 3.
Set the stacks of buttons to light up that many squares, and push the button again to knock the capsule over and get the key piece inside.
Roman
Use a clue from upstairs to unlock the top drawer at the base of the stairs.
Each colored rectangle under the railing covers a different number of columns. From shortest to longest, they are yellow, red, blue.
Click the buttons 1, 2, 3 times and open the drawer to find a key piece.
Three sliders
Use a clue near the stairs to unlock the bottom drawer under the stairs.
The framed pictures, from left to right, are in the top, bottom, middle positions.
Set the sliders accordingly and open the drawer to find 8 losing slips.
Pointer
On the ground floor, use the clue from the framed picture of a wall box to unlock that wall box.
The box and picture in question are on both sides of the locked door (the one without the buttons), and the green arrow on the picture tells you to click the top right corner.
Since clicking the corner of the box doesn't help, click the corner of the picture instead to peel it off and reveal a button.
Pushing the button unlocks the wall box, which contains 8 losing slips.
Sideways
Use pink, blue and yellow clues from the game to unlock the top of the stacked wall boxes.
The colors on the lock match those on the painted walls.
Not counting the doorways and boxes on each wall, you find that the painted areas of the pink, blue, yellow walls form the shapes of the digits 6 (flipped), 0 (sideways) and 3 (sideways).
Enter 603 into the box and open it to find a key piece behind the left door and 8 losing slips behind the right door.
Top and Bottom
Use a clue from upstairs to unlock the bottom of the stacked wall boxes.
(Notice that the button to open the box turns green when held down, matching the shape of the building outside.)
Looking out the upstairs window, you find that the fences appear (from left to right) on the DUDDU rows.
So push those buttons to open the box and find a key piece behind the left door and 8 losing slips behind the right door.
Obvious
Back in the first room, use your instincts (no other clues) to unlock the top and bottom drawers.
For the top drawer, fill in the sequence with the missing digits: 246.
Inside, you find 8 losing slips.
For the bottom drawer, click the buttons in order from 1 to 6, in other words the LLLRRR buttons.
Inside, you find 8 losing slips.
Circled
Use a clue you saw upstairs to unlock the middle drawer in the first room.
The round carpet is marked 010, so enter that in the drawer and open it to find a key piece.
Filter
Play around with the left wall box in the first room until you unlock it.
The horizontal slider controls the vertical strokes, and the vertical slider controls all the other strokes.
As it turns out, you only need to change the vertical strokes, so simply moving the horizontal slider to the third position solves the puzzle.
Once the word OPEN appears, open the wall box to find 8 losing slips.
Bubbles
Use the clue from the flier on the table to unlock the right wall box in the first room.
The circles along the top of the flier run from large to small and then back to large, so push the LCRCL buttons on the wall box and open it to find the remaining key piece.
You're all ready to leave with a huge stack of losing lottery tickets, but somehow you feel unsatisfied. There's more to the game!
Grid
Use another clue you saw upstairs to unlock the door with the button grid.
As seen from the upper floor, there's actually five square windows above the starting area, arranged in the following pattern:
w-w

-w-

ww-
Click the four buttons corresponding to the areas without windows, and open the door.
Outhouse
Suddenly you find yourself in the toilet! The bowl has a recycling button and a locked panel with three colored shape buttons.
In the bottom-left corner, you find some text that thanks you for playing (the series), as well as a small hint about the toilet being at least 100.
Backing out of the toilet, you get the option to turn right. Do so and you get a view of the house with its large blue roof.
Use the remaining clues from the game to unlock the toilet bowl.
The green (toilet roof), blue (house roof) and red (carpet) shapes are square, triangular, circular.
Click the buttons 2, 1, 0 times to open up the hole in the lid.
Lost
Select the 100 lottery slips you have and toss them into the toilet, which rewards you with a premium lottery ticket.
Open it up to find that it's also a losing ticket.
Return to the house and leave through the front door to end the game!
Item list
6 key pieces:
Top left: in right wall box
Top middle: in middle drawer in first room
Top right: in top stacked wall box
Bottom left: in bottom stacked wall box
Bottom middle: in top drawer under stairs
Bottom right: from dartboard machine
100 lottery slips:
First room:
8 on the couch
8 in the bottom shelf
8 in the middle shelf
8 in top drawer
8 in bottom drawer
8 in left wall box
Second room:
8 in bottom drawer
8 in side wall box
8 in top wall box
8 in bottom wall box
Third/upstairs room:
8 on railing
12 in bin
And 1 other item:
A premium losing slip, which you get from recycling all the others!
thanks again kk. looking forward to the last one.
White Love
A warning based on the earlier spoilers here: one particular puzzle in this game is kind of unconventional. If you're stuck, get creative.
Exploration
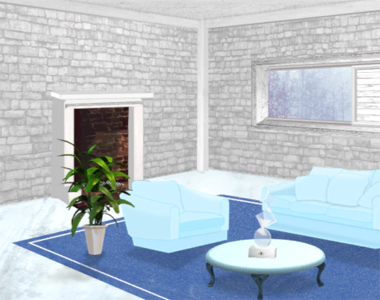
After the short and mysterious intro, you're left on your own in the white room. In front of two light blue couches, a glass sculpture sits on a box with a keyhole (and hovering the keyhole tells you what kind of key is required). You can lift a cushion from the right couch to find a snowflake. The fireplace in the background has only a wire rack inside.
Turn right to face a bed covered by blue curtains. On the left, a shelf with a potted plant inside has a blue box on top out of reach. On the right, you see a clock with one hand detached attached to the wall with a screw, and under it is a chest of drawers with an OK button on top. The top drawer has four colored buttons labeled with card suits, the middle drawer can't be opened for some reason, and the bottom drawer has a four-digit lock beside a small clock clue.
Turn right to find a radiator with colored buttons on top, a dress (laced together on its front) on a mannequin, and a set of locked double doors where the lock panel beside has four red triangular buttons and a small picture of a duck. The snowman beside the door passes the lady's message to stay inside until the snow melts.
Turn right to face a locked door with a blue keyhole, a table with four colored chairs and four ace cards, a kitchen unit with two pots of soup already placed there, and a narrow clay pot beside it with two rows of buttons that turn red when pushed.
Columns
Use the clue from the dress to unlock the narrow clay pot.
Each eyelet on the dress is connected to one thread, with red threads being connected to the 1st, 2nd, 5th, 6th on the left and the 3rd, 4th, 5th, 7th on the right.
Push those buttons to open it, then look in the top to find some rubber ducks at the bottom.
Suits
Use the clue from the table to unlock the top drawer near the bed.
The aces of diamonds, clubs, spades, hearts, are placed in front of the yellow, green, blue, white chairs.
Click the buttons 3, 2, 1, 0 times and open the drawer to find a screwdriver.
Unscrew
Unscrew the clock from the wall, revealing a panel with a snowflake-shaped hole.
(There's also something else here which I won't describe because a later clue will point it out.)
Flip the clock over to find a sequence of four numbers.
Four numbers
Use the clue from the clock to unlock the bottom drawer.
The hand that remains on the clock is the minute hand, and minute values of 20, 45, 5, 30 would be represented on the clock by having the hand point to the numbers 4, 9, 1, 6.
Enter that into the drawer and open it to find a stainless steel jug.
Flake
Place the snowflake into the panel where the clock was, which opens up to reveal a mysterious note.
The note tells you to do something with the OK button on the chest of drawers. What exactly do you need to do?
With all the drawers closed, push OK. (You should hear a sound.)
Then open the top and bottom drawers and push OK again.
Those two drawers slam shut and the middle one opens up! Take the stick and the black-and-white photo from inside.
Reach
Examine the stick and click to extend it, then use it to dislodge the blue box above the bed, and then pick that up from the floor.
Open the box to find a blue key.
Unlock / Exploration 2
Use the key to unlock the door behind the table.
Entering this room, you see a large white shelf divided into a grid. A stone bench on the right has a switch panel on the front (clicking the brown area toggles it between tall and short), a metal bowl you can't use, and a pile of snow accumulated from the open window above.
Click the area just to the right of the white shelf to look around it. This elegant bathroom is almost ruined by a printed curtain with rectangles and the letter A. On the right, you see a colorful panel with a hole/gray patch in it, as well as a metal hinge that covers a hole in the wall. You can pull the hinge shut to reveal a matchbox, but it springs back open automatically.
Jug
Fill the jug with the snow from the pile in the second room.
Alpha
Uncover the mystery of the printed bath curtain.
The rectangles on the curtain are supposed to represent the left end of a keyboard, where A begins the second row of letters.
Find the letter A on your keyboard (probably where I just described) and press it, and the curtain slides aside to reveal a grid clue.
Grid
Use the colorful panel on the white shelf, and it fills in the squares with colors.
Then use that clue and the other grid clue to unlock the radiator.
The squares covered by the arrow behind the bath curtain correspond to squares that are Red, Yellow, Green, Gray (represented as 0) and Blue, in the order RYYG00YBBGGB.
Push the buttons on the radiator in the order 233544311551, which opens it up to reveal some firewood.
Binary
Use the clue from the soup to unlock the switches on the stone bench.
Each ingredient appears in exactly one of the pots, and appears a different number of times (from 1 to 7).
Since the taller pot only contains ingredients which appear 2, 3, 6, 7 times, flip the switches with those numbers and push ENTER to release a photo of a brick wall with an open panel.
Clicking the photo slowly swivels it over to reveal numbers on the back.
Ternary
The numbers appearing on the back of the photo call your attention to the buttons shown in the same area on the front of that same photo.
Those buttons are actually present above the snowflake panel you opened earlier, so use the clue from the numbers to unlock them.
As the swivel "animation" hints, you need to imagine the clue in three-dimensions, which reminds you that the number nearest to the left button is 2, and those nearest to the right button are 1,5.
Following the sequence of numbers on the photo, push the RLCCR buttons to make a stone appear.
Physics!
Use the stone to hold down the metal hinge, and take the matchbox from behind it.
You've got fuel for it, but what about tinder?
Place the firewood in the fireplace, crumple the drawer clue into a ball and place it on top, and light the fire with the matchbox.
Place the full jug of snow on the wire rack.
Then back out, zoom back in and collect the jug of steaming water.
And finally, pour the water into the pot with the ducks, which float to the top.
Ducks
Use the clue from the floating ducks to unlock the door beside the snowman.
Using the duck markings as a guide, the floating ducks point LULR.
Push those buttons on the panel to unlock the door.
Exploration 3
It's another room! A long staircase leads up to a locked stone door, and the snowman beside offers you a blank note before you go. There's also a basin full of water in front, and a machine in the back left corner with a password lock, a three-digit keypad lock and a lever.
When you try to back out, you face the door you entered from, with an expensive-looking bench on the left. Checking the right wall, you find an ice platform with several colored shapes floating above it, as well as a picture with the alphabet printed on it.
Clicking the corners of the picture makes it tilt.
Hidden
Return to the first room and use the blank note on the lit fire to reveal a letter clue.
Then use that clue to unlock the alphabet picture.
(Normally I'd tell you which corners to click, but it's easier to) just click the letters NAONNA.
The picture comes off and you find a yellow potion with a flower in it.
Yellow
Pour the yellow potion into the pool to make some lines appear.
Then use that clue to unlock the top compartment of the machine.
The lines spell out
ICE, so type that into the password box and open the compartment to find a black key.Unlock 2
Use the key to unlock the box in front of the couches on the first screen, which lights up the glass shapes above.
Use that clue to unlock the floating shapes in the third room.
The shapes which light up are the red circle, yellow star, green diamond.
So click the bottom-right circle, the top-left star and the top-left diamond, and a blue potion appears!
Green
Pour the blue potion into the pool to make more lines appear.
Then use that clue to unlock the bottom compartment of the machine.
Enter 498 in the keypad and push E, and the compartment now displays CLEAR too.
Now pull the lever to unlock the stone doors!
This is where you get to choose between two endings, but there's a good reason to do one first.
Escape through the doors, and you wake up in the snow, just as before. The story continues…
(Click the button that appears to continue at the end of the game.)
Talk to the blue snowman and take the present from him (locking you out of the other ending), then leave through the doors.
With the blessing of the snow lady, you unleash spring all over the land!
Maroya's site is back, Test Game playable.
I was stuck on this puzzle more than 30 minutes. I had to leave the game be and when returned to it luckily I had a bright moment. Not an easy one.
Update