
 Hi! The week is over and Escape Wednesday here!
Amajeto haven't taken down the Christmas decorations yet. No wonder, their bluish room is very lovely indeed - and description 'very lovely' is fitting for all this week's games. With Kamonosoukutsu we are used to it as all their rooms are sweet (without exception) and there is always some cute animal(s) we meet. From Sarameya we got good looking game with many codes to solve. Nicolet is just perfect and fun.
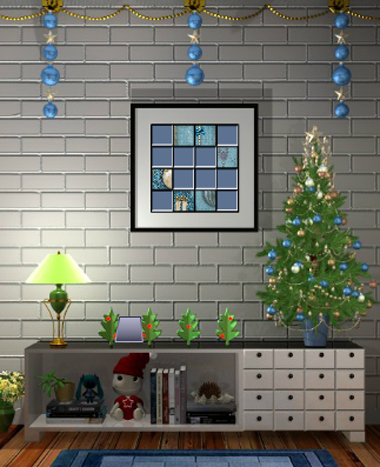
The first Amajeto's game in this year wants you to find your way out of the room where are still Christmas decorations but also New Year's ones. And four capped frog-like dolls, ten tiles scattered around the room and many likable puzzles. Will you escape?
The cursor is changing, no save button, one ending.
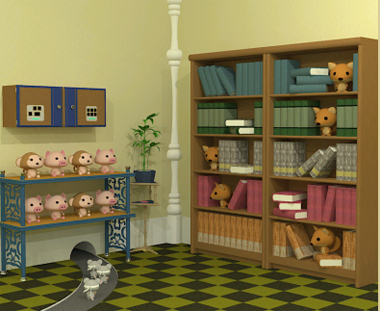
Kamonosoukutsu delivered a new lovely game from Chotto series and it's a bit longer than usual (yay!). You find yourself locked in a room together with Ms Doggie 1 and Ms Doggie 2, and on the floor is taking place a mice race at the moment (walk lightly). Both Ms Doggies have some special wish, and the exhausted mouse lagging behind other runners in the lane needs something too. Now you know what to do first - try to get what ladies want and the mouse needs and then you'll see what occurs next.
The cursor isn't changing, save button, one ending.
The game is available for Android too.
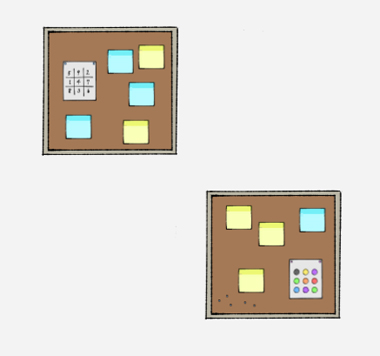
After one year Sarameya released a new game with simple name and simple goal - you're trapped inside a huge dice and you're supposed to escape it. Interesting puzzles are everywhere around you, on each side of the dice (the floor and the ceiling included) so look for some hints and start. Puzzles are well ballanced, hand-drawn graphics pleasing to the eye and the game overall enjoyable. Can you escape?
The cursor isn't changing, autosave, one ending.
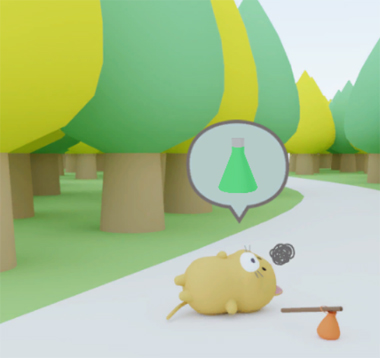
One lovely day, a cat went for a walk in Nicolet's woods when suddenly ran across another cat lying on its back. After short examination became clear that the lying fellow cat isn't just resting but is wounded and you need to find some help. Luckily, the solution is easy - at least seems so at the beginning - get a green potion. The recipe and ingrediences for that miraculous medicine you find in nearby villa and its gardens, and the composition is surprisingly simple...but getting components not so much. It worth the effort though. The curing effect is instant.
The cursor isn't changing, autosave, one ending.
The game (as a part of a bundle) is available for Android, iOS and on Steam. Here is the coffee button.
We love escape games, and our readers love talking about them and sharing hints! How about you? Let us know what you think, ask for clues, or help out other players in the comments below.


looking forward to these.
Chotto escape 014
One of the puzzles, the one with the cup bottoms that you have to match with the cup clue; the hexagon shaped cups will not turn.
I am on Windows 10
Firefox latest version
I have noticed some subtle changes since the last time Firefox updated.
Update:
Chotto escape 014
The same puzzle does the same thing in Microsoft Edge.
Hi 4red3s,
That appears to be intentional:
the hexes are fixed, so you have to rotate your clue to match the hex positions and then rotate the circular positions to match up with the rotated clue.
Hope that helps.
Turn the clue upside down.
HaHaHa
@eondivad and Scotty57
I was looking at that puzzle every which way but upside down.
Bless you for the help.
I will try again today!
And thank you Charpa for finding these lovely and fun games to get us through each week.
I have loved Jay is Games for many years. :)
I too have loved JIG for many years, and loved Chotto escape 14. I managed the whole game with one hint near the end to find the last coin I had overlooked. Beautiful game!
Is anyone else having display problems with this site? It's like half of the CSS isn't loading all of a sudden.
It's good for me.
See my comment on the Support page; here's a screenshot of how broken the top of the page would look.
Yep. That's exactly how JIG looks to me now, kktkkr. It seems like it started slowly a few weeks ago when the JIG logo image disappeared from the header.
no hurry on the walkthroughs but i hope they get here soon.
I spent ⚅ hours figuring out the logic on Dice, which is why they got delayed. Here's the first one.
Amajeto 2020
This walkthrough may make everything look easy, but you know what they say about hindsight.
Exploration
You start off facing a picture with missing tiles over some Christmas decorations with a square tile leaning against small trees. There's also a cute snowman underneath that will be important later.
Turn right to face four windows looking out into the snow. The table has a square tile leaning on some yellow digits with another snowman on the couch behind. It's not obvious, but you can
click some of the digits to change them.
Turn right to face the exit door and the television screen to the left of it. Under the TV, there's another square tile next to the snowman and colorful figurine.
Turn right to find a new year's greeting glowing bright green on the wall. Of the four pictures above, you know from past games that the third one tilts when you click its corners. And the five cupboards below have locks with
four yellow digit buttons
a column of three red buttons
four shape buttons arranged in a diamond pattern
four letter buttons
four color buttons
as well as a square tile and snowman on the right side.
Digital
Use the clue under the windows to unlock the left (first) cupboard door.
After clicking the clue to change it, it spells out the code 5028, so enter that into the cupboard and open the door to find a square tile.
Red
Use the clue from the first screen (with the Christmas trees) to unlock the second cupboard door.
Following the order of dots on the small tree decorations, push the top, bottom, bottom, middle, middle, bottom, top buttons and then open the door to find a square tile.
Shapes
Use the clue from the snowmen to unlock the middle (third) cupboard door.
Paying attention to the hats and shirts on the snowmen, you find that the snowmen with hats pointing up, right, down, left are wearing shirts with a seven-pointed star, five-pointed star, square and triangle.
Set the buttons accordingly and open the door to find a square tile and remote control.
Screen / Colors 1
Use the remote to turn on the TV, which shows a sequence of colored squares.
(Surprisingly, this is the only clue the TV will give you.)
So use clues from the TV and colorful figure beneath to unlock the tilty picture above the greeting.
The blue, red, yellow, yellow, green colors appear on the top-left, bottom-right, bottom-left, bottom-left, top-right limbs of the figure.
Click the ⌜⌟ ⌞⌞⌝ corners of the tilty picture, which makes all four picture frames come loose. Turn them over to find a square tile, some clues with numbers in boxes, and colored corner markings.
Spell
Use clues behind the picture frames to unlock the fourth cupboard.
Matching the (numbers of) boxes on the clue to the (numbers of) letters in the words in the greeting, you find that 1 and 3 correspond to the H and A of HAPPY, 2 is the E of NEW, and 4 is the R of YEAR.
Putting them in order from 1 to 4 gives the code HEAR, so enter that into the door and open it to find a square tile.
Colors 2
Use the remaining clues behind the picture frames to unlock the last cupboard.
From least to most, the colors of the filled-in corners behind the frames are green, red, yellow, blue.
Click the buttons 6, 3, 1, 2 times and open the door to find a square tile.
Complete
Place all 10 square tiles into the picture on the first screen, which activates a randomized puzzle which you need to solve by rotating the tiles until they align.
(This one is a bit tricky, so be careful with both the top left and top right corners.)
Once you're done, the picture slides up to reveal a gold key. Use it to unlock the door and escape!
Chotto Escape 014 - Room with Bear Sofa
Just like in the previous games, I'll solve the puzzles following the sequence of the hint system.
Exploration
A stylish dog girl asking for a cowboy hat stands on top of a cupboard whose right side has a lock with a grid of nine buttons having different symbols and whose left side has a lock with some squarish shape buttons. Above that left side, there's a display of bunnies in three different colors, with a tray at the bottom that looks like something will be dispensed there.
The left wall has a locked door next to a shoe rack, and you notice that the blue pair of shoes contains a pink doggy coin. Also, you notice a track running across the floor, where a mouse asks for a bottle of something.
Turn right, where you see the track leading into a mousehole. Three mice are already carrying those bottles, and they seem much more lively than the previous one. Around the mousehole, you see a shelf with monkeys and pigs, as well as a potted plant and coin beside. The cupboard on the wall above has two locks, one with very unusual buttons in green and blue, and one with shaped buttons with lines extending from them. The bookshelf on the right wall has colorful books, small foxes and a single coin in the left middle shelf.
Turn right. On this wooden shelf, you see three pictures of rabbits, a potted plant, and pink and green things with curly hairs/tails sticking out.
The right wall has a blue cupboard with its handles tied shut, some stacks of bowls in different colors, a locked compartment with buttons showing those bowls, and a locked compartment with a keyhole. Looking through the bowls, you notice a coin in one of the blue bowls. Above the red bowls, you find a coffee set with different-shaped cups. And above that, there's an abstract looking picture with colored squares and a black drawing.
Turn right to find another dog girl… wait, she's blocking the stairs and won't let you proceed until you give her a guitar! Oh well.
Turn right to get a glimpse of what's up the stairs. You also see the other end of the track, which has a tiny water station but no water.
Shapes
Use the clue from the cups to unlock the right door of the wall cupboard.
(After picking up the 4 coins before, you should be able to view the hint for this.)
As the game's hint points out, the two hexagonal buttons can't be changed. This seems to be a problem because the hexagonal cups have their handles on the wrong side.
Thankfully, you can solve this by just reading the clue upside-down, which means the lines on the buttons need to point:
R D U
L R R
Set the puzzle accordingly and open the door to find a coin and a clue with animals.
Stacks
Use the clues from the bowls to unlock the three-button compartment of the cupboard near them.
Playing around with the buttons, you find that they stack more and more bowls into the picture, but only those of the same color, which means that the black, white, black bowls will always be in the 2nd (red), 2nd (green) and 1st (blue) position from the bottom.
Checking that against the bowls, you find that those stacks have a total of 2, 6, 3 bowls. Click the buttons 0, 4, 1 times, then open the compartment to find a coin and a clue with more curly things.
Curls
Use both curly thing clues to unlock the cupboard under the rabbit display.
The shelf compartments with 2 green, 3 pink and 3 green curlies have different patterns of adjacent compartments:
2 green: top (small) + left + bottom
3 pink: top (large) + left + bottom
3 green: top + left
Click the buttons 4, 0, 1 times to match the surroundings of those squares, and open it to find a guitar.
Give the guitar to the dog blocking the stairs, and now you can proceed.
But you can turn right instead to find her thanking you.
Exploration 2
Going up the stairs, you find three bear chairs (okay, bear sofas) around a fish-shaped table. On the table, a cash register requires nine coins, and a pink box has a shoe symbol over a grid of four buttons.
Click the potted plant to find a brown rabbit hidden next to it.
Turn right, and you're now facing the way down. Before you leave, check out the three-digit lock on the wall.
Shoe
Use the clues from the shoe rack and colorful picture to unlock the pink box on the table upstairs.
As the box tells you, you need to read the shoe rack from top down, getting the colors yellow, green, blue, black, white, red.
The picture (which has a shoe drawn on it) has those colors in the LL UR UR UL LL LR corners, or
⌞⌝⌝ ⌜⌞⌟
so push those buttons and open the box to find a pair of bear scissors.
Snip
Use the scissors to open the blue cupboard. Among all the cups and plates, you find a white rabbit and an animal-shaped box with two buttons that flash pictures of foxes.
Upwards
Use the clue from the bookshelf to unlock the box you just found.
From bottom up, the foxes appear on the RLLRR sides, so push those buttons and open the box to find a coin.
Furniture
Use the clue from the upper level to unlock the left side of the wall cupboard.
As you can see by going upstairs, looking from downstairs (maybe) or just checking the hint, the two side-by-side chairs are blue and adjacent to the large fin of the table, and the other chair is pink and next to the tail of the fin.
Click the table button 3 times, the left chair button once and the other chair buttons twice each, then open the cupboard to find a coin.
Zoo
Use the clues from the animals in the room to unlock the three-digit lock by the stairs.
(The hint button will helpfully show you everything you need if you're having trouble keeping track of them.)
As shown in the wall cupboard, you need to count pigs, mice and foxes.
The rack has 5 pigs (among the monkeys), the running track has 4 mice in total, and the bookshelf has 5 foxes.
Enter 545 into the lock and open the panel to find a tiny bottle and a grid clue.
Save
Give the bottle to the struggling mouse on the track, who rewards you with a note showing two rows of shapes.
Grid
Use clues around the room to unlock the nine-button cupboard under the other dog.
From the grid clue and note you just read, both the letters of WESTERN and the shapes on the note are related to the cupboard.
This suggests that those letters and the note are connected in some other way. What's the connection?
The numbers of shapes on the note matches the numbers of letters on the WATER STATION sign.
Picking out only the ones that correspond to WESTERN, you find that they are the square, club, diamond, heart, club, star, asterisk:
■♣◆♥♣★🞶
Push those buttons and open it to find a hat.
Give the hat to the dog on the first screen, who replaces her old hat and thanks you.
Check her old hat to find the last coin.
Collection
Now that you have all nine coins, place them in the cash register upstairs, which dispenses a key.
Use that key to unlock the remaining compartment under the blue cupboard, which contains a black rabbit.
Shades
Use clues from the shelf beside the blue cupboard to place all three rabbits into the display.
(If the clue/hint is too difficult, you could just guess. But here's the logic.)
You need to place the rabbits so the formations shown appear in the display (without rotation or reflection).
Consider the first formation, which has two white rabbits and one black. The existing black rabbits cannot participate in this formation because the rabbits to their left and bottom are the wrong colors.
In other words, to make this formation appear you need to add a black rabbit to one of the empty slots. There's only one slot which can possibly have white to its left and bottom.
So place the black rabbit in the top slot.
Now consider the second formation, which requires white to be to the left of black. You have no more black rabbits to add, so look at the four already present to figure out where a white rabbit can go. After ruling out the top row (because brown goes above white), only one possibility remains.
Place the white rabbit in the bottom left.
There's no need to consider the last formation anymore, because the brown rabbit must fit into the remaining slot.
Do so, and the display finally dispenses a house key.
Use it to unlock the door and leave!
Dice
All this may seem rather random and you may feel like the die is already cast, but think outside the box and you'll be on a roll.
(Note that some puzzles can be guessed and if you do so the item required to solve it will disappear, so I recommend not doing so.)
Exploration
You start off facing a pair of noticeboards with blue and yellow notes stuck on them. There are also two grid clues pined to the boards, one having numbers from 1 to 9 and the other having colored circles.
Turn right to face three safes. The top one has a row of five small dials but the middle dial is missing. The middle one has a row of six buttons that can be toggled between square and circle shapes. And the bottom one has a large dial that can be turned left or right. You also see a metal plate fastened with three screws.
Turn right to find four circular portholes (actually safes). The locks on them have:
two digit buttons,
six colored buttons that cycle through patterns of squares,
a grid of nine buttons,
and a grid of four buttons.
Turn right to face four large picture frames. The top-left one has blue lines on a gray background. The top-right one has spiraling arrows surrounded by black lines, with one line in each set colored red. The bottom-left one has a grid of pink and blue circles. And the bottom-right one has a grid of different-colored circles.
The circles in the bottom-right picture don't all have the same thick boundary. Clicking the orange and purple ones (in the top left and bottom left), you manage to pull off a yellow piece and red piece to reveal the original marker-drawn circles.
Click the carpet on the floor to look down. It comes off to reveal a red thing that looks like a manhole cover with a small hole in its middle.
And as the title suggests, there's clues on the ceiling too! Back out and click the top of the screen to look up at a clue with pencils pointing at dots.
Nine buttons
Use the clue from the left noticeboard to unlock the bottom left circular safe.
I'm copying the clue here for easy reference, but all you need to do is click the buttons in order from 1 to 9:
5 9 2
1 4 7
8 3 6
Inside the safe, you find a round handle.
Wheel
Place the handle onto the hole in the floor, and you get the option to rotate it with pink and blue arrows.
So use the pink-and-blue clue from the bottom-left picture frame to unlock it.
The trick here is that you need to read the pink and blue clue in the order described by the number grid you just used.
For example, the first move is represented by the left circle, which is pink, and the second move is represented by the top-right circle, which is blue.
Since the pink arrow points left and the blue arrow points right, the full sequence requires you to click the LRLRRLRRL buttons. Once done, the cover pops out and you find a colorful Rubik's cube.
Six colors
Examining the cube, you find that it's not a puzzle you can solve (really, it's not even a valid configuration), but instead you can rotate it to look at all six faces.
Use that clue to unlock the top-right circular safe.
The six available patterns on each safe button are actually the common arrangements of dice pips. Each of the faces of the cube contains exactly one pattern, and each such pattern appears in a different color.
Those colors and the number of pips in their patterns are
Red(4) Blue(5) Yellow (1)
Purple(3) Green(6) Orange(2)
Set them accordingly and the safe pops open revealing a memo with a pattern of shaded squares.
Radial
As the spiral marking on the memo suggests, you need to use it together with the clue on the upper-right picture frame to unlock the bottom-right rectangular safe.
Hint 1: This type of safe requires you to turn a dial in alternate directions to specific positions, but the spirals on the clue aren't in alternate directions.
Hint 2: How large is the pattern on the memo?
The pattern of shaded squares can be divided into six smaller 3×3 squares, each representing a different dice face:
5 4 1
2 6 3
The correct order of instructions is:
Turn counter-clockwise to bottom left
Turn clockwise to top left
Turn counter-clockwise to right
Turn clockwise to bottom-right
Turn counter-clockwise to top
Turn clockwise to left
So click the left arrow thrice, right twice, left five times, right once, left thrice and right six times, and the safe opens to reveal a Reversi/Othello board with a blue-green disk?.
Fission
By looks alone, it seems quite obvious that the two-colored disk is actually two blue and green pieces glued together.
Perhaps you can separate them with some kind of hard thin edge?
Use the disk on the screwed plate near the rectangular safes to separate it into blue and green pieces.
(No, I don't actually understand why this works.)
Recolor
Use the clues from the color grids to do something with the four colored pieces.
Hint: The grids on the noticeboard and bottom-right picture frame look quite similar, differing only in four spots.
You can place the pieces back onto the bottom-right picture frame. As you've already seen, this changes the colors on it.
In order to produce the required changes, you need to place:
Blue onto the bottom red, producing purple
Green onto the top-left red, producing black
Red onto the top-right blue, producing purple
Yellow onto the left blue, producing green
Once done, the picture slides up to reveal a toolbox with six switches.
Flipped
Use the clue from the ceiling to unlock the toolbox.
Hint: each of the curved patterns on the pencils means something.
Since the switches are vertical and the pencils are horizontal, you need to read the clue sideways. If you tilt your head to the left, you find that the two kinds of curves look like the letters I and U.
But what they actually represent are the roman numerals I and V! Since your head is now tilted left, the pencils labeled Ⅰ, Ⅱ, Ⅲ, Ⅳ, Ⅴ, Ⅵ are on the UDDDUU sides of the dots.
Flip the second, third and fourth switches on the toolbox to open it. There are several tools inside but you can only take the slotted screwdriver.
Unscrew
Use the screwdriver to remove the screwed-down metal plate, revealing a light switch.
Before we touch that: you can examine the plate and flip it over to find a clue.
Turn off the lights and look around.
Other than not being able to open anything, the only other difference should be the screen with the framed pictures, which now have dice (?) drawn on them.
(Turn the lights back on when you're done.)
Holes
Use the clue from the plate to unlock the top-left circular safe (whose lock has the same pattern of holes).
The clue on the back of the plate spells out 7×10.
So enter 70 into the lock to open the safe and find a dial.
Four buttons
Use the clue you saw in the dark to unlock the bottom-right circular safe.
The dice glowing in the dark have different numbers of pips, with 1 to 8 appearing on the LR LL UR LR UL UR UL LL pictures, or
⌟ ⌞⌝⌟ ⌜⌝ ⌜⌞
so push those buttons to open the safe and find a sheet with holes. To select this item, you should click the upper left of its box.
Mask
Place the sheet over the top-left picture frame to view a clue.
Also place the dial into the top-left rectangular safe, and then use that clue to unlock it.
In the circular holes of the sheet, the blue lines point down, up-left, up-right, up, down-right.
So click the dials 4, 7, 1, 0, 3 times to open the safe and find a hammer.
Smash
Use clues from the room to figure out where to use the hammer.
Each wall or floor or ceiling has a different number of identical shapes, matching the design of dice, except for the circular safes and the picture frames which both come in fours.
There isn't room for one more frame, so there must be a hidden safe. (Another way to make this deduction is to recall that most dice have opposite faces adding up to 7, so that the wall with a hidden area would have to be opposite the wall with 2 noticeboards.)
Smash the middle of the wall among the circular safes to reveal the fifth safe, which has a four-letter lock.
Spell
This four-letter safe also has holes on its lock, but in different positions, which means you can use the clue from the metal plate again to unlock it.
Reading the back of the plate upside-down gives you the code OIXL.
Enter that into the lock to open the safe and reveal a new memo and a lever.
Box
Use the remaining clues from the game to unlock the middle rectangular safe.
The sequence of symbols on the new memo is a pigpen cipher, which means they represent the numbers surrounded by those shapes of lines in the grid clue: 316452.
And the background of the memo tells you to look around at the room.
Since the only safe you haven't opened has squares and circles, how do you get those from the numbers and the room?
As described above, the room is designed like playing dice, and you've already done a little remodeling to make each wall/ceiling/floor represent a different number: 1 carpet, 2 noticeboards, 3 rectangular safes, 4 picture frames, 5 circular safes, 6 ceiling spots.
Of these objects, the ones that appear in groups of 1, 5, 6 are circular. Combining that with the memo clue tells you that you need to push the 2nd, 3rd, 5th buttons from the left.
The safe opens to reveal a pair of horizontal grooves with holes on the left.
Place the lever into the grooves and shift it.
This opens up a hidden doorway in the wall for you to escape!
awesome walkthroughs as usual KK. The dice one especially. Looking forward to Potion. Nicolet games are always awesome.
Potion
Don't worry fallen cat, we're here to save you… eventually!
Exploration
The wounded cat lying on the road (next to the stuff you left behind) tells you about a green potion with healing properties.
Back out to the fork, turn left, and enter the gate. Hopefully this grand-looking building is a wizard's academy!
Go forward to the middle of the courtyard. Instead of a fountain or statue, there's just a locked panel whose four buttons have different numbers of horizontal lines. In the background, the left flower patch has bees on a purple flower that scatter and rest on other flowers when clicked, and the right patch has a pair of shears you can take.
Further ahead, the door to the building is locked (needing a key) and its handles are tied together.
Back out to the entrance and turn left. The only thing you can do with this gate is to take a closer look at the small protrusion on the pillar to its right.
Back out to the entrance and turn right. This gate is open!
There's a key hanging from the left half of the gate, but even you as a cat are not able to reach it.
Walk through the gate and onto the dock, where a seal (?) asks you for a lollipop.
Your path forward is blocked by the water, where you see a lot of bubbles.
Four colors
Use the clue from the bees to unlock the panel in the middle of the courtyard.
The bees with 1, 2, 3, 4 stripes are resting on blue, yellow, purple, red flowers.
Click the buttons 2, 3, 1, 4 times to make them those colors, then open the panel to find a broom on top of another panel, this one secured with bolts.
Stick
Use the broom to retrieve the key from the gate on the right.
Unlock 1 / Exploration 2
On the building's double doors, use the shears to cut the door handles free, then use the key to unlock them.
This floor panel has four buttons which cycle between patterns of intersecting lines, but the symbols above are not very similar at all.
The door ahead is unlocked, and opens into a very small room where someone has left the window open and now the clue on the floor is covered in tiny gray stones.
Back out and turn right. The doors on this side are locked, but the plate beside identifies this as the drinking room.
Back out and turn left. This door is unlocked, and the plate identifies this as the library.
Enter the library. Every book here is blue, but some of them are marked with card suits. Zooming in on the left half of the shelf, you also find a clock(?), a yellow dot, a framed photo of something triangular, and a set of test tubes. Zooming in on the right half of the shelf, you also find a yellow dot, a framed photo of an orb, and three things that are supposed to represent purple flasks of green liquid.
Don't forget to look at the table, which has a box with four card suit buttons that rotate when clicked, a stand consisting of a ring supported on three legs, and a book with a fancy cover and potion-related contents.
Suits
Use the clue from the bookshelves to unlock the box on the table.
Following the clue on the box, the card suit on each book needs to be rotated so that the yellow dot ends up on top. In other words, the parts of the card suits that are closest to the yellow dots on the bookshelf should be rotated to the top.
Click the buttons 3, 1, 2, 0 times and open the box to find a golden key.
Unlock 2 / Exploration 3
Use this key to unlock the room marked with a bottle.
There's a bottle on the table next to a plate with geometric patterns marked around its rim. The framed pictures above show plants and red Xs. The cupboard on the right is locked (needing a key) and the blue jar on top is also locked, having five animal switches.
Cleanup
Use the broom to sweep away the small stones under the window, revealing a set of five colorful animal drawings.
Animals
Use the clue from the animal drawings and test tubes to unlock the jar in the drink room.
The teal and green liquids in the test tubes have a lower level than the other colors.
The animal drawings having those colors (I'm not going to try naming them) are the last two enemies on the lock, so flip the first three switches and then open the jar to find a spanner.
Tools
Bring the spanner out to the courtyard and use it to remove the bolted panel, revealing a sickle.
Use the sickle to remove the black flower from the right patch. (This is ingredient number 2.)
Dial
Use the clue from the clock in the library and the plate in the drink room to unlock the panel between them.
The clock and plate have only one symbol in common: the filled circle that the hand of the clock points to. So let's take that as a reference.
The symbols on the panel appear on the clock 6, 3, 1, 7 steps clockwise from the needle (notice that their vertical direction is the clock's radial direction).
The corresponding patterns on the plate have a total of 4, 3, 6, 5 lines.
So click the buttons on the panel 1, 0, 3, 2 times, then open it up.
Exploration 4
You descended through the trapdoor into a dimly lit room. The cauldron on the right is empty, and you can zoom in on the firewood beneath it.
The pentagonal hole in the wall has a net in front of its iron bars, and is surrounded by five beaver drawings wearing patterned hats.
Collect
Bring the net to the river and use it on the bubbles to get a seashell.
Also fill the bottle there.
Incomplete
You don't quite have all the ingredients for the potion, but you can try anyway.
Following the instructions from the library, place the seashell, flower and water into the cauldron in that order.
A pill floats to the surface!
The pill is actually a capsule containing a small key.
Unlock 3
Use this key to unlock the cabinet in the drink room. Inside, you find a triangular hat piece and a box with four shape buttons (and a shape on each end).
Shapes
Use the clue from the book on the table (in the library) to unlock the box you just found (in the drink room).
Noting the positions of the eight pointed star and hexagon on the book cover, the sequence of shapes that connects them is Star Square Circle Square.
Click the buttons 3, 2, 0, 2 times and open the box to find a crank handle.
Crank / Exploration 5
Place the handle onto the pillar to the right of the locked gate, and turn it. The gate is now open!
Walk through the gate to find a familiar-looking beret beaver who hands you a shovel and asks for a lute. On the left near a tree with a bear marking, a box has three buttons abstractly depicting water in circles that grow bigger when clicked.
Sizes
Use the clue from the "flasks" in the library to unlock the box you just found in the woods.
Paying attention to the water with choppy waves, no waves and gentle waves, you find that the flasks with those patterns are medium, large, small.
Click the buttons 1, 2, 0 times and unlock the box to find a lollipop.
Sweet / Exploration 6
Give the lollipop to the seal at the river, who produces another float so you can travel across.
After some vigorous pedaling, you make it to the island which has a tiny patch of grass, a box with a row of lights above two water-drop buttons, and a treasure chest with three triangular holes.
Splash
Use a clue you just saw to unlock the two-button box on the island.
The animation that plays when you use the float (if you missed it, you can back out and use it again) has drops on the LRRLR sides.
Push those buttons and open the box to find a matchbox.
Hidden
Use the picture clues from the drink room to find hidden spots.
Dig in front of the marked tree near the beaver to find a broom piece.
Use the shovel near the grass on the island to find a triangular tripod piece.
Triforce
Place all three triangle pieces into the treasure chest on the island according to the picture in the library: hat on top, broom on left, tripod on right.
This summons a wizard who conjures a lute!
Give it to the beaver in exchange for a feather.
Phoenix
Examine the matchbox and click to remove a match and light it.
Then use the match to burn the feather.
Then use the burning feather to light the firewood beneath the cauldron, which leaves a white orb.
Ball
As the picture in the library suggests, you need to place the white orb onto the tripod on the table.
A mouse appears and stands next to it!
Prophecy
Click the ball/mouse to view a vision of an alternate universe. This is definitely a clue!
Return downstairs, click the bottom left corner of the pentagonal hole, and click again to reveal a five-button panel.
Use the clue you saw in the ball to unlock this panel.
The arrow in the prophecy travels through seven different points (seven corners of the pentagon), corresponding to the 1st, 2nd, 4th, 5th, 3rd, 4th, 1st buttons.
Push those buttons and unlock the panel to raise the iron bars. Now you can take the flask, as well as a pink ball, yellow ball and blue ball from the small red, yellow and blue bottles.
Complete
Use the flask to collect the potion.
As shown in the potion book, add the blue, pink, yellow balls in that order.
(If you mess up, the flask will empty out and you need to collect the potion and balls again.)
Bring your completed potion to the wounded cat to end the game!
Hello Guys,
I would be pleased to assist you on the broken layout issue.
The quickest method would be to meet any of you that have layout issues on Team Viewer and take a look at the issue because I cannot reproduce it on my side.
Please get in touch via Skype to "pro_it_service" so that we could agree on a time to meet, as well as get your "Your ID" and "Password" to connect to your computer via Team Viewer.
Many thanks,
Mihai Bocsaru
Update