
 Hi, it's Wednesday, it's escape time again!
The first comes sweet Detarame Factory game followed by well-done (and sweet) Shigeyuki Kagamura's escape where you turn into explorer of sewerage system and successful rescuer of lost cat. Lubricants and capsuled key parts are scattered around tomoLaSiDo's red room and after you collect everything and leave it, the big adventure awaits you - the most classic of the classics - hunt for a treasure buried on deserted island, with InkaGames in director's chair. Lucky digging.
Have a good time and enjoy!
Huzzah! Detarame Factory finally delivered July! Their Monthly Escape 1-6 we played in the WE N°150 two years ago and meanwhile other games were released so it seemed that the series was finished. You never know.
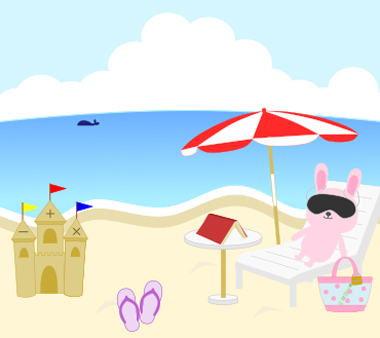
It's summer on the beach and you have to solve many puzzles before all the cute animals resting here can have their picnic. There is empty basket in your inventory which you need to fill up with four mysterious things...when is the basket full the picnic begins. Bon appétit!
The cursor isn't changing, no save button, one ending.
The newest game by Shigeyuki Kagamura consists from three levels as the previous one; after you pass one the following unlocks at the starting gamescreen.
Atmospheric and poetic (quite Rinnogogo-like) game has a story - a black cat needs your help as another one is stuck in a sewerage system, inside huge pipe behind strong bars. Before you can do something about it, you need to get there first which means to overcome several coded doors and open several coded cases. Will you set the cat free?
The cursor isn't changing, autosave - saves only finished stages, one ending. The game is at the bottom of the game page.
Escape Challenge 93: Room with Lubricant
In the very red living room where tomoLaSiDo locked you are hidden eleven lubricants. Only one of those is usable and important as all devices and cabinets' doors are stuck. What a lucky coincidence. Just as well that all the stuckness didn't happen in the room with fish. So, you need to find this lubricant and then use it everywhere...and remember the safety regulations for work with combustible substances!
The cursor is changing, no save button, one ending.
Sack Esparro and the Treasure Island
Pirates, a treasure map, a captain's parrot, an island infested with dangerous fauna and monkeys, many puzzles with more or less intuitive solutions - that's the latest point'n'click game by InkaGames. It's long, and several problems Sack Esparro faces aren't exactly easy to figure out - but it's always fun. Oldschool adventure games' spirit is strong here though not strict - you can die many times (very probably you will) and in many creative ways; however, the game kindly returns you to the moment before the wrong decision without saving. So, can you get the treasure?
The cursor is changing, save button, one ending.
P.S. Talking about pirates, here is romantic Pirate Coast 3 (and here are Pirate Coast Escape and Pirate Coast Escape 2 we played earlier) by Esklavos.
We love escape games, and our readers love talking about them and sharing hints! How about you? Let us know what you think, ask for clues, or help out other players in the comments below.


Here is correct link to the Voice of Sewer before Jeff fixes it. Scroll down the page to find the game.
looking forward to the walkthroughs as usual.
Monthly Escape 7
It's July! Escape the hostile summer heat with a gentle sea breeze and some watermelons split for sharing.
Reminders:
No guessing or skipping! If any clue requires getting or using an item to view, you can't complete that puzzle without doing that.
You can examine any item by double-clicking it.
The hint button in your inventory will reveal hints for some puzzles that you're able to solve. Since some puzzles are solvable during initial exploration, I recommend you finish exploring first before opening up those hints.
Exploration
In your inventory, you find an empty basket missing four things, as well as a magical hint button.
You start off on a screen with a pink bunny wearing a sleep mask on a deckchair/lounger. It has a flowery bag with a lock, but you have to have a necklace before you can touch it. The small table beside has a book with some picture clues. On the left, you see a sandcastle with colored flags and some symbols, as well as a pair of purple slippers that you can lift up to find a coin. To complete the picture, there's a tiny whale far off in the background, that surely will be relevant later.
There are two arrows to change screens. Let's ignore the diagonal one and go right for now. On the beach, you see a swimming sign that you can flip over to find a lighter with a lock on it (that lock has three buttons which cycle through different numbers of stars), a bunch of pink seashells that you can open (and a blue one that's locked), and a fire pit with the fish already skewered and the logs already arranged. In the sea, a penguin wearing a float and a key asks you for a chocolate popsicle, and in the distance are three sailboats which seem to have tiny dots on their sails.
The forward direction into the sea is forbidden for obvious reasons, so go right instead. On the beach, there's a mouse and squirrel that want a beach ball, as well as a rock that you can only lift a corner of. In the sea, another animal (a dog?) rides a jetski back and forth.
Go left twice and then click the diagonal arrow. A fox operates a food stand with only three items on the menu, and instead of asking for your order it just wants three coins. The right side of the food stand is just a bunch of numbered lockers: 1 has four dials marked with hiragana, 2 has a keyhole, 3 has three letter buttons, 4 has three buttons each split in half with the left halves changing colors and the right halves remaining white, 5 has four buttons which cycle through lines, (broken, straight and curved), and 6 has four star buttons with a red mark on each star. Finally, the area in front of the stand has four blue starfish with a darker blue point on each, as well as a flower pot with many plants and buds but no blooms.
The diagonal arrow here leads back, so go right instead. Near you, there are three rows of conches, a cooler box with three sliders, a barrel which you can look at the top of, and another heavy rock. In the background, the palm tree (?) bends left and right (and one of its fruit seems different), the stack of floats is all marked with the same text ("Detarame Beach" in hiragana, but "detarame" also means nonsense) and when you get to the bottom one you find a coin, and the three pastel-colored surfboards are marked with dolphins.
Go right again. A bear sleeps soundly under a sand blanket, the rock on the left is identical to the previous ones, and the tree on the right has a beach ball instead of fruit, which explains why the llama is asking you for fruit.
To help you navigate, I'll number the screens explored as follows:
1 2 3
4 5 6
But the layout is linear, so the only path from 6 to 3 passes clockwise through all six screens.
Stack
(Hint 1) Use the clue from the stack of floats (on screen 5) to unlock the locker numbered 1.
The indicated symbols appear on the floats (from top down) on the bottom, bottom-left, top-left, top-right sides.
So push the buttons 4, 5, 7, 1 times and then click the checkmark to unlock the locker. Inside, you find a pink shovel.
Awake
Use the shovel to uncover the sleeping bear (on screen 6), who immediately awakens, leaving behind the binoculars it was sleeping on. Also, the bear asks you for your basket, but it seems you'll have to fill it up first.
Zoom
Use the binoculars to look at the whale (screen 1), which sprays jets out of the water surface repeatedly.
Also use the binoculars to look at the sailboats. Ooh, they have colored flags and their sails have stars!
Arc
(Hint 6) Use the clue from the whale (screen 1) to correctly shake the palm tree (screen 5).
The sprayed jets curve towards the Left, Right, Right, Left, Right sides, so click the buttons on those sides to bend the tree similarly.
Once you complete the sequence, a yellow fruit drops from the tree.
Give the fruit to the llama (screen 6), which extends its neck long enough to dislodge the beach ball. Hmm, this one seems to be out of shape.
Math
(Hint 7) Use the clues from the sandcastle (screen 1) and sailboats (screen 2) to unlock the lighter you picked up.
(Too lazy to revisit those clues? They're both visible in the hint.)
Each sail has a different number of stars (hence, one pair per boat), and the symbols on the sandcastle tell you what to do with those numbers:
Yellow: 5 − 1 = 4
Red: 2 + 3 = 5
Blue: 4 × 2 = 8
Enter 458 into the lock and unlock it.
Grill
Use the unlocked lighter on the fire pit (screen 2). Nothing seems to happen, so you'll need to "wait" by changing screens and then coming back.
After changing screens, you find that the dog (from screen 3) is now standing in front of the fire pit, and its boat is now on the beach (on screen 3).
Click the boat to pick up the swimming equipment (flippers and mask) from it.
Exploration 2
With the help of the equipment, you can now enter the water from screen 2 by pushing the forward arrow.
Underwater, you find a parade of different fish above an array of 9 jellyfish. Click the jellyfish to take a closer look, and you'll find them moving and flashing in order. Also on the seafloor, an octopus emits some ink from its face, an dark circle of sand does nothing, and you can pick up a treasure chest among the seaweed.
Surrounded
Use the clue from the jellyfish (underwater) to unlock the grid of similarly-colored seashells (screen 2).
The jellyfish move clockwise from the bottom-right, so open the seashells in the same order:
567
498
321
The blue seashell in the middle contains a coin.
Purchase
You now have all three coins, so give them to the fox (screen 4) to get the chocolate popsicle.
Then give it to the penguin (screen 2) to get its key.
Also, the fox now mentions an old-style gold coin.
Unlock (gold)
Use the key from the penguin to unlock locker 2, which contains a paper ball with an interesting instruction, as well as a baseball bat which immediately goes into the basket when picked up.
Three colors
(Hint 3) Use the clue from the surfboards (screen 5) to unlock locker 4.
The boards with 1, 2, 3 dolphins on them are green, pink, blue.
So click the buttons 1, 3, 2 times, then open the locker to find a fishing net. While examining the net, click it again to assemble it.
Four stars
(Hint 5) Use the clue from the starfish (screen 4) to unlock locker 6.
To make the red points on the buttons match the blue points on the starfish, you need to click the left, top, right buttons 1, 3, 2 times (and leave the bottom button at the top position).
Open the locker to find a crowbar.
Force
Use the crowbar to lift the rocks on screens 3, 5 and 6. Each has a crab under it.
You can't just reach out and grab the crabs, as they're really good at scuttling away.
But you can use the net to pick up all 3 crabs.
Love
(Hint 2) As the second page of the book tells you, crabs love conches, which can be found on screen 5 as well as the sign on screen 4. How does that help with locker number 3?
Placing the crabs on the conches on screen 5, you find that they stop at different positions on each row.
The row lengths match the word lengths on the menu, which means the conch positions match the letter positions, and those that the crabs settle on (from the top row down) match the letters S, E, A.
Enter that into the lock and open it to find an air pump.
Inflate
Use the air pump on the beach ball to inflate it.
Then give it to the animals on screen 3, who start passing it around, leaving behind a bottled key where they were standing.
Trail
(Hint 4) Use the clue from the animals passing the ball (screen 3) to unlock locker 5.
The ball gets passed straight, or up in an arc, or down bouncing against the ground.
Tracking the ball's path, you find that it's passed straight, down, up, down.
So click the leftmost button twice and the third button once, and open the locker to find a hammer.
Tap
Use the clue you found in locker 2 to open the barrel (screen 5).
As the paper ball tells you, you need to strike the barrel five times with the hammer.
Do so (it should make a sound on each strike), and the barrel breaks open to reveal a clay pot inside.
Ceramic
Since nothing you're holding has an effect on the pot, you'll need to use the pot on something.
Where exactly do you need to place the pot?
Go underwater, and place the pot on the dark spot.
This seems to get the attention of the octopus.
After you surface and go underwater again, the octopus now occupies the pot, giving up its position on the gray rock.
That rock is just as heavy as the others, even underwater, which means you can use the crowbar to lift it too. Underneath, there's an olden golden coin.
Valuable
Give the gold coin to the fox (screen 4), who returns your favor with a blue mat, which also goes straight into the basket.
Gemmed / Unlock
Use the hammer to smash the bottle and get the ruby key inside.
Use that key to unlock the chest and find a sapphire necklace.
Give it to the bunny (screen 1) to get its mask, which goes into the basket.
This also lets you access its bag, which has four fish buttons and a row of six lights on top.
Lineup
(Hint 8) Use the clue from the fish underwater to unlock the bag (screen 1).
You could watch the fish and try to memorize the sequence, or you could just read it off of the clue.
Either way, you'll need to press the 3rd, 1st, 1st, 2nd, 4th, 2nd buttons on the lock to open it. In the bag, you find a bottle of plant vitalizer.
Power up
(Hint 10) Use the plant vitalizer on the flower pot (screen 4), leave the screen, then come back and use the new clue to unlock the cooler box (screen 5).
From left to right, the flowers that bloom are in the middle, top, bottom positions.
Set the sliders accordingly, then open the box to find a watermelon, which completes your basket.
Hmm, all the land animals seem to be missing from their spots… oh, there they are on screen 6, waiting for you to hand the basket in.
Give it to the bear, and watch the ending animation. Yes, you get a piece too.
thanks KK. looking forward to the other 3.
Voice of Sewer
Just like the last one, Japanese hints and codes are now available under the game, which is set up in three stages.
The previous game had a rabbit who wanted to go home (that's what the missing dialogue was, according to the author's comments at the end), and this one has… a cat?
Stage 1
Exploration
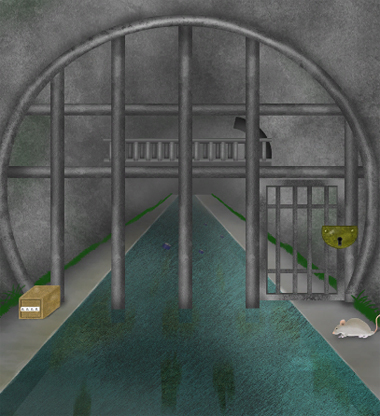
After clicking the open sewer cover, you enter the sewer.
It seems to be very foggy here, but you can see stuff like a drink can floating in the water (and several more further back). Along the left and right walls, you see some rats standing in front of numbered flower paintings, as well as a box with four colored buttons and a weird hint. Also, the right wall has a poster with some clues that doesn't seem very helpful.
Click near the gate to move further forward into the sewers, where your progress is blocked by a padlocked gate. There's another rat (and flower painting) on the right, as well as a four-letter safe on the left.
Unseen
The clue on the four-color box has a crossed-out eye. Since you're not too keen on removing any eyes, you should probably look for something that's the opposite of an eye.
Well, more than one thing, as you're going to need a sequence of colors too. The only colorful things in this area are…
The eight painted flowers appear in numbered pairs. In each pair, the rat beneath faces one of the flowers, and the ones that the rats aren't looking at (i.e. the ones behind them) are, from 1 to 4, blue, green, pink, blue.
Push the ⌝ ⌞⌜⌝ buttons on the box to open it and find a pair of tongs.
Reach
(Select the tongs and) use them to safely/cleanly pick up the empty can floating in the water.
Code
The can has white markings on it, but each marking only seems to be half visible.
The other halves are on the poster, and you can place the can against it to join up the markings.
Then you can use the completed clue to unlock the four-letter box.
In the order indicated by the dots on the poster, the combined markings spell out the code: LOST.
Enter that into the box to open it and find a golden key.
Use that key to unlock the gate and complete the stage.
(Then click again to access the stage select screen, where the next stage is now available.)
Stage 2
Exploration
This new screen (which you may already have seen a bit of) has a bridge leading to an open doorway, but you can't reach it. At the left, there's a box with five buttons that flip between left and right arrows.
Back out to reach the screen you just escaped from. There's absolutely nothing useful left here.
Back out even further. The rats have now reformed into an unusual tower (without any flowers around). Also, an unusual sphere with a handle has some sort of three-color lock on it, and the treasure chest further back (looks close-up like a crate) has various markings arranged around a blank rectangle.
Pentagon
Use the clue from the tower of rats to unlock the five-button box.
The top and top-left rats face left, while the other three face right.
Make the arrows on those buttons point the same way to open the box, which contains a ladder.
Climb
Use the ladder on (or under) the right side of the bridge to place it there.
Clicking the doorway gets you to a locked door with a lion head that appears to be missing an eye, above which a light flashes different colors.
Colors
Use the clue from the light above the door to unlock the sphere with the three colored buttons.
Ignoring the white flashes (white doesn't appear on the buttons), the sequence is green, blue, red, green.
Push the right, center, left, right buttons to open the sphere and find a locked notebook with a fancy cover.
Trace
Place the notebook into the treasure chest, which activates its upper stone panel for you to enter an animal code.
So use the clue on the chest to unlock it.
Following the jagged lines on the notebook, you find that the numbers 1 to 4 are connected to the panda, giraffe, dog, pig.
Adjust the buttons accordingly to open the chest and find a mysterious orb that the game helpfully identifies for you as "the eye of something".
Seen
Place the stone eye into the door at the end of the bridge, and open the door to end the stage.
Stage 3
Exploration
You finally figured out where that cat meowing is coming from. Clicking on the black cat, you find a second, smaller black cat trapped in the pipe, and all they have to say is "nyaa". You can also check the table to find an unusual treasure map, as well as look in the box in the corner to find some scrolls.
Back out to the screen with the lion door, which is now surrounded by flowers and grass.
Back out again. Under the bridge, some flowers are painted on the left wall behind a carefully carved mouse made of stone which has four picture buttons.
Back out again. The gate now has a blue toolbox on the left with three colored digit buttons.
Back out again. Next to the colored flowers on the right is the treasure chest you fixed in Stage 2, now without the stone panel. Opposite it on the left wall, stone slabs flank what appears to be a wooden dumpster, and the four brown bars on its lock change in height when clicked.
Heights
Use the clue from the scrolls in the cat room to unlock the dumpster.
Click the bars on the lock 1, 3, 2, 0 times to make the heights match.
Inside, you find a broken figurine.
Colors again
Use the clues around the stage to unlock the three-digit toolbox.
Counting the flowers by color, you find a total of 4 red/pink, 2 blue, 3 green flowers.
Enter 423 into the lock to open the toolbox, which contains a tube of glue.
Repair
Use the glue to fix the figurine (just examine the figurine and select the glue).
Hmm, how can the fixed figurine help you proceed?
Place it on the treasure map, and it moves/teleports on its own around the map.
Ocean
Use the clue from the map to unlock the stone mouse.
The figure moves onto the pictures of the whale, boat, dolphin, island.
So click the 2nd, 3rd, 4th, 1st buttons from the left. The mouse explodes into unrecognizable pieces and leaves behind a silver key.
Unlock
Use that key to unlock the notebook, which is still embedded in the treasure chest, and you find that it opens the chest instead!
This time, the chest contains a pair of bolt cutters.
Use them to free the trapped kitten and end the game.
Escape Challenge 93: Room with Lubricant
Exploration
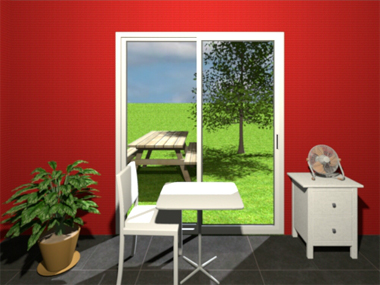
Instead of windows, this room has sliding glass doors (which might technically count as windows), but they don't do much sliding. As usual, there's a potted plant next to the table, where you find a bottle of lubricant on the chair. A fan that doesn't do anything sits on top of a chest of drawers, the top one containing a key piece (in a capsule) and more lubricant, and the bottom one having a lock with three circular color buttons, where each button has a different size and only the outer parts are colored.
Turn left to find a head-ball on a platform, looking scared of an open hand mounted at the top of a curved track. The platform itself has a capsule behind glass as well as a button that releases the hand, which slides down but quickly loses momentum at a rough spot near the bottom. The other thing on this screen is a large machine with a capsule on a grabber on a conveyor belt. It looks like that grabber is not going to just drop the capsule into the hole, and the "Apply grease" button on the left isn't helping.
Look under both the head-device and the capsule machine to find 2 lubricant bottles on the floor.
Turn left again to face the exit door. The wall clock actually moves!… slightly. Under it, the brown box on the wall has three colored buttons, and the white one just seems to have a stuck shutter.
Turn left again to face yet another large machine. The clearly labeled buttons on it adjust both the position of the capsule as well as the gates blocking its way to the bottom. The wall box to its right just doesn't seem to open at all, while the blue bin at the bottom has a bottle of lubricant beside.
But the bin isn't empty! Looking carefully at the self-shadow, you spot the black cap of another bottle of lubricant (item).
Under the machine, you find another lubricant bottle.
And checking the top of the wall box confirms your suspicion that its door has been nailed shut.
To finish off our tour, enter the corridor to the toilet, sit down, and look right, up, left to find a drawing. (I can't decipher this one.)
We have six plus one bottles of lubricant, so it's time to smoothen some things up… wait, there's one more thing I have to translate!
Examining the lubricant bottle, you find some Japanese text on the bottom label:
"Warning: grease will get rinsed off."
and the bottom line is
"LP gas: where the ventilation is great."
Name
Let's start with the clue on the bottle's top label, which reminds you of the machine beside the toilet.
With help from the button labels, you figure that C means Center and R means Right.
Together with the numbers given, they form instructions to click the Center button 2 times, the Right button 5 times and then the Center button 6 times.
The last button press finally opens up a lane for the capsule to fall. You get another key piece!
Airflow
You can select the lubricant icon, but it doesn't seem to work (or perhaps it's too dangerous to use)… unless you follow the instructions on the bottom label.
Yes, the most-ventilated place in the house would be the sliding door, if only you could get it open. (The fan nearby is an additional hint.)
Using the lubricant on the sliding door handle (along the right edge) immediately opens it! However, you can't leave that way nor step outside for any fresh air.
Jammed
The next obvious place to use the lubricant is the white wall box beside the exit door. Just a quick spray, and it opens up super smoothly so you can reach the lubricant bottle inside.
Circled
Use the lubricant to fix the clock, then use the clue from that to unlock the bottom drawer.
On the fixed clock, the hands spin so fast that they turn into circles with their colors superimposed onto each other.
The colors that appear are:
Large/Outer: Red
Medium/Middle: Red + Yellow = Orange
Small/Inner: Yellow + Blue = Green
Click the buttons 3, 2, 1 times to make those colors appear, then open the drawer to find a key piece and more lubricant.
Frictionless
The device with the head and hand definitely needs some lubricant, but one spray doesn't seem to be enough to make a slap happen.
Spray both the track and the hand (which lubricates the wrist joint).
Now when you release the hand it speeds towards the end of the track and bends forward for the slap. For solving this puzzle, your reward is a key piece.
Greasy
Next up is the conveyor machine. The lubricant spray easily gets rid of the grease, allowing the machine to stop properly. But how do you get the capsule?
The grabber can stop in four different positions, but only one will respond when you bang on the glass.
By skillful timing and/or quickly (or persistently) alternating between the grease button and lubricant spray, you manage to stop the grabber at the top right, and knocking on the machine causes the capsule to fall out from the non-grabbing side. Of course, it's another key piece.
Toolless
There's still the wall box above the blue bin. You've already found the nails (on the top) keeping it shut, but how do you remove them?
Simply spray lubricant on the nails, and they magically fly out of the holes!
Opening the wall box, you find the last key piece and another lubricant bottle.
Palette
For your optional puzzle, you need to use a clue from the room to unlock the wall box beside the door.
(Hint: why is blue an option?)
Instead of blue sky and green grass, you're in a room with a white ceiling, red walls and black floor.
Make the buttons on the wall box white, red, black by clicking them 0, 3, 2 times, then open the box to find the last bottle of lubricant.
Exit
Now that you've collected them all, it's time to make a smooth exit — just open the door and leave.
Item list
6 key pieces:
Top left: in bottom drawer
Top middle: in wall box above bin
Top right: in top drawer
Bottom left: from head device
Bottom middle: from conveyor machine
Bottom right: in dropper machine
11 bottles of lubricant:
Item: in blue bin
On chair
In top drawer
Under head device
Under conveyor device
Beside blue bin
Under dropper device
In white wall box
In bottom drawer
In wall box above bin
In wall box beside door
As usual, walkthrough for the last game will take slightly longer.
thanks again for the walkthroughs kk. looking forward to the last one although I know it could take time.
Here it is!
Sack Esparro and the Treasure Island
A pirate's daily routine quickly turns into a treasure hunt in a remote jungle. You'll probably get eaten but that's just part of the adventure!
(Some puzzles seem to be randomized, so keep your eyes out for different clues.)
Exploration
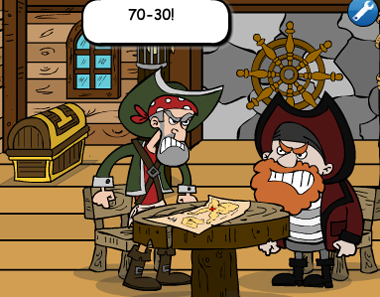
After getting woken up by the sound of two simultaneous punches, you can look around the tavern. The owner is fast asleep and you want to keep it that way, so none of the options on him have any effect. You can pick up the two empty glasses (more like mugs) at your table as well as the 'wanted' poster on the back wall.
(Once you pick it up, you can select the poster and "Look" at it for more details.)
Go left by clicking the red arrow. The only thing you can do here is pick up the treasure map, but this makes One-Eyed Drake immediately show up to take it from you!
After the Game Over, clicking "Back To Game" undoes the mistake so you can work out a better plan.
Deceive
Clicking during the conversation skips most of the dialogue, except for a brief moment: when you're asked about the paper, you can show him the wanted poster instead.
However, your lie falls apart because it can't explain the two unconscious pirates! Game Over again.
So you need to plant the empty glasses onto the table with the pirates before starting your conversation, and then carry on showing the wanted poster instead of the treasure map.
Reading the map, you don't see any familiar landmarks. Looks like some sailing is necessary!
(By the way, you may have noticed that you can place the glasses even when the cursor doesn't change. Don't rely on the changing cursor to solve all the puzzles!)
Exploration 2
Now that you're outside the bar with no reason to go back in, it's time to wander around the port. But first, you can talk to Janel outside the bar, who tells you about his missing cat.
Go right, and you'll find the cat high up on (the bowspirit? of) a ship. There's also a lady selling stuff, and somehow you already know what you'll need but you don't have the coin for it.
Go right to find two boats, one not for sale and the other only for a good price. There are also soldiers playing cards and a bone on the floor that, if picked up, makes the pirates reappear for revenge. Game Over!
Leave that alone for now, and go right again to the edge of the dock where all you can see is water.
Wanted
Pick up the bone on the dock and, when the pirates appear, show the wanted poster to the sailors.
This gets rid of the pirates, and you get your reward of 3 silver coins.
Trade
Use the coins to buy the smaller boat. It only costs two coins, and you can even take the fishing rod from it.
Also use a silver coin at the market stall to buy a can with worms, a bag of bread, a bottle, and some meat and cheese.
Pet
The reason you still can't leave is because of Janel's quest. (And no, you can't avoid it by ignoring him.)
Perhaps you can attract that cat to come to you.
Click the can of worms to take one out, then attach it to the fishing rod.
Then go to the end of the dock and use the completed rod on the water to get a fish.
Use the fish on the cat to bring it down, then pick up the cat.
And finally, bring it back to Janel to get your reward, which is a snake puppet.
Welcome
Board the ship and after a few weeks (or a few seconds in-game) you reach the island. The only items you have left are the map, the sack (no more bread), the bone, and the snake puppet.
That red arrow next to your face gets you off the boat… and into the claws of a gigantic crab, which is a Game Over. (Should've read the treasure map more closely.)
There's a lot of other stuff on the beach but all you can safely reach is a handful of seaweed from the clump floating beside the boat.
Tossing the seaweed on the nearby sand makes the tortoise crawl towards the scent. From your hiding position in the boat, there's only one thing you can do before the seaweed gets eaten up…
(And if you miss it, just pick more seaweed.)
Once the tortoise reaches your boat, use the snake puppet to scare it away and get its shell. How do you use it?
Jump out onto the beach. The instant the crab finishes emerging from the sand, your inventory becomes active and you can select the shell, which is enough to have the crab pinch it instead. With the crab gone, you can continue exploring.
Exploration 3 (west half)
Checking the beach, you find a half-buried anchor, a large vine, half a coconut, and a giant tuna.
Go right/east to find some ruins, including a particularly enticing man-snake thing on a throne. Climbing onto it opens up the nearby cave and releases a giant snake, Game Over!
There's also a banana hidden against the bottom-left stone block.
Go further right to find another stone figure with its arms outstretched. Near its left hand (where the fist is), you see a large boulder and a square block protruding from the wall. Also, there's another large vine on the ground.
Go left/west and then up/north. Just like the map shows, there's a large mound in the middle of a mud lake which gives you a slow Game Over when you try to cross it. The mound has a carving of fruit that you can see from here, as well as a pirate parrot perched on top, and what appears to be a wooden log. On your side of the mud/quicksand, you see three bushes with yellow fruits, orange fruits and red fruits.
Go up/north again to find yourself at a cliffside, which has a wood log, a tranquilising flower, and a boulder that's much too heavy to do anything with. You can use the down arrow to dive into the water, making it all the way to a smaller island before losing in an epic battle for another Game Over.
Go left/south from the cliff, then down/south twice. You can pick up everything on the ground, but that triggers all the masked men to jump out from behind the trees. Game Over!
Go right to a place with lots of colorful flowers near a log that's a skunk hideout. From the right side, you can take a large vine and a short vine.
Go left twice to find a sandy area bordered by trees, where you can take a large vine, a short vine, a medium-size vine and some woodpecker food, a large leaf and the bunch of blackberries on it, and some green fruits from the bush.
Exploration 4 (east half)
Go right, down/north, and right/east twice until you reach a pair of coconut trees, with a stony slope on the left that you can climb. If you try to touch the boulder on the right or either of the trees, the monkeys quickly knock you out and it's Game Over.
Go up/north to find a pair of tall trees. There's a stick on the ground but grabbing it triggers a beetle-related Game Over.
Go down/south to find a tall tree with a woodpecker and a bunch of graves. You can take the pirate hat and half a coconut from the left side, but crossing the red line on the ground immediately gets you spooked, Game Over. The stick in the bottom right is definitely not a thing you can get right now.
Go left/north and then right/east. Your path is blocked by a lake flanked with poisonous thorny vines, and the lake itself is guarded by a crocodile just waiting to give you a Game Over. All you can do is pick up the sun scepter and coconut from the near ends of the vines.
Recap
(And a reminder to save your game and turn on autosave.)
If you've been following the exploration up to here, you should have the following items, occupying 22 inventory slots:
Vines: 2 short, 1 medium, 4 long
Colored fruits: green, red, orange, yellow
Coconuts: one whole and two halves
Banana, bunch of blackberries, four portions of woodpecker food
Giant leaf, tranquilising flower, wood log, giant tuna
Treasure map, sun scepter, pirate hat, anchor, sack, bone
And you have the following obstacles from west to east:
Hungry shark
Hungry mud
Hungry snake
Hungry natives with masks
Hungry beetle
Monkeys
A ghost
Hungry crocodile
Stinker
You'll need the skunk to help you, which means luring it out of that log. Of all the things that they commonly eat, the one that's in your inventory is…
Blackberries! Place a small amount on the ground beside the hideout, and you'll have just 3 seconds to react before the skunk eats them all.
While the skunk is eating the berries, use the sack to pick the skunk up.
As Sack comments, the skunk beats anyone in combat. Yes, even against a group of armed warriors.
Even when you figure out that the skunk needs to attack the masked natives from the empty spot at the right of the screen, there's still one problem: the skunk is nearer to you than them, which really stinks for you.
Thankfully, the Game Over screen points you towards a solution.
Place the log on the ground and then the skunk on the log. And don't forget to duck down or it's another Game Over!
Once you've knocked out the natives, you can pick up the long log, extra large vine and very large wooden scepter from the ground.
Also, you can pick up the bright green wooden mask from the middle native.
Also, don't forget to pick up the log that you placed down!
Chomp
The giant boulder on the cliff is a perfect weapon to use against the shark below, and the giant tuna you have is perfect bait for a trap. But how do you set it up?
You need to tie the tuna to the rock, which means using it on a vine first. The only correct length of vine is the large vine.
So do that, and then use the tuna-on-large-vine on the rock. Finally, all you need to do is jump in the water as before and watch the shark set off the trap!
The small island is now safe, but it doesn't have much. Just take the bent branch and leave.
Lava
You need to avoid the pool of mud, and you can't fly but you have a lot of vines.
Just one extra-large vine is long and strong enough to bridge the gap. Use it on the distant mound and click it to climb across! Pick up another wood log there.
(Once you're done, you'll need to cross the vine again before going anywhere else.)
Fruity
The parrot will happily accept any colored fruit you throw at it (but not the banana), but you'd do better using the clue from the mound it stands on.
In order to interpret that clue, you'll need a (randomized) clue from something else.
On the mound, the carvings of fruits in the top, right, bottom, left corners are of a banana, pear, orange, apple, which would normally be yellow, green, orange, red.
Examining the wooden mask, you find that each corner has a different number of scratches. Counting from fewest to most scratches gives you the correct order of colors to toss at the parrot.
Once the parrot is well-fed, it squawks a clue that you manage to copy onto a note for later reference.
Pacify
You can't do anything physical to the trees while the primates are guarding them. In order to get them to let down their guard, you'll need their favorite food: a banana.
Since monkeys don't stay distracted, you'll need to poison it.
Place the flower in a coconut half and mash it with the bone, then apply your finished poison on the banana and toss it at a monkey.
The monkey on the right rejects the banana, but the one on the left gobbles it up and slides down its tree trunk.
You can now freely climb the left tree, but how does that help you deal with the remaining monkey?
Recoil
From the sloped rock, a large vine would be just long enough to reach the left tree. The only way to make this connection is to climb the tree, tie the vine there and then move the other end of the vine onto the rock.
This free end can be attached to a lot of things, but the only reasonable choice is the anchor you dug up. Climb up and tie it there.
The last remaining step would be to push the anchor off the slope, but the slope isn't slippery enough for that.
Since there's no spray lubricant around, the obvious alternative is water. The game won't let you collect seawater or pond water, but there is something wet you can scoop up…
Go back to the mud pool and fill the remaining half a coconut with mud.
Then apply the mud to the stone slope, and push the anchor down from the top of the slope.
Finally, untie the vine from the anchor to release the tree from its bent position, knocking the other monkey out of the tree and driving it away.
After all that work, you can finally pick up the medium-size rock from the right side of the screen.
Statues
The stone statues on the map span two screens in the game. On the right screen, climb onto the rock, the block, and then the statue. You can try pushing the statue's head, but it's way too heavy.
However, you're now in a good position to place the large scepter in the statue's fist.
After that, click the scepter to use it as a support for kicking the head off. It rolls down onto the ground and comes to a stop just before the hole.
Close, but not enough, and now there's no way you can continue pushing it.
However, the statue arms are now tilted, so from that same position on the protruding block you can place the medium rock and let it roll. This collision displaces the stone head to block the hole!
Finally, you can safely climb onto the left statue. Actually, you stop climbing and stand on its knee, which holds its mouth open.
Feed the statue a coconut, and a short cutscene shows the process that leads to a cryptex coming out of its foot.
The cryptex has four dials, which reminds you of a particular clue in the game.
Spin
Use the (randomized) clue from the parrot to unlock the cryptex.
The clue has four numbers, one for each dial.
With 0 or 12 being the initial position (up), click the dials as many times as the clue says (which makes them point towards the correct clock directions).
The cryptex pops open to reveal the spyglass inside.
Amplify
You'll need to use the two tall trees in the northeast to set up a weapon against the giant beetle.
The order of steps might not make sense unless you know what you're building, but you may go ahead and guess anyway.
The thing you're building is a battering ram, hung from both trees and then set swinging.
Start by tying the remaining two large vines to the lowest branches of the trees.
In order for the long log to be at the right height to be tied, you need to support it. Use both (small) wood logs on the long log to easily place them, then balance the long log on top.
Click the two loose vine ends to finish tying the log.
Next up, you'll need a device to cut the rope remotely. There's perhaps nothing more remote than light, and you can harness that by placing the spyglass on the right tree.
Once you pick up the stick, you'll need to trigger it quickly or else it's a Game Over.
So when the timer is counting, click the sun scepter to produce sunshine, which gets focused through the spyglass onto the left vine, which burns up and releases the long log, which remains supported by the smaller logs, whoops, it's a Game Over.
Fix that by removing the two smaller logs, and now the trap should work perfectly, unless you forget to duck and then it's another Game Over.
If you forgot none of those things, the beetle vanishes and you get to keep the bamboo branch you picked up.
Drill
Go to the graves in the southwest, and use the woodpecker food to feed the woodpecker.
It seems that your throws are weak and lousy, but that's totally intentional: after using up all the food, the woodpecker holes form convenient footholds that allow you to climb onto the branch. But why are you up here?
Crafting
Break the bamboo branch into two shorter pieces, and rejoin them with a short vine to form a cross.
That would look perfect on the last grave, but how are you going to reach it?
Use the remaining short vine on the bent branch to form a bow, and combine it with the cross.
Now from your position atop the tree you can aim the crossed bow at the grave to complete it. All three pirate ghosts appear, express their thanks, then vanish. Also, they said something about the pirate hat you picked up.
Since the red line is no longer dangerous, you can just walk to the end of the screen to pick up the wooden pole there.
Leap
Since you're not skillful enough to just swing over the lake, you'll need to find a way to get onto the tree in the middle.
So use the wooden pole on the ground where you're standing, which makes you pole vault over the tail and onto the crocodile's body. You have only three seconds before a Game Over, but all you need to do is click the branch above to climb it.
(There's no going back now, but it's actually impossible to get stuck here.)
Alright, but how do you get down?
Use the medium-sized vine with the giant leaf to make a parachute, which gets you to the other tree.
Then tie the vine to the high branch so you can climb down it and land on solid ground.
Treasure
The only way onward is right, and you reach an important-looking area with two totem poles. Take the shovel from the left.
The map tells you that the treasure is buried between the poles, so use the shovel on the ground in the middle to dig up a treasure chest, which is locked.
Pick up the shovel again and use it to smash the padlock… which is exactly what One-Eyed Drake was waiting for. He robs you of the treasure and you get a Game Over and have to dig it up all over again.
When the pirates appear, select the pirate hat to put it on. This summons the ghosts to help you defeat them.
Finally, the treasure is yours! Enjoy the ending sequence.
Update