
 Welcome! The week is over and the new Weekday Escape is here!
It's lazy summer afternoon, and Amajeto locked you in their velvetish looking living room with colorful coctails standing here and there. After the escape, you are delivered mysterious box by skelex, closed of course. However, short examination reveals hints for the codes so you can open it without using an axe. TomoLaSiDo wants you to find sparkles and you get a chance to play with them for a while. In the last No1game's game you turn into voluntary prisoner in your own apartment - not being locked, the door can be opened any time but it's not recommended due to weather conditions...can you change them?
Have a good time and enjoy!
Amajeto locked you in a comfortable room of theirs and wants you to escape it. If the escaping process takes too long, you find few coctails thoughtfully prepared for slow and/or thirsty players - but don't drink them to the bottom, you may need them later...
The cursor isn't changing, no save button, one ending.
In short but very well done atmospheric game by skelex you aren't escaping from anywhere. Your uncle sent you a box together with strange note stained with suspicious dark red liquid and strong command not to open the box...well he shouldn't have sent it to someone who loves puzzles! Of course you crave to discover its secrets...and the command is crossed out, anyway. Will you open the box? Are you sure it's not the Pandora's?
The cursor isn't changing, no save button, one ending.
TomoLaSiDo hid seven sparklers in their neat and tidy living room, and also six blue and white capsules containing key parts. You need to figure out several codes and open the coded drawers to get what you want but that's not all. By the wall is standing a strange device, quite complicated, which only function is to give out one capsule. Can you get it work and assemble the key?
The cursor is changing, no save button, one ending.
This time you find yourself locked inside your own apartment from very good reasons - it's typhoon season and Picoon, a strong typhoon, has been attacking the area where you live for several days. You're tired and bored from your long imprisonment at home; but believe it or not, finding No1game's ten escape-men may dramatically change the situation in large scale! So, look everywhere, solve few puzzles - and you'll see how powerful the green guys can be!
The cursor isn't changing, no save button, one ending.
P.S.: Here is original but not identical Find the Escape-Men 61: Typhoon.
We love escape games, and our readers love talking about them and sharing hints! How about you? Let us know what you think, ask for clues, or help out other players in the comments below.


looking forward to the walkthroughs here.
are walkthroughs coming soon?
Solomon's Box was simple but fun. Hope to see more from skelex.
well I hope a walkthrough will be here soon.
hope one comes soon.
I'm back! And here are walkthroughs for the first two.
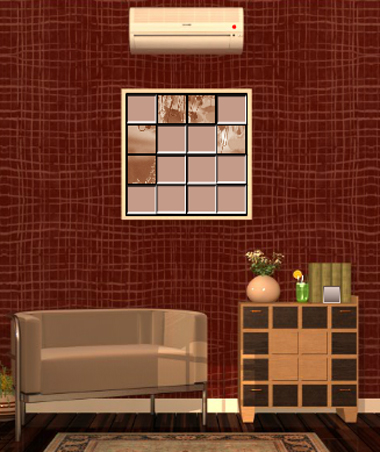
Summer Afternoon
Lots of afternoon-y activities in this room, none of which involve going out into the sun.
Exploration
As usual, you start off facing a chair and a picture grid missing several pieces. The air-conditioner here doesn't seem to be turned on. On the right side, a piece of furniture has many small drawers (that's what I'll call them), but only the ones at the corners can be opened. They're colored and empty except for the bottom left one which has a square tile. The other square tile on top of those drawers invites you to take a closer look, where you find some books not arranged in order, and a green drink that you can lift up. The only thing under the drink is the coaster, which you can also click on to examine its pattern of dark circles.
Turn right. The shelf and couch here are uninteresting, but you can take a closer look at the table, where a square tile rests next to two drinks. The cupboard on the left has a lock with four buttons split into two halves each.
As you might suspect from experience, one of the picture frames here is special: the rightmost one tilts when you click its corners.
Turn right. The only things you need to look at here are the lamps on the left, which have (under the lamp) four books marked with shapes, a square tile next to another drink, and a locked compartment with four buttons.
Turn right. This time, only the right side is interesting, with a television screen (currently off) over a large cupboard, with door locks that have two colored buttons, a grid of sixteen buttons that light up, and a row of four shape buttons. Next to the bright blue drink, you find a square tile and a bowl with six pink and green balls (actually hanami dango).
(Check that you have five square tiles.)
Two colors
Unlock the top-right cupboard door under the TV using the clue from the bowl nearby.
The small black marking on the bowl forms an arrow pointing up-left, but since the dango are arranged in a circle this tells you to read the colors in a counter-clockwise direction.
Starting from the arrow, the colors in the bowl are pink, pink, pink, green, pink, green, so push the RRRLRL buttons and open the compartment to find a square tile.
Four shapes
Use the clues from books in the room to unlock the bottom-right compartment under the TV.
There are two groups of identical books on the first and third screens, and reading the shapes from the second group in the order indicated by the first group gives the code: pentagon, star, heart, circle.
Click the buttons 5, 2, 3, 1 times, then open the compartment to find another square tile.
Grid
Use clues from the furniture on the first screen to unlock the bottom-left compartment under the TV.
Before you open anything, the furniture with drawers shows a 4-by-4 grid pattern, where the middle parts of the grid are lighter than the outside parts.
So push the four middle buttons in the grid to light them up, then open the compartment to find a square tile and TV remote.
Screen
Use the remote to turn on the TV, which shows only one clue with a row of colored squares.
Corners
Use the clues from the TV and colored drawers to unlock the tilty picture on the wall.
Referring to the drawers on the first screen, the white, green, purple, green, blue colors appear at the UR LL UL LL LR corners.
So click the ⌝ ⌞⌜⌞⌟ corners of the picture to make it come loose, then flip it over to find a square tile.
Bottoms up
Use the clues from the drinks to unlock the side table on the screen with the picture frames.
Each coaster has a different number of circles. Those with 1, 2, 3, 4 circles are placed beneath cocktails that are red, green, blue, yellow, which are topped with slices of lime, lemon, lime, lemon (i.e. green and yellow fruit.)
Click the buttons
2 1 2 1
3 0 2 1
times, then open the compartment to find a square tile and another remote control, this one for the air-conditioner.
Cool
Surprisingly, the usual way of using this remote control doesn't work.
Instead, double-click on the item to examine it, then click again to make another temperature appear on its display.
Now the room is cooler. But more importantly, you can use the clue from the temperatures shown to unlock the shelf compartment on the screen with the exit door.
The four digits on the controller tell you the order to press the four buttons: 1 appears in the upper right, 2 in the lower left, 3 in the upper left and 4 in the lower right.
So push the ⌝ ⌞⌜⌟ buttons and open the compartment to find the last square tile.
Complete
Use all the square tiles on the grid on the first screen, and now all you have to do is solve a randomized puzzle by rotating the pieces until they align.
(Hint: those thin lines are plant stems, so they tend to run vertically.)
Once you're done with the puzzle, the small compartment beneath opens to reveal a key.
Use that key on the exit to end the game!
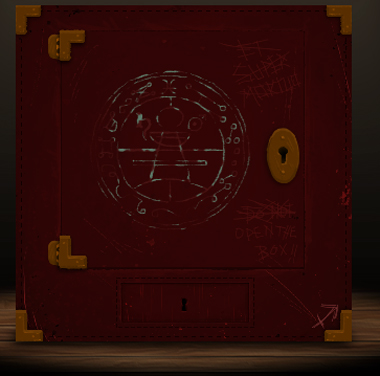
Solomon's Box
Just in case it's not immediately clear, here's your one warning that the game is tagged as Horror. That said, the scare factor in this is more eww than aargh.
Exploration
The bloody note from the first screen is your starting item as you explore the box. It's not very helpful, but you can test out your controls by examining it again to get an extra description of it. Click multiple times, and you'll get multiple descriptions, just like many other things in the game.
Anyway, the large compartment on the front is clearly what you need to (not) open, but both it and the smaller panel below have keyholes. And what's that arrow thing in the bottom right?
Click the left arrow to change to the Left face. (The name appears very briefly when you rotate.) Some text is etched into the box, and you might recognize the symbols on the four buttons and at the top left.
Click the left arrow again to go to the Back face. The arrows between the sliders should make it quite clear what to do, but the middle slider is clearly missing.
Click the left arrow again to go to the Right face… oh it's actually a face! The only parts that respond are the eyelids, and when you open its eyes you find that the left eye (eye on the right) is missing, and there's a small key there instead, which releases a stream of yellow stuff when removed.
Click the up arrow to go to the Top face. Other than a checkered grid beneath a mysterious panel that can't be opened, there's also a symbol at the top right corner.
Unlock
Use the small key you picked up to unlock the bottom compartment on the Front face, then take the lever handle from it.
Descend
Attach the lever onto the Back face, then pull each handle down (slowly).
This retracts the horizontal bars enough for you to reach the eyeball behind. It's just glass, or is it?
Vision
Place the eyeball into the empty eye socket on the Right face, which makes its mouth open up.
Try not to dwell on that yellow-green slime dripping onto the old note in the mouth.
Symbols
The symbols all over the box are zodiac signs. To solve the Left side of the box, you have to figure out which signs go where.
(As an extra hint, the game reminds you that "alchemy is the key".)
The signs etched onto the box should be entered onto the buttons in matching corner positions. For example, Sagittarius appears on the bottom right of the Front face, so it goes on the bottom right button.
This gives the code
♉︎(9) ♌︎(3)
♒︎(6) ♐︎(5)
so click the buttons that many times. Once you've entered it correctly, the buttons stop responding and the compartment beneath opens to reveal some runed stones.
Board
Place the stones onto the board on the Top face, then use the clue from the old note to adjust them.
Simply drag the stones into the positions indicated on the note. (I'm not going to copy the clue here.)
Once done, the panel opens up to reveal a large key.
Ending
Use the golden key to unlock the large sigil panel on the Front side. It will all be over soon…
And the other two.
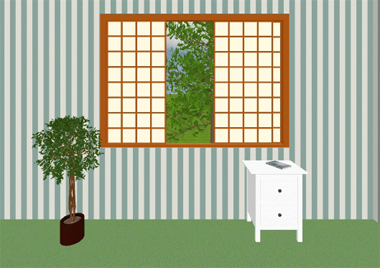
Escape Challenge 91: Room with Sparkler
The new piano music may seem quite somber, but perhaps playing with sparklers will cheer you up.
Exploration
The wooden/paper window in the first screen looks out of place in this modern room. On the left, a potted plant has a colorful sparkler hanging from its left branch. The small side table on the right has two drawers, the top having a three-color lock and the bottom having a three-digit lock covered by three yellow digits.
Turn right. Besides a wall box with four buttons, there's also a giant machine trapping a blue-and-white capsule with a complicated mechanism behind glass, controlled by a row of buttons at the bottom.
Look under the machine to find another capsule containing a key piece.
Turn right to face the locked room door. There's also a clock with weird numbers and no hands, a framed picture with irregular red and white stripes, and another chest of drawers, the top having three heart buttons that actually cycle through digits, and the bottom having three rectangular buttons with the same height but different widths.
Turn right. There's a television screen on the wall, and you can turn it on to watch a video advertising a sparkler. ("On summer nights, words are unnecessary. i-Sparkler, 3 for 100 yen.") Attached to the top of a picnic table, an inverted blue bin has white dots marked on its base.
The corridor on the right leads to the toilet, where you can sit down, look right, look up and then look left to find a small drawing of someone sitting with a lit sparkler.
Stencil
Use the clue from the bottom drawer on the first screen to unlock it.
The yellow parts read 033, so just enter that into the drawer and open it to find a sparkler and key piece.
Painted
Use a clue from sparklers to unlock the top drawer on the first screen.
The straight/lower part of the sparklers is colored (from top to bottom) blue, yellow, red.
So click the buttons 3, 1, 4 times, then open the drawer to find a sparkler, a box of sparklers and a key piece.
Thin
Use the clue from the picture frame beside the door to unlock the bottom drawer beneath it.
Since the buttons are white, you only need to look at the white stripes, which grow from thin to thick and then back.
Push the LCRRCL buttons, and open the drawer to find another sparkler and key piece.
Love
Use the clue from the sparkler ad to unlock the top drawer on the screen with the door.
The last three sparks that fly off are curved with symbols over them. Translating the roman numerals, you find that the code is 1, Heart, 2.
So click the left button once and the right button twice, then open the drawer to find another sparkler and key piece.
Lines
Experiment with the large machine until you can solve its puzzle.
So first, you notice that the four circular buttons make water or fire appear above them, except for the third one that's stuck on fire. The triangular button launches the sparkler along the tracks, where water and fire attach to it, and at the end the sparkler resets.
Each time the sparkler dips into fire, it loses a section. It's also not surprising that water removes fire and fire removes water.
Also, it looks like the red button controls the red barrier, but you can't hit it.
The yellow triangles on the left look like they fit something. Getting fire to the correct height doesn't do anything, so what about water?
The fire that's already there will remove water that comes before or after it, so you need to use water at least twice. On the other hand, you can't let the sparkler burn too much, so you can't start with fire.
Click the right and left buttons twice each (water), and then launch the sparkler. The water eventually pulls down the triangular markers, bringing the red button down slightly.
Now launching the sparkler in any state will hit the red button and remove the barrier. However, the capsule refuses to budge. It just needs another little push.
This time, you need to deliver something to the capsule's height, which means a lot of burning is required.
Make each button display fire by clicking them once! Once launched, the burning sparkler releases its spark onto the capsule, knocking it into the bottom hole, and you get the last key piece.
You're all ready to leave, but there are more optional things to do.
Diamond
Use the clue from the framed picture to do something to the blue bin.
The digits from 1 to 6 appear on the URDLLR sides, so click the white dots in those positions.
After much wobbling the blue bin comes off… and you take the picnic table from under it!
Backdoor
Place the table under the window, and now you can climb out.
This area appears to be walled in by hedges (unlike previous games where you mysteriously couldn't leave even though you were outside), and there's a wooden crate conveniently placed to allow you to climb back in. Also, the concrete area on the right has another box of sparklers between the candle and bucket.
Light
You can select the sparkler box on the ground and use it on the candle to start a small show.
Or, you can use the box you picked up earlier on the candle, with slightly different effects.
Which version gives you the clue for the wall box?
The sparklers you picked up end their combustion with a rapid sequence of sparks flying towards the ↗↙↖↘↗ directions.
So push the ⌝ ⌞⌜⌟⌝ buttons on the wall box and open it to find a sparkler.
Escape
Now that you've collected everything, open the room door and leave.
Item list
6 key pieces:
Top left: in bottom drawer under window
Top middle: in top drawer under window
Top right: in top drawer under clock
Bottom left: in bottom drawer under clock
Bottom middle: from large machine
Bottom right: under large machine
6 sparklers:
On potted plant
In bottom drawer under window
In top drawer under window
In bottom drawer under clock
In top drawer under clock
In wall box
The box (in top drawer under window) does not count towards the end screen.
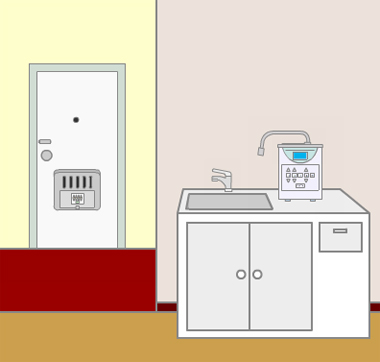
Find the Escape-Men 203: Typhoon 2
Once again, the forces of nature are ruining your mood by stranding you indoors. But with the experience and power of ten green men, you can strike back.
Exploration
Let's start with the kitchen sink, which has a working tap. It has a drawer with a can opener inside, the cabinet under the sink contains a tin can, and the water purifier on the sink counter has a five-letter lock with two of the letters already filled in. As you might expect, the door on the left is too dangerous to open, but you can still look out of the peephole as well as check out the four-digit lock on the mail slot.
As you stare out the peephole, lightning strikes loudly all over the sky.
While looking at the door, click to the left side to find a clue hanging on the wall, or to the right side to find a shoe rack with five pairs of colored shoes.
Turn right to find a green picture with a confident guy (you can't pick up), hanging over a couch that hides an Escape-Man beneath its right cushion.
Turn right to face sliding glass doors which don't stop rattling. The rain doll hanging at the top left doesn't seem to be helping.
But click it nine times, and an Escape-Man falls out.
Click the brown area at the bottom of the screen. It's a table with a radio, but the static it spews out might as well be baby talk.
Under the table, you find a remote control. You can flip it over but not open it up.
Back out and turn right. The television here is turned off, and it sits on an empty shelf, on the left of which is a safe with a keypad and a four-digit display.
Canned
Use the can opener to open up the can, and you'll find a green bottle inside.
The can opener hasn't been marked as used, so see if you can do something else with it.
Clicking around on the can opener, you'll find that it doubles, no, triples as a corkscrew and knife.
Bottled
In corkscrew form (click the middle of the tool) you can use it to open the bottle. It's… empty?
Check the corkscrew again to retrieve the green cork from it. The bottom of the cork has an outline of a man.
Dashed
The outline on the green cork is a dashed line, as if all you need to do is to cut it out.
You can do that! Change the corkscrew into a knife (clicking the right end) and then use it on the cork to cut out the shape of an Escape-Man.
(Once you collect the Escape-Man from the cutout, all of the items involved get grayed out.)
Lace
Use the clue to the left of the door to solve the puzzle on the right of the door.
On the shoe rack, the top pairs of shoes are red, blue, yellow, and the bottom pairs are green and white.
To keep things simple, I'll number the shoes from left to right (red, green, blue, white, yellow), with the left red shoe being 1 and the right yellow shoe being 10.
Then the instructions on the clue (in order of the arrow, BL GR RL WL YR YL GR GR RR) indicate, by color and side, the shoes in the 5, 4, 1, 7, 10, 9, 4, 4, 2 positions, which you have to click. Since GR appears twice consecutively, you'll have to pick up that shoe and then put it down before continuing.
At the end of that sequence, the right red shoe is lifted and you'll find an Escape-Man beneath.
Blink
Use the clue you saw through the peephole to unlock the panel on the door.
The lightning forms the digits 5372, so enter that in the panel. After opening it up, you find an Escape-Man and a neatly wrapped newspaper.
The newspaper appears blank, but if you unfold it and wait long enough, another Escape-Man slowly appears and fades away in the top left.
Keyword
Use a clue in the room to unlock the water purifier.
The framed picture points in the right direction, both literally and figuratively, while handing you the solution as the giant word written in capital letters.
Enter GREEN into the device to activate it.
Then click the blue area to make it dispense a drop of water. It may not be clean, but it certainly is green enough to be an Escape-Man.
View
Use the remote control you found to turn on the TV.
The visualization is great, but the weatherman's comments seem a bit subtle.
To enlarge the speech bubble, he needs to speak louder. (This metaphor makes a bit more sense in Japanese.)
So click the up button on the remote control to raise the volume up to 11.
Now even the period ending his sentence is huge enough that you can see that it's green. Of course, it's another Escape-Man.
Nonsense
If you try out the four-digit safe, you'll find that entering a wrong code produces an unusual error message.
But ABOG is four letters, and you need a four-digit code, so where's the missing connection between them?
Those letters seem to appear a lot in the "words" emitted from the radio.
Counting the number of times the letters A, B, O, G appear, you get the code 6246.
So enter that into the keypad, push the ENTER button and then open the safe to find an Escape-Man and a roll of duct tape.
Reinforce
Use the duct tape to seal the shaky windows. No more howling wind!
Check the used duct tape to find the last Escape-Man on the back.
Complete
The chime indicates that you've found all 10 Escape-Men:
Under right couch cushion
From doll
From cork
Under shoe
In mail slot
On newspaper
From water purifier
On TV
In safe
On tape
They transform into an orb with a wedge missing… wait, what?
Remedy
Since you still have the remote, use it to turn the TV on again, and use the weird green thing on it.
All signs point to the typhoon being gone, so open the door to end the game.
Update