
 Hi, welcome to the new Weekday Escape!
Amajeto locks you in a hotel room, and wants you to find eight tiles here. You surely find them, escape the hotel, have a short amnesia, and wake up in sinister Javelin Ltd.'s room not knowing what's going on and wishing to be somewhere else. Anywhere. That's not a problem (after you solve few puzzles), but you end up in another dark place, fortunately not so filthy, where are hidden ten golden coins - yes it's Dassyutu's game. The last escape is from luxurious Neat Escape's camper. Nice.
Have a good time and enjoy!
You find yourself in a hotel room without any bed and without a key - and you are supposed to solve several puzzles and find missing tiles for the final one. Amajeto tries to trick you again, successfully, in my case - how about you, can you escape?
The cursor is not changing, no save button, one ending.
P.S. Here is one older red hotel (haven't found a blue one), Amajeto Hotel: Tea Time.
Atmospheric Javelin Ltd.'s game is very good in any aspect; smooth-running, realistic graphics, fitting music, quality puzzles, and even choice from three languages at the beginning. However, it's not long, and one may ask why authors have put so much effort in it. It's simple, it's demo only, for the full version see note below. But it's also perfect midddle-sized escape game with clear goal (discovering the code from exit door) and clear ending (leaving through the exit door). The only puzzling thing is the timer which you may lightheartedly ignore as you aren't punished for running out of time.
The cursor is not changing, autosave, one ending.
The game (full version) is available for Andoid and iOS too.
Dassyutu's delivered new game quite soon - it's only two weeks from the last one - and again, you are trapped in windowless room with coded door and ten coins scattered there. The white cat sharing your prison isn't a statue, just sits likewise in front of the cupboard and prevents you from proper exploring, and you know you need to look everywhere, check every dark corner, every shelf and every drawer. It's not just coins you are looking for, some items are well hidden too. So, can you get rid of the cat somehow? Can you escape?
The cursor is not changing, save button, one ending.
For players who don't read titles and then wonder, why is the Neat Escape's room so narrow - you're trapped in a camper or a recreational vehicle, luxurious one (the bathroom!), clean and polished. Puzzles are clever and many; don't forget to use the save button as you may use one key in two locks, and get two different endings. Both are good.
The cursor is not changing, save button plus autosave, two endings.
The game is available for Android.
P.S. Here is Escape from the Camper - Remake, and here the original, Escape from the Camper.
We love escape games, and our readers love talking about them and sharing hints! How about you? Let us know what you think, ask for clues, or help out other players in the comments below.


thanks! :)
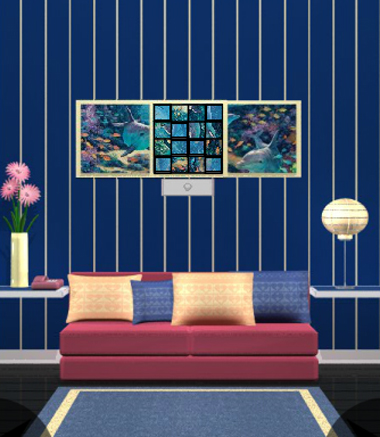
Blue Hotel Room
A classic color paired with a classic theme!
Exploration
You start off facing a couch with two colors of cushions. Above it, three pictures seem to form a pattern but the middle one is somehow broken. On the left, you can pick up a square tile from the telephone.
You can also click the corners of the right picture to tilt it.
Turn left to face some windows above a smaller chair with similar cushions. This time, you can lift the larger cushion to find a square tile. On the right, there's a clock that you can zoom in on. What mysteries does it hold?
Turn left to find a wall with lots of stars spread across it, as well as a television screen that's currently turned off. Under the TV, there are some books you can look at. Well, just the spines of the books, which are different colors and have numbers on some of them. The four compartments around them have a lock with a grid of buttons, a lock with two yellow buttons arranged vertically, a four-letter lock and a four-shape lock with its buttons in different shades of gray.
Turn left to face a locked door. On the left, you can look through an opening to see a window with a flower vase… wait, it's just a mirror image of the opposite wall! What you're looking at is a tall mirror flanked by striped doors, with a four-digit lock on the left one.
Timely
Pushing any button on the clock makes it momentarily switch to a different time, but as you experiment with it you find that holding it longer causes even more changes to occur.
So use that clue to unlock the left door beside the mirror.
When you hold down the buttons, each of the four times that show up is displayed with three zeros and one nonzero digit.
Ignoring the digit positions and focusing on their face values, the sequence of nonzero digits combine to give the code 1328. Enter that into the lock and open the door to find a square tile at the bottom right of a clue with four grayish shapes.
Gradient
Use the shape clue you just found to unlock the fourth compartment under the TV.
From lightest to darkest, the shapes are: star, pentagon, heart, circle.
Click the buttons 1, 5, 3, 0 times, then open the compartment to find a square tile and a clue with a small checkered grid labeled 4.
Shine
Use the clue from the wall around the TV to unlock the second compartment from the left there.
The white vertical lines divide the wall into five columns. Each column has exactly one star filled in, at the top, bottom, bottom, top, top.
So click the UDDUU buttons and open the compartment to find a remote control, square tile and grid clue.
Screen
Use the remote to turn on the TV, which displays some symbols above a number.
Use it on the TV again to switch to a clue with colored letters.
Use it on the TV again to switch to a clue with a grid of numbered boxes.
Call
The first TV clue appears to show a phone number, but the game absolutely refuses to let you use the phone. Perhaps you also need to consider the square shape in the clue.
On the phone keypad, the digits in the clue form a square shape at the corners.
This means you need to click the ⌞⌝⌝ ⌜⌟ corners of the tilty picture! When you do so, it comes loose and you can flip it over to find a square tile and a number clue.
Spell
The second TV clue has colored letters, and the colors match those on the books below, so use those clues to unlock the third compartment.
The books numbered 1 to 4 are orange, green, purple, blue, and the letters of those colors spell LOXY.
Enter that in the lock (thankfully, you don't have to go through the entire alphabet to get to X and Y!) and open the compartment to find a square tile and another grid clue.
Grid
Use the grid clues (including the third TV clue) to unlock the remaining compartment.
Putting together the numbered grids according to the TV clue, you get the pattern
- B B -

- B B -

B - - B

- B B -
where the squares marked B are shaded.
Awkwardly, it's not the white square you need to mark but the shaded squares. Click each button in the middle two columns and the third row (but not where they overlap), then open the compartment to find the last square tile.
Complete
Use all eight square tiles in the middle picture. It's slightly more complete, and now all you have to do in this randomized puzzle is to fix the picture by rotating the tiles until they align.
Once you're done, you get a gold key. Use it to open the door and escape!
Spotlight: Room Escape (demo)
What exactly are you escaping from?
Exploration
After the tutorial section where you pick up a hairpin and use it to open the drawer, you're free to explore!
But first, you may have seen that big red display above the door. Yes, it's a timer that's been ticking all this while. Since I can't know how far you'll get in 10 minutes, I'll just say that
when the time comes, how you handle it won't matter
and I'll return to it at the end.
(Since red herrings are part of the experience, I'll describe them as usual.)
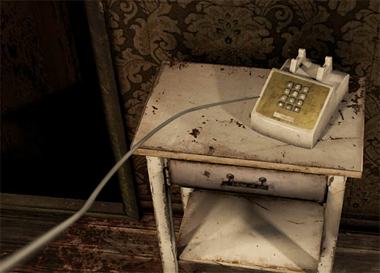
In addition to taking the knife in the drawer, you can try to use the phone, but it doesn't respond. (Back out.) Still ignoring the timer over the metal door, look at its keypad which is actually a grid of nine letter buttons that change when clicked. Some sepia-toned photos cover the wall, up until the left door which is missing something that you need to open it. Which is just as well, because that stain on the floor does not look comforting. The last object on this screen is the fridge, which is frozen shut.
Turn right to find a barred window with a rugged curtain (not tough nor bristly, but messy and torn). After checking the left door (also missing something), the nice lamp attached to the ceiling fan, and more wall pictures, you finally get to the stuff on the floor: a red toolbox with a lock consisting of five concentric rings and discs marked with letters and numbers, a wooden handle between it and the bed, and a cardboard box that's taped shut.
You can't turn any further right, so turn left twice instead. The window on this side has its blinds in worse condition, but you still can't get through the bars. To its left, the wall cupboards hold various kitchen supplies as well as a flashlight. Under that, you find a still-warm oven surrounded by cabinets that hide a four-digit safe on the left and a battery on the right (in the drawer). Look at the table on the left to find some stuff that you don't like, as well as a fragment of glass with something drawn on it.
The last spot is extra tricky: back out to face the oven again, and then click above and below the arrow at the right edge of the screen. On top, you find more dish cupboards with another fragment in the larger one. Below, you find an empty cupboard, a full trashcan and an icky sink.
(That's a total of six items. You can scroll the inventory by dragging it to reach the newer/older items.)
Unpack
Use the knife to cut open the cardboard box, and take the door handle from it.
Then use that handle to fix and open the right door. (It won't fit in the left.)
Exploration 2
There's no turning around in this narrow room, so all there is is the smashed mirror with some text still visible on it, the plunger next to the empty bathtub, and the air vent that helps keep the air fresh.
Drain
The plunger is useful for removing water… from the sink to the right of the oven, leaving a golden key.
Use that key to open the left door.
Exploration 3
There's a surprising lack of blood in this room. Instead, the wallpaper (and skirting) ends abruptly where the left wall gets entirely covered in white paint. There are some busted shelves and a few more photos which you somehow feel a connection with. The last photo is a little blurry, and you can shift it aside to find a fragment.
Turn left to find a standing lamp without a bulb, a row of lockers, an open cardboard box of junk, and another fragment in the corner. The left locker can't be opened because something is missing.
Turn right twice to find a small study desk with a comfortable-looking chair. Among the stuff on the desk you see a conspicuously blank notebook. The desk lamp has no power, and its wire connection to the power box is missing a section.
Piece
Place all four fragments into the mirror, and their symbols line up to form a code.
Enter that code (WE64A) in the toolbox lock by dragging the rings to rotate them.
Once it appears from the center to the right edge, the box automatically opens up and you can take the short wire and screwdriver from inside.
Unscrew
Use the screwdriver to remove the grate from the air vent in the bathroom. Beside the fan, you find a small key.
Use this small key to unlock the locker in the other room, where you find an axe blade.
Chop
Attach the axe blade to the handle (no need to examine them, just click one and then the other in your inventory), and then use that axe to break down the white wall.
There's clearly a space behind, but you can't see anything interesting.
Perhaps the room light is too dim. Thankfully, you have a flashlight you can use to improve the lighting! But first, you need to put the battery in it.
Once you've powered up the flashlight and used it on the hole, a clue appears in red paint. (Best not to ask why the wallpaper background is full of Latin text.)
Connect
Use the wire to fix the power supply at the desk. Now you can access the power box, which has a bunch of numbered modules and colored wires.
Despite the warning written at the top, these things are perfectly safe to touch. But where should you touch them?
Click the small numbers to select that end of the wire, then click the large numbers to attach those wires there. (And click the numbers again to disconnect the wires.)
It's not that simple though: there are additional conditions you need to fulfill.
Each large number should be the sum of the small numbers it's connected to. If you take the time to work out the math, you'll find that all nine wires must be used, and:
Based on whether the sums are even or odd, you can deduce that 2 is connected to 38.
Of the remaining numbers, exactly three of them (11, 23, 17) are 1 less than a multiple of 6 and the others 1 greater. Those three numbers must all be connected to different terminals.
25 is either 11+7+7 or 1+7+17.
If it's 1+7+17, then 37 cannot be connected to 23, which means 38 is 2+23+13.
If it's 11+7+7, then 37 includes 1, and the remaining four numbers add up to two pairs of 36.
Long story short, there are essentially three possible solutions, and you can enter one of them as follows:
Attach 2, 23, 13 to 38.
Attach 1, 7, 17 to 25.
Attach the others to 37.
Once you're done, the lamp turns on to reveal a clue on the notebook.
Four
Use the clues from the white wall and the notebook to unlock the safe in the cupboard to the left of the oven.
Translate the clue from the notebook (AMDG) using the code on the wall. (This puzzle seems to be randomized so I can't say for sure, but if you see an extra-faded digit it's a 9.)
Once you enter the resulting four-digit code into the safe, it opens up and you find a note with a grid of letters.
Grid
Enter the code from the letter grid into the metal door, being careful not to mess up U and V:
KUR

OIT

VAS
Once you're done, it opens and you find yourself in the stairway.
Final
Okay now, remember when the timer went off, and the phone rang? (I'll assume you haven't just played the entire game at pace.)
If you answered the phone, you might be expecting someone to be on the staircase right now. Perhaps he's even been watching you struggle through the puzzles on those cameras. But there's no sign of him at all, and he's politely left the front door ajar!
Leave through it to end the game. No more pressure, no more fear.
Even if you've beat the timer or avoided picking up the phone, you still get the same ending, which may make the entire timer thing seem pointless.
But as I see it, the 10-minute time limit is really hard to achieve on the first playthrough, which means it's intended for players to fail it. Both the timer and the phone call are lies, but they fit seamlessly into the unsettling atmosphere of the game, which is a stroke of genius in the game design.
Room Escape 31
This impractically dark room sets a serious tone that's immediately broken by the title written in Comic Sans.
Exploration
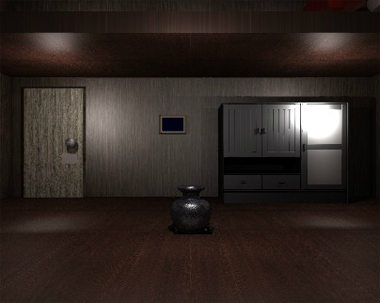
A round urn in a square hole catches your eye immediately. On the wall behind, there's a door with a four-digit lock, a blank picture frame, and a set of cupboards. Searching them, you find a set of glasses in the top-left doors, a lever in the drawers, and a plain sheet in the right door. The entire wall is squeezed by the low ceiling, and you can see a bit of the floor above with no way of getting to it.
Click the left and right edges of the cupboards to look beside them on the floor, where there's a coin and a PET bottle.
Turn right to find a really upset cat perched in front of some cupboards or large drawers; you can reach into the top ones to find a bag of powder and what the game claims is a battery but is actually two. (Okay, under the original definition of "battery" the two cells form one when they're connected, but anyway.) The picture frame here is also blank.
The floor directly under the frame also has a coin.
Turn right. You see a board (actually several wooden planks) on the left, yet another blank frame, a table with a machine, and a bowl of water that hides a coin. The machine seems to fit four round objects, but it's not clear how to activate it.
To the left of the machine is a hole for batteries. On top of the machine, you find a coin.
Under the table, you find a compass. Clicking on the left side of the table also reveals a coin.
Turn right to find a mirror with description text in Japanese ("it's dirty."), another blank frame, a mysterious piece of wooden furniture (with a small round hole over a password panel over an empty space with a hook), and something that looks like a camera pointed towards the opposite wall.
Pick up a coin from the left of the wooden furniture and a spanner from on top of it.
Even with your best pixel-hunting skills, that's only a total of 6 coins. Let's move on.
Higher / Exploration 2
Use the spanner on the board parts to assemble them into a ladder. (Video game logic!)
Then place that ladder in front of the main door and climb up.
Translucent squares highlight the pulley (without rope) attached to the ceiling and what looks like a chain attached to the ceiling light. Under the light, there are some black cabinets with a coin hidden in the lower-left one, a dustcloth in the upper-right, and a four-digit lock on the lower-right drawer.
Click to the right of that cabinet to find a long wooden rod.
There's also something red on the right, which turns out to be a box that's missing a lever. The right side of the screen is highlighted, and it brings you to a narrow beam that ends abruptly, with something attached to the ceiling at the opposite corner.
Switch
Since you have the lever, put it on the red box. You can't pull it, but when you try to you find a coin hidden behind.
The beam is now longer, allowing you to pick up the white box at the end and the coin hidden under it. The white box has a four-shape lock, so you'll just have to carry it around until you find the code.
A mysterious blue glow remains after you take both items.
Reach
You can't reach into the ceiling light, probably because it's too dangerous to touch.
But you can add the hook to the rod, then use it on the light to shut it off. A four-digit code appears over the still-glowing light.
Enter that code (1432) in the drawer nearby to open it and find a smartphone.
Remote
Use the smartphone on the "camera" on the mirror screen, which rotates upwards to project a bright spot on the ceiling.
Oh, it's a lamp!
Place the sheet in front of the bright spot, which makes the projected word appear clearly.
But if there isn't actually a camera, this must be a code for something.
Type the projected word (CAMERA) into the wooden furniture beside the mirror, and open that panel to find a thick coiled rope.
Lift
Attach the rope to the pulley upstairs, which automatically connects it to the urn and moves it.
In the square hole where the urn was, you see a safe with four color buttons.
Click the side of the safe closest to you to find a coin wedged in the gap.
Dispense
You can place the glasses in the dispenser, then add the water and powder to them to make bright colors.
However, that doesn't give the correct code for the safe.
Also insert the batteries into the compartment on the side of the machine.
This makes the glasses swap around to give you the correct code.
To enter that sequence (red blue yellow green) into the safe, you need to push the 3rd, 1st, 4th, 2nd buttons (from the left).
Once you do so, the safe opens and you find some cat food that looks like popcorn.
Feed
Use the cat food on the bowl to feed the cat (I don't know what happens to the water).
With the cat gone from its original position, you can finally access the bottom-left drawer there, which has a lock with arrows on its buttons.
Clean
Use the dustcloth to clean up the mirror, revealing a sequence of four arrows.
Then push those arrows (↑←←↓) on the drawer you just found to open it. Inside, there's a pair of futuristic sunglasses.
Vision
Use the glasses to find a hidden clue in each blank frame.
Also climb back up to the extended beam, and use the glasses on the bright spot at the end to view a clue. (This particular one can be done even if you don't have the glasses, just selecting the inventory spot is enough.)
Then use those clues (and that from the compass) to unlock the box in your inventory.
As the compass tells you, the north side is the one with the door, which means to look at the NWSE walls you need to turn counterclockwise (left).
The symbols on those frames are Circle Triangle Star Square, so push the 1st, 3rd, 2nd, 4th buttons to open the box. It's empty except for a four-digit code painted on the bottom.
Enter that code (2231) into the door to open it and leave!
Coin list
To left of cupboards (screen with door)
To right of cupboards (screen with cat)
In/around bowl of water
On dispenser
Under/left of table
To left of wooden tower (screen with mirror)
Upstairs, in lower left of black cabinet
Behind red box
Under white box (ceiling compartment)
Wedged against safe in floor
Escape From the Camper 2
To repeat the story from the first games (which you should definitely play, after this one): you wake up on a camping trip to find yourself locked in your own (rented) camper.
Exploration
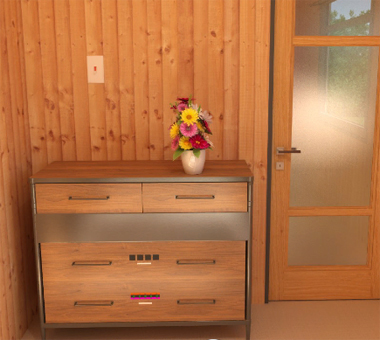
You start off facing a locked door and a chest of drawers. The top-left drawer is empty, while the top-right drawer doesn't open. The second-bottom drawer has a four-button lock, while the bottom drawer has a five-slider lock with colored stripes. The vase on top looks suspicious, and you shift it aside to find a small hole with a hexagonal bolt. On the wall above, you see a locked panel and a switch that refuses to stay on.
Turn around (using the arrow at the bottom) to find another locked door next to the bed you just woke up in. How did you not notice the nut socket hidden under the pillows and the tablet under the blanket? Speaking of which, oooh it's an escape game!
Minigame
Start the game on the tablet, and you see a mess of stone textures, with no navigation options. Clicking stuff doesn't do much either, but you can drag the rough textures in the middle to move them!
The physics of 2-dimensional blocks makes it hard to stack them out of the way. It's possible but unnecessary, as you can just drag the blocks far away, even out of the main window, to get rid of them.
This leaves a sledgehammer that appears in the tiny inventory when picked up, which you can use to remove each brick section of the door.
Once you're done, click the doorway to win!
Stripes
After enjoying your virtual parfait, let's return to reality! The patterns around the congratulations screen match those on the bottom drawer.
And the green dots are on the DUUDU sides, so drag the sliders into the corresponding stripes, and push OK. (Make sure the sliders are all the way to the end.)
The drawer opens and you find a ratchet wrench.
Unbolt
Attach the socket to the wrench, then remove the bolt hidden under the vase.
Now you can open the top-right drawer to find a red key.
Unlock (red) / Exploration 2
Use the red key to unlock the door beside the bed, which opens into a bathroom that seems a little wider than the bedroom you were in.
The full bathtub is full of water and has a small round hole on the wall side. Directly above it, there are some soap bottles where the right one hides a plus socket, as well as a bright green towel that hides a code.
The toilet bowl is held down by a four-digit box. Above it, there's a mess of squares with black-and-white markings.
Alignment
You can drag each of the black-and-white pieces above the toilet bowl to rotate them, or drag the background to rotate all the pieces. What's the secret?
The digit code is drawn with lines of equal thickness, which means that the thin strokes along the edges of each piece must match up in pairs along the middle line.
The result is rather hard to read by itself, so you can either try to deduce it by considering tall rectangles with black rectangles of the correct sizes removed, or you can use the fact that the entire pattern is four tiles wide to deduce that the dividing vertical lines must be in the middle of the squares.
The code is 5497, so enter that in the box and open it to find a round cap.
Button
Place the cap on the hole at the end of the bathtub, where it forms a button you can push down.
This drains the tub, revealing a yellow key at the bottom.
Unlock (yellow) / Exploration 3
Use the yellow key to unlock the door on the first screen (beside the drawers), which opens up to a cozy living room.
The television is turned off and on the side walls are framed clues with square grids and colored edges. Under the TV, there's a wooden box with screws at its corners.
Turn around to face the way back. There's a lot of stuff here, so let's start with the table beside the window on the left, which has a four-button box with a green star and furniture symbols on the buttons, a coffee cup with a battery in it, a laptop you can't use, and a box with a white square outlined in four colors that gets covered in smaller red squares wherever you click it.
On the opposite wall is the kitchen area, with very few items of interest. You see a box with a hexagon on its front, but on closer look it turns out to be an octagon divided into triangular buttons. Zooming in on the area under the sink, you find that the pot holds another battery and the white jar hides a padlock behind it that (based on recent experience) probably holds the drawer shut.
Instead of going through the door, click just to the right of it to reveal the main entryway. You can't leave yet, but you can take the umbrella from the door and look at the locked panel at the bottom left.
Fan
Use the clue from the umbrella to unlock the box on the kitchen counter.
There's one triangle you can't adjust, and it's bordered by two white lines.
So find the red triangle on the umbrella that's bordered by two white spokes. The other red triangles are 1, 3 and 5 away from it in the clockwise direction.
So click the corresponding wedges on the box. (On a normal clock, those wedges would contain the numbers 11, 2 and 5.) Inside the box, you find a special lens.
Quarter
Use the clues on the walls beside the TV to unlock the box at the right of the table beside the window.
Comparing the colored edges on the frames and box, you find that every frame other than yellow is upside-down.
Rotating the patterns accordingly and putting them together gives the following grid:
- R - R

- - R -

R R - -

- R R R
Click those buttons and open the box to find a silver key.
Unlock (silver)
Use the silver key to unlock the padlock hidden behind the white jar.
Then open the drawer to find a fuse.
Unscrew
Attach the plus-shaped socket to the wrench (removing the previous socket in the process), and use it to remove the screws on the box under the TV.
Inside it, there's a box with a green star and two red sliders that control numbered images of furniture.
Catalog
Use the clues from the bathroom and box under the TV to unlock the box on the left of the table beside the window.
The green star code from the bathroom is 3718, and being very careful to avoid mix-ups, you move the sliders to find the matching numbered furniture:
3: Couch facing right with long thin legs
7: Bunk bed with vertical ladder at end
1: Alarm clock
8: Bed facing front with curved metal frame.
Click the buttons 4, 9, 5, 8 times, then open the box to find a TV remote.
Display
Insert the batteries in the back of the remote, then use it to turn on the TV.
Hmm, this mess of gray squares isn't very helpful at all.
Use the special lens on the TV while it's on to view a different clue with squares marching up the screen. Where can you use that clue?
The squares appear at four different horizontal positions, so it's a clue for the remaining drawer in the first room.
Push the 2nd, 4th, 2nd, 3rd, 1st, 4th buttons on that drawer, then open it to find a blue key.
Unlock (blue) / Normal Ending
Save your game, then use the blue key to unlock the panel beside the main door.
It's an emergency escape button, but just pushing it doesn't work.
Place the fuse in the hole above the button, then push it.
The side and back walls fall out from the vehicle! You're no longer trapped, but the rest of this camping trip might not be very good.
Unlock (blue)
Return to the title screen and make sure you click Load Game. This time, use the blue key to unlock the wall panel on the starting screen. Inside, there's two wire ends meeting at a rectangular hole.
After you place the fuse there, you can now flip the switch below.
The bed rises up, and under it you find a wooden trapdoor, a long metal lever that controls it, and two protrusions with holes attached to the floor.
Bar
You'd be free if you could just stop this lever from springing back into its original position!
Close the umbrella and place it across the holes, holding the lever down.
In the trapdoor, you find a box with five roman numeral buttons, and two letters embossed on the side walls.
Review
Those letters spell out TV, so go back to the other room and turn the TV back on. Great, it shows roman numerals!
Except of course that's the wrong code; you need to use the special lens on the TV to view the correct code.
Now that code appears as ⅦⅣⅨⅧⅥ, but you can tell which letter belongs to which number by considering the first five groups of letters that appear and then the other five groups.
To enter the code 74986, click the buttons 6, 3, 8, 7, 5 times. Inside the box, you find a big red push button.
Food Ending
Push that red button, and you hear/see the door unlock, which means you can just leave through it!
You finally get to enjoy your breakfast (presumably right outside the camper, even if the music leads in a different direction).
I can't get the neat escape game to run. I'm using the latest firefox on windows 7. I was told it was a lack of unity support but I tried some nicolet and den of the kamo games and they worked fine?
small problem on Escape from the Camper 2
even after checking all the clues i'm supposed to put the pie slices in certain colors. after following the walkthrough on what to do, you said I follow it like a clock byt I tried that but got nowhere. cam you post a link to a screenshot to that part? appreciate it.
It should be enough to just have the item.
Screenshot for that part.
Update