
 Welcome, it's time for a break - the Weekday Escape is here!
Again, we start with two Nicolet's tiny cubes, both lovely and overall enjoyable with their slick visuals and well-worked out puzzles. Dasyutu then introduces escape in classical style - basic graphics and focus on logic. After long pause we can help to three cats in their mission (or the other way around) - Chokochai is back, as adorable as always!
Have a good time and enjoy!
You wouldn't call the Nicolet's cube design exciting or even brave, just clean and simple. But for attentive and experienced escapist the room seems promising right from the beginning - there are two doors! And yes, the estimate is correst, the game's bigger than you might expect and than their earlier works. Many puzzles and much fun!
The cursor is not changing, autosave, one ending.
The game is available for Android too.
Lucky us! Two Nicolet's cubes arrived this week and this one is as good as the first. The game reminds of early Neutral (e.g. Switch), but it's definitely not a copy, very well stands on its own. So, can you make the cute toy train work? If so, does it deliver anything from the mysterious tunnel or just disappears? Just start, you'll see.
The cursor is not changing, autosave, one ending.
The game is available for Android too.
P.S. Talking about mysterious tunnels, here is T2B Escape 2, which is definitely worth your attention. We got only four games from T2B - and all four are very good! A bit of pixelhunt, true, but good.
Dasyutu's game starts with skippable introduction in Japanese. Unless you understand Japanese, click any of green bars, then click 'skip' button and then the left blue one. You're in. Trapped in the room with few devices and without exit door, and the only chance to leave is to figure out how the devices work and enter correct codes. Will you escape?
The cursor is not changing, save button, two endings.
Few years ago Chokochai's three cats helped their 'mum' to find a ticket for a concert (Wanna Go to the Concert! Part 1- no I don't know what happened to the Part 2 and Part 3) and succeeded. Lets leave aside how one can lose anything in such a tidy and almost empty apartment, and look around. Well the room haven't changed much in last four years! Only the kitchenette is non-identical, seems bigger. However, puzzles are completely different. Notice, that the cats are in your inventory and therefore you can - you have to - use them. Don't forget to choose the language - Japanese or Engrish (sic) at the beginning.
The cursor is not changing, autosave, two endings. The game loads very, very slowly.
The game is available for Android too.
We love escape games, and our readers love talking about them and sharing hints! How about you? Let us know what you think, ask for clues, or help out other players in the comments below.


I agree Color Room: Pink feels alot like the older Neutral games. The puzzles are tricky enough that it felt satisfying to complete.
Just to clear things up:
The second Nicolet game up there is called Toys,
Color Room: Pink is an Amajeto game, and
you can find the T2B games under its tag.
Yes. My comment is about Toys. I was just copying the name from the mis-title up there.
Thank you. This is exactly what I meant to write.
My Bad: it's fixed now :)
Loved 'Toys', simple straightforward and satisfying!
This week, I'm trying out a change/return in format: puzzles with hints and codes get them in nested spoilers. (Currently, the other main things I use them for are pixel-hunt spots and translations.) Please give feedback if this causes any confusion.
Plain Room
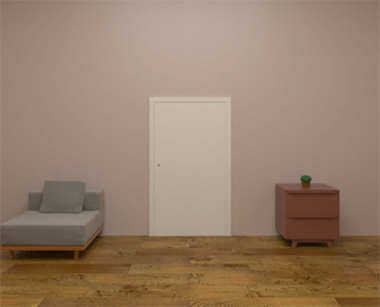
Now that you're out of the tiny cubes, you find yourself in a (tiny) simple room.
Exploration
(Remember, I'm simplifying the color names just enough to keep puzzle answers manageable.)
This time, the first screen with the locked door only has a stool next to it with a folded note showing some animals in shapes. Click the stool to view it from the back; something looks unusual about it.
Turn right to find a cupboard with three drawers and a cactus on top. The drawers are locked and have keyholes that are red, yellow and blue. On the left, you can look in the bin to find some kind of handle.
Turn right to face another door without a doorknob. There's a bed on the left, but all you can do is shift it aside to find a wall panel with large screws. On the right, a chest of drawers has a smaller cactus, and you can look in its top drawer to find a red key. The bottom drawer has a three-digit lock with different shapes on each digit.
Turn right to face a wall with three simplistic paintings hung up, if you can even call them that. Each painting has three colored animals in different sizes, and the rightmost one has push pins on its corners. The stylish wooden table has a glass jar/bottle surrounded by colored chairs, and after taking the jar you can look at the table from above to find an arrow clue.
Red drawer
Use the red key to unlock the left drawer. Inside, you find a box with four colored buttons.
So use the clue from the table to unlock that box.
Follow the arrow (clockwise from top left) to get the order of colors around the outside:
Green Yellow Pink Blue
(3, 2, 1, 4 clicks)
Open the box to find a screwdriver and a red marking on the bottom of the drawer.
Unscrew
Use the screwdriver to remove the panel behind the bed. Inside, you find a really small wooden block.
Numbers
Use the clues from the note and paintings to unlock the bottom drawer.
Hint: The digit in the hexagon needs to represent both dogs.
Since some animals appear multiple times with different colors, the only reasonable way to assign a number to them is to count:
Square ⇒ 1 cow
Circle ⇒ 1 rabbit
Hexagon ⇒ 2 dogs
Enter 112 in the drawer.
Open the drawer to find a hacksaw.
Woodwork
The stool beside the door has four legs, so you can saw off the stool leg at the back. Now you can see that there's a square hole in the leg.
Attach the wooden piece to the leg, and then place it on the door to become its handle, and now you can open it.
Exploration 2
Under the narrow window, something is covered with a pink sheet that's tied down.
Turn right. The table here has a box with five buttons that show corner symbols, as well as a teapot and four teacups on saucers. Each teacup has a gray dot in it, and you can flip over the saucers to find more symbols. On the left, you see another wall compartment fastened with screws.
Turn right to find the doorway back. A bench on the left has a red seat.
Check the lower left corner of the bench to find a panel fastened with hexagonal nuts.
Turn right to find a purple couch with an innovative modular design. A box on the left has a green keyhole.
Unscrew 2
Use the screwdriver to remove the wall panel beside the table. Inside, you find a metal piece protruding from the wall and a circular grate directly below it. (It's a bit hard to see, but the protruding part has a square hole in its top.)
So attach the handle to the protruding part to complete the tap! You can turn it to dispense some water which flows down the drain.
Corners
Use the clue from the couch to unlock the box on the dining table.
The couch backrests split into five parts:
⌜⌝ ⌜⌞⌝
Open the box to find a yellow key and yellow marking.
Mix
Fill the glass jar under the tap.
Then pour the water into the teacups to make flowers appear.
Yellow drawer
Use the yellow key to unlock the middle drawer (in the first room). Inside, you find a box with colored shape buttons.
So use the clue from the filled teacups to unlock that box:
The saucers with different shapes hold cups with different-colored flowers:
Heart Star Square Triangle
⇒ Orange Pink Purple Yellow
(4, 3, 1, 2 clicks)
You find a pair of scissors and a purple marking.
Unwrap
In the second room, use the scissors to cut off the covering sheet.
It's a table with some colored numbered blocks on top! Some of the numbers are smudged though. Under the table you see a round cover with screws.
Unscrew 3
Use the screwdriver to remove the cover under the table with colored blocks.
Underneath, you find a yellow cloth and a lock with a grid of four buttons showing lines extending from circles.
Orientation
Use the clue from the teacups to unlock the new panel on the ground.
The handles on the teacups face
Left(2) Left(2)
Up(1) Down(3).
Open up the panel and take the green key from it.
Green box
Use the green key to unlock the box on the purple couch. Now you can access a panel with five colored digit buttons.
Five digits
Wet the cloth under the tap, and then use it to clean up the colored blocks.
Then use that clue to unlock the box on the couch.
The light green, yellow, red, teal, purple blocks have digits which form the code 50714.
Open the box, take a metal claw and look at the light-green marking inside.
Leverage
Use the claw to pull out the pins on the right painting. Behind it, you find yet another wall panel with screws.
Unscrew 4
Use the screwdriver to remove this panel too, and you find a blue key in the compartment behind.
Blue drawer
Use the blue key to open the right drawer. The box inside has five buttons which cycle through familiar shapes.
So use the remaining clues from the room to unlock that box.
The shapes appear in various places, having colors that match those of the colored blocks.
So in the order of the colored blocks, they are:
Red: left drawer, four circles
Purple: middle drawer, two diamonds
Light green: couch box, three circles
Teal: bottom drawer, three diamonds
Yellow: box on dining table, two circles
Click the buttons 0, 1, 4, 2, 3 times to produce those patterns.
Open the box and take the spanner from it.
Dismantle
Use the spanner on the hidden spot of the bench, and you find a key inside.
So use that key to unlock the door and leave!
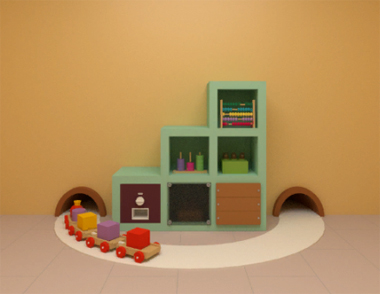
Toys
There are plenty to play with.
Exploration
The locked exit door is yellow this time, and you spot a blue bucket full of gray dirt to its left. On the right, a red square outline surrounds a tiny hole in the floor.
Turn right. A toy train is stopped on a track connecting two holes in the wall. Looking at the shelves behind, you see a toy abacus, three towers of cylinders on pegs, a green whack-a-mole machine with only three moles, some kind of vending machine with an unsettling lack of decorations, a frosted glass pane with hexagonal nuts on its corners, and three horizonal planks nailed down.
Turn right to face locked yellow double doors. Something hangs off the top of the screen, but you're somehow unable to look up.
Turn right to face a green loft bed without its ladder. Looking through the desk, you find that the desk lamp has no batteries, while the tray of pencils has them all sharpened at different lengths with an eraser you can take. The rug under the chair partially covers a floor panel which is fastened with screws. Looking at the orange chest of drawers on the right, you see that the top drawer has three colored digit buttons, the middle drawer has four sliders, and the bottom drawer has some colored squares, with the four corner squares being buttons that change colors. (Actually, all three drawers are unlocked, and those locks I mentioned are on boxes inside them.)
Counter
Use a clue from the shelves to unlock the box in the top drawer.
The colors of the digits (and their order) match those of the three towers, which have 3, 2, 4 disks.
Inside, you find a yellow key.
So use that key on the double doors. This storeroom has a string connecting the ceiling to something in the ground, another string tied to a ring hanging from the ceiling, and an extremely short ladder with a red rope tied around it.
Lengths
Use the clue from the pencils to unlock the box in the middle drawer.
Click the sliders 3, 1, 2, 0 times to match the relative lengths.
Take a bent stick from the box.
Lift
Use the stick to remove the outlined floor panel beside the exit door. Inside, you find a frame with three different-shaped holes.
Examine the frame and flip it over to find a coin.
Winner
Place the coin in the vending machine, and it dispenses a blue S-shaped hook.
Dangle
Attach the hook to the frame, and hang it on the ring in the storeroom.
The weight causes the platform on the left to rise, revealing a shelf. The box there has some colored square buttons and more clues on the left.
Squares
Use the clue from the train to unlock the box in the storeroom.
The shapes on the box match those on the train. Ignoring the train's engine, its cars have yellow, purple, red cubes on them.
(Click the buttons 2, 3, 1 times.)
Take the utility knife from inside, and you find a simple white drawing of a cat.
Cut
Use the knife to cut the rope on the ladder, and it extends to twice its length!
Place it against the bed to climb up.
Exploration 2
There's no mattress, but where the frame meets the wall you see a lock with some pictures on its three buttons.
Turn right to face a display with some colored blocks in the shape of the moon, sun and stars. You also see a book with colored circles in front, a yellow battery at the back, and colors on top of the bed posts.
Turn right to face the way back down. There are more colors here, and you see a pink balloon in the background holding up the panel you saw earlier.
Turn right to find a small yellow mat and pillow. Taking a closer look, you find that four acorns of different sizes rest on the pillow, and there's a three-digit lock in the top right. You can also look through the small hole beside the pillow at the table lamp. The posts on this side are also colored, but the right one has a red triangle piece on top.
Array
Use the clues from the top of the bed to unlock the box in the bottom drawer.
Placing the yellow and green squares at the bottom where the ladder joins the bed, you find that the corners are
Blue(1) Light-green(3)
Pink(2) Brown(4)
so click the buttons that many times.
Open the box to find a screwdriver.
Tools
Use the screwdriver to remove the panel under the rug, and take a mini crowbar from there.
Use the crowbar to remove the planks covering the bottom-right green shelf. Inside, you find a box with pictures and colored square buttons.
Sky
Use the clue from the blocks on the bed to unlock the three-color box in the bottom-right shelf.
The star, moon, sun blocks are red, blue, yellow (2, 1, 3 clicks).
Take the spanner from inside.
Glass
Use the spanner to remove the frosted glass panel on the bottom green shelf. Inside, you find a box with a red button.
So hit that button, and the train enters the tunnel and comes back out slightly different!
Powered
Place the battery you found on the bed into the table lamp, and its top now glows a bright green.
Climb up the bed and look down at the lamp through the hole to find a three-digit clue.
(You can zoom in to read it more clearly.)
Enter that clue in the lock beside the pillow:
087
Take the green circle piece from the compartment.
Elimination
While you're still on the bed, use the eraser on the book to remove some of its circles.
Also remove the blue cover from the eraser.
Also use the knife to cut the cover open.
Icons
Use the clue from the cut eraser cover to unlock the panel on the bed.
Boat Butterfly Flower
Inside, you find a cute dog panel.
Heavier
Back in the storeroom, place the circle and triangle pieces in the frame, which descends even further.
The shelf that rises from the ground is now three high, and you see a box with five colorful digits and another box with acorn buttons that get bigger when you click them.
Beads
Use the clues from the book on the bed and the abacus to unlock the second box on the storeroom shelves.
Since the colors match in all three places, you just need to count the RRLLL groups of beads on each row:
36162
Take a red scoop and view the yellow bunny drawing.
Buried
Use the scoop on the bucket beside the exit door to unearth a rabbit panel.
Growth
Use the clue from the acorns to unlock the third box on the storeroom shelves.
Click the buttons 2, 0, 1, 3 times to match the relative sizes.
Take another coin from the box and notice the red drawing of a dog.
Winner 2
Place the second coin in the vending machine to get a dart.
Pop
Climb onto the bed and throw the dart at the balloon.
The cat panel lands neatly in front of the storeroom doors.
Ride
Use the clue from the drawings to place the animal panels in the train correctly.
Red, Yellow, White = Dog, Rabbit, Cat
The train reenters the tunnel and comes back with a green star piece.
Bottom
Place the star piece into the frame in the storeroom, revealing the last layer of the shelf.
The box there doesn't have a lock, and you just find a hammer and coin inside.
Winner 3
Place the third coin in the vending machine, which dispenses a lightbulb.
Replace
Place the new lightbulb in the desk lamp, which turns it a pinkish red.
Climb back onto the bed and look at the lamp again to find a clue with three numbered circles.
Tap
Use the clue from the lamp to win at whack-a-mole.
The numbers from 1 to 5 appear on the LRCRL circles.
After hitting the moles in the correct order, you find a golden key.
Use the key to unlock the door and escape!
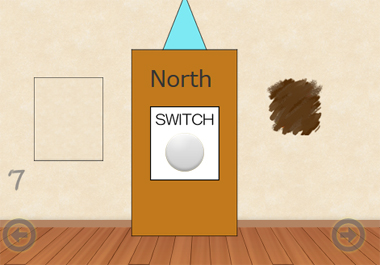
Game 0007: Yume Yume Cherry Blossom Viewing
Yumeyume (Yumemi's nickname) is mostly worried about only one thing: her overprotective father. He usually stops her from going out in an "indecent" outfit, but this time she's invited to cherry blossom viewing and he's converted the room to an escape game!
Exploration
You start out facing north, as the pillar in front of you helpfully explains. It has a blue triangular object on top (out of reach) and a switch you can push. There's also a blank wall panel to the left next to a number 7, and a smudged mess on the wall to the right.
Turn right to face east. The pillar here is almost identical except for the object on top. Anyway, the NEWS door catches your attention, and you also see (a picture of) a green apple and a number 5 on the wall.
Turn right to face south. The number 4 is painted in brown on the left.
Turn right to face west. A device with apple and banana symbols has five sliders under five colored flags. There's a banana drawn on the wall and a number 6 drawn on the floor.
Direction
Now that you've gotten your bearings, you can use the clue from the pillars to unlock the door.
The door gives you the initials of the pillars to press the switches on: North, East, West, South.
(If you mess up the order, trying to open the door resets the switches.)
The door opens into a passage.
Exploration 2
After picking up the stepladder from the ground, you notice that the drawers here have very familiar letters on them. The top one has four digit buttons, the middle one has four shape buttons, and the bottom one only has an OK button.
Return
You already know how to unlock the bottom drawer.
Same logic as the first puzzle, but the clue is reversed: push the switches on the South, West, East, North pillars.
After pushing the OK button, open the drawer to find a full bucket of water.
Digits
Use the clue from the numbers on the walls to unlock the top drawer.
To view the numbers on the NESW walls, just start from north and turn right:
7 5 4 6
The drawer is empty except for a drawing of a blue apple!
Climb
Place the ladder in front of each pillar, and climb up. What do you find?
The objects on each pillar look different when viewed from their top! Their in-game descriptions helpfully decode the side and top views to tell you their exact 3D shapes.
Also, the object on the South pillar is hollow, and you find a purple apple drawn on the pillar.
Shapes
Use the clues from the pillars to unlock the middle drawer.
The shape that matters is the one seen from the top view, so those on the NESW walls are:
Circle Triangle Star Square
Take the star piece and rag from the drawer.
Cleanup
Dip the rag in the water bucket and then use it to clean the north wall. It was a drawing of a red banana!
Flags
Use the colored fruit clues to unlock the flag machine.
The colors of the fruit match those of the flags, and the symbols indicate that the flags matching the apples need to be raised to the top and those matching the bananas need to be raised only halfway.
So click the 2, 3, 5 flags twice each and the 1, 4 flags once each.
The chime informs you that the wall panel on the North side has opened up. Before you go look at it, now is the time to save your game.
Take the tiered bento box (jūbako) from the compartment to guarantee the good ending, and leave it there for the normal ending.
Pinnacle
Climb the south pillar and place the star there. This makes the north pillar slide left, and the ladder collapses.
(If you do this step before the flags, the wall panel won't be revealed and you won't be able to take the bento box.)
However, the shifting of the pillar reveals a passage to a room with a three-digit lock next to a door.
Total
Use the remaining clues in the game to unlock the exit door.
The flags matching the apples were numbered 2, 3, 5 and those matching the bananas were numbered 1, 4.
So the sum in the clue works out to 235+14=249.
Open the door and leave!
(Normal End)
Just as you escape, you (i.e. the protagonist) see your father running towards you. He seems to be holding something, but for now you're just happy to escape his control to go flower viewing!
(Thanks End)
You make it out well in time, but there's a note in the bento box. Your overprotective father has written a long letter with lots of nagging, including a very early curfew and a basic error in his safety mnemonics… but the effort is appreciated. Thank him by sending a picture!
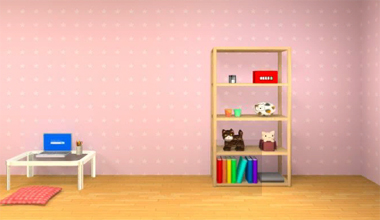
Let's Take Mum to the Concert! Part 4
The three cats are back to save the day!
Exploration
(As usual, you can click on the cat icon to get the three cats to do stuff. In addition to facing the target object, you will also sometimes need to examine it first.)
You start off facing some shelves full of stuff: a can with a tight lid, a red toolbox with a four-digit lock, some candles and three cat figures, including a small cat in a box hiding an orange ball. Looking through the colored books, you find that you can take the red book. To the left of the shelf, you see a laptop on a low table, having a password that's five symbols long, and also a pencil holder next to it with some scissors you can take.
Turn right to face the exit door. It's not locked but you have a mission to do. There's also a light switch on the left and a clock that's way too high to reach.
Turn right. There's another door here that you can't open, and a switch next to it that you cannot use. There are also other things hanging from the rack on the left, but you can't do anything with them.
Turn right. This view leads to the kitchen area, so just click it to change the view. On the right, you see a litterbox and empty food bowls for the cats. And on the left…
Click the fridge and cupboards to take a closer look. You find nothing worth taking from the fridge, so move on to the sink where you find a sponge. The cupboards above are out of reach, but you can access the drawers below the sink. The top drawer is locked and needs a key, the middle drawer is missing its handle, and the bottom drawer has a four-digit lock with some drawings beneath the digits. To the right of the drawers, a cabinet beneath the stove is sealed shut with paper.
Between the fridge and the sink, you spot a screwdriver that you can't reach.
Back out (twice) and turn right to face the bed. You can draw the curtains and open the window to find a wind chime outside.
Look under the bed to find a stick that you also can't reach.
Turn right to find a small dressing table with a mirror and a locked drawer. There's also some art on the wall, but surely that can't be a clue.
Flip through the book to find a clue with colored rectangles and a jigsaw puzzle piece between the pages.
Elastic
Pull out the cat head on the shelf, and this time you can disconnect it with the scissors and take the knob that was hidden there.
Handle
Place the knob on the middle drawer, and open it to find some duct tape.
Tall order
Let's start using the cats' powers. Face the wall clock and click the cat icon to summon them.
Hmm, looks like Shokora is best suited for this task. (Click the large one twice.)
Yeah, that's clearly not enough. Chai, you're next!
(Click the medium one once and then click the tall one.)
Just a bit more. Chibi, help out!
(Click the small one and then the medium one.)
Okay, really just a bit more this time.
(Click the small one and then the large one again.)
Finally, you can click any of them to get a bronze key.
Wait, this key doesn't fit any of the locks so far! Let's try something else.
Unlocked
The other door looks suspicious without any mechanism attached to it. Perhaps it's just stuck?
Summon the cats, and get Shokora to help out again.
(Click the large cat and then the door.)
That wasn't completely successful, but now you can go to the next room. It's just a toilet with some incense sticks in the corner and a locked cupboard on the left.
Unlock (bronze)
Use the key from the clock to unlock the cupboard in the toilet, and take the step stool from the left.
Climb
Okay, no more straining your tiny legs. Just place the step in front of the sink and climb up.
In the kitchen cabinets, you find a red pot. Examining the pot reveals that its bottom is dirty.
Forbidden
The seal on the cabinet does say "No Entry", but this probably counts as an emergency. Maybe the cats can do something about it.
Summon the cats (while not zoomed all the way), then click the medium-sized one and then the seal.
With the seal torn away, you can now open the cabinet to find some dish soap and some cat food.
Nom
Let's try out that cat food by pouring it into the empty food bowls.
Another puzzle piece falls out!
Clean
Soak the sponge in the sink, then add the dish soap and use it to clean the pot. All that remains of the stain is a single digit clue.
Math
You finally have the clues needed to unlock the bottom drawer.
Fish: total of 4+3=7 on windchime
Sticks: total of 5 in the toilet
Cans: total of 6 in the fridge
Pot: 3, written on the pot
Which makes the code 7563.
Open it to find a silver key.
Unlock (silver)
Use the silver key on the top drawer to open it. Inside, there's a jigsaw puzzle with three pieces missing.
Headroom
One last place to use the cats: look at the bed and then summon them.
Chibi (the small cat) fits comfortably in there and comes back with a long stick.
Narrow
The stick is still too short to reach the screwdriver beside the fridge. Is there anything you can use to make it longer?
Wrap the duct tape around the end of the stick. Now it's just long enough to reach the flathead screwdriver.
Flat
That's an oddly specific description (in English) for a screwdriver when there aren't any screws around.
Instead, use it to pry open the can on the shelf, and take a gold key from it.
Unlock (gold)
Use the gold key to unlock the dressing table drawer. It has only a puzzle piece inside.
Trio
Now you can return to the puzzle in the top drawer and place all three pieces, which makes a symbol clue appear over the cat picture.
Pass
Enter the clue from the jigsaw puzzle into the laptop.
Heart Diamond Infinity Star Cross
Hmm, there appears to be an image file on its desktop. Open it up to take a closer look at a clue with flowers.
Colorful
Use the clues from the computer and book to unlock the red toolbox on the shelf.
The arrow confirms that the flowers in the clue appear in groups of four and five. The flowers within each group have different colors, but some of them are only half colored.
Cross-referencing that with the diagram in the book, you find that the colors match those of the rectangles, and the half-colored red and cyan flowers represent vertical rectangles that naturally split into top and bottom halves.
So the colored rectangles/half-rectangles represented by the groups form the symbols…
They form the digits
8 9

3 5
which, read in the direction of the arrow, gives the code 5839.
In the box, you find the concert ticket!
Normal End
Click the door to leave. You get a short animation and then a simple ending screen.
Happy End
(From the ending screen, hit Replay and then Continue.)
Let's not leave just yet, and look around a bit more. Is there something we haven't done?
Turn the lights off and look around, and you spot a cyalume glowstick on the rack beside the other door. (Picking this up autosaves your game so you can't get the other ending.)
Now leave the room as before, and you get a slightly different animation for the Happy End.
On either end screen, you can click the button on the right to flip through some photos of the cats.
for some reason on "let's Take Mum To The Concert" it never loads. i can get the others to load. i'm confused. i tried clearing cache and going to chrome etc. same result.
The game loads really very, very slowly. Loading can take several minutes.
yes i finally figured that out, chrpa. but anyway cool games as always and kk's walkthroughs rule :)
Question: is Plain Room somehow similar to The Room? Or is it just the name? If it is, it's totally my jam and I need to try it.
Why would you not try to play in the real quest . Personally, I liked the Escape Room Berlin which I passed with some friends . I was with a team of 4 people and it was enough to go through all the missions with pleasure without rushing .If you find yourself in Berlin, do not miss the chance to try the most interesting and cool escape room .It is perfect opportunity to spend the time in interesting way together with friends.
How to get more details of that?
anyone can tell me more about this?
Update