
 Hi! Another week is over and the new Weekday Escape here!
Games from Nicolet are growing. Good, very good. Their sixth game is longer and more elaborated than the previous ones, with excellent playability! Then you spent some time in Amajeto's living room, from which you escape to Selfdefiant's tech room. The last comes very charming Rinnogogo's creation to warm your heart.
Have a good time and enjoy!
You are locked in Nicolet's cube in the color of egg shell (I mean the brown one) and as could be expected, with eggs. Several plain and one crowned. These aren't the only ovoid objects you find, the game's bigger and more complicated than it seems - so many eggs ahead! Also many good puzzles and loads of cuteness.
The cursor is not changing, autosave, one ending.
The game is available for Android too.
In their latest creation Amajeto's slightly changed usual format for the one more convenient for mobile devices. Surprisingly, it's still in Adobe Flash - maybe intermediate stage yet. The game is as solid as always and very pink - just don't bother with looking for TV controller, you won't find any. The TV set is decoration only.
The cursor is not changing, no save button, one ending.
Selfdefiant's tech room, where you find yourself trapped, seems a bit strange - it's almost empty without any technical devices and with colorful disco lighting. Maybe you lost your way in a leftover set from a sci-fi movie of the 70's and maybe the neon tubes are upcoming technology, or the main area is behind the coded door and this is just a vestibule. Whatever. You goal is clear - explore the room, open the door and solve all the puzzles you find!
The cursor is changing, autosave, one ending.
How little the Rinnogogo's house really is (and also who is Coco) you'll find out after your escape. Being closed inside it you have another concerns, like 'where is a screwdriver' and 'where do I get keys for so many locks' or 'can I ride the tricycle'? Lovely ringing tune accompanies you as you explore everything what surrounds you - don't hurry, we've got another Rinnogogo's poetic, fragile and clever game. Such aren't many around, enjoy!
The cursor is not changing, autosave, one ending.
We love escape games, and our readers love talking about them and sharing hints! How about you? Let us know what you think, ask for clues, or help out other players in the comments below.


Egg Cube
All hail King Egg!
Exploration
(As usual, I'll stick to simple color names even though the game uses a wide variety of colors.)
The locked door you start with is surrounded on both sides by shelves with unlit candles. Lifting the candles, you find that they're placed on tiles with yellow squares.
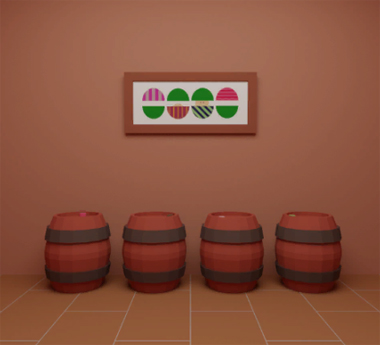
Turn right. Some eggs are placed in bowls on a table, and an the egg cup in the middle has an egg with a crown and a wand that's really just a metal stick. In front of the other four bowls, there are colored indentations in the table.
Turn right. A blueish cupboard has something at its top left, and there's a small hole on the wall next to it. Opening the cupboard doors, you find a row of green egg cups, two red books and a green book, and two boxes. The second cup from the left contains a green egg, the right red book has a nice drawing and the green book has a lock on it. The left box seems to be tied shut, but the right box has some buttons that show an increasing number of yellow squares when clicked. Under the cupboard, you see two drawers, the top one fastened shut at its corner with a small wood block and some screws, and the bottom one locked with a keyhole.
Turn right. Four barrels have different-colored stoppers in different positions on their tops, and you can pick up a matchstick from the second one. The framed picture on the wall has four eggs split into halves, with the half eggshells having various colors and patterns, and something else is going on with the middle two eggs.
Yellow
Use the clue from the candle shelves to unlock the right box in the cupboard.
From left to right, the tiles under the candles have 2, 4, 1, 3 yellow squares.
Reproduce the same designs on the box buttons, and open it to find a green semicircle piece.
Green egg
(and no ham)
Place the green egg in the table in front of the second bowl. The egg in that bowl opens up to reveal a lock with four dials.
So use the clue from the barrels to unlock (the bottom half of) that egg.
While looking at the barrels, the stoppers are on the top, right, bottom-left, left sides of the tops.
So click the dials 0, 6, 3, 2 times, and push the button to open what's left of the egg and find a square key (i.e. the bow/handle of the key is square).
Unlock 1
Use the squarish key to unlock the bottom drawer. Inside, you find a wheel with a hole in the middle and a box with a green semicircular protrusion above an identical semicircular hole.
Half
Place the green semicircular piece in the hole in the box in the bottom drawer. Both pieces turn into buttons that you can push.
So look for the clue to unlock that box.
Looking at the framed picture you find that the green half-eggs are on the DUUD sides of the split eggs.
So push those buttons to open the box, and take a circle key.
Unlock 2
Use the circle key to unlock the green book, which is fake and only contains a blue egg. You know what to do…
Place the blue egg in the second-right indentation of the table. The egg in that bowl opens up to reveal a lock with four sliders.
Drive
Attach the stick to the wheel, place it in the wall next to the bookcase, and turn. The entire cupboard slides aside, dislodging a blue box onto the ground and revealing a tiny door in the wall.
Burn
The blue box is a matchbox, so strike the match on it and then use that to light all the candles on each shelf, which burn down really quickly.
Height
Use the clue from the spent candles to unlock the slider egg.
The relative heights of the candles are 3rd, 1st, 2nd, 4th from the bottom, so click the sliders 2, 0, 1, 3 times and open the egg to find a tiny knob.
Tiny / Exploration 2
Place the knob on the tiny door and open it.
It's another room! The wall cupboard has two pink doors, and you can easily reach the top to find three color-changing square buttons separated by < symbols. Looking in the left cupboard door, you find four color-changing buttons with different shapes. In the right cupboard door, there's a box with thee colored digit buttons, and what looks like a bottle with an egg label.
Turn right to find a bathtub with three eggs and no water. On the wall above, there's something that looks like a clock, but the hands with shapes don't move and there are no other markings.
Turn right to face the door you came from. It still looks small, but not as small as you remember.
Turn right to find a bowl with four eggs surrounding a purple egg. Each egg wears a colored circular hat divided by white lines into equal sectors, and the mobile hanging above them has pieces that you can zoom in on.
Overhead
Use the clue from the mobile to unlock the box in the left cupboard door (in the new room).
The crown and moon are yellow while the duck and whale are blue, with the duck and crown being slightly darker (more saturated) than the whale and moon.
Click the buttons 3, 1, 2, 4 times, then open the box to find a crown piece.
Purple
Place the purple egg in front of the rightmost bowl in the first room. The egg in that bowl opens, and you find a lock with some silhouettes on its buttons.
So look for clues to solve that puzzle.
The same shapes appear in the drawing in the red book, where they're shaded with different striped patterns, and those patterns also appear in the framed picture.
So the eggs in the picture, from left to right, contain the same stripes that decorate the trees, castle, clouds, road. Click the buttons 3, 0, 1, 2 times, and open it to find a screwdriver.
Unscrew
Use the screwdriver to release the top drawer of the cupboard. Inside, you find a bottle with an egg label and a box with slots for crown and egg pieces.
Checking the bottle, you find a colorful serial number printed near its bottom.
Three digits
Back in the smaller room, use the clue from the bottle to unlock the box in the right cupboard door.
The yellow, purple, green digits form the code 301. Enter that in the box and open it to find the egg piece.
Portrait
Place both the crown and egg pieces in the box in the top drawer, then remove its cover to find a bottle opener.
Quart
Use the bottle opener to open the bottle, and then empty that bottle into the bathtub.
The eggs transform into colored jellyfish shapes!
Comparison
Use the clue from the bathtub to unlock the box on top of the wall cupboard.
In ascending order of size, the jellyfish are pink, blue, yellow, so click the buttons 3, 2, 1 times and open it to find a utility knife.
Cut
Use the knife to cut the left box in the blue cupboard. Inside, you find an orange egg.
So place the orange egg in the remaining spot on the table, opening up the egg in the bowl to reveal three color-changing shape buttons.
Three colors
Use the clue from the clock above the bathtub to unlock the egg.
All three hands have pointers with the same color, so where do you actually need to look for the colors?
The colors on the eggs also appear on the barrels, and you notice that the positions of the heart, star, triangle markers match those of the green, pink, light pink (off-white) barrel stops.
So click the buttons 2, 1, 3 times, and open the egg to find an pretty wand.
Magic
Give the wand to the egg king in the middle bowl, and it too pops open. Inside, you see a lock with circles divided into sectors.
Slices
Use the clue from the tiny eggs in the second room to unlock the egg king.
Each of the king's subjects (eggs on the table) now has a different colored egg in front of it.
The orange, green, blue, purple hats on the tiny eggs are divided into 4, 8, 2, 6 sections, so click the buttons 0, 2, 1, 3 times to open the egg and find a golden key.
And that's it! Use the key to open the door and escape!
Color Room: Pink
The change in layout also comes with changes in interface, some of which you can learn about by clicking on the lower-left menu icon.
Exploration
(Take note that there's no changing cursor. I'll still ignore most of the non-interactable objects.)
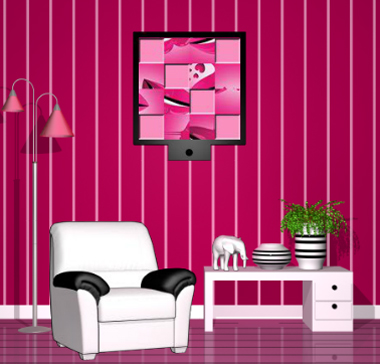
As usual, the first view of this room has a picture frame over a chair. Unlike the past games, this picture frame is missing several tiles, and the chair can be spun around to reveal a note on the back. There's also a table with two drawers, but surprisingly all you can do there is pick up the elephant figurine and flip it to find colored spots on its feet.
Turn right to face some windows that can't be opened. A cupboard has three compartments marked with pink-and-white stripes, but only the left and right ones can be opened. Unfortunately, they're both locked, the left one having four digit buttons and the right one having a grid of buttons that light up when clicked.
Turn right to find two locked doors. The picture frame in between them tilts when you click its corners.
Turn right to find some more cabinets stacked roughly into an L shape around a television screen. Three of them have puzzles on their locks: a three-digit lock on the left one (black), a three-pattern lock on the bottom-left one, and a four-letter lock on the bottom-right one. Clicking around, you find that the bowl in the middle of the shelf hides a lighter(?) that warns you about pink lies.
Layered
Use the clue from the cupboard under the window to unlock the bottom-left cabinet on the screen with the TV.
Enter vertical, diagonal, horizontal stripes by clicking the buttons 4, 1, 6 times, then open the cabinet to find a square tile.
Fake
Use the clue from the bowl under the TV to unlock the left cupboard door under the window.
Reading the word LIES upside-down produces the clue 5317, so enter that in the lock and open the door to find some books and a key.
Use the key to unlock the left door.
The area behind it is too small to even count as a storeroom, but it has three flamingos in slightly different poses, a grid of shelves with several shiny balls and a star, and another square tile.
Three digits
Use the clue from the flamingos to unlock the black cabinet to the left of the TV.
The legs of the flamingos are shaped like the digits 147, so enter that and open the cabinet to find a square tile.
Grid
Use the clue from the grid of shelves to unlock the right cupboard door under the window.
The position of the star on the lock indicates that you need to mentally rotate/reflect the clue to make the star match.
Click the top-right and bottom-left corners as well as the four buttons adjacent to them, and open the door to find more books and another square tile.
Colorful
Use the clues from the books and elephant figurine to unlock the tilty corner picture.
The green, purple, yellow, purple, green, pink colors appear on the ⌞⌟ ⌝⌟ ⌞⌜ legs of the elephant (when you flip it over), so click the corresponding corners of the picture, which comes loose.
Flip the picture over to find a square tile and a grid of shapes.
Shapes
Use the remaining clues to unlock the black cabinet under the TV.
The shapes in the top row of the note appear in the left column of the grid, forming the letter I.
Doing the same for the other rows, you find that the letters formed by the shapes spell out the word ISLE.
Enter that in the lock and open it to find a square tile.
Complete
Now that you have all six square tiles, place them in the picture above the armchair.
This leaves a randomized image puzzle which you can solve by rotating the pieces until they align.
Once you're done, a compartment opens up so you can take a more fancy key. Use that key on the right door to leave!
In case you're wondering about the pointless Exit button on the end screen: the second Color Room is already out and doesn't have it.
Tech Room Escape
Where's the techno? Oh… right.
Exploration
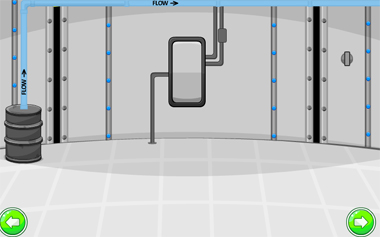
A pipe extends up from a barrel and leads off the screen, over a blank screen that has a small panel next to it. Examining that panel, you find that it's missing a screw. Yellow and red things move up small channels in the walls, and you see a knob at the very right.
Turn around (right or left). The pipe runs across the ceiling and out of sight, there are more colored things, and the door has a keypad with four colored buttons arranged in a circle.
Pie
Use the clues around the room to unlock the door.
The direction of flow passes over the yellow, red, blue, green channels, so click the bottom-right, top-left, bottom-left, top-right buttons to open the door.
Exploration 2
Going through the door makes you automatically turn around to face it. A huge console with lots of buttons stands on the left, with its cabinet doors jammed. On the right, you see a set of four pipes with blue rings attached at different heights, and you can pick up a screw from the floor beside it.
Go right to find the next locked door, as well as a wall of lasers. The channels in the walls here have some flashy moving zebra stripes. The panel next to the door has two sets of three electrical contacts, with a hint that tells you to look for a wire to connect them.
Conveniently, there's a green wire to the left of the door.
Go left twice to find racks of computer units connected together with blue wire to a central terminal. Zooming in on that, you find a control to open its (empty) disc drive. A bright orange object on the right rack appears to be some kind of case with a tiny hole.
Go left to find a lab table with a green box you can't use, a red box with a grid of colored buttons, and a clipboard with a word scrawled on it. Pick up the paperclip from the clipboard. There's also a blank screen on the right and some pipes with green rings on the left.
Go left once more. There's a green chest with sliders and colored lights, some pipes on the right with yellow rings, and a large unpowered machine (which I'll call a server unit) on the left.
Click the top left corner of the unit to find a blue wire stuck in its vent.
Pinhole
On the screen with lots of computers, use the paperclip to open the orange case, and you find a screwdriver inside.
Fixup
In the first room, use the screw on the panel and then the screwdriver. (The screw immediately falls back out when you look at it again, but that's okay.)
The server unit is now on, and flashes some lights on its front.
Grid
Use the clue from the server unit to unlock the red toolbox on the lab table.
Reproduce the color pattern at the top of the unit by clicking the buttons
3 1 0

2 2 1

3 0 3
times, then open the box to find a pair of cutters.
Snip
Use the cutters to remove the blue wire from the server unit.
Sliders
Use the clues from the pipes with colored rings to unlock the green box beside the server unit.
Paying attention to the relative positions of the rings on each pipe (there are five slider positions, and therefore five different ring positions), you can form the same patterns on the sliders. Here's some specific instructions for doing so:
Start with all four sliders at the top, and click them 4, 1, 3, 2 times, then push the button to turn on the left light.
Click the sliders an additional 2, 1, 3, 1 times, then push the button to turn on the right light.
Click the sliders an additional 1, 1, 2, 1 times, then push the button.
Once all three patterns are entered, the box opens and you can take a crowbar from it.
Force
Use the crowbar to pry open the large control panel. Inside, you find a data disk and a switch.
Crack
Place the disk into the computer (in the middle of all the racks), which prompts you for a password.
So enter the password from the clipboard (RHINO) into the keyboard, which disarms the system. Wait, what system?
The lasers are now off and you can walk through them to the right.
This screen just has four cylindrical containers with colored rectangles on one of them and a red-and-white striped glass panel next to another. Opening the panel, you find a red wire. There's also a blank screen and a switch on the wall.
Wired
Three wires, three switches, three screens. How do they work?
Attach the wires in any order to the panel beside the locked door, and the panel turns into a digital keypad. Also flip the switches in the cylinder room, under the console and in the first room.
This makes the screens light up with the following clues:
On first screen: green 369
Near lab table: purple 8
Near cylinders: orange 782
Connected
Use the remaining clues in the game to unlock the keypad beside the exit.
The purple, orange, green numbers form the code 8782369, so enter that into the lock and push E at the end.
The door opens and you can leave through it to end the game!
A small note for chrpa: I feel that the word "delicate" has much better connotations than "fragile", especially when referring to games.
Little House
It looks like a normal-sized house, but you're probably used to that by now.
Exploration
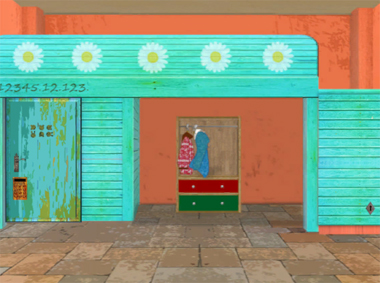
You start off facing a fancy blue structure with some numbers below the sunflowers at the top. The door at the left has some cute markings and a keypad with room for three digits, while the shutter on the right is locked and has a keyhole. In the middle, you can click the wardrobe to take a closer look: the blue coat hides a slightly green key behind, the red drawer contains some colored lights arranged on a rectangular outline, and the green drawer is locked (with a keyhole).
Turn right to find a green couch whose cushions hide a pot with its secured by chains and a parchment scroll that just says Ribbon in bright yellow text. Judging from past games, the plant drawn on the wall must mean something but you can't figure it out yet. The stone/metal sculpture on the right has three colored digit buttons.
Turn right to face a bed which doesn't seem very special. On the left, a pedestal has three buttons that change colors and a picture clue printed on it.
Poking around the bed, you find that clicking to the right of the pillows shifts the potted plant into view, revealing a screwdriver tip in the leaves.
Turn right to face the exit, which has a light switch on the right and a locked wall box on the left. There's also a colorful tricycle in front and a grate at the top left that looks like it's fastened with screws.
The right (near) handle of the tricycle comes off.
For now, turning off the light provides no new information.
Triangle
Use the clue from the tricycle to unlock the pedestal beside the bed.
Using the orientation shown in the clue, the wheel at the top is yellow and the other two are blue (left) and red (right), so click the buttons 3, 0, 2 times and push the Enter button to pop open the cover and find a pair of pliers.
Cut
Use the pliers to cut the chains off the pot and find a shiny key.
Unlocks
Use the green key to unlock the bottom drawer. It contains a box which you can type into.
Also use the shiny key to unlock the shutter to the right of the wardrobe. Now you can climb up the stairs there.
The small area upstairs has a plush bear and bunny, both with symbols marked on their bodies. The only thing you can do with the kitchen area is to take a rolled scroll that reads Grapes.
Two rows
Use the clues from the toys upstairs to unlock the door (with the keypad) downstairs.
Mentally replace each drawing on the door with the marking on the corresponding toy, and you should get something like the following:
xxx xxx xxx

x__ x_x __x

xxx x_x xxx
__x x_x x__

__x x_x x__

xxx xxx xxx
Combining the two rows gives you the code 502, so enter that in the keypad and push E to open the door. It's just a storeroom with some Christmas lights and a ladder. You notice some vertical divisions between the lights.
Trace
Use the clue from the colored lights and the numbers above it to solve another puzzle.
The lights are divided into groups of 5, 2, 3, just like the numbers above it, and the same colored lights also occur in the box in the top drawer.
Reading each group according to the numbering given, the string of lights indicates three sequences of lights connected by lines in the drawer, which form some squarish symbols…
The clue spells out OIL! Type that into the box in the green drawer and open it to find a diamond.
Climb
Place the ladder to the left of the door, and climb up to the metal plate which is indeed fastened by screws.
Attach the screwdriver head and handle you found earlier, and unscrew it.
Behind, you find a round socket of some sort. Do you have anything that fits there?
Glow
Place the diamond in the socket, and it glows a bright orange.
Turn off the lights to find that the orange light is actually a beam that shines off onto the next screen, where it lands on the wall above the bed.
Turn the lights back on, and check the bed again. This time, hovering over the bed reveals the hotspot, and you find a hidden compartment with a weird green device with rectangles that change colors, and a faint outline on the door.
Branch
Use the clue from the plant drawn above the couch to unlock the rectangle device.
The flowers/leaves appear in pairs along the stem, with the following colors:
.. White(2)

Red..(1) Green(0)

Green(0) White(2)

Red..(1) Green(0)

White(2) Green(0)

Green(0) Red..(1)
In short, you need to click the CLRLLR buttons in each row 2 and 1 times, alternating. After pushing Enter, the ceiling above opens up and chains drop down!
Zoom in on the bed and click the chains to attach them. The bed lifts up and you find a trapdoor in the ground with its handle secured with string.
Snip / Exploration 2
Use the cutters to remove the wire and open the trapdoor. Alas, there's no ladder.
Pick up the ladder you placed before and use it on the trapdoor, and then you can descend.
The dimly lit basement has a painted sakura tree on the wall, a frosted(?) glass window with vines growing over it, and a rocking chair with a book that has several colorful clues.
The left side of the sakura has a small hole, and you can look through it to find a label reading Sakura.
Turn around to face the way out. Some kind of machine is connected to a pedestal with some picture clues and a space for you to type.
Word list
Use the clues from the colored words and the book to unlock the pedestal.
Matching the colors of the words to those in the book, you find that the words you need are Grapes, Sakura, Ribbon. Each of those words has six letters, so each square in the book represents a letter.
This means the squares numbered from 1 to 6 spell out the word SPRING, so type that into the pedestal (all uppercase or all lowercase), and the projector turns on to display a clue on the wall!
Spectrum
Use the clues from the basement wall and book to unlock the three-digit sculpture upstairs.
The rings in the sculpture look like the loops in the clue, and the back page of the book helps you to figure out which segments in the clue represent which digits:
The red digit consists of all the red and orange segments, forming a 7.
The yellow digit consists of all the yellow, orange and green segments, forming a 5.
The blue digit consists of all the blue and green segments, forming a 6.
Enter 756 into the lock and push Enter, and a key appears!
Another unlock
Use the key to unlock the wall box next to the door. Inside, there's a grid of nine identical buttons.
Nine
So use the last clue in the game to unlock the panel in the wall box.
The window panes in the basement have
0 1 6

3 4 5

0 0 2
So click the buttons in that order (from 1 to 6), and the door opens, ending the game!
I see. Thank you.
Color Room is already out and doesn't have it.
Update