
 Welcome to the summer season with the new Weekday Escape!
And welcome in cosy and colorful Amajeto's living room full of puzzles and with three well hidden keys. In another room by tomoLaSiDo is hidden one key only, but cosisting of six parts; and besides there is lot of grated vegetables. That girl at the toilet graffiti seems very happy about it. The third escape is by Neat Escape and takes you to a hotel, again, this time quite a basic one, but sufficient. You aren't going to spend a holiday there, anyway - if stuck, there is a helpful walkthrough.
Have a good time and enjoy!
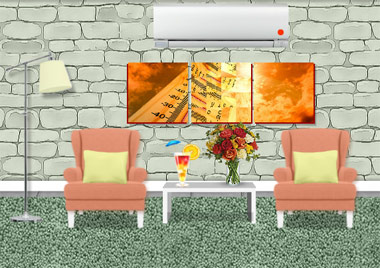
Amajeto has installed an air conditioning unit to their upgraded room (the one with a balcony and a bathroom) and seems that it will be very useful this summer! It's off at the beginning and you need to turn it on...for puzzles solving purposes, of course...not for your comfort. More puzzles are waiting for you - just look around!
Regrettably, the coctail drink at the table isn't active, but you can make your own - here are some ideas: Pool Coctail Escape and Pool Coctail Escape 2 by Tomatea.
The cursor is changing (its color), no save button, one ending.
You need to find six balls with pieces of a key to get out from tomoLaSiDo's room; your side quest is to find ten dishes. The devs are trying to confuse you and have scattered few red herrings around the room, so some items may seem promising, but they are not active, like a hammer (you get a hammer to your hand in the next game!) or a teddy bear (by games and movies rules, an important item should be hidden in its belly - and nothing). Solutions of puzzles are quite simple, however, not visible at the first sight.
The cursor is changing, no save button, one ending.
The hotel room where Neat Escape locked you is just for spending one or two nights; only basic equipment like tea&coffee set and small fridge is here and not much space. The hotel offers unique service though - you may rent a hammer! Hopefully hotel management doesn't regret the decision later...but it's not your concern, as the hammer certainly helps in escaping the room, or precisely, the escape wouldn't be possible without it. Can you escape?
The cursor is not changing, save button, three endings.
The game is avalable for Android too (a slighty different name).
We love escape games, and our readers love talking about them and sharing hints! How about you? Let us know what you think, ask for clues, or help out other players in the comments below.


Walkthroughs for the first two.
Summer Heat
The temperature's up and the AC's... working, but it can't hurt to take a sip of the tropical drinks in the room.
Exploration
Just like Spring Rain which was in the last Weekday Escape, you start off facing a heat-themed photo divided into three picture frames, with the middle part scrambled up. You can click the picture on the left to flip it and find a large letter M. Above all of that, the air-conditioning unit is turned off.
Turn right. You can see a giant umbrella outside the locked balcony door. The thermometer on the left of the door shows a rather hot reading, and the small cupboard on the right has two green buttons.
Turn right. The doors on both sides are locked. The TV is turned off and the grid below cannot be used yet.
Turn right to find two rows of cupboard doors, a tilty corner picture and a clock that stays accurate with the actual time. The middle doors on each row don't respond to your clicks. The rest of the top row is unlocked, and the top-right door hides a clue reading EE. The other doors in the bottom row have a four-color lock, a four-shape lock, a three-digit lock with clues beneath the digits, and a four-letter lock. Using the changing cursor, you find something else you can interact with: the lamps on the sides which flash when clicked.
Unscramble
Go back to the first screen, and rotate the tiles on the (randomized) picture puzzle to solve it.
The right picture frame slides over so you can take a square tile.
You can also click the right picture frame to flip it over and find three letters on the back.
Two buttons
Use the clue from the flashing lamps to unlock the cupboard beside the balcony door.
The lamps flash in the LRRRL order, so click those buttons to unlock the cupboard.
Inside, you find a AC remote control and a square tile.
Cooler
Use the remote control to turn on the air-conditioning. What a relief!
The room instantly cools down, as you can tell from the thermometer reading.
So use the clue from that thermometer to unlock the second-right cupboard door (on the screen with the clock).
The clue on the lock tells you to multiply the Celsius readings that you get when the air-conditioning is off (red) and on (green).
This works out to 35×25=875, so enter 875 in the door and open it to find a silver key in front of a clue reading LLL.
Unlock 1 / Exploration 2
Use the key to unlock the balcony.
Outside, you find the colorful umbrella as well as an eight-letter clue, a pair of slippers, and a bucket that you can push aside to find a square tile.
Picking up the square tile revealed a hole in the wall. Clicking on it to take a closer look, you find a clue reading TTTT.
Spell
Use all four of the letter clues to unlock the rightmost cupboard door.
Each clue you've found so far is just one letter repeated, each time one letter longer than the previous.
In order of increasing repetitions, they spell out MELT, so enter that in the door to open it and find an orange key and a square tile.
Unlock 2 / Exploration 3
Use this key to unlock the door to the left of the TV.
As you probably guessed, it opens into a bathroom where you can pick up a yellow towel, turn on the tap in the shower, and open the cupboards to find a square tile.
Clarify
While the tap is running, use the towel in the water stream to wet it.
Now you can use the wet towel on the letters on the balcony wall. Most of them fade to a lighter shade, but the middle two disappear completely.
So use that clue to unlock the tilty corner picture.
As you saw from the back of the right picture frame, each of the letters in
too hotcorresponds to a corner of the picture frame.So click the ⌜⌝⌝⌟⌝ ⌜ corners. The middle cupboard door above opens up and you can take the square tile from it.
Rainbow
Use the clue from the umbrella on the balcony to unlock the leftmost cupboard door.
The colored stripes on the umbrella are green, yellow, pink, blue.
So click the buttons 3, 2, 0, 1 times to unlock the cupboard door. Take the TV remote from inside.
Screen
Use the remote to turn on the TV, which shows a weather forecast with four suns, which differ slightly in their shape.
Then use the clue from the TV to unlock the second-left cupboard door.
Each sun on the screen is a circle surrounded by eight rotations of a different shape: square, triangle, diamond, pentagon.
So click the buttons 2, 6, 4, 5 times to unlock the door. Take the last square tile from inside.
Jigsaw
Place all seven tiles in the grid beneath the TV, and swap them to complete a picture of a flower.
Once done, you can pick up another golden key, and then use it to unlock the main door and escape!
Escape Challenge 59: Tsuma Room
Tsuma (in this game) is the garnish you might find alongside your sashimi. There's no sashimi to be had in this room — it's all tsuma.
Exploration
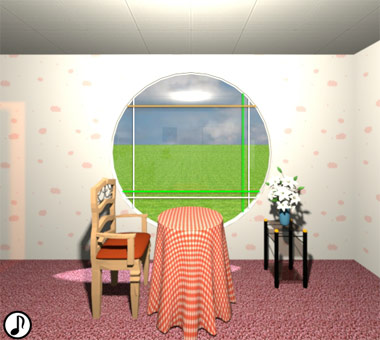
You start off facing a round window squared off by colored lines. In front of you, the table and chair have a plate of tsuma and a (capsule containing a) key piece respectively. A flower vase sits on a glass table on the right.
Turn right to find a square window with more colored lines. Beneath it, three balls with faces and white hair rest on a table with a switch that makes them flash in sequence. On the right, a large box with five digit buttons has colored threads hanging over what appear to be U-shaped grabbers. The clock above that has no hands but you can click its center to find a key piece.
Turn right to find the locked exit door. A picture of tsuma and sashimi (and some power symbols) hangs over a chest of drawers with a hammer and teddy bear on top. (What's this, some kind of pun?) The drawers themselves each have three colored buttons, but those on the top drawer are round, those on the bottom drawer are square and those on the middle drawer are both, and they also display digits. There's also a red lantern (?) on a post in the corner that doesn't do anything.
Turn right to face a locked wall box with two buttons (slightly different in their top parts), an empty blue bin on the floor, and a television screen which shows you how tsuma is made (an illustration with vegetables shredded by an "unrivaled machine").
Walk into the corridor on the right and then into the toilet. There's nothing to do here except to sit down, look right, look up and then look left at a drawing of a cheerleader holding large clumps of tsuma.
Dipping
Play around with the mysterious machine until you learn how to solve it.
You can't do anything until you click the digit buttons, and you should find that the buttons are special: the first one you click will always show 1, the second will always show 2 and so on, even if you try to click them again.
Once you click all five buttons and the triangle, each of the colored strands falls from the top in quick succession before the machine resets.
You might also notice some of the grabbers at the bottom snap shut and hold onto the strands. When does that happen?
Each grabber only shuts when its button shows a specific number. If you also notice something else about the grabbers, you'll be able to deduce the pattern.
If multiple grabbers close, they do so in the order given by their numbers. This means that the grabber you click first needs to close first, which means it must grab the first strand that descends.
So you need to click the buttons in the order that the strands descend!
Click the 2nd, 1st, 4th, 5th, 3rd buttons (so that they show 21534), and then the triangular button. All the grabbers close on the strands and pull down 5 tsuma balls.
Back out and zoom in on the machine again. The first and last grabber have opened back up.
Two buttons
Use the clue from the grabbers to unlock the wall box.
The pattern of open and closed grabbers matches the LRRRL buttons on the box, so click those buttons to unlock it.
Inside, there's a key piece.
Top drawer
Use the clue from the heads on the table to unlock the top drawer.
Flipping the switch makes the red, red, blue, yellow, blue heads flash.
So push the LLRCR buttons on the drawer, then open it to find a flashlight and a key piece.
Middle drawer
Use the clue from the windows to unlock the middle drawer.
The numbers of orange, green, white strings on the round, square, round windows are 1, 2, 3.
So enter 123 in the drawer, then open it to find a key piece.
Bottom drawer
Use the clue from the TV to unlock the bottom drawer.
The ingredients which enter the unrivaled machine come out as tsuma which are white, white, orange, green, white, green, orange.
So click the LLRCLCR buttons, then open the drawer to find a key piece and tsuma dish.
Extra
You're all set to walk out the door, but there's a feeling of missing something. You still have an item to use! A clue to find! Collectibles to collect!
Shine the flashlight on the wall picture. It's a blacklight that reveals upside-down power symbols in different colors: red, blue, red, blue, yellow.
Hmm, those match the colors of the flashing heads!
So you need to flip the switch on, and then turn it off while the red face is lit, then repeat for blue, red, blue and yellow.
Once you have it correct, the 3 tsuma piles forming the hair fly off of the heads.
Escape
You have the entire key and all the collectibles, so click on the door to open it and leave!
Item List
6 key pieces:
Top left: in top drawer
Top middle: in middle drawer
Top right: in bottom drawer
Bottom left: in wall box
Bottom middle: on chair
Bottom right: in clock
10 tsuma dishes:
1 on table
5 from machine
1 from bottom drawer
3 from heads
1 item:
Flashlight in top drawer
Escape from Business Hotel
What better way to wake up than with an escape game in the morning? This hotel knows just what you need.
Exploration
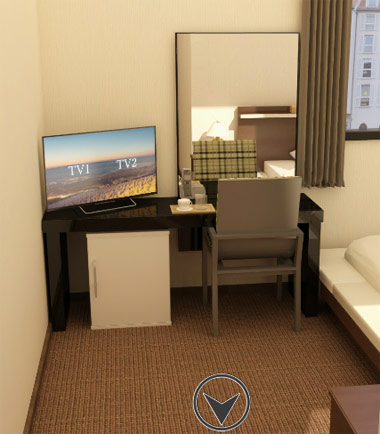
You start off facing a desk with a television which only has two channels: one has finished broadcasting, and the other needs a five-letter password. On the right in front of the mirror, there's a small phone on its stand as well as an induction heater that's turned off. Under the desk, you can open the refrigerator door to find an empty kettle.
Look around the right side at the bed. The pillow hides nothing, but you can pull back the blanket to find a booklet advertising a hammer for rent from the front desk. You can also look at the safe above the pillow with three shape buttons arranged vertically, and the side table whose drawer has a lock with three roman numerals. The bin beneath the drawer holds a piece of paper with a grid of letters, and you can hold down the mouse button on the paper to flip it over and find a star symbol on the back.
Back out and turn around to face the room door, which has a mail flap that opens into an empty compartment. On the right, the wardrobe is locked with no obvious way to open it.
Open the door on the left and enter the bathroom, which looks perfectly normal. You can zoom in on the sink and turn on the water, but nothing happens.
Call
Use the clue from the paper to borrow a hammer.
The letters on the paper are the same red color as the word beside "Front desk": IDEA.
And the letters of IDEA are in the same positions in the letter grid as the 9 4 5 1 buttons on the phone.
So push those buttons, and the phone rings, and the front desk gives you a helpful countdown before ringing your doorbell. Prompt service as always!
Check the door flap to find the hammer there.
Smash
Use the hammer to break the bathroom mirror.
Three of the square bathroom tiles behind the mirror are outlined in black.
Column
Use the clue from the bathroom wall to unlock the safe above the bed.
Just click each button 8 times to display a square.
Open the safe to find a red key.
Unlock 1 / Exploration 2
Use the red key on the door, and you're out of the room and in the hotel corridor.
There's not much of interest until you walk to the end. A doorway on the left leads to the laundry room, and you find a vending machine for TV cards in it. That machine has a three-digit lock with a star marking above.
In the other direction, the corridor turns and ends in a lift lobby. The lift buttons are locked behind a panel with a keyhole. You can also lift the flower vase on the table, but there's nothing beneath.
Instead, click the flowers to remove them and find a screwdriver.
Boil
Fill the kettle in the bathroom sink, then place it on the heater.
Then back out and zoom back in, and the kettle should have boiled. So remove the lid and let the steam escape.
(If you tried this immediately after starting the game, you would have to wait until after acquiring the hammer for it to boil.)
The steam fogs up your remaining mirror, revealing three roman numerals.
So use that clue to unlock the drawer of the side table.
Click the buttons 1, 4, 2 times to display the roman numerals Ⅱ Ⅴ Ⅲ.
Then open the drawer to find a coin.
Filter
Place the paper on the kettle, and the steam causes all but three of the letters to fade away.
As hinted by the star on the back of the paper, you need to use this clue to operate the vending machine.
From left to right on the paper, the letters which remain spell DHF.
So enter that in the vending machine and push the button, which dispenses a TV card which you can turn over to find a silvered panel labeled No.
Viewing
Use the coin on the back of the card to reveal the code for the TV.
It reads PAYTV, so use that code on the TV2 channel.
Instead of letting you access the programs, the code unlocks your wardrobe!
The wardrobe is empty except for a pair of slippers with a yellow key hidden inside.
Unlock 2
Use the yellow key to unlock the elevator buttons, or rather, a big red button that you can push to summon the elevator.
As you enter the elevator, you see a helpful list of floors. Turn around to face the buttons- oh no, the button panel is broken! On the left side, there's another locked panel that you can also unlock with the yellow key to find a red switch.
(Un)screw
Use the screwdriver to remove the screw holding the floor list up.
Then use the screw to reattach the button panel. Hmm, the buttons still don't seem to work.
You can now click the floor list to turn it over and find a clue.
Save your game here.
Lift
Following the top suggestion on the floor list, leave the switch on A and push the 1R421R buttons.
The elevator takes you to a small room marked R. The shutter is locked by a small metal bar attached to a concrete block on the wall.
Breakout
Hammer the metal bar into the block. Now you can click the shutter to lift it up a bit, but it immediately drops back down.
So repeatedly click the shutter until it stays up.
Special End
Now you can simply walk through the bright doorway to end the game.
You get to enjoy the special facility on the rooftop: an outdoor bath!
Lobby
Load your game and make your way to the elevator again. This time, you need to flip the switch and enter the code from the second line (push the R314R1 buttons).
The lift takes you to the ground floor. Just like in the previous game, the place is crowded with people who are somehow not bothered by the fact that you can't leave through the glass doors.
On the left side, the two empty tables have wooden safes on them, the left one having four digit buttons with the left and right digit pairs separated by a colon, and the right one having different-sized square buttons which display symbols. Further forward, there's a restaurant which you can't enter, with its operating times written on a chalkboard outside.
On the right side, the front desk appears unmanned, but it has machines for coffee and restaurant tickets on the counter, and you can look at the wall behind to read the check-in and check-out times, as well as the time shown on a stopped clock.
Punctual
The game gives you so many time clues, but which one opens the four-digit safe?
The Open button on the safe is the only labeled one in the whole game, which hints that the time you need is also labeled Open.
So enter the restaurant's opening time (07:30) in the safe to open it and find an empty coffee cup.
Drink
Place the cup in the coffee machine, and the coin slot opens up.
So use your coin in the slot, and the machine dispenses a hot cup of black coffee.
Click the cup of coffee to gulp it all down.
Then look in it again to find some shapes at the bottom.
Sized
Use the clue from the coffee cup to open the second safe.
The shapes of the clue, from large to small, are hexagon, square, circle.
So click the buttons 5, 8, 6 times to match, then open the safe to get a blue key.
(If you don't mind being locked out of the previous ending, you may save the game again.)
Simple End
Use the blue key to unlock the main door and escape.
You get to make full use of the nice day to play outside.
Breakfast End
(Load your save and play until you get the blue key again.)
Place the blue key in the ticket machine at the front desk, pick up the meal ticket it gives you, and enter the restaurant with the ticket to end the game. Enjoy your breakfast!
Update