
 Just a kindly reminder, it's Wednesday. That means three escape games are here for your fun!
All three games are of the same style this week. Shiesuta has locked you up in nice room with garden view, Neat Escape invited you to a traditional inn and has you locked up there too and Riddle Escape, for a change, left you locked in a temple entrance hall. What a manners! At least they left the music on.
Have a good time and enjoy!
About Shiesuta's game can be said that it's Traditional Japanese Escape Room Game with all the qualities we know and love. Good looking visuals, good puzzles, good music. Don't forget to turn on the sound at the beginning (the button in the lower right corner) and don't worry about language barrier - description of found items is in Japanese only, but you can get through without translation. A little puzzled for a while, perhaps. By the way, that thing which seems like a blowpipe is not a blowpipe (just saving your time).
The cursor is changing, no save button, one ending.

Neat Escape takes you to a traditional Japanese inn and from the moment you enter the place pleasant music sounds around creating relaxing atmosphere. Maybe you would like to stay there and enjoy your room, but doors are locked and you can't take a bath anyway, so you'd rather start with escaping. Navigation is a bit confusing in this game, so if you get stuck try to explore the room(s) again from different angles. Also notice, that some keys you find can be used only once, but in two different locks, so a choice must be made. That's exactly the moment when you appreciate a save button.
The cursor is not changing, save button, three endings.
The game is available for Android too.
P.S. Escape into the Open-Air Hot Spring or Escape from the Tatami Room by Tesshi-e definitely worth revisiting!
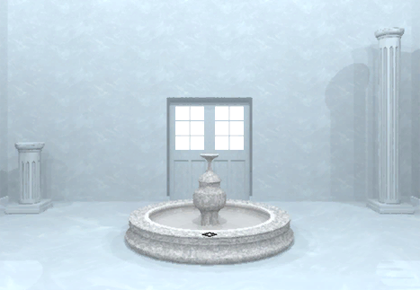
With Riddle Escape you have to escape from a temple devoted to unknown deity. The temple is large and feels cold and abandoned a bit; it's not a ruin though and dry fountain in the great hall is neither frozen nor broken, only switched off. Except for the fountain and some uneven columns (they occur in mysterious temples regularly probably, in Escape from the Blue Temple from WE - Retro Edition N°2 they've built them too) you find only few small stone tables and shelves, temple's marble halls are empty otherwise. Can you escape?
The cursor is not changing, autosave (not 100% reliable), one ending.
The game is available for Android too (the developer is Room's Room on Google Play, not Riddle Escape).
We love escape games, and our readers love talking about them and sharing hints! How about you? Let us know what you think, ask for clues, or help out other players in the comments below.


Mint Room
Exploration
(The button in the bottom right controls music. Turn it on!)
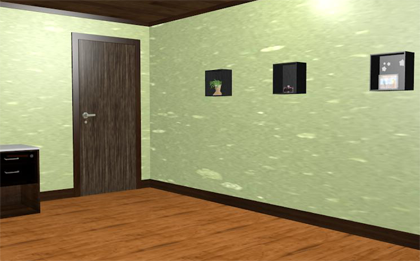
You start off facing a screen with the exit door on it. On the left of the screen, a bookcase has four shelves with identically-wrapped books and two spheres on the shelves, and a rather redundant BOOK label and arrow on its side. The lower sphere rests next to a device with three buttons in the shape of a bowtie. In between the bookcase and the door, a small cupboard has a pink four-digit box on its top, as well as a slightly translucent door with a three-digit lock and two drawers over an empty space. The top drawer is locked, but the bottom one is just stuck.
If you zoom in on the stuck drawer and click the right edge, the view shifts to show you a screw on the right side.
Turn right to a plain wall with three small shelves attached to it, containing a calming plant, a jar of candy, and a parrot photo frame under some starry decorations.
Turn right to find an unusual painting over a sofa with only one cushion on it. The cushion hides a folded piece of blank paper. The sofa has a side table with a four-letter safe on it. In the upper-left, a blue balloon floats out of reach, and in the lower-right, a potted plant hides a code with green-colored Pac-Man shapes.
Turn right to find a glass coffee table under a window that can't be opened. The window has a short tapered wooden pipe on its sill, and the coffee table has a plate of alphabet cookies in the middle and a full cup of coffee on the right.
Sector
Use the clue behind the potted plant to unlock the device on the bookshelf.
The shapes from the plant clue fit the sectors on the RLRLLR sides of the device.
So press those buttons, then the middle button, and the sphere opens up so you can get a simple key.
Unlock
Use the key on (the keyhole of) the top drawer to unlock it and get a sturdy hammer.
Numeral
Use the clue from the painting above the sofa to unlock the door of the cupboard next to the door.
The silvery areas in the painting form the digits 582, so enter that in the lock.
Behind the door, there's only a jar with some coffee creamer in it.
Dairy
Use the creamer on the coffee, forming an unusual pattern with four digits in a circle.
Skyward
Use the clues from the star-shaped objects in the room to unlock the four-letter safe near the sofa.
The cookies spell out BIRD, and the star decorations are next to a picture of birds.
So enter that in the safe and open it to get a sharp-looking screwdriver.
Unscrew
Use the screwdriver on the hidden screw on the right of the cupboard, freeing the stuck drawer.
Inside, there's a tiny pencil (tip), too small to use comfortably.
Handle
So use the wooden tube on the pencil (not the other way round) to get something more usable.
Shaded
Use the pencil on the white paper to reveal a clue.
Then use that clue to unlock the pink box on the cupboard.
The digits in the cup read 9385, and there are 4, 2, 1, 3 books on the bookcase shelves, so the code is 9385−4213=5172.
Enter that in the box and open it to get a slingshot.
Target
Use the candies on the slingshot, and then use them on the balloon to bring it down.
Then check the left side of the sofa to find the capsule that was hidden inside. It's sealed too tightly to open with your bare hands.
So use the hammer to smash the capsule and get a pretty azure key.
Then use that key to unlock the main door and escape.
…but before returning home, you decide to snack on the cookies and still-warm coffee. Tasty!
Remember the last time you got trapped in a seaside hot spring ryokan? This time round, your choice determines whether the ending includes dinner.
Ryokan
Just when you get used to Neat Escape's style, they change up the interface (a little)… making the game English only and adding a tutorial screen and a volume control for music! The volume control doesn't go down to 0 though.
Anyway, you've checked into a ryokan next to some hot springs, but you seem to be stuck in your spacious room. Really, this room has a lot of furniture, so spend some extra time looking around.
Exploration 1
You start off facing a large coffee table with chairs on two sides (chabudai and zaisu), and two round wooden storage boxes in front. The right box holds a teapot with a single battery inside, and the left one holds four large teacups (?) with colored dots under them.
Beyond the table is a pair of locked sliding doors.
Back out again and click the right side of the screen to change the view to one with a television screen under a beautiful flower painting. The screen itself doesn't turn on (yet), but the shelves under it hold a digital camera and a can of tea that you can slide out and open to find another battery stuck inside.
On the left of the TV and under the plates, there's a clock with bright red digits which appears to be stopped, next to a cupboard with a locked drawer and an unlocked pair of sliding doors with an empty white porcelain bowl behind them.
On the right of the TV and over the bonsai and yellow woven balls, there's a safe with four colored buttons forming quadrants of a circle, and there's a tray with teacups and a tea can which you can open to find a remote inside. The remote is missing both its batteries.
To the right of all these shelves is a fridge with cans and bottles of drinks which has a top compartment screwed shut. Removing the cans in front, you find a bottle of water. Above the fridge, a locked safe has two handles and an OPEN button, as well as a circular hole in the top-left of its left face.
Back out to the starting view, then turn around to face the rest of the room. There are four cupboard doors on the left, with the top two locked and the bottom two unlocked. Opening them, you find an electric fan behind the left door. Along the wall, there's also a water kettle which is empty but plugged in.
There's one last door to this room, so click it to walk into the corridor.
Exploration 2
There are two doors on this screen. Unintuitively, it's the right door that brings you back to the main room. Go into the left door instead.
It's a nicely decorated washroom with no bath, only a working toilet and sink with a continuous stream of flowing water. Next to the sink, a shelf holds a mug with toothbrush and a hair dryer. Above that, there's a painting of a cloudy sky. On the other side of the room, a dry towel hangs off a rack, and hides a light switch.
There's nothing interesting to find in the dark right now, so leave the lights on and back out to the corridor, then turn around to a screen with another locked door on it, as well as an uninteresting slipper rack. To the left of this door is a shoe cupboard (getabako) which only has one pair of shoes. All the other compartments have potted plants and safes in them. There's a four-digit safe, a four-button safe where the buttons show pictograms of different electrical appliances, and a five/six-letter safe with a hot spring emoji over the letters. (No, the code is not Maymay.)
Electric
Use the clues from the electrical appliances throughout the game to unlock the corresponding four-button box in the corridor.
Each appliance is placed on, in, or under a cross with horizontal and vertical bars:
The camera is placed at the upper-left of a cross-shaped shelf.
The fan is placed in the lower-left compartment of a cupboard whose dividers form a cross.
The kettle is placed at the lower-right of cross-shaped beams on the wall.
The hair dryer is placed on the upper-right of a cross-shaped wall shelf.
So click the buttons 8, 4, 2, 6 times to match, then open the box to get a bar magnet.
Pull
Use the magnet on the tea can beside the camera (under the TV) to get the other battery.
Screen
Turn over the remote and use both batteries on it, then use it to turn on the TV, which shows a static image of a macaque taking a bath.
Words
Use the clue from the TV to unlock the box with lettered buttons in the corridor.
Hint: it's nothing to do with what's in the speech bubble.
The animal on screen is a Monkey.
So enter ONKEY in the box and open it to get a red key.
(This is the only safe in the game which requires you to have viewed its clue.)
Unlock (Red)
Use the red key on the sliding doors, which open up into another room with a fantastic sea view. On the coffee table is a box with eight buttons that can be turned on (green).
Click just to the left of the right sliding door to find another locked door.
Slice
In the first room, use the clue from the round boxes to unlock the four-button box to the right of the TV.
Hint: Why is that button below them so big?
The colors at the bottom of the larger box are red, cyan, green and magenta in clockwise order, with cyan and green closer to the other box.
Since the large round button is below the other four, the colors have to be rotated into the following arrangement:
Purple(5) Red(1)

Lime(4) Cyan(6)
Click the buttons that many times, then open the box to get a screwdriver.
Unscrew
Use the screwdriver to unscrew the top compartment of the fridge to get the block of ice with a ball trapped inside.
Warm
Use the ice on the white bowl and the water from the fridge on the kettle.
Then back out and zoom back in on the kettle, and its red light has turned green, indicating that the water has boiled. So use the bowl of ice on it to fill the bowl with hot water.
(The water will not boil unless and until you have placed the ice in the bowl and used the red key.)
Walk around with the bowl of ice until it melts. (It should be sufficient to just back out to the starting view.)
Then retrieve the iron ball from it.
Dial
Use the clue from the digital clock to unlock the safe above the fridge.
The left handle is slightly longer than the right, as you can check by turning them so they both point up.
A time of 16:35 would be represented by the shorter hour hand in the 4 o'clock position and the longer minute hand in the 7 o'clock position.
So point the right and left handles in those directions, and then open the safe to find a miniature spiral staircase hidden behind a glass pane, ending in a small door. There's also a blue ball at the base of the stairs.
Click the small door to slide it aside, and this opens up the hole at the top of the safe.
Displace
Use the iron ball on the hole at the top of the safe, and watch it roll down the stairs and push the blue stone ball out.
Chlorophyll
Use the clue from the potted plants in the corridor to unlock the eight-button box in the sea-facing room.
The plants appear in the top two compartments, the bottom compartment on the left and the lower-middle compartment on the right.
So click those four buttons on the box, and open it to find a hammer head.
Clouded
Wet the towel in the sink, then use it on the painting in the bathroom. The beautiful clouds disappear and only a mirror is left, with some white lines on it.
Turn off the lights and look at the mirror again. There are more white lines now, forming the digits 7362.
So enter that into the four-digit safe in the corridor, and open it to find a pink key.
That's every puzzle you can solve before a choice of endings. Save your game here.
Unlock (Pink)
Either:
use your pink key to unlock the top cupboards next to the kettle, and take the bath set which mysteriously has a stick hidden in it, or
use your pink key to unlock the drawer in the cupboard next to the digital clock, and take a free meal ticket and a stick from the drawer.
(See below for the list of endings.)
Smash
Either way, you have a stick that fits on the hammer head.
So assemble the hammer and use it to smash the stone ball, which gets you a blue key.
Unlock (Blue)
Either:
use your blue key to unlock the door beside the shoe cupboards, or
use your blue key to unlock the door on the right of the sea-facing room.
Then click the door you unlocked to escape.
Endings
If you left through the corridor door with the bath set, you get to enjoy the indoor bath.
If you left through the corridor door with the meal ticket, you get to enjoy a free meal.
If you left through the other door, you get to enjoy an open-air bath. The ending is exactly the same regardless of whether you got the bath set.
This game/walkthrough was a little longer than expected, so I'm thankful that the game doesn't let you waste time revisiting solved puzzles and safes.
Escape from the Temple
神殿 (shinden): a temple; a shrine; a sacred place; a sanctuary.
This place, with its plain colorless walls and structures, certainly looks the part. Approach with a clear mind, and the path forward will reveal itself. Or you could just read a walkthrough.
Exploration
Great, you're already facing the exit door! It's locked of course, and there's a fountain in front of it which doesn't flow. The fountain has a set of eight buttons arranged in a diamond/square shape. The two marble columns on the sides of the screen are of very different heights.
Turn left to find a doorway blocked by metal bars, with a keyhole next to it. The column on the left, which reaches all the way to the ceiling, has a dark patch in its middle, so zoom in and click on it to open it up and find a snowflake-decorated round button in a hole marked with the same snowflake pattern.
Back out from the column, and now you're facing a door with no handle and two round slots on either side of it. The left column is the last column in this room, and its height is exactly half that of the room.
Turn left one more time to face another barred doorway. This one seems to have a lock with four long rectangular buttons, as well as a circular socket at its upper-right.
Eight in Four
Use the snowflake button on the circular slot, causing a short white column to show up on each of the four rectangular buttons.
So use the clues from this room to unlock the gate.
The tallest column had the snowflake button and marking, and the other columns (in clockwise order) were 1/4, 3/4 and 2/4 of its height.
So click the buttons
1 3

2 0
times, then push the snowflake button to open the gate.
Exploration 2
There's a rectangular panel up ahead with a set of three buttons to the lower right which display a white circle when turned on.
Turn left to find a small pedestal with a three-digit safe with the digits arranged vertically next to a flowery yellow circle. Next to the safe, seven unlit white candles are attached to eight black candle holders, which means the bottom candle holder is empty.
Turn left to find the doorway back, as well as a clue to the left of it, with five identical four-pointed star shapes, where the triangular tips are colored either red or black.
Turn left to find another pedestal with a safe with four buttons in a similar four-pointed star pattern that light up in red when pressed, as well as a set of small shelves with a different number of gold coins on each shelf.
Directional
Use the red-and-black clue beside the doorway to unlock the four-button safe.
Starting from the left (all tips black), the tips gradually turn red in the order LRUD.
So click the buttons in that order, and the safe opens so you can get a candle.
Tithe
Use the clue from the coins on the shelves to unlock the three-digit safe.
From top to bottom, the shelves hold 4, 1, 5 coins.
So enter those digits in the safe to unlock it and get a matchbox.
Four in Eight
Use your candle on the last candle holder to complete the square, then use the matches on it.
The candles burn quickly, some more quickly than others. So use that clue to "unlock" the fountain.
The candles at the corners have burnt out, and the inner ones are still lit.
So push the inner four buttons on the fountain to light them up, and keep the others off.
Once the pattern is correct, the fountain starts to flow really loudly, and patches of snow, or maybe just foam, appear and disappear on its surface.
Froth
Use the clue from the flowing fountain to unlock the big wall panel in the second room.
The top circle appears, then
the left circle appears, then
the top circle disappears, then
the right circle appears, then
the top circle appears.
So (turn all the buttons off, then) click the ULURU buttons to unlock the panel. Inside, there's a red orb under a painted laurel wrath, and a picture frame showing another four-pointed star pattern all in red with an X drawn under it.
Seek
Use the clue from the picture frame to find the hidden spot.
Next to the doorway, zoom in and click under the rightmost shape in the clue to find a hidden compartment with a key.
Unlock
Use the key on the gate on the opposite side of the fountain to unlock it.
Exploration 3
Once again, there's a locked panel in the wall straight ahead. This time, the panel needs a key, and a round table below the panel holds a (well-camouflaged) wooden safe with four square buttons over a white semicircle. On the right, an ink splodge covers some sort of circular drawing. Above all of these, four windows pour daylight into the room.
Turn left to find (on a pedestal) a two-button safe with a crescent moon between the buttons.
Turn left again to find the doorway back. Three short columns on the right have black stripes on their (top and bottom) ends. To the left of the door, an empty small stone font is attached to the wall, with a locked panel above it.
Turn left again to find a painting of a crescent moon with white dots along its left and right edges, as well as a three-button safe on the pedestal where each button shows a white column.
Three (twos)
Use the clue from the striped columns to unlock the safe under the painting.
The groups with 1, 2, 3, 4, 5, 6 stripes appear on the C, C, R, L, L, R columns.
So click those buttons to open the safe and get a key.
Unlock 2
Use the key to open the wall panel in the same room.
Behind it is a symbol of a six-pointed sun in a circle. (Or it could be a cogwheel.) There's a two-button safe in here with a display above the buttons that shows a pentagram, with the tip at the top colored red. There's also a picture frame showing the font beside the door holding something light blue. The panel above it is open in the picture.
Two (threes)
Use the clue from the moon painting to unlock the safe on the other pedestal.
From top down, the dots appear on the LRLRRL sides.
So click those buttons to open the safe and get a vase.
Aqua
Use the vase in the fountain, then use the full vase to fill up the font beside the doorway in the third room.
Just like the picture, the panel opens up to reveal a button.
So push the button, and some of the panes on the windows change colors.
Windows
Use the clue from the stained window panes to unlock the safe on the small table.
Since the semicircle is on the bottom, the pattern is upside down, so the colors should be
Yellow(3) Green(2)

Blue(1) Red(0)
So click the buttons that many times, and the safe opens up to let you take a towel.
Hydro
Use the towel in the fountain, then use the wet towel to wipe up the ink splatter on the wall beneath the windows.
This reveals a clue with three colored pentagrams circumscribed by arrows.
Starred
Use the wall clue to unlock the safe in the same wall.
The wall clue reads Left Green Right Blue Left Red (where right is clockwise).
So press the left button until the colored tip is green (2 times from top),
then the right button until the colored tip is blue (3 times),
then the left button until the colored tip is red (1 time).
The box opens up and you can get another red orb.
Rouge
Use the two red orbs on the slots next to the doorway to the left of the tallest pillar.
The door slides away and there's a room which you can't really explore, having only a four-looped pattern painted on the wall over a safe on an octagonal table with four/three buttons displaying various motifs.
Quartet
Unlock the final safe using the decorative patterns in each room.
The button layout represents the floor plan, with the top picture representing this room. So:
The first room (middle button) has a snowflake in a pillar.
The second room (left button) has a wreath in the wall.
The third room (right button) has a sun symbol in the wall.
So click the buttons (from left to right) 3, 0, 1 times. The safe opens up and there's a large golden key inside!
Use this key on the last locked double door to escape and get a now-familiar end screen.
question on Ryokan
I got to that puzzle with the 4 pics like Kettle etc. I tried it top 2 then bottom row matching the pics in the walkthrough in that order but then seeing as the cluse was bottom left top left top right bottom left, I tried that instead and it still didn't open.
i'm confused
anyone?
@Paul: The numbers in the walkthrough are top left top right bottom left bottom right, so the code for the vacuum button box is
Camera(8) Dryer(4)
Fan(2) Kettle(6)
Update