
 Hi! Three little big adventures are waiting for you this week on Weekday Escape!
With Lutaru you visit lonely rock island, maybe artificial, maybe in another world, with strange devices around. You can take a break in Yonashi's room then, pet some cats and play with them (but also feed them and care for them). The last game is comeback in a great style, Factory.112 returned after few years with excellent game!
Have a good time and enjoy!
After escaping from desert prison in Tsure Game 7 the journey continues. Lutaru lets you stranded in the middle of a bridge and only possible direction is straight forward to dandelion island. And you get stuck there. After short exploration is clear that there is something strange about the island - the white tower isn't a lighthouse and has coded door lock, the ordinary wooden shed too and why is the fountain here? This thing on bridge rail is what for? And, the most importantly, can you get out of there? The cursor is not changing, no save button, one ending.
To be continued, Lutaru says...yay!
In Yonashi 's game you are locked in the room with cats. Many cats. They are everywhere, all colours and shapes, all intensely watching you. Some meowing. What do they want? Are they trying to say you anything? Or are they just hungry? Well, they do want something, and you have to figure out what it is. Cats are moving around during the game, sometimes revealing a new item or clue. Whenever you feel lost, just look around and check cats' current positions. Final reward is...unexpected.
The cursor is changing, save button, one ending.
Game by Factory.112 is fantastic. Graphics, design, playability, puzzles...everything on top-level. At the beginning, you can chose from three degrees of difficulty, Normal, Hard and Extreme. Puzzles are the same in all three levels, higher difficulty means less clues. Normal is Teshi-e level, I would say, Hard stands for its name and Extreme too. The room seems like some special prison, they gave you a chair and a table, small generator and some petrol. And then immured you. Can you do it? Can you break free?
The cursor is changing, autosave, one ending.
The game is available for Android and iPhone too.
We love escape games, and our readers love talking about them and sharing hints! How about you? Let us know what you think, ask for clues, or help out other players in the comments below.


YAY! I have missed y'all!
can't wait for the walkthroughs. How come there have been no new games in the last few weeks?
Yay from me too to see weekday escape back again! Can't wait to play the games!
It's great to have Weekday Escape back. (This time, the games are all moderately challenging!)
Tsure Game 8
I already miss the teleportation technology from the previous game.
Exploration
(Remember, you can look left and right using hidden arrows on the sides of the screen.)
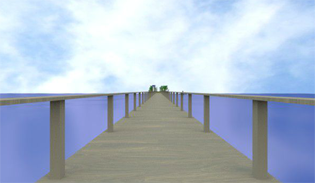
The elevator (from the end of Tsure Game 7) opens you up to a very long bridge in the middle of the sea, with only some lush greens in the distance. But there's more than meets the eye.
Move forward twice by clicking the center of the bridge. A strange device with a lever comes into view on the left. Zooming in on it, you find that it also has three hollow columns with decorations on the left and right, as well as a clue note and a key that makes a loud noise when you pick it up. You can also see another island on the right.
Move forward off the bridge and onto the green island. Something glimmers on the right side, so check there first. A basin marked with
5Mhas a golden telephone receiver hanging off a white hook.Turn back to the left and continue along the right side. There's a white locked box on a pedestal on the right. Back out and walk to the waterside. A tower stands in the middle of the sea, but since you can't swim there, clicking on it zooms you onto the closed metal ball on the shore instead.
Back out twice and turn left to find a wooden locker with six sliders on the lock. In front of that (back out a few times), there's a clay pot with a hole(?) in the base and something dangling over it.
Back out thrice more and turn left to the solar panel tower, which is oddly labeled
0Z. Its door is locked and below the Solar Power Generation placard, a mirror slides up to reveal a four-digit safe.Unlock
Go to the white locked box and use the key to unlock it. A number/symbol clue is written on the door (
6⊕), and there's a winged wooden piece in there, and you can turn it over to read ANGEL on the back.The back of the box also has miniatures of the columns from the bridge device, six of them in total.
Six
Use the code from the back of the white box to unlock the wooden locker.
The figures on the back of the box appear on the left, right, center, left, left, right of the bridge device.
So move the sliders into the LRCLLR positions, and open the locker.
The locker has four circles on its door (actually, the clue
8∞) and a brush hanging inside.Gloss
Go back to the solar panel tower, and click on the mirror next to the door to move it up.
Leaving the mirror up, back out and zoom back in on the placard. The mirror now reflects a code on the back of the placard, reading 7143 with some weird symbols below them.
So enter 7143 into the door to unlock the power tower.
The ladder in the tower brings you to the dirt-covered solar panel at the top, where you can use the brush to scrape the dirt off.
Before you leave the tower, turn left at the bottom of the ladder to find a clue (
2⊚) and a wooden piece which looks like it has hands and HUMAN written on the back.Bright
Now that the solar panel is working, you can look in the clay pot. The base reflects the light from above, so click on the lit portion.
It turns over, so click on it again to lift up the false base and find a horned wooden piece under it, with ANIMAL written on the back.
Guardian
Now that you have all three wooden pieces, go back to the device on the bridge and place them according to the clue from the note to activate it.
The note hints that Human is in the middle, so place the Angel piece on the right, Human in the middle and Animal on the left.
Once all the pieces are in place, pull the lever. The bridge moves to the right.
Exploration 2
The bridge now points to the island on the right, so walk to it, and then click to the right of the tall rock to walk around it.
On the other side of the rock, there's a clue with a bunch of circles. 10 of them are in a grid, arranged in five pairs with one circle in each pair shaded dark. There's also a valve in front of the tall rock, so turn it, and water starts pouring out next to the golden phone.
Back out all the way to the start of the bridge. A white sign stands on the right of the bridge, and it has four symbols on it.
Spout
Turn the bridge back (by pulling the lever again), and go to the basin which now has flowing water.
The water flows out of a hole halfway up the "telephone hook", so click and hold on that hole to redirect the water to the top.
This balances the phone and opens up the metal sphere in front, which now has a four-digit safe.
Symbols
Use the clue from the symbols throughout the game to unlock the four-digit safe.
Translate the symbols from the white sign to digits:
✤=???

⊕=6 (white box)

∞=8 (wooden locker)

⊚=2 (inside tower)
Apparently we've never seen that first clover symbol...
But we've seen every other digit except for 9, so the clover must be 9!
Enter 9682 into the lock. The door on the distant tower opens up, and some platforms appear on the water.
Crossy
Use the clue from the tall rock to jump across the platforms safely.
From bottom to top on the rock, the light circles are on the left, left, right, left, right sides.
So click the LLRLR platforms, and enter the tower.
Click the pedestal in the tower to light it, and then click it again to end the game.
You get a surreal airborne sequence as a teaser for the next game.
can't wait for the other 2 walkthroughs. Tsure 8 was cool.
Cats Escape
Exploration
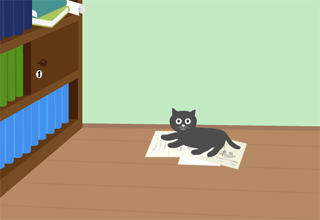
You can zoom in on a cat, but can't get past it to the papers underneath. The cabinet on the left is locked. Nothing else to manipulate here. Turn right.
You see a door with a three digit code, a cat on a rug you can zoom in on, and up at the top a closed circular window with some kind of green light next to it. Turn right.
After pulling back the curtain you see a bathtub with movable handles, and a sink with a cat in it. Turn right.
You see a diagram of big fish eating smaller fish going up, and a hamper with a cat and a hairdryer. Take the hair dryer. Turn right.
You see a couch with a cat on it. You can look under the couch to see something that is too far away to reach. And that's it.
Not much to work with.
The only item you have found is the hair dryer. So use it under the couch. This blows the wadded-up item out, and the cat that was on the couch chases it. You can now get a remote control off of the couch from where the cat had been.
Remote.
The remote has a green light. Where have you seen a green light?
The circular window.
Open the window and notice that there is now a circular patch of light in the middle of the floor. With a cat in it.
Hmmm... now what?
Where did that cat come from?
Ah, that's the one that was on the rug.
Move the rug to reveal a trapdoor that contains a mallet and a newspaper.
When you open the newspaper, a cat comes in and lies on it.
Where did THAT cat come from? (Notice a pattern?)
That's the one that had been lying on the papers.
Moving the papers reveals a diagram suggesting that you look behind the bookcase.
Behind the bookcase you find a paper sliding door.
Where does the door go?
Notice the fish symbol at the bottom of the door?
Put the door over the hamper next to the fish. You can now slide it open and shut, but that doesn't seem to do anything.
Hmmm. Now what?
Go see if any cats have moved.
After looking around you find that the cat who was inside the hamper tore the paper door to shreds. You can now pick up a claw and observe both the cat behind the door and another cat under the fish.
Ok, NOW what?
The only thing that seems like a good lead at this point seems to be the three digit code by the door. Notice that the first digit is white on grey, the second digit is orange on white, and the third digit is black on white. Why are those colors familiar?
There are now cats with those colors that you can examine closely.
Notice the shapes on them.
White on grey: pentagon = 5
Orange on white: square = 4
Black on white: triangle (nose and mouth) = 3
Enter the code 543 and the door opens.
Exploring room 2
You start off looking at two cats, one of which you can zoom in on. That one seems to be sitting in a colander, and you can rub her head or tummy. You can also look up to see a cat in the rafters with a key around her neck. Turn right.
You see a feeding station, a four-by-four curio cabinet with Russian nesting dolls that you can take and open, and a panel in the floor that seems to be locked with some kind of three button code. Turn right.
You see a bunch of boxes you can move to reveal a box with three kittens in it. You also see the doorway back the way you came. Turn right.
You see a cat who is upset about her kitten being stuck down a hatch, a picture that consists of the Roman numerals 1-3, and another cat that is lying in some potting soil. When you disturb this last cat, she leaves, and trails some footprints behind her.
The nesting dolls
It seems you can place the dolls back on the curio cabinet. But what pattern to make?
Where else have you seen a 4x4 pattern?
The paper door that the cat ripped up.
The dolls go in the four spots that remain undamaged. But which goes where?
The fish are the clue.
Largest to smallest going from bottom to top.
0 0 1 0
0 0 0 2
0 3 0 0
4 0 0 0
The cabinet slides to the side revealing a third room.
Exploring the third room
You find a contraption that seems to have a spot to put a sitting cat. There is also a locked door with a cat door in it. Nothing to do here.
Now what?
Go searching to find out what cats have moved.
You now see three cats in the sunspot. And one of them is clearly the one that had been rolling around in the potting soil, because you can see the footprints. Interestingly, you can take this cat! But what do you do with it?
Well, it's dirty, right?
And indeed you can stick the cat in the tub. But how do you turn on the water? The handles don't seem to work.
One handle is red, and the other blue.
The sunspot has two shadow letters, one R and the other B.
And notice that the footprints seem to line up with the R and the B.
B R R B B R
And voila, the cat is clean.
But still wet.
Use the hair dryer on the wet cat. You now have a whisker.
What else can be done?
It may not be entirely clear when it happened, but the cat on your newspaper is now gone. This reveals a Roman numeral 2 with an x under it.
Moving the the picture with the roman numerals, we see the cursor now changes to a finger underneath the II.
Hit that spot with the mallet. This earns you a brush and a toy mouse.
Who wants the mouse?
Have we seen a cat already who likes to chase things?
The one on the couch.
Give her the mouse and you finally get to see what was originally under the couch. A piece of paper you can open to get a key and a strange note that has a circled 3 x 1, a circled 1 x 3, a grey cat head, and a circled 2 x 2, along with a picture of the brush.
The cat must be brushed EXACTLY the way it wants to be brushed. Isn't that just like a cat?
But how do we interpret the instructions?
The key thing to recognize is that two of the lines are above the cat head and one is below it.
The circled numbers are the order of the instructions, and the noncircled numbers are how many brushes.
Brush in this order: Head Head Head Tummy Tummy Head
The cat leaves and you get the colander.
Where does the key go?
Yeah, ok, there aren't many possibilities, so this probably doesn't need to be spoilered. Unlock the cabinet on the bookshelf to reveal a rope and a book with instructions for making a Magical Cat Robot?!?!? Ok, things just got very strange. But apparently we need cat hair, a whisker, and a claw. We have two of those. Can we find the third?
Yup. Look on the brush. Ewww.
And apparently we are not supposed to eat cat food.
Rescue the kitten!
We have a rope. We have a basket. It should be obvious what to do with them!
Combine the rope with the basket and haul up the kitten.
Now where did they go?
Ah, found them! In the box with the other kittens. And they are nursing. And the dashes on their backs make a code! 1 2 3 2 3. Possibly the cutest code ever! Where does the code go?
The panel on the floor.
But which button is which?
Use the pattern from the Roman Numerals on the wall. Enter the code to reveal... cat food! Don't eat it!
But do open it and give it to the cats. Turn around and come back and all the cats are busy eating. You can now get the key from the one that had been up in the rafters before.
Hmmm. Not ALL the cats are eating.
And no, I'm not referring to the kittens in the box.
You can pick up the cat that is on the couch. And when you do, you see a keyhole in his tummy.
Unlock him with the key and put the hair, claw, and whisker in the little drawer.
Put him on the strange device in the third room, and push the button. Zap! He hits you with his laser eyes, and you seem to turn into a cat! Exit through the cat door to play outside with the rest of the cats!
The graphics are reminiscent of Tesshi-e's style, but this game has its own quirks you don't see elsewhere.
unReal:birth
What a cryptic name!
Before you start
There's no English version. The text on the first screen tells you that the Flash version has better graphics than the apps but is larger and slower to load.
Click the ゲエムお読み込む text on the bottom to load the game. (Be patient, it's an 8MB download.)
The NEW GAME and CONTINUE buttons are also on the bottom of the screen, and you get a choice of difficulties: Normal, Hard (fewer clues), and Extreme (minimal clues and different codes).
I recommend starting on Normal, otherwise you may find the solutions rather arbitrary.
Exploration
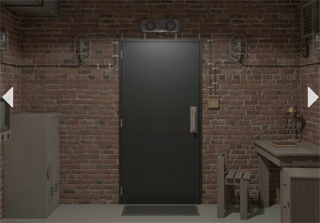
You start off facing an iron door with two lights above it. It's unlocked, but it opens up into a brick wall. Next to the door, a wire runs from the right light onto a device with nine vacuum tube lights.
Turn left. On this wall, there's a short metal locker padlocked with a bronze lock, a hole in the wall with loops of cable connected to its bottom, a trapdoor in the floor below hiding plumbing with a missing valve handle, and a television set with three knobs and no power.
Turn left. The wires from the screen run behind a large fuel tank into a small engine connected to the wall. The other wires (from the first door) run across the wall and end in a circuit box with a screwed-down cover. Next to it, a locked box sits on a wall shelf.
Turn left. There's a potted plant in the corner, hiding a metal key in its top branch. Next to it, a box holds a mining pick/chisel, but the door to the box is tied shut. A desk on the left has a helpful book under the table lamp (in normal and hard mode), and a chest of drawers on the right has an empty top drawer, a locked middle drawer with a three-digit safe and an unlocked bottom drawer with a valve handle. Each digit on the middle drawer lock only has nine possibilities, from 1 to 9.
Above the desk, a fan is missing its switch. You can open up its casing, but the blades are fastened by screws.
The book on the desk has (in hard mode)
a picture of three dials, pointing to the 8th, 5th, 1st position clockwise from the top (the 1st position being the top one).
but in normal mode, it also has
a 1 marked on the pointer of each dial, and a diagram on the left showing various combination locks.
Unlock 1
Use the key on the locker next to the door to open it and get a bucket.
Fueled
Use the bucket on the fuel tank and turn the handle to fill it.
Open the cap on the top of the engine and pour the bucket of oil in.
Then pull the red handle, powering the whole room except the lights on one wall.
Hydraulic
Use the valve handle on the pipe under the trapdoor, and click on it once to turn it.
Back out, and you'll notice that the hole in the wall now has a three-digit safe in it.
Static
Zoom in on the television, which shows a static pattern. Perhaps you could change the channel?
The noise gets weaker when the first dial is turned to the 1st, 4th or 5th position. (Or in Extreme, the 3rd, 4th or 7th position.)
Turn the second dial until the image becomes clearer, then repeat with the third dial.
You should get three images corresponding to the following dial positions (clockwise, with 1 at top):
Normal/Hard:

135 drawers

481 dumbwaiter

569 door
Extreme:

361 dumbwaiter

428 door

795 drawer
If only you had a clue which code to enter...
Flip Flap
Use the clue from the television (and book) to unlock the safe in the dumbwaiter (hole in the wall next to the TV).
Normal/Hard:
Number each dial clockwise starting from the position in the book (which is 851 from the top).
The dials corresponding to the dumbwaiter picture are in the 6th, 4th, 1st position relative to the book clue.
So enter 641 in the lock.
Extreme:
Each dial is numbered clockwise from a common starting position. But which one?
Enter 361 in the lock. It doesn't work.
So brute-force each starting position by repeatedly adding 1 to each digit.
472 doesn't work, 583 doesn't work...
692, 715, 826, 937... 937 works!
(So the starting position was 4.)
With the correct code entered, the slider with a down arrow slides to the left so that it now shows an up arrow.
Lift
Turn the valve handle again, and the safe rises out of view and a compartment with a screwdriver takes its place.
Drawer
Use the same method from before to unlock the middle drawer.
Normal/Hard:
The dials corresponding to the drawer image are in the 3rd, 8th, 5th position relative to those in the book.
So enter 385 and open the drawer.
Extreme:
The dials corresponding to the drawer image are in the 4th, 6th, 2nd position relative to the hidden starting position.
So enter 462 and open the drawer.
The drawer is empty, but it seems like something is supposed to be hidden inside. Maybe your changing cursor can help.
Click the right side of the drawer to find a hidden compartment where a bronze key hangs on a hook.
Unlock 2
Use the bronze key to unlock the box on the shelf. Inside, there's a knob.
Unscrew
Use the screwdriver to unscrew and open the control panel.
The circuit board looks like it's missing a component, so let's leave it for later.
Use the knob on the fan control and turn it off, then unscrew the blades to remove them and find some pliers in the vent behind.
Snip
Use the pliers to cut the wire on the toolbox (on the wall), then slide its door aside to get the pick.
Brick Break
Use the pick on the brick wall behind the door, revealing another three-digit safe which has a knob and a button.
You know the drill by now, so I'll just skip ahead: the code is 729 on Normal/Hard and 185 on Extreme.
Click the button until the first digit is correct, then turn the knob and repeat for the second digit, then turn the knob again and repeat for the third digit.
Turn the handle to open the safe and find a diode (at least, that's what I think it is).
Filled
Use the diode on the left side of the circuit board in the control panel.
Tripled
Now that the other side of the room is (also) powered, the device next to the door opens up, with three buttons below the nine lights.
Click the buttons in the correct order to light up all nine of the lights.
As the Normal book hints, you should combine the three-digit codes to get the correct sequence.
Normal/Hard:
The codes were 641, 385, 729.
The digit 1 occurs on the right of 641, 2 in the middle of 729, 3 on the left of 385, and so on.
So click the RCLCRLLCR buttons.
Extreme:
The codes were 937, 462, 185.
The digit 1 occurs on the left of 185, 2 on the right of 462, 3 in the middle of 937, and so on.
So click the LRCLRCRCL buttons.
When you have the correct code, the nine lights on the device remain on and the right light above the door also turns on.
Escape
Both lights above the door should now be lit, so open the door, which now leads into a white corridor with a ladder leading up.
Climb up and take a moment to look around and enjoy the view of the surrounding islands, then open the last white door to end the game.
Warning for Tsure Game 8
When stepping on the right-left stones at the end of the pathway pay close attention to the entire clue.
Look at the final stone you'll step on.
So it's the white stones, not the black ones.
I guessed wrong, and after I made the mistake, I got a message saying I had drowned. And there was no opportunity to retry, so I could only refresh the browser window and start again from scratch.
@barbara: Huh? Of all the times I tried, the game has never locked me out of that puzzle.
The Retry text appears under "...fell to the sea..." after a short delay.
@kktktr, I guess I didn't have enough patience. As I recall, I sat stunned, staring at the screen for at least half a minute, waiting for something to happen ... but maybe it just seemed like half a minute.
Yay! A new Yonashi game, and finally one that I managed without a walkthrough! :P Their games are always so cute and on point, and this one felt a bit more intuitive than others.
thanks for the help! i got stuck on the final sequence because
i thought it meant each grouping of numbers was for left center or right (for example, that the code for the door was all for the right button bc of the position in the diagram)
Update