
 Maybe you are on holiday, maybe you are planning it and maybe you don't have any. Anyway, Weekday Escape is here as a short break for everybody! Well, not so short, in fact.
The first game is from Detarame Factory and consists of six small games which are not exactly small. What do I mean. Each of them could be easily introduced separately (and as far as I know at least two of them were) as "short cute game"...so really a lot of content today on Weekday Escape! From Amajeto we get what we expect, solid escape game with good puzzles and pleasant graphics. Finally comes Riddle Escape´s room, or I should say escape garden, with full moon magic atmosphere.
Have a good time and enjoy!
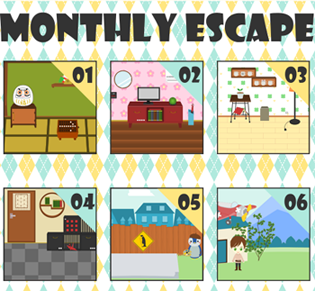
As I've mentioned Detarame Factory brings six (!) games in one pack, each for one month of this year. They are not linear, you can play them separately or skip any of them, but it would be a pity. They are all cheerfull and sweet and full of cute mice, cute penguins, flying pandas and demons. Cute demons of course. And also one romantic wedding is involved! There is not any language barrier, though it may seem so sometimes (the April game). The cursor is not changing, no save button, some games have one ending, some two, intro screen tells you.
Update: the links to games have changed and the game is not a bundle anymore. Here are separate links:

Amajeto brings us another piece of holiday atmosphere and if I say to us, I mean players not living in tropical paradises. For some players it's everyday reality I believe...but holiday or not, you are locked in the apartment by turquoise sea under bright blue sky with small white harmless cloud here and there (judging by window view). The room is surrounded by closed cupboards, jigsaw puzzles, some clues and also one lego-robot, which is a belly dancer, probably. Will you escape? The cursor is changing (its color changes), no save button, one ending.
You find yourself in the garden but all around are high walls (and furiosly chirping cicadas). The only window is barred and so is the exit...should you look for a file? Though it may seem so, you are not imprisoned, it's a game only from Riddle Escape and your mind is more useful than brute force. Just look around carefully for some items and hints and you can escape. One small hint for players who can't read Japanese - later in the game you find something what seems like little planet, mini Venus maybe. It's a seed. Just saying. Took me a looong time to figure it out.The cursor is not changing, no save button, one ending.
This game is available for Android too.
P.S. Did you like this garden where you are inside but also under the opened sky, at the same moment? Then there is The Seeds of Eden and The Song of Flowers by Robamimi and they definitely worth playing or replaying!
We love escape games, and our readers love talking about them and sharing hints! How about you? Let us know what you think, ask for clues, or help out other players in the comments below.


Does anyone know how to get the first (second?) ending for Monthly Escape 02? I just can't get rid of this cake!
@Noel: For some reason, I also had trouble getting to the second ending on my first try.
You need both the cake and the blue box from the first ending. Don't box the cake, but turn around to the windowsill, which should look different (not just empty).
My walkthrough will be in the next comment.
Let's just do the Monthly Escapes in pairs. Each of them is slightly longer than your typical Weekday Escape game!
Some notes about this series:
Not all of them are strictly escape games. In fact, most of them have screens that are clearly "outdoors".
In the description, it says that months 1 and 5 are remakes of original Flash games. You can still find that Flash collection of monthly games around, but the puzzles are slightly different.
It also says that months 7-12 will be released separately.
Monthly Escape 1
It's January, and New Year's day is upon us. So write down a Japanese New Year's greeting (kakizome) with your trusty calligraphy brush.
(There's more Japanese things throughout the game. I've provided names for those I can identify.)
Exploration
You start off with a brush in your inventory.
You start off on a screen facing a white daruma doll on a cupboard with a stuck door. Clicking on the doll reveals that it's missing some red color. Next to it, what looks like a rectangular Reversi board has a pattern of stones that looks like a white arrow on a black background, but one of the white stones is missing. There's a handle on the right of the board, but the drawer also appears to be stuck. A box of rice cakes (kagamimochi) sits on the shelf on the wall, but the topmost tangerine is missing its orange color. The calendar on the wall reads December 30, but you can lift it to find a bottle of green ink. Under the calendar, some clams are grilling over a fire that's missing its red color.
Turn around (left or right). The sliding doors in this room have a sakura flower on one of the left panels, but the doors are guarded by a snake missing its green color, next to a straw mat with nails in it and a piece of calligraphy paper with a purple outline. Next to that, a statue (komainu?) missing an eye holds a crowbar in its mouth. On the wall hangs a painting (with auspicious hatsuyume elements) that looks like it can be opened, but Mount Fuji in the painting is missing a blue color.
Green
Zoom in on the green ink and dip the brush in it, and use it on the snake, who gets up and walks off on two legs through the doors, leaving them open.
In his place, there's a white stone on the floor.
White
Use the white stone on the game board, completing the white arrow.
You hear something unlocking, and you can now open the drawer on the side to find a yellow ink bottle.
Yellow
Go through the sliding doors. It's pitch black except for a white circle, missing its yellow color.
So dip the brush in the yellow ink and use it on the circle, lighting up the screen.
Exploration 2
We're outside on a balcony with a blue bird, a panda with wings (missing their blue color) on a pot in a pond, and a monkey with a top in front of a pink box, who runs across the screen past a banana missing its yellow color. There's also a New Year's decoration with bamboo (kadomatsu) with a locked compartment at the bottom, where the bamboo is missing its green color, and a stone lantern (ishidōrō) with a weird safe at the bottom where the buttons cycle through various emoticon faces.
More green
Use the brush on the green ink, then use it on the bamboo on the kadomatsu, consuming the green ink bottle.
Then open up the compartment and pick up the red ink.
More Yellow
Use the brush on the yellow ink, then use it on the banana, consuming the yellow ink bottle.
Then click on the monkey, who trips over the banana and drops a top.
Red
Go back in the house, use the brush on the red ink, and then use it on the fire under the grill.
While we wait for those to cook, there's something else to color...
Use the brush on the red ink again, and then use it on the daruma doll, unlocking the door below it.
Open that cupboard door to get a second top.
Grilled
Turn around and then turn back, and the clams have cooked and opened up, revealing cute faces with emoticons on them.
Faces
Use the clue from the clam faces to unlock the stone lantern safe outside.
Click the faces 5, 1, 4 times, then open the safe and take an orange ink bottle.
Orange
Use the brush on the orange ink and use it on the tangerine on the shelf, which pops up.
Take the orange key.
Double
Use both tops on the lid of the pink box, unlocking it. (You could say that the tops top the top.)
Open the box to find a blue ink bottle.
Blue
Go back inside, and dip the brush in the blue ink and then color in Mt Fuji.
Then open the painting and get a padlocked book.
Go back outside and dip the brush in the blue ink again, then use it on the panda's wings, consuming the blue ink bottle.
Click on it, and it flies off, and an octopus emerges from the pot. But it's missing its red color.
More red
Use the brush on the red ink, then color in the octopus, consuming the red ink bottle.
Click on it, and it spews out some black ink. But you need something to pick it up with.
Unlock
Use the key on the book, which has a clue in it with lines, symbols, numbers and an octothorpe.
Grid
Use the clue from the book to find a particular spot on the sliding doors.
The X is two squares up and four across from the flower sign.
That's the middle square on the second row of the right door, so click that square to tear a hole, then pick up a piece with a screw that looks suspiciously like an eye.
Tooth and nail
Use the eye on the lion statue, then take the crowbar from its mouth.
Then use the crowbar to remove the floorboard with nails and find a glass bowl.
Black
Click the octopus, then use the bowl to collect the black ink.
Dip the brush in the ink and use it on the scroll, then step back to end the game.
Monthly Escape 2
It's February! Bake a Valentine's Day cake, and choose from two endings!
Exploration
This time, the door to the room really is locked, and you need to bake a cake to unlock it. In the mirror, you can check your reflection: with bright red eyes and pointy horns, you're definitely cute enough to meet your date. There's also a power socket beneath that, next to a TV console with two locked doors, some cookbooks with cake instructions and a green object with a hole in the top. The left cupboard door needs a four-letter code to open, but only the letters from M to W are available. There's also an air-conditioning unit and a spiked club with a red heart shape attached to the handle.
Turn left. A small couch (or bench) has green and yellow cushions, with a jar of sugar hidden behind the yellow one. Above the chair, a board has some cute photos, post-its and a drawing of a red flower in a spherical green flowerpot. A suitcase on the floor is locked with three buttons that cycle through 15, 30, 45, 60. Above the suitcase, you can open the windows to see lots of snow, and a bird with a flower in the distance. There's a rectangular area marked on the windowsill. The refrigerator to the left of the window is locked and needs a four-digit code.
Turn left. Everything is here on this kitchen counter, even a handy button that lets you refer to the baking instructions. It has a working sink, chopping board and stove. There's two locked drawers under the stove, one with a weird color code and another requiring a sequence of six presses of three buttons. Next to those drawers, there's a microwave oven ready to be turned on, with a cake tin already inside. On the left, two cupboard doors are next to each other. The left one is locked and needs a code with four weather symbols, and the right one is unlocked and contains both a mixing bowl and spatula and a saucepan.
Three buttons
Hint: there's one item you can lift but not take, so it's a clue.
Use the positions of the spikes on the club to unlock the lower-right drawer of the kitchen counter.
From top to bottom, the spikes appear in the center, left, right, center, right, left positions.
So click the CLRCRL buttons, and open the drawer to get a bar of chocolate.
Melt
Following the instructions from the book, unwrap the chocolate and use it on the chopping board, then pick up the chopped chocolate and pour it into the mixing bowl.
Then fill the saucepan in the sink, turn the stove on and place the saucepan on it, followed by the mixing bowl.
After the chocolate melts, click it to move the bowl back onto the chopping board. Clouds of steam escape from the saucepan.
Four digits
Use the clue from the clouds of steam to unlock the fridge.
In order of appearance (bottom to top), the clouds have 3, 5, 6, 4 lobes.
So enter 3564 into the fridge, and open it to find an egg, a tub of butter, and a packet of whipping cream, and also a locked drawer.
Mix?
We only have four of the six ingredients for the next step, but let's put them in anyway.
Open the butter, sugar and whipping cream containers and add them in order, then crack the egg on top.
Wait, why do you still have things in your inventory? There's an empty tub of butter and half an eggshell.
Not butter
There's no more butter in the tub, but the base is a different color from the rest of the container. So click on it to remove it and find a key.
Use the key on the drawer in the fridge. Inside, there's a sushi roll with five ingredients in a familiar arrangement.
Five colors
Use the clue from the arrangement of the sushi roll to unlock the upper drawer under the stove.
The ingredients are pink/orange, yellow, brown, green, tan.
So click the small circles 1, 2, 4 times for the top row and 3, 5 times for the bottom row.
Then open the drawer to get a box of birdseed.
Feed
Use the birdseed on the windowsill, then back up and zoom in again.
The bird flies to the windowsill, and it brought the red flower.
Flowerpot
Use the flower on the green flowerpot beside the TV.
This unlocks the cupboard door directly under it, which contains a smartphone with low battery charge and a box with a chick figure.
Hatch
Use the eggshell on the chick, unlocking the blue box.
Open it to find a yellow phone charger (which you can't examine for some reason).
Power
Use the charger on the power socket, then the phone on the charger.
Then back up, turn right or left, turn back again, and pick up the charged smartphone.
The phone has two buttons on it, for the TV and AC. So activate the TV app and click on the TV to turn it on, and then do the same for the air-con.
Once both are on, the phone disappears from your inventory.
Weather
Unlock the left cupboard door below the sink with the weather icons from the weather report.
From west to east, the parts of Japan are sunny, cloudy, rainy, snowy.
So click the buttons 1, 5, 2, 4 times, then open the cupboard door to find the cocoa powder and flour.
Mix!
Open the tin of cocoa powder, then use the flour and cocoa powder on the mixture.
They're well stirred, so pick the bowl of batter up.
Bake!
Use the batter in the microwave, then close the door and press the button.
The game skips ahead to when it's done, but it's now too hot to remove from the oven.
The microwave display changes when you open it though, with fish facing left, down and right.
Dial
Use the hint from the fish on the microwave display to unlock the suitcase under the window.
Left Down Right = 3 2 1 clockwise quarter-turns, and 3 2 1 quarter-hours = 45 30 15 minutes.
So click the buttons 2, 1, 0 times, then open the suitcase to find a pair of oven mitts.
Chill
Use the mitts to pick up the cake, then place it in the fridge.
Then back up, open the fridge again and pick up the cake, now cool enough to touch.
Frost
Turn left. The mirror has now frosted over, and the word SNOW is written on it.
So enter that in the four-letter lock under the TV, and open the cupboard door there.
Inside, there's a blue box with black ribbon.
End1
Open the blue box, place the cake inside, then close the box and leave through the door.
(Once you're satisfied, click the replay button to continue from the previous step.)
End2
Turn around, and your sisters are now waiting by the windowsill. Trade in your blue box for a pink heart box and heart-shaped cutter. (Click them again and they wish you good luck.)
Use the cutter on the cake, then the cake on the open box, close it and leave through the door.
Aww, man. I only got the one
congratulation
in Moon Riddle Escape. I was hoping for at least a couple more.
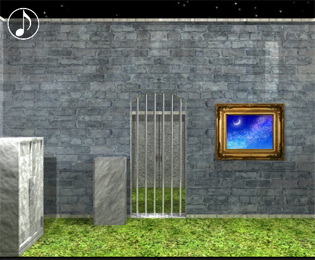
Moon
You start off facing some bars that block the exit and a painting.
Get closer to the bars and pick up the one that is loose. Click again on the
bars and use the one you took on the leaves on the ground to uncover a
message:
_ _ G H _
Go back and turn left (you should see a white cabinet). Pick the towel hanging on the wall.
Turn left again and pick up the shovel next to the well.
Also, on the left side of the well notice the message:
_ I _ _ _
Turn to the white cabinet and use the shovel on the square to the right of it. Pick up the candle.
Go back to the well. Put the towel in the water to get it wet.
Go left. You should see a window with bars and a black safe with a little
box on top of it. Click to the right of the safe and use the wet towel on
the stain on the wall. This will uncover the message:
L _ _ _ T
Now, combine the three incomplete messages to get the word:
L I G H T
Use this word to unlock the white cabinet. Pick up the barrel.
Also, notice the pattern:
top-right, bottom-left, top-left, top-left, bottom-right, bottom-right
Go to the painting and click the corners in the same sequence as indicated by the pattern. Pick up the moon shape. Notice that there's a spot missing a candle. Place here the candle you found when digging.
Go to the screen with the black safe. Place the barrel in the left corner. Now you can climb and get closer to the barred window. Pick up the key. Also notice the pattern on the bars:
Up Up Down Down Down Up
Use the pattern to open the little box on top of the black safe. Pick up the matches. Click the small opening on the bottom of the box to uncover a small sphere (a seed).
Use the key you found to open the black safe. Pick up the vase. Notice the
brown box. We'll soon be able to open it.
Go back to the picture. Uncover the candles and light them up using the
matches. Notice the color pattern:
Blue Red Yellow
Use the color pattern to open the brown box inside the black safe. Pick up
the semicircle shape.
Go to the well and use the vase to fill it up with water.
Go back to the place where you first dug (to the right of the white
cabinet). Plant the seed there, use the shovel to cover it and wet it with
water from the vase. Pick up the circle shape.
Go to the little column to the left of the bars and place the three shapes
on top of it: the moon, semicircle and circle shape.
Go through the door that is now open. Pick up the crowbar. Notice the
picture on the right.
Go to the well and use the crowbar above it, as indicated in the picture.
Pick up the piece of paper that says "Water Fire".
On the piece of paper use water (from the vase) and fire (from the matches)
to uncover two numbers.
Go to the barrel and use the crowbar to open it. The wooden box needs a
three digit code. Add up the two numbers on the paper (water+fire) and use
the sum to open the box.
502 + 344 = 846
Pick up the new key and use it on the locked door. You just escaped!
As a reminder: these two games are longer than the first two, and there's no save button, so you'll have to play them all in one go.
Monthly Escape 3
It's March, and Hinamatsuri is here. So collect 15 dolls (among other things) to place on the platform.
Exploration 1
You start off facing a green locked door. There are shelves with coffee cups. On the top shelf, the middle cup reads BREAKFAST and the right cup hides a gem (#1). On the bottom shelf, the middle cup hides another gem (#2). There's a short table with a plant pot hiding a mouse doll (#10), and a red book under it with just the word MARCH written across its pages. There's also a trashcan which you can knock over to find a pink paper ball and a gem (#3) under the bottom paper ball. There's also a lamp which you can plug in and turn on. picking up a doll (#4) from inside.
Turn left to see the doll's platform with five tiers, missing all its dolls. There's nothing to pick up or do here, so turn left again. On the right of the screen, a picture of books has shifty corners. A doll in a mousehole (with a green door) is too shy to come out, and the cupboard that this sits on has a tall door and three drawers. The tall door is locked and has four buttons with crowns on them that move upwards when clicked. The top drawer has three musical note buttons and takes a sequence of six button presses. The middle drawer has three C buttons that cycle through circular sectors. The bottom drawer is unlocked and contains a doll (#9) and a bunch of checkered crackers (click the three outlined in black to take them).
To the left of those cupboards, lift the green shutter over the window to find a doll (#11). Under that, four boxes (or books) are displayed, with a different picture, label and capitalized letters on each. There's also another mousehole with a blue door that's locked. On the left side of the screen, there's an eye chart with rotated letter Cs, as well as an empty plate on a table.
Turn left, and you're back to the starting screen. A doll (#15) is sweeping up the mess from the trashcan. Thankfully, that mess sorts itself out when you back out of the view.
Feed
Use the crackers on the empty plate, then turn left or right and come back. The shy mouse from before has nibbled on them, so pick up the doll (#3).
The green-doored mousehole is now empty, but there's a tiny mouse key next to it.
Unlock
Use the mouse key on the blue mousehole door, then open it and take a doll (#13), and then take the green semicircular token behind him.
Decimal
(Optional: unfold the pink paper ball for a clue.)
Use the clue from the eye chart to unlock the middle drawer.
The C shapes (gaps on the right) occur on the left of the 0.6 row, middle of the 0.2 row and right of the 1.0 row.
So click the buttons that fill that proportion of the circle (3, 1, 5 times), then open the drawer to find a rubber mallet.
Charm
Use the clues from the labeled boxes and book to unlock the picture of books.
Spell MARCH with the capitalized letters, corresponding to the Meat Ant Reward CHurch boxes.
These occur in the LL UL LR UR corners, so click the ⌞⌜⌟⌝ corners of the picture frame.
The picture comes off the wall, and there's a golden key taped to the back.
Use the golden key to unlock the main door. You can now go outside to find more stuff.
Exploration 2
On this plain facing the mountains, there are some yellow flowers and a white flower next to a gem (#4). Click the white flower, which releases dandelion seeds to the left and right. The rock on the left is guarded by a mouse who wants some sake. Click the bird on the tree to zoom in. It wants 5 gems for some reason.
Turn right. There's a box on the left with another half a token in its front, and a guy wearing a graduation cap/mortarboard, and a pine nut(?) on the ground that sheds leaves to the left or right when clicked. On the right, there's another rock hiding a gem (#5) and a doll (#5).
Turn right. A yellow butterfly which looks like a doll floats across the screen. Nine moles pop out of the ground in a square grid, and a sign next to them has a grid of nine letters next to a hammer symbol. Flip the sign by clicking on it, and there's a doll (#6) behind. There's also a bear soundly sleeping on the grass patch.
Shinies
You should now have all five gems:
Top shelf, under right cup
Bottom shelf, under middle cup
Under paper ball in trashcan
Beside dandelion
Behind rock on right side of screen
Use them on the bird in the tree, who sings a quick tune.
Musical
Use the (visual, not audio) clue from the birdsong to unlock the top drawer in the house.
The birdsong goes ♫♫♩♫♪♪, so click the RRLRCC buttons.
Then open the drawer to find an alarm clock.
Awake
Wake the bear from hibernation using the alarm clock.
It gets up, revealing a doll (#7) and a graduation scroll.
Whack
Use the mallet on the moles according to the clue from the sign (and one of the clues from before).
Spell BREAKFAST (from the middle coffee cup) on the grid, forming a zigzag pattern that passes through the letters in the following order:
943
852
761
So hit the moles with the mallet in that order. The middle mole pops back up, holding a doll (#8).
Left and Right
Use the hint from the dandelion to peel the pine nut.
Click the Right, Right, Left, Right, Left leaves.
A doll (#2) was hiding in them!
Graduation
Give the graduate his scroll. He removes his cap... there was a doll (#14) under it!
Alcohol
Use the green semicircular object on the box (spelling the kanji for Open), and open it to find a tiny bottle of sake.
Use the sake on the mouse on the rock, and pick up the doll (#12).
Then shift the rock to find four plant shoots of different heights.
Taller
Use the hint from the plant shoots to open the tall cupboard door.
The shoots have 1, 3, 2, 4 crowns on them.
So click the buttons 0, 2, 1, 3 times, then open the door to get a butterfly net.
Catch
Extend the net by clicking on it, then use it on the yellow butterfly on the screen with the bear.
You get a doll (#1).
Fifteen
You should have all fifteen dolls:
Butterfly floating across screen
Within pine nut
Eating crackers
In lamp
Behind rightmost rock
Behind letter/hammer sign
Under hibernating bear
Whack-a-mole reward
In bottom drawer
Behind plant pot
Window behind green shutter
Drinker on the rock
Behind blue door
Under graduate's cap
Sweeping up trash
(They're also numbered in order of appearance on the platform: top to bottom and left to right.)
So use them on the platform to finish the game.
Monthly Escape 4
It's April! Go catch the blooming sakura (hanami) before the season's over!
Exploration
Open the door. You can't go out that way, but there's a stick on the floor. Read the red book on the shelf, which describes 8 types of vegetables (and fruits). There's an arrangement of cupboards, but first unfold the red paper crane among them to read a clue about growing flowers with ash. The left cupboard takes a sequence of six presses of two buttons, and has an ant icon in the corner. The right cupboard has three buttons which each cycle through a limited set of katakana. The top cupboard has four buttons which cycle through the vegetables and fruit images from before. The middle cupboard is just locked and simply needs a key. To the right of those cupboards, a fridge is locked and needs a four-digit code, one digit for each card suit. The digits only go up to 7 though.
Turn around. There's a pair of sliding doors here, but clicking on it just brings up zooms in on its lock with three April Fool buttons as some sort of mini-IQ test. In front of those, there's three peas in a pod, but the peas and pod are all fluffy cushions and you can click the different-colored peas to poke them. There's a picture on the wall with a 12x5 grid of card suits, above a locked cupboard (needing a key) with an ant farm above it. To the right, a panel in the wall has a horizontal handle over a lock which takes a sequence of five presses of four buttons.
Suits
Use the clue from the picture with the grid of suits to unlock the fridge.
Divide the grid horizontally into four parts, and look at the Spade Diamond Heart Club patterns in each part.
They form the digits 1472, so enter that in the fridge to open it.
Open the fridge (and freezer) doors to get a hanami dango key and chocolate ice lolly/popsicle.
Unlock 1
Use the key on the middle cupboard on the first screen, and open it to get a watering can and sakura coin (#1).
Fool's
The buttons on the door lock display various facts, but one statement on each button is false.
Math: 5 + 2 ≠ 7
Colors: Magenta - White = Yellow
Numbers: FOUR = 3
Click the buttons 3, 2, 4 times, then open the door and leave to the garden.
Exploration 2
The sakura tree on the left hasn't bloomed yet. On the right, seven four-leaved clovers are arranged in a row, but the middle five are each missing one leaf. Pick up two sticks and three tufts of grass from the ground.
Turn right. There's a working water pump next to what looks like a tree stump, a patch of sand with an ant warning sign, and an incinerator with nothing inside. Pick up another two sticks and three tufts of grass from the ground.
Feed
Unwrap the ice-cream and place it on the sand patch. While we wait, there's another puzzle to solve.
Corners
Use the clue from the clovers to open the four-button panel inside.
The clovers are missing their UR LL UL LR LL leaves.
So click the ⌝ ⌞⌜⌟ ⌞ buttons, then open up the panel. Pull the handle and a bed lowers down, revealing a sakura coin (#2) behind.
There's more to do here, but let's take a quick nap first...
Exploration 3
Ooh, that was a good sleep. It's night now, so go back out to the garden. The lights are on and an owl perches on the fence, a silver key around its neck.
Turn right. There's a sparkle next to the water pump. Zoom in and click on it to pick up a sakura coin (#3). Also zoom in on the sand patch from before. The ice-cream is half eaten, and a single ant stands next to it. So pick it up.
Pet
Place the ant in the ant farm (after opening up the top). Now we just need to wait...
Go back to sleep.
Time passes
It's daytime again! The ant has made some winding tunnels in the soil. Head outside, and the ice cream has melted.
Consolation
Reading the popsicle stick, it looks like you didn't win a prize. But at least you get a clue for the bottom-right cupboard.
Enter ハズレ (0, 2, 3 clicks), and open the door to find a sakura coin (#4).
Winding
Use the clue from the ant tunnel to unlock the bottom-left cupboard.
The tunnel alternately goes left and right.
So click the LRLRL buttons, then open the door and take the bag of seeds.
Growth
Plant the seeds in the pot outside (the one which looks like a tree stump), then fill your watering can and water them.
Now we just have to wait. And by wait, I mean sleep.
Slow
It's night, and a snail is by the flower pot. It carries a pink ballpoint pen with a hint on a scrap of paper in it.
Don't forget to water the flowers again!
Veggies
Use the hint from the pen (and book) to unlock the top-right cupboard door.
You could look in the book to translate the numbers to vegetables, or you could observe that each button starts at Tomato, which is 121.
So 127 124 121 125 = 6 3 0 4 clicks.
Open the door to get a matchbox.
Burn
Place the sticks and grass in the incinerator, and light the fire with the matches.
Now we have to "wait" while it burns. Back to sleep!
Fast
Daytime again! Open up the incinerator and take the ashes, then zoom in on your flowers. A bee hovers over them and flies around when clicked.
Fertilized
Use the ashes on the sakura tree, which is now sparkling.
Colorful
Use the clue from the bee to poke the peas in the correct order.
Poke the left, center, right, center, left peas, and a sakura coin (#5) pops out.
We have all of them but don't know what they're used for yet, so let's go back to sleep.
Blossom
Nighttime! The flowers are blooming and there's a caterpillar on the tree.
Snip
Use the caterpillar on the owl to bite off the string. Now you have a silver key.
Unlock 2
Use the key on the cupboard beside the bed, and open the door to take a smartphone from it.
Social
As in the previous game, this smartphone has two apps on screen. There's a QR code scanner, but you don't have any codes to scan. So use the chat app instead, and click to post a message into the group chat.
It looks like all your friends will be coming over.
And they're here! Open the door and let the alpaca, bunny, squirrel (who gave you a pizza voucher!) and bear in.
Cheap
Turn on the QR code scanner on the phone, then use the voucher on it, then click the screen twice to place the pizza order.
The pizza guy's quick! He needs 5 sakura coins, and you have them:
Inside middle cupboard
Behind bed
Beside water pump, at night
Inside bottom-right cupboard
From pea cushions
So pay him, and take that pizza.
Endings
Now that everybody has an item, bring them outside into the garden and use them under the tree to end the game.
You can do this in the day (End1) or at night (End2).
can't wait for monthly escape 5 and 6 as well as amejeto tropic.
So, in the mini-5 one -- the one for May -- I have finished it several times and one part of it has me confused.
There is the one panel with the three guys with the rope. You click on them and they have two/one/three circles on their heads. There are also three posters filled with ones, twos, and threes.
The ones, twos, threes, do not seem to do anything. Clicking on them in any order does not seem to affect the puzzle's solution any.
@Brf: The penguin trio in May is there to tell you
which digits to look at in each grid of digits.
You probably bypassed this puzzle by guessing its solution - viewing those clues is entirely optional.
Oh. I get it now. I guessed the puzzle it is giving the hint for.
anyone getting 5 and 6 walkthroughs ready as well as the Amejeto tropic walkthrough?
ok.
Six games in just one pack!
bullet force
Here they are!
Monthly Escape 5
It's May! Fly some carp streamers.
Exploration
You start off facing a large sheet of fabric under a diamond-shaped penguin sign with shifty corners, next to a pole that's perfect for putting up a carp streamer. A penguin painter stands on the right with a palette in hand.
Turn right. Three grids of numbers are on the wall, and three penguins with fancy hats hold a loop of rope. The penguins display different numbers of circles when clicked. There's also a small sprout in the ground on the left.
Turn right. A penguin on the left is holding a pair of scissors, but he's not feeling too good because of "gogatsubyō". Perhaps you could give him some motivation. There's a locked chest here which needs a three-letter code, and a paper plane which you can unfold to find a clue involving Japanese zodiac signs.
Turn right. A woman holding a needle and thread is standing on the left. There's also a circled H on the ground, an old-school telephone with only the # and * buttons, and a tiny penguin atop a utility pole.
Turn right. There's a vending machine which only sells kashiwamochi for 3 sakura coins, and a non-stealthy ninja, and an arrow pointing to an unusually blank spot on the fence. Click on the blank spot to find a sakura coin.
Turn right. There's an orange box with a wi-fi symbol that needs to be colored in, a Mother's Day poster with something at the bottom covered over with gray stuff, a turtle with six spikes that you can push around a seventh that looks like a pencil tip on its shell, some planks nailed down to the fence and a penguin that seems to be wearing a simple helmet.
Turn right. There's a blue bear in a sumo ring, and he looks like a tough opponent. There's also a pond full of clear water.
Turn right. There's a chest which takes a sequence of five presses of four buttons. There's an orange pinwheel which is spinning so fast that it's dangerous to touch with bare hands. There's a pole with a lock that takes two zodiac signs. There's a poster of those zodiac signs arranged clockwise around a circle. And there's a few bamboo shoots on the right.
Hmmm... eight screens, loads of puzzles... Let's start with the most complicated one.
Zodiac
Use the clue from the unfolded paper plane and the zodiac poster to unlock the padlock next to it.
Translate the zodiac sign positions to clock times,
Dragon:Horse = 4:30
Tiger:Rooster = 2:45
Total = 7:15 = Sheep:Rabbit
So click the buttons 7 and 3 times, then unlock the padlock to get a fishing pole.
But there's a glimmer where the base of the pole was, so click it to get another sakura coin.
Fishing
Turn left and use the fishing rod on the pond to get a chain of fish in four different colors.
Four colors
Turn left and use the colors on the fish to unlock the orange box.
From large to small, the fish are blue, red, yellow, green.
So click the buttons 4, 1, 2, 3 times, then open the box to get some chilled lemonade.
Cure
Turn left three screens and give the lemonade to the penguin with the scissors, who perks up immediately. And by "perks up", I mean four-up-arrows perking up.
Pick up the Cutter, I mean scissors penguin.
Directional
Turn left twice to the starting screen, and use the penguin's arrow clue to unlock the penguin sign.
There were four up arrows, so click the top corner four times.
The sign comes off and you can take a watering can and pair of chopsticks.
Reach
Click on the chopsticks twice to unwrap and separate them.
Then turn left and use the chopsticks on the pinwheel to stop it. There are some roman numerals on the propellers.
Directional 2
Use the roman numerals from the propellers to unlock the box on the same screen.
The numerals I, II, III, IV, V appear on the left, right, bottom, top and left propellers.
So click the LRDUL buttons and open the box to get a samurai helmet.
Gear
Turn left thrice and give the helmet to the ninja. Now you have a samurai penguin.
Then turn right thrice and use him on the bamboo, slicing it to pieces. Pick up the cut bamboo.
The remaining bamboo is sparkling. Pick up the sakura coin from it.
Vend
Turn left thrice and use all three sakura coins on the vending machine, then push the PUSH button to get a plate of kashiwamochi.
Grow
Turn right twice and fill the watering can in the pond, then turn right thrice and water the sprout.
Then turn away and back, and the sprout has grown into a purple flower with a blue caterpillar on it.
Alphabetic
Turn right, and use the clue from the number grids and penguin trio to unlock the three-letter box.
The penguin trio shows 2, 1, 3 circles.
The 2s in the left grid form a letter M, the 1s in the middle grid form an A, and the 3s in the right grid form a Y.
So enter MAY (3, 0, 5) clicks, then open the box to find a Kintarō bib.
Feed
There's three mochi cakes on the plate, perfect for feeding three penguins.
So turn left and use the mochi on the penguin trio, and they drop the rope.
Higher
Use the rope on the bamboo pieces to make a ladder.
Then turn right twice and use the ladder on the pole, and then climb up and feed the caterpillar to the small bird.
A larger bird lands on the transformer, holding a paintbrush in its beak.
Dress up
Turn right twice and give the bib to the penguin with the helmet.
The Kintarō penguin is now ready for battle!
Turn right and use him on the bear, who's easily pushed out of the ring.
Take the crowbar from behind the bear.
Pry
Turn left and use the crowbar on the planks on the fence, revealing a jumbled image.
Spin
Click the tiles on the image
232
132
132
times to form a counterclockwise arrow, then press the big button beneath.
A green turtle symbol is superimposed over the arrow.
So click the spikes on the turtle shell in counterclockwise order from the upper left, and the spike in the middle pops up. Take the pencil.
Measure twice,
Turn right thrice to the starting screen, and use the pencil on the fabric sheet followed by the scissors (penguin).
An eraser falls out of the fabric.
Clean
Turn left thrice, and use the eraser on the Mother's Day poster, revealing a telephone "number".
Dial
Turn left twice, and press the *####***## buttons on the telephone. (That's 1 *, 4 #s, 3 *s and 2 #s.)
Back out, and a Demazon quadcopter drone drops off a box. Open it to find a bouquet of flowers.
Give the flowers to Mom.
Sew
Turn left thrice to the starting screen, and use Mom on the cut fabric sheets to sew them into a streamer.
Paint
Use the paintbrush on the painter penguin. Now that you have him, use him on the carp streamer to paint it.
Then click on the streamer to raise it and end the game.
Monthly Escape 6
It's June! Get the couple married, but there are some unusual challenges along the way.
Exploration
The first screen has a plane crashed atop a house with our groom next to it, a tree which you can take some branches from, a working water pump, and a cliffside with nails at the top.
But we're not limited by such human obstructions, and can just move to the next screen on the right, where there's a patch of soil and a bright blue rain boot lying in the grass, and another cliffside without anything on top.
Move right again, to a screen with a church. It's raining, and a frog is taking cover using a leaf. He's wearing one rain boot (and a matching cap) and missing the other.
Move right again. There's a bush with large clusters of pink flowers on the left, under which another patch of grass is darker than usual and outlined in red. There's also a crocodile in the river.
Move right again, to a screen with a pond. Four lilypads and a lotus flower are floating in the pond, and you can click the lilypads to rotate them. There's a bush with blue flowers on the left, similar to that on the previous screen, and a snail on the right flower has a bright pink shell and bright pink feelers that you can click on. Next to the bush, a mouse holding its tail stands by a tree. To the right of that, three purple iris flowers in pots have different heights, and you can click the pots to nudge them. Then there's a house with our bride standing in front, and its window has five sun/rain dolls (teruteru bōzu) hanging at different heights, with three star shapes drawn above.
Cover
Give the rain boot to the frog in exchange for his leaf umbrella, and give it to the bride, and click her to get her to move to the left.
This reveals that the door of the house is locked and needs a key.
Short
Use the clue from the window of the house to nudge the iris flowerpots in the right order.
Tall Medium Short Tall Medium = Left Center Right Left Center
So click those pots to get a golden key, and then use it to unlock the door of the house.
Exploration 2
Finally, some shelter from the rain. A cupboard on the left has a ladybug in a terrarium next to a blue book full of useful information about fairy tales, pencil doodling and weak spots. The cupboard itself has three locked drawers: one which needs a sequence of five presses of four colored buttons, one which needs a four-letter code (but only the letters A, I, N, R), where there are two lines above the letters tapering to form a less-than sign, and one which needs a code with three geometric shapes.
There's a window with yellow curtains that you can pull back to find a lizard outside. Tap on the window, and the lizard crawls to different intersections on the grille. Beneath the window, a pink cooler box holds a fish in ice.
On the right, there's a screwed down panel next to a picture of the letters IANARNININ arranged in a heart shape, and a shifty-corner picture with an abstract geometric pattern in blue. Under that, a toy piano next to a blank book on a smaller table with two drawers. The left drawer has crescent-shaped and circular holes, and the right drawer needs a key.
Corners
Use the clue from the lizard to unlock the shifty-corner picture.
Click the ⌝⌟ ⌞⌜⌟ corners, then click the picture to shift it aside and find a watering can.
Letters
Use the clue from the letters in the heart picture to unlock the four-letter drawer. (Or you could just guess the code.)
The picture has 1 R, 2 As, 3 Is and 4 Ns.
So enter RAIN in the drawer, and open it to find a screwdriver.
Use the screwdriver on the screwed-down panel to reveal a light switch.
Light and Darkness
Turn off the light, and the daylight from the window reflects off something on the floor. Click on the sparkle to get a silver key.
But it's still too bright in here. Turn the lights back on, close the curtains, and turn them back off again.
A clue appears to the left of the window with an equation and geometric shapes, and a bright spot appears on the terrarium that cycles through several colors.
Once you're done viewing the clues, turn the lights back on.
Colors
Use the clue from the light on the terrarium to unlock the top-left drawer under it.
The colors are Yellow Pink Green Yellow Blue.
So click the ⌝ ⌜⌞⌝⌟ buttons, and open the drawer to get a trowel.
Math
Use the clue from the equation beside the curtain to unlock the bottom drawer on the left.
Count the number of sides: 50×4+635
That's 835, so click the buttons to show an octagon, triangle and pentagon (5, 1, 3 times), then open the drawer to get a folded rope ladder.
Unlock
Use the silver key to unlock the drawer on the right, and open it to get a roller stamp.
Click the stamp to push it in, then use it on the blank book to stamp in a red strip with lilypad patterns.
Lilypads
Use the clue from the lilypad patterns to arrange the lilypads outside.
The openings face Right Down Left Down.
So click the pads 1, 2, 3, 2 times, then click the lotus flower to open it up and take a magic bean.
Excavate
Move left to the river, and use the shovel to dig up the grass on the left and find some firecrackers.
Sprout
Move left twice, and use the magic bean on the soil patch.
While we wait for it to grow, go left and fill the watering can.
Then go right and water the beansprout.
Up
Go left and use the rope ladder on the cliff, then click the groom a few times to move him to the next screen.
Go right, and click on him again to make him climb the giant beanstalk.
Then climb up with him.
Exploration 3
There's a bunch of clouds here, with an orange creature on the left one. A floating cloud chimney is spouting tiny clouds upwards into the upper platform.
Move right. The upper platform passes through a changing room with nicer clothes. Beneath that, a red creature on the lower cloud layer is pouring rain below. There's a ring of red magic circles around him, and a pedestal with a circular hole.
Move right. There's a blue creature that's similar to the red one, with the ring and the pedestal in the same spot. There's also a pile of three clouds on the left (how?) which hide a box of matches, and a purple creature on the top layer.
Move right. There's a green creature, ring, pedestal, etc. and a blue creature, and a cloud staircase. You know the drill.
Ears
Orange guy has weak ears, so use the firecrackers on him and the matches on the firecrackers to light them and scare him away.
Open the box to get the green orb.
Place the green orb in the pedestal on the very right, getting rid of the green creature and stopping the rain below.
Dress up
Click the groom a few times so that he climbs up, walks to the next screen, changes his outfit, and walks away.
He left behind a paper ball, which unfolds to a sketch of the church with a red star marked on it.
Star
Following the clue from the paper ball, the tree to the left of the church has three roman numerals inscribed on it. Let's keep that clue for later.
Nose
Use the fish on the crocodile, who chomps it up and leaves the fish head.
Attach the fish head on the branch to give it a little extra range.
Then wave it at the purple creature, who flees from the stench.
Roman
Pick up a pink box from where the purple creature was, then use the code from the tree on it.
Enter V II IV into the box, and open it to get a pair of chopsticks. You can unwrap them, but not separate them.
Fluffy
Go back to the screen with the cloud chimney, and use the unwrapped chopsticks on one of the small cloud puffs to pick it up. Now you have cotton candy!
Dry
Go back to the screen with the pond, where the rain has stopped. Pick up the pencil on the ground, and notice the peach on the tree. The lilypads in the pond have also been replaced by tadpoles.
Shading
Go in the house and use the pencil on the blue book to get a hint about the mouse's favorite food.
Treat
Following the hint from the book, give the cotton candy to the mouse outside, who climbs the tree and gets the peach for you.
Mouth
Use the peach on the blue creature. Overwhelmed by the sweetness, he leaves and you can open the box behind him to get a red orb.
Place the red orb in the pedestal on the corresponding screen, driving the rain demon away.
Bright
Go back to the church. Now that the rain's gone, roses are blooming in the bushes. One of them is different, so pick up the pink rose.
Pink
Use the clue from the pink rose to play with the snail.
The leaves occur on the right, left, right, right, left sides.
So click the RLRRL feelers of the snail, and pick up its shell.
Quaver
Use the hint from the tadpoles to play a tune on the toy piano.
The tadpoles' relative distances are 3, 5, 2, 4, 1.
So click the corresponding marked buttons (ACGBF) on the piano, opening up the top so you can get a bright blue crescent piece.
Lunar
Use the crescent piece and snail shell on the drawer beneath the toy piano, unlocking it. Open the drawer to get a blue orb.
Climb all the way back up and place the blue orb in its pedestal, driving away the rain.
Together
Click on the groom until he arrives via cloud elevator at the church.
Click on the bride so she crosses the rainbow bridge, then click her again to put the couple together.
Back out to finish the game.
how about Amejeto Tropic?
Amajeto Tropic
We're in the tropics for a vacation. But if you're coming directly from another Amajeto game (like in Weekday Escape N°145), then you might feel right at home.
Exploration
In good Amajeto fashion, we start with a jumbled picture puzzle over the sofa. The two pictures on the side can be flipped over to show clues in red and green: 2x2 grids with the lower-left and lower-right corners colored in. In the right corner, a drawer has four buttons with pictures of a tropical fruit (and a tree), which change color when clicked.
Turn right. The door to the balcony is locked, so turn right again. There's a television (powered off) over an empty grid of squares. Take a yellow tile beside the vases on the left. The main door, of course, is locked.
Turn right. There are lots of cupboard doors on this screen, but I'll call them drawers to keep it short. Open all five drawers at the top, each of which has a colored handle. There's a digit behind each of them, except for the middle black-handled one which has a tile and a grid clue in blue with the lower-right corner colored in. Below those, the next four blue drawers are locked and require a four-(colored)-letter code, two-button code, four-(colored)-digit code and 4x4 monochrome grid code. Also check out the tilty-corner picture to the left and the square tile in the lower-left corner, and the shelf on the right side with another tile in front of five model coconut trees with colored bases, three facing left and two facing right.
Jumble
Click on each of the pieces in the picture above the sofa to rotate it until the picture is fixed. This puzzle is randomized but when you're done, the picture should match the ones on both sides.
Take the tile from the compartment in the lower-right corner.
That gap in the hammock is distracting, but it lets you flip the picture over to find a clue with the same plant images as the right drawer.
Four digits
Use the clue from the top drawers to open the lower-left blue drawer.
The blue/yellow/red/green-handled drawers hide the digits 4573.
So enter that in the drawer, then open it to get a yellow tile.
Binary
Use the clue from the coconut tree models to open the upper-right blue drawer.
Click the left button thrice and the right button twice.
Then open the door to find a yellow tile and remote control.
TV
Use the remote on the TV to view three clues:
A palm tree with four colored circles in the corners of the screen.
A humanoid figure with a sequence of colored squares.
Names of tropical fruit, each name written in a different color.
Corners
Usee a clue from the TV and coconut tree models to unlock the tilty corner puzzle.
The bases of the trees are Yellow Blue Red Green Yellow, which occur on the UL LL UR LR UL corners of the TV screen.
So click the ⌜⌞⌝⌟ ⌜ corners of the picture to drop it down and get a square tile.
Then flip the picture over to find a 2x2 yellow grid clue with the lower-left square colored in.
Four letters
Use a clue from the TV to unlock the top-left blue drawer.
The letters in the drawer are Red Blue Green Yellow, and the corresponding fruit names are Pineapple Avocado Lemon Melinjo.
Taking the initials gives PALM, so enter that in the drawer and open it to find a yellow tile and silver key.
Outside
Use the silver key on the balcony door to unlock it, and step outside for a breath of fresh air.
Take a yellow tile from the right chair, and watch the figurine on the table do a little dance, raising each limb in clockwise order.
Grid
Use clues from the dancer on the balcony and the TV to put the small colored grid clues together and unlock the lower-right blue drawer.
The colored squares are on the lower-left on the yellow and red grids, and lower-right on the green and blue grids.
According to the TV, yellow and red are the second and third colors that the dancer indicates.
The dancer indicates this by raising its left (our right) arm and leg second and third.
So the right two subgrids should be colored on the lower-left and the other two should be colored on the lower-right.
Click the middle two squares on the second and fourth row:
____

_WW_

____

_WW_
Then open the drawer to find a tile and rectangular filter strip.
(If you squint, you can see the filter colors, which happen to be the same as those on the TV's second screen.)
Four colors
Flip the middle picture above the sofa over, and then use the filter on the plant images on the back, holding the mouse button down to see the colors.
Then use that clue to unlock the drawer on the right.
The banana, tree, coconut, pineapple from the drawer are tinted red, blue, yellow, green by the filter.
So click the buttons 1, 2, 0, 3 times, then open the drawer to get the last yellow tile.
Tiles
You should have all 12 tiles:
Left of TV, beside vases
Middle drawer on top
Beside speaker, lower left of cupboards screen
In front of model coconut trees
From jumbled picture
In lower-left drawer
In upper-right drawer
Behind tilty picture
In upper-left drawer
On right chair on balcony
In lower-right drawer
In drawer right of sofa
Use them on the grid under the TV, forming another jumbled picture puzzle.
Unscramble this jumbled picture (randomized) by swapping the tiles.
This time, there's no reference picture. So as a hint, place the tiles with blue bottom edges at the bottom, and then build up the leaves from there.
When you're done, you get a golden key, which opens the main door to let you escape.
I could get only one ending in February -- my sisters never showed up!
Well done and many thanks to kktkkr for the detarame wt's! Very cute, playable and original games, but I needed a nudge here and there, like
closing the curtain in #6
Update