
 Hi! Welcome to the new Weekday Escape, the firm spot in the middle of a week!
This Weekday Escape at first takes you to the art museum with no1game, not to admire modern art, but to find ten little green men there. After the museum you can play for a while with Amajeto, and finally, with Miyabure>, you visit a truly magic place!
Have a good time and enjoy!
 Find the Escape-Men 177: Museum
Somehow you´ve got lost in the art muzeum and it´s a maze! Wherever you go, you end up at the same place. Finally you find a useful sign which says that if you find 10 little green men, they will help you...so what else to do than find them? First, if the game is not loading properly, it may be your Adblock (has to be disabled for no1game´s site). When it´s loaded, switch to English and start! Remember to check items in your inventory and notice, that if they don´t disapear after using they are reusable.
You are locked in the Amajeto´s room with a balcony (refurnished a bit) and to escape from it you have to open some cupboards and drawers (which you´ve probably opened some time ago and not just once). Cupboard may be the same, but puzzles are new and good ones, so go!
Also, Amajeto as Tomatea´s successor confirmed, there is a link to Tomatea´s games on their site.
Awesome game from Miyabure> takes you to witch´s workroom and before it lets you escape, there is a potion to be made and some codes to be breaked, mostly to get ingrediences for the potion. Nothing special, just some dried snakes or fish, only what you usually use for magic potions, you know.
There isn´t a language barrier to understand clues, only you have to click through a dialogue between a chicken and a small man (there is also a rabbit, but it doesn´t say anything). Some puzzles are tough, but logical. Everything is lovable in this game - wonderful soundtrack, beautiful wartercolor art and strong magic atmosphere. Hope you enjoy it!
We love escape games, and our readers love talking about them and sharing hints! How about you? Let us know what you think, ask for clues, or help out other players in the comments below.


Find the Escape-Men 177: Museum
Don't forget to make the language English so you can understand the intro and a hint.
Exploration
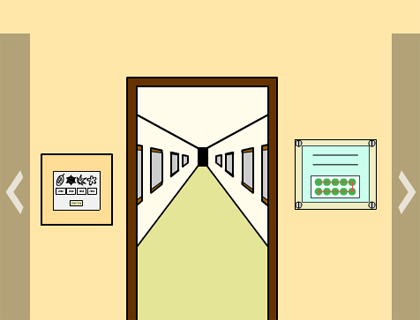
You start off facing a long hallway. It's your best chance at a way out, but you somehow feel that you'll get even more lost if you try. So check the plaque on the side, which tells you to find 10 escape-men first. Also look at the safe on the left, which has pictures of a snowflake, flower and two kinds of leaves, with buttons underneath the pictures which cycle through eight two-letter combinations.
Turn right. The three pictures on this wall show various pairs of fruit in various numbers in variously colored frames. There's a guard sleeping in front of those, and his hands are a rather bright shade of green.
Turn right. There are four pictures on the wall: SPrINg with light pink flowers, SUmmER with a bunch of leaves and an escape-man (#1) hidden in the upper-right, aUTUmN with red maple leaves and WInTeR with snowflakes. There's a sofa with an escape-man (#2) stuck in it which you have to click ten times to yank free, and a safe on the right armrest with colored frames around pairs of colored regions. Under the sofa, it's too dark to see a selfie stick (on the left) and an escape-man (on the right). Yeah, too dark.
Turn right.There are three blank paintings on the wall that shift around a bit when you click them. And if you spend too much time trying to decipher them, an escape-man (#3) appears on the left one. Pick up a copy of Art Monthly magazine from the rack, which has many pages of boring arty blather and an ad for a selfie stick at the end, where the picture on the phone is of an escape-man (#4).
Left and Right
Click the left and right sides of the three blank paintings according the clue from the fruit paintings.
The groups of 1 to 6 fruit occur on the left of the middle painting, right of the right painting, etc.
Click the L of M, R of R, L of L, L of R, R of L, R of M sides. (i.e. 35 16 42)
The middle painting falls off and you can take a flashlight from behind it.
Brighten
Turn on the flashlight, and use it under the sofa to get the selfie stick and escape-man (#5).
Fruity
Unlock the safe on the right sofa armrest using the clue from the fruit paintings (again)
White frame around red and orange
Brown frame around black/green stripes and red
Black frame around pink and green/yellow
Click the frames 3, 1, 2 times and then the insides 6, 4, 2 times, then open up the safe to get a screwdriver.
Unscrew
Use the screwdriver on each of the four screws to unscrew the plaque beside the hallway. After removing the plastic cover, you can take the escape-man (#6) from the sign.
Seasons
Unlock the safe beside the hallway with the clue from the pictures over the sofa.
The four seasons are summer, winter, autumn, spring. If you only keep the lowercase letters, that's mm, ne, am, rg.
So click the buttons 7, 1, 5, 3 times, then open the safe to get a camera.
For no reason whatsoever, close and open that same safe again, and there's an escape-man (#7) on the inside of the door.
Time for a selfie
Mount the camera on the selfie stick, and use it on the wall with the fruit paintings.
The guard instantly jumps out of his chair to stop you, and you can click on him to pick him up as an escape-man (#8).
Shift his chair aside to find another escape-man (#9) behind it.
Then take that selfie again, and pick up the escape-man (#10) on your head.
Now that you have all the escape-men, they point in different directions.
Escape
Use the hint from the plaque next to the hallway to get directions through the hallway.
Watch where the escape-men point.
Top row, from left to right: LURUL
Bottom row, from right to left: RURLU
So enter the hallway and click the LURULRURLU sides. A door appears on the right side, and you leave through it. Congratulations!
the white blank painting code does not seem to work,kk
even though you and I both figured out based on the painting clue the solution should be M R L R L M it doesn't seem to work.
i'm confused.
sorry I figured it out
I thought they were wanting the actual picture clicked. they were wanting the actual side of the picture.
man I;m stupid. lol anyway can't wait for the other 2 :)
In case anyone else has problems like I did with the final hallway section in Escape-Men:
I was reading the instructions as "at each intersection, choose that direction," (so go through 10 intersections), when actually you only go down a hallway when the escape-man points up, and for the R and L instructions just turn in those directions, not actually move down halls (so a total of 4 intersections).
For once, I don't have to spend ages solving the very first tile-rotating puzzle!
Ludo Swap Escape
Its a room with Ludo pieces! Let the game begin.
Exploration
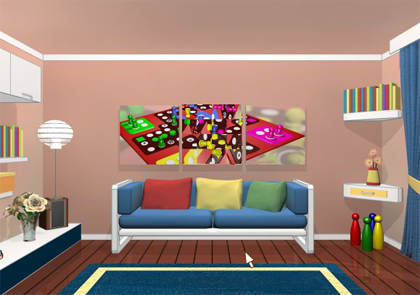
You start facing a sofa with colorful cushions and a triptych of a Ludo board above it, where the center picture is messed up and the picture on the left can be flipped over to reveal a clue with four letters and arrows. Click on the right corner to zoom in on a locked drawer with four dials you can rotate.
Turn right. Its just a door to a locked balcony, so turn right again. There's a television (powered off) on this screen over a grid of squares that's missing 11 of its tiles. Conveniently, one of those tiles is on the left beside a vase. So take that pink square tile, and examine the main door. Yes, it's locked.
Turn right. Open all five drawers at the top, pick up a square tile and the green ludo piece on the very right, leaving just six red and green pieces. Then check out the four drawers below that, which are locked and require a four-color code, a two-button (green/red) code, a four-(colored)-digit code and a monochrome 4x4 grid code. Also check out the picture to the left which has tilty corners, and the sqaure tile leaning against a speaker with a yellow die on top of it.
Jumble
Click on each of the pieces in the center picture above the sofa to fix it. This puzzle is randomized but not too difficult because of its many angled patterns.
Once the picture is solved, a compartment opens in the lower-right and you can take a square tile.
Directions
Use the clue behind the left picture above the sofa to unlock the drawer to the right of the sofa.
The letters LUDO appear next to right, down, down, left arrows.
So click the dials 2, 4, 4, 6 times, and open the drawer to get another square tile.
Binary
Use the order of game pieces in the top five drawers to unlock the upper-right locked drawer.
The six pieces left are (from left to right): red, green, green, red, green, red.
So click the RLLRLR buttons, and open the drawer to get a square tile and a key.
Fresh air
Use the key to open the balcony door, and go outside. After taking the square tile from the left chair, zoom in on the table in the middle which has a Ludo board set up.
Increment
Use the green piece from your inventory on the board. A blue die appears in the center of the board.
Four colors
Each of the corners of the board now has a different number of pieces. Use this clue to unlock the lower-left locked drawer.
There's one yellow, two red, three green and four blue pieces.
So enter YRGB (2, 0, 3, 1 clicks), open the drawer and take a square tile and remote control. Behind the tile, there's a green die.
(Current tile count: 8)
TV
Use the remote on the TV. There's a picture of another Ludo board, with a huge red die covering the center and black-and-white grids in each corner.
Use it again, and the picture changes to a gray rectangle with LOUDU written under it.
Corners
Use the clues from the TV and left picture to unlock the picture with tilty corners.
The LOUDU letters are in the upper-left, lower-right, upper-right, lower-left, upper-right corners.
So click those corners, and the picture slides down so you can open a compartment behind it to take a square tile.
Patterned
Use the clue from the TV to unlock the lower-right locked drawer.
Put the four black-and-white grids together to form
BBWB

WWWB

BWWW

BWBB
Then open the drawer to take a square tile.
Dice
Use the clues from the colored dice around the room to unlock the lower-left locked drawer.
(Hint: use the numbers facing you, not the ones on top.)
Yellow: 3 (On speaker)
Blue: 6 (On board in balcony)
Red: 2 (On TV screen)
Green: 5 (In upper-left locked cupboard)
So enter 3625, open the drawer and take the last square tile.
Tiles
Use all the tiles on the grid under the TV, then unscramble the image that appears. (Also randomized. The image is the same as the (bottom part of the) tilty corner picture but reversed, so you have a reference there.)
A drawer slides out and you can take a key, which opens the main door so you can escape!
I'm playing the Witches' Building game and I'm stumped on
the "X Z" hint. What's it supposed to mean?
@ander: You know how
that potion bottle pictured on the note is blocked by a magic barrier, and needs a sequence of stars to open it?
Draw an X and then a Z through the four corners to break the barrier.
Witch Manor Escape
The music is great but it gets repetitive, so turn it off by clicking on the "BGM" text.
Exploration
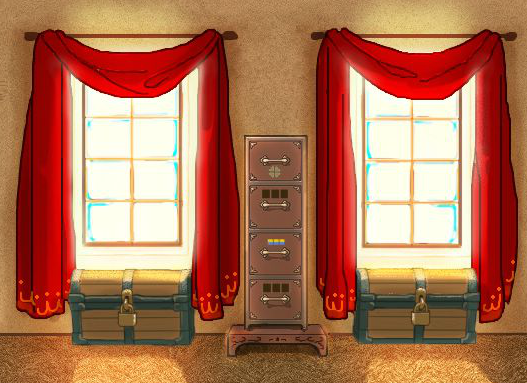
You start off facing two windows draped with nice red curtains, each with a padlocked chest below. In between, there's a cabinet with four locked drawers. The top drawer has a bunch of petals that light up in different colors when clicked, as well as a four-leaf clover where each leaf cycles through different colors. The next drawer takes a three-digit code, but the digits run from I to IX. The next drawer looks like a normal three-digit lock, but there are no digits to be seen. Instead, each of the slots is split into two halves, top yellow and bottom blue. It also has a card slot below the lock. The bottom drawer is your usual three-digit lock, but don't ask me why witches are using seven-segment displays for digits.
Turn around. Here, two magical seals stand in front of a door with no handle, but there's nothing you can do with them yet.
Turn right. A cauldron sits in the middle of the room, with a dark shadow hiding under it. Click on the shadow, which turns out to be a chick, who's actually a chicken but shrunk down, and you need to restore him to size. (If you haven't noticed yet, the chicken is a main character that even appears on the background of the game page!)
The back of the room is marked by a pair of purple curtains, and there's a silhouette of a statue on the back wall. It's just decorative, since you can only access the shelves on the left and right walls. On the left shelves, several white and purple books are blocked off on the top shelf and several numbered green books are arranged in order on the bottom shelf. You can click on the books to move them up or put them back, rearranging them in order. The books have a six-pointed star marking and dark green bands at different positions on their spines. Next to those books, there's a four-digit safe.
Click the arrow or bottom of the screen to look at the other shelf, which is full of various reagents. There are two jars in the bottom, with dried fish and dead snakes. Just turning the lids left or right doesn't seem to open them. On the left of the top shelf, there are a bunch of rectangular blue potion bottles with a key hanging from one and a note in front. You can't have it though, because there's an invisible barrier in your way. Poking it reveals four stars, one on each corner. Similarly, the right compartment has short and round yellow potion bottles with a key hanging from one, blocked by a magic barrier with stars on the corners. Clicking on it shows a pink shape that seems a bit familiar. Click the top-right corner on the shelf above that to take a mortar and pestle.
Colors
Unlock the top drawer with the clues it already gives you.
The petals combine in pairs to form quarter-clovers:
Top left: Yellow + Red = Orange
Top-right: Blue + Yellow = Green
Bottom-left: White + Blue = Cyan
Bottom-right: Red + White = Pink
So click the corners 1, 4, 5, 2 times, and open the drawer up to get a card with the digits 532 in two colors: blue top and yellow bottom. Or maybe I'm holding it upside-down.
Dichromic
Use the card on the third drawer to activate it, and use the code on the card to unlock it. (You can remove the card to look at the code again.)
The card would read 2E5 if you had the yellow sides up, but you can mentally flip it over to make it read 235.
Enter 235, and unlock the drawer to take a note which unrolls to display a string of numbers against a background of six-pointed stars.
A string of numbers
Use the clue from the digit note to put the books in order.
Click all the books to move them to the upper shelf, then click them in the order 8, 2, 10, 5, 7, 3, 9, 1, 6, 4, 12, 15, 13, 14, 11.
The screen flashes white, and another note appears from thin air, which has the letter XZ with a picture of a blue potion bottle between them.
You can now lift up the bar blocking the top shelf, and take a yellow book between the white and purple books. You can also click on the white books to zoom in on their spines, which have a symbol over the book number.
This yellow book is an interesting read, telling you the Japanese names for the snake (MAMUSI) and fish (SAKANA) in red and blue letters, as well as clues on how to use the cauldron- oh no, the last page is missing.
(Fun fact: The Japanese mamushi is a venomous pit-viper which is "the most common snake in Japan", according to Wikipedia.)
Roman
Now that the books are in order, their spines form dark green roman numerals which unlock the second drawer.
Enter I II V (click 0, 1, 4 times), and open the drawer to get a memo with two colored halves (blue and red) labeled LEFT and RIGHT with numbers above the labels.
XZ
Use the XZ note to unlock the magic barrier blocking the blue potion compartment.
Draw an X (top-left to bottom-right, then top-right to bottom-left) and then a Z (top-left to top-right to bottom-left to bottom-right).
After clicking the ⌜⌟⌝ ⌞⌜⌝ ⌞⌟ stars, the barrier breaks, and you can get the bottle and note with a picture on it of a ghost scaring a cat under a witch flying under the moon while a bunch of stars surround each of those.
Examine the bottle to take a gold key, as well as uncap the top. Mmm, potion fumes.
Graphic
Use the picture on the note to unlock the safe on the bookshelf.
There are 0, 1, 2, 3 stars to the left of the cat, moon, witch, ghost (and 3, 2, 1, 0 on the right).
This means that they are in the 1st, 2nd, 3rd, 4th positions of a code.
Cat = 2, Moon = 4, Witch = 5, Ghost = 3
So enter 2453, and open the safe to take a bag of herbs. But on closer examination, it's not a bag, but a single piece of cloth wrapped around the herbs. The cloth has a diagram printed on it.
Treasure hunt
The diagram on the cloth is a floor plan, with additional dots where the curtains are. One of the dots is red.
The red dot points at the left curtain of the left window. So click there to find some opera glasses.
Magnify
The pink shape on the other magic barrier is the same floor plan, rotated left.
So use the opera glasses on the ceiling where the stars would be.
Each of those spots has digits written on the ceiling.
UL: 2 (between purple and red curtains)
UR: 1 6 (upper-right of right window)
LL: 3 5 (left of purple curtains)
LR: 4 (upper-left of door)
So click the⌝ ⌜⌞⌟ ⌞⌝ stars to break the remaining magic barrier, take a yellow potion bottle from inside, and then take a silver key from the bottle, as well as uncap it.
Two chests
Use the silver and gold keys to unlock the two chests, which have silver and gold snake statues in them as well as markings on the lid.
Three digits
Use the clues on the lids of the chests to unlock the bottom drawer.
Put them together to make the digits 308.
Enter that code and open the open it to get a torn page with 42135 written vertically on it.
Jars
Use the clues from the book and two-colored memo to open the jars, one at a time.
Translate the contents of each jar to their sequence of colored letters. The colors determine whether to turn the lid left or right, and the letters determine how many times to turn the lid.
Hint: what do 1432 and 31232 have to do with LEFT and RIGHT?
The letters L, E, F, T / R, I, G, H, T are written with 1, 4, 3, 2 / 3, 1, 2, 3, 2 strokes.
Similarly, M, A, M, U, S, I / S, A, K, A, N, A are written with 4, 3, 4, 1, 1, 1 / 1, 3, 3, 3, 3, 3 strokes.
Right jar: Snake/MAMUSI = L4R3L4R1R1L1
So turn the lid 4 times left, 3 right, 4 left, 2 right and 1 left. (If you mess up, I recommend backing out and then zooming back in before trying again.)
Left jar: Fish/SAKANA = R1L3R3R3L3R3
So turn the lid 1 time right, 3 left, 6 right, 3 left and 3 right.
Take a fish and snake from the jars.
Witchcraft
Use each of the five reagents on the cauldron, forming a clock on the ground. The hands of the clock spin faster and faster, until *poof!*
Oops, looks like you got it in the wrong order. (There's a second different scene for messing it up again!)
Maybe you should check the torn page...
The blue potion, fish, snake, herbs and yellow potion make markings show up on different parts of the cauldron, from top to bottom.
So place them in the 42135 order, i.e. snake, fish, snake, herbs, blue potion, yellow potion.
The magic takes effect, reversing the witch's curse. The chicken thanks you, and a black memo drops in front of the door.
Snake statues
Use the snake statues on the windowsills, and unlock them with the code from the black memo.
Silver: Press the lower-right, left, right, lower-left, top, lower-right buttons.
Gold: Press the lower-left, top, lower-right, left, right, lower-left buttons.
(These two are basically the same code: you could just keep pressing the button that's two spaces clockwise until the statue opens up.)
The pentagon on each of the statues opens up into a star, concentrating the sunlight into bright beams.
Turn around, and the star-shaped beams land on the middle of the seals, vanishing the door so you can escape.
KK a correction on the
color puzzle. you said it was on the lower left door. it was the upper left one that has the color puzzle. the lower left is numbers.
Another correction to your Walkthrough kktkkr: Snake is used only once in the potion.
Okay, that's what I thought I was doing but it didn't work before
Thanks for corrections.
Just to clarify Cyberjar88's correction:
The correct order of ingredients for "Witchcraft" is snake, fish, herbs, blue potion, yellow potion.
Update