
 Hi! Do you miss something? Are you bored? Or tired? Or....just needing a break? Well, a new Weekday Escape is here!
This week are games holidays themed. Ichima invites you to an airy weekend house in deep pine woods, Aries escape to a lovely hotel by the sea and with a bit of imagination, the faucet you are dealing with in Bianco-Bianco´s game, may be placed in some historical city centre you are wandering around.
Have a good time and enjoy!
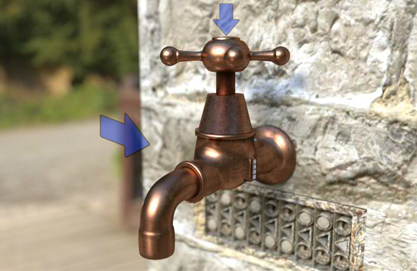
The first and the shortest game from Bianco-Bianco (LTNS!) is only one screen game and your goal is to get to work a faucet. Bad, bad Dr. Ichie made sure nobody from town can drink water and everybody´s mouth is dry! Luckily, Dr. Ichie is not very inventive so you can easily save the whole town just by solving few puzzles. Will you?
The cursor is changing, no save button, one ending.
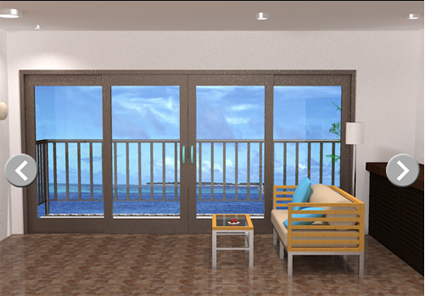
The place Aries Escape locked you in is a lovely room with a view of the sea and seems like a room from some hotel brochure. At the upper right corner is settings button where you can switch off music if it´s too repetitive for your ears (the music loop is quite short). The game is also available for Android and iPhone. Puzzles and clues are everywhere around the room, so hurry, the beach and warm sea is straight ahead!
The cursor is changing, save button, two endings.
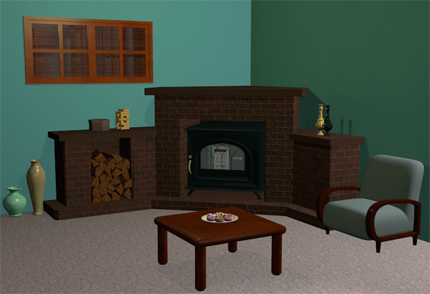
Escaping from Ichima´s Antique green weekend house is very comfortable for your eyes - the window, that displays the game, is large. What a relief! Everything is visible! If you get stucked, and find some help, you can´t ask "how was I supposed to see this?!". But you won´t get stucked, or only for a moment - the difficulty is reasonable and there are no obstacles in playing. Items descriptions are in Japanese though, but you easily recognize what you have found (because you can see it). Go and escape to the woods!
The cursor is changing, save button, one ending.
We love escape games, and our readers love talking about them and sharing hints! How about you? Let us know what you think, ask for clues, or help out other players in the comments below.


Finished all three, all very intuitive with no pixel hunting. I enjoyed Antique Green quite a bit.
looking forward to the walkthroughs.
Jaguchi Escape
I usually play with the tab muted, but I found I needed the feedback that I had done things right. The music is quite pleasant.
Navigation
There are several sections you can visit on the pipe
The faucet at the top
You can rotate the dial to four positions.
The right side
From here, you can click on a section with four vertical white windows. They aren't clickable.
The left side
From here, you can
- press a big white button
- visit the bottom of the tap (upward blue arrow)
- visit the pipe coming from the wall (hotspot to the left of the white button)
- click on the end of the tap to turn it upwards
The pipe coming from the wall
There are three buttons here, left-circle triangle right-circle
The bottom of the tap
There are four pictures that can be positioned under a red marker.
The inside of the tap
From the left side, click on the end of the tap to turn it upwards, then click on the end again. There are four pictures in a row. They are the same pictures that are on the bottom of the tap.
Solving the puzzle
The pattern below the tap
From the view of the right side, notice the pattern below the tap
There are 9 panels, each with a circle, triangle, and circle.
One of the shapes is highlighted in each panel.
Turn your head so the left-most panel is at the "top".
LC RC LC - RC LC LC - RC RC TR
(LC = left circle, RC = right circle, TR = triangle)
The dashes are just to break it up into 3 sets of 3
Go to the pipe coming from the wall where there are three shapes that can be clicked.
Click the shapes in the 9-click pattern from below the tap. Listen for the chime at the end that says it was correct.
Click the white button.
Go to the place with the four vertical white windows. One of them has changed to have a picture.
Go to the top of the tap and notice where the marker is pointing.
Each position of the marker corresponds to one of the white windows.
The goal
The goal is to get the four white windows, top to bottom, to show the same four pictures as are inside the end of the tap, left to right.
Getting to the goal
Work back and forth, figuring out which position at the top of the tap corresponds to which white window. Then position the correct picture under the red marker at the bottom of the tap so that when you do the 9 clicks + white button, the correct picture will go into each white window.
Turning the tap
Once all the pictures in the white windows are correct, you can turn the tap!
Yay!!!
Seaside Hotel Escape takes ages to load. (The time it took me to click around the page a bit, open Chrome to get the same non-game, come back here to see if there were instructions for loading, then going back to the Firefox game window. I was planning to close the game window, but the game was finally there.))
Initially, it doesn't look like the game is there at all.
i can't even get started on jaguchi with the walkthrough. can someone explain this? or at least get a better walkthrough?
@Paul: I can't explain much better than what barbara has without writing my own walkthrough, but here's one for the second game first.
Seaside Hotel Escape
So, Aries Escape has started up a second series and called it Episode2, to match the first Episode series. Are you confused yet?
Also, it's Flashless, the control scheme is very different, and apparently the mobile apps come with extra features.
Let's begin. You only get one room and no TV in this hotel, but that just means more space, more puzzles, and more time to enjoy that seaside view. You're going to have to do it in your underwear though, since for some reason your clothes have been misplaced somewhere in the room.
Interface help
First, adjust all your settings with the upper-right menu button. You can leave the saving on Automatic, since the game won't lock you out of either ending.
The entire inventory is now hidden behind a single large ITEM button to the left of your highly distracting chest pic (which is labeled Yumi, so I guess you have a name now). You have to browse through that menu and click a "choose" checkbox to make an item your active item.
This game is a little easier than the previous games in that the arrows on the sides of the screen are now always visible.
Exploration
You start facing the balcony window with a seaview beyond. But it's locked and you need a key for it. Turn right to view a screen full of stuff.
Sofa view
There's a sofa in front, with two light blue pillows. The left one hides a box which takes a five letter code. Yes, yes, I know you've already guessed the code without even looking at the box, but the game won't let you open the box until you have viewed the clues for it. There's a table in front of the sofa with a plate of strawberries on it. Is that what hotels are up to these days? Just serving strawberries?
There's a lamp behind the sofa, with no lightbulb in it. Back out and look at the photo above the lightbulb, which shifts towards any corners that you click. There seem to be some faint geometric shapes on the photo.
Look over to the shelf to the right of the photo. It has a bunch of glasses and cups, which is ironic for a room whose only water source is a bottle of water. There's a row of four dice neatly arranged on the second shelf, but their top faces are all different. There's also an ice bucket which you can lift up to find a red 8 painted on the wood behind it.
Under the shelf, there's a safe which needs a four-digit code. The four digits are colored blue, yellow, red and green.
Zoom in on the flowers next to the shelf, and take a scoop from it. Then look over at the wardrobe next to it, which is locked and needs a key.
Turn right again.
Bed view
The bed is quite badly made. Apparently you're a messy sleeper. The blanket has a large yellow 3 printed on it, and the right pillow has a piece of paper under it, which the game helpfully names paper A. It has the numbers 1 to 8 written on the four corners.
Zoom in on the picture of a beach at night, which has a whole panel of buttons beneath it, arranged into three locks (each with their own OK button, of course). On the left, four buttons each turn on a column of green lights one by one. In the middle, there are just five switches which can be up or down. On the right, there's two buttons, left and right, and a row of six unlit lights above them.
Back up and turn right.
Desk view
Someone has drawn over this mirror and marked it with red arrows! There are six of them. To the left of the mirror, there's an empty glass on the desk. The desk also has four drawers on its left side, the top and bottom of which are locked. The top drawer requires a key, the bottom drawer doesn't seem to require anything, the second drawer is empty, and the third drawer has a green box whose three buttons make geometric shapes appear when pressed.
To the right of the desk is the exit door, but the lock is blocked by something that seems to need to be unscrewed.
To the right of that door, a hat is hanging on a knob on the wall, and you can pick it up to see a green 7 on the inside.
Puzzles
Corners
Use the digits on paper A to unlock the photo safe.
The digits appear on the UL LR LL UL LR UR UR LL corners.
?? ??
So click the ⌜⌟ ⌞⌜⌟⌝⌝ ⌞ corners to open the safe. (I had to try it several times for it to work.)
Inside the safe, there's a key (key A) and a purple box which takes a four-color code.
Shapes
Use the shapes from the photo to unlock the green box in the drawer.
Circle Triangle Square (2, 6, 4 clicks)
Open the box and take the lightbulb.
Lightbulb
Use the bulb on the lamp, lighting it up.
A blue 9 appears on the lampshade.
Numbers
Unlock the safe under the shelf with the colored numbers you saw around the room.
Blue 9 from lampshade
Yellow 3 from blanket
Red 8 from shelf
Green 7 from hat
Enter 9387, open the safe and take the binoculars.
Balcony
Use key A (from the photo safe) to unlock the balcony door and go outside. You can click on the railing here, but you "need some kind of tool" to properly view it.
Use the binoculars on the island in the distance, which has seven colored flags on it: red cyan orange blue yellow pink green.
Turn right, zoom in on the potted plant, and use your scoop to pick up a lump of soil.
Soiled
Fill the glass on the desk with the bottled water, then drop the lump of soil in it. The soil completely disintegrates, leaving a key (key B).
Top drawer
Use key B on the top drawer, and open it to take paper B, which has a sequence of ◯s and ✕s on it.
Colors
Use paper B with the flag colors to unlock the purple box behind the photo.
RCOBYPGOXXOOXO
R__BY_G = Red Blue Yellow Green
Click the buttons 4, 2, 6, 5 times, and take the magnifying glass.
Look closely
Use the magnifying glass on the balcony railing to find a row of five purple marks, where the first and fourth ones are lower than the rest.
Panel left lock
Use the dice on the shelf to figure out how many times to click each button.
5, 2, 4, 3 times.
A chime sounds and green symbols appear overlaid on the photo.
Panel middle lock
Use the railing markings to figure out the pattern of switches.
Down Up Up Down Up
Flip the 2nd, 3rd and 5th switches, and take key C.
Panel right lock
Use the arrows on the mirror to figure out the sequence of left and right buttons to press.
From top to bottom: RLLRRL
Press the buttons in that order, and red symbols appear overlaid on the photo.
Sofa box
The red and green symbols on the beach photo combine to form the code for the box on the sofa.
Enter BEACH, and take the screwdriver.
Wardrobe
Use key C to unlock the wardrobe, and take your dress from it.
Main door
Use the screwdriver on the door lock, unlocking the door.
But you're "not decent yet", so click on your body and use your dress on yourself.
Normal End
Open the door to escape, enjoy the fresh breeze for a while, then click the "Return to before escape" button to carry on.
New unlocks
Open the bottom desk drawer, which is empty but has a picture of strawberries on its bottom.
Nom
Eat the strawberries off the plate on the table (in front of the sofa), then flip the plate over. It has the digits 6385 in yellow, red, green and blue.
New items
Unlock the safe with the code from the plate.
Blue Yellow Red Green = 5638
Open the safe and take a necklace.
Happy End
Use the necklace on yourself, then leave through the main door. This time, you get a cocktail on your ending screen, for an extra fruity ending.
well i'm confused kk
I pressed all 4 of the anmimals in order and I heard no sound. I made a screenshot of it too. White Button won't press either.
What am I doing wrong?
Ok, first you need to make the white button work:
Solve the puzzle with the circles and triangle buttons, behind the tap on the same screen as the white button.
Then you can solve the animal puzzle,
making the animals show up in light blue on white on the right side of the faucet.
To do this, you will need to coordinate the positions of the animal buttons (bottom of faucet, in black on gold) and the center piece of the faucet top, then press the white button when they're in position, and then repeat for each animal.
i'm still confused.
well now the
Pictures always show up in #1. I thought each picture was supposed to show up in a different window.
never mind. sorry. I ifigured it out. anyway the first 2 games were cool. can't wait until antique green
For Antique Green, the locations of the 4-tile puzzles. I kept forgetting where they were ...
Pink
Behind the chair by the fireplace
Blue
In the alcove to the left of the bookcase
Red
Behind the yellow/brown diamond puzzle in the kitchen (locked at first)
Yellow
Behind the 4-shape puzzle under the cactus (locked at first)
Going crazy with the fireplace code at the end? I was ... I had to go to a video walkthrough
Remember where you got the 6 numbers you've been trying over and over?
In the yellow safe in the room at the bottom of the ladder. Go back there and poke around a bit before opening the last spoiler here.
Close the door of the yellow safe. I guess I should have recognized that all the other locked doors in the game re-shut themselves after leaving the scene.
got a walkthrough for antique green?
someone needs to ban abhiedit, he seems to be spamming the boards. anyway hope a walkthrough is coming soon to the last game.
Yes Paul I banned him.
room19 antique green
At first glance, this looks like a pretty cosy room where you'd just sit around the fire for tea and donuts. But this house is larger than it looks, and whoever lived here took extra effort to mess things up just enough to hinder your progress.
[Exploration] Main room
Fireplace view
On the left, just above the pile of firewood, there's a hexagonal box with a yellow tile in it (actually a yellow flower on a white background, but let's keep it simple). Taking the tile reveals the number 57 on the bottom of the box.
In the fireplace, there's a safe instead of whatever flammable material's supposed to be there, and... there appears to be another safe inside it. At least it's secure.
To the right of the fireplace, there's two ceramic flasks, in black and (off-)white. They have diamonds drawn on them which form a code. To the right of that, the armchair moves aside to reveal a safe on the wall with three purple flower tiles in a grid that's missing the lower-left one.
On the table, there are seven donuts on a plate with a clover mark. The upper-right and bottom ones are pink and plain (other than the sprinkles). The upper-left and lower-left ones are white with a chocolate stripe over the top, and the top, middle and lower-right ones are brown with a chocolate stripe around the outside.
Turn left.
Bookcase view
The door on the right is locked, so look over at the bookshelf behind the pillar.
This bookshelf has a few groups of books, with matching colored spines. It also has a speaker and a metronome, just cause. To the right of the metronome there's a safe which takes a three-digit code. The buttons have decreasing lengths from left to right, with the left digit sitting on an awkwardly long button. Under that safe, there's three stacks of three, two and five books. The right stack has wider (taller?) books than the left stack, which has wider books than the middle stack.
Back out and click on the wooden door behind the bookshelf. This zooms in on the wall which has another one of those safes missing a tile. This time, you need a blue flower tile. Turn right to look at the wooden door, which doesn't open. There isn't even a doorknob for it.
Back out again, and click on the stairs to go up. The door here is locked with what appears to be the same safe, but it's not missing any tile. The four tiles on the door have yellow, red, purple and blue flowers.
Go back to the bookcase view and turn left.
Kitchen view
Once again, I'm going to switch directions and start from the left side. Behind the sink (which works perfectly), there's a safe with diamond-shaped buttons in white and black.
Look past the window and fancy lamps and click on the fridge. In the freezer, there's a tub of ice-cream with 23 written on the lid, and in the fridge there's a tetrahedral juice packet with 48 written on it. Come on, who's been drinking all the juice?
Open the cabinet to the right of the fridge, and take a slice of bread from the square plate. The number 16 is written on the plate. Under those doors, there's a locked drawer, where the lock takes a four-digit code. The wine bottles below that drawer are unimportant, so it's time to move on.
Back up and turn left.
Dining room view
Check out the picture frame on the right, which has three donut-shaped buttons below it. The buttons are white, with dark stripes going around the left one and across the right one.
There's a jug on the table. Lift it and take its coaster, which is a red tile.
There's five cupboard "doors" to the left of the table, not all of which are actually doors. Zoom in on the first section on the left, where the door has been screwed shut. The second section has a small box over it with three drawers, containing a note, nothing, and a power cord respectively. The note reminds you to spritz your cacti.
The door on the third secion is locked with a lock that has four buttons on it, in the shape of a triangle, circle, hexagon and square. The fourth section has a cactus on top which looks rather dry, and the fifth section has a lamp which is fancy but completely irrelevant.
Four shapes
Combine the digit hints strewn around the room to unlock the cupboard door.
Triangle = 48 (Juice box)
Circle = 23 (Ice cream tub)
Hexagon = 57 (Box over firewood)
Square = 16 (Bread plate)
Press the SCCTHSHT buttons (which is ⌟⌝⌝ ⌜⌞⌟ ⌞⌜) to open the safe.
Inside, there's another safe! It's one of those missing tile ones, and is missing a yellow tile. Place your yellow tile there, and the light turns green.
Three donuts
Unlock the picture on the wall with the clue from the plate of donuts.
The corresponding donut stripes are circle, none, circle, line, line, none, circle.
So press the LCLRRCL buttons. The picture opens up, and of course, there's a toaster and power socket in here.
Toast
Plug the toaster in and toast some bread. That was quick! The untoasted area of the bread seems to form a weird squarish symbol with holes. More than one symbol, perhaps.
Two diamonds
Use the diamond symbols on the white and black flasks next to the fireplace to unlock the safe behind the sink.
Press the BWBWWBB or RLRLLRR buttons to open the safe. Inside, there's a missing tile safe that's missing a red tile. Fill it in to light it up.
Four digits
Use the code on the toast to unlock the kitchen cupboard drawer.
The toast reads 1763, so enter that and open the drawer.
The drawer seems a little cluttered, but it's relatively easy to find the screwdriver, a pencil hiding among the forks, and a hidden compartment that you can't open yet.
Three digits
Use the code from the bookcase books to unlock the bookcase safe.
Long: 5 books
Medium: 3 books
Short: 2 books
Enter 532, open the safe, and take the fork hiding among the pencils.
Put those back
Use the pencil from the kitchen drawer on the pencil holder in the bookcase. A drawer slides out and you can take a purple tile.
Use the fork from the bookcase on the other forks in the kitchen drawer. The hidden panel opens and you can take a blue tile.
Put those back too
Use your remaining tiles on their safes.
Tile and safe list:
Yellow tile from fireplace box goes into the cupboard safe (left of table, 3rd door)
Red tile from dining table goes into safe behind sink
Purple tile from bookcase goes into safe behind armchair
Blue tile from kitchen drawer goes into safe left of bookcase
There's still one more thing to do in this room, but let's go up the stairs and open the door.
[Exploration] Bedroom
Right after going in, there's a box with three buttons on the front forming the shape of an acorn. Turn right to the bed view. The window is shuttered up, and a wire runs from it to the corner of the room. In that corner, there's an open trapdoor with hooks on its edge, and an empty spray bottle next to that.
You can't do anything with the bed, so go back down.
Spray
Turn the sink on and fill the spray bottle, then use it on the cactus, which instantly grows flowers and magically opens up a drawer in the pot. Take the white key from the drawer.
Unscrew
Use the screwdriver on the left cupboard door to open it. Take the curling stone.
The game helpfully holds on to the screwdriver for you to use later.
Unlock
Use the key to unlock the door to the right of the bookcase, and go to the entrance hallway.
[Exploration] Entryway
Walk in to see a locked white door at the end of the room, as well as a box with a target painted on it.
Turn around, and there's a big red switch (circuit breaker?) on the wall, with wiring running upward from it. Flip it up. Nothing happens, at least not that you can see from here.
You can't pick up any of the items in this room, so it's time to solve more puzzles.
Score
Place the curling stone on the target, which weighs it down and opens up a compartment on the top-right corner. Take the yellow key.
Window
Go upstairs, and look at the window. The shutters are now open, and there are acorns on the windowsill with parts of them painted green.
Acorns
Follow the acorns on the windowsill to open the acorn box in the same room.
Top, Top, Right, Top, Left, Right.
The box opens. Take the broken ladder.
Descend
The ladder may be broken, but it's still good at least once. Hang it on the hooks on the trapdoor, and go down.
[Exploration] Basement
Turn left. There's a yellow safe here which is already open, and a card in there with 468618 written on it. Since there's nothing else in the safe, let's close it for them. And play with the door buttons... wait, the buttons make the wrong digits appear! Clearly someone has tried to rewire the buttons on this thing, and now it doesn't lock properly.
Turn left again. The door is locked with a golden padlock passed through two metal loops screwed tightly down. Oddly enough, there's no keyhole on this padlock.
Turn left again. The ladder has broken down, trapping you in here. Time for plan B.
Breakout
Use the screwdriver to loosen the loops on the door. It swings right open and you can get back to the main room.
Unlock 2
Use the yellow key to unlock the safe in the fireplace. The safe inside that safe takes a six-digit code.
Let's see. 4, 6, 8... no, that doesn't work. What now?
Cryptic
Enter the code from inside the yellow safe on the door of the yellow safe.
Then use the code that appears to unlock the safe in the safe in the fireplace.
468618 becomes 815125.
Enter 815125 on the fireplace safe-in-a-safe, and take the door key from it.
Exit
Use the door key to escape through the white door. You're out! And a squirrel thanks you for playing.
Jeff, Thanks for that. and KK thanks for that walkthough.
Update