
 Hi! Quality time ahead! The Weekday Escape is here for all puzzles and riddles lovers! Just sit back and loosen up yourself, there are three adventures of the mind for you!
Common theme for this week is poultry. Really. You are not escaping a poultry farm, but some domestic fowl is involved in each game. In the first one from daba you are a huge and apparently very clever rooster. In Yonashi´s game you find a rooster´s figurine in the laboratory during the escaping process. And in beautiful Kamotokamotokamo´s game you have to fulfill some tasks for two cute duckies.
Have a good time and enjoy!
The setting is very simple, there is a hall, four doors around and a puzzle or two behind each door. Puzzles are not difficult, but they do require some thinking and combining clues. Don´t forget to check the items you collect!
The cursor is not changing, no save button, one ending.
The laboratory you have to escape from seems a little bit different. I haven´t seen many laboratories in my life but a door knob replaced by an apple isn´t very common, right? And these animal figurines everywhere.....anyway, you have to escape from a place, "a laboratory", they say, and I have some hints for you. Don´t overthink puzzles, you don´t need chemistry knowledge to solve them. Also, there are more views than it seems. Side bars are for navigation, but some views miss them, so click everywhere.
The cursor is changing, save button, one ending.
Three weeks ago we played Nunu Kid escape from Kamotokamotokamo (the developer´s name is Den of the Kamo now) and this week they are back with another game. And it´s pure pleasure again! Two pleasures, actually. At the beginning you have to chose game - A or game - B but don´t worry, it´s not a crucial choice. After finishing A or B game you can return via replay button to the start and try the other one. Game B is longer, but otherwise there is not much difference, both games are lovely in all aspects, graphic, design, music (each part has different music!) and puzzles, of course. More Den of the Kamo, please!
The cursor is changing, save button, one ending.
We love escape games, and our readers love talking about them and sharing hints! How about you? Let us know what you think, ask for clues, or help out other players in the comments below.


I never liked this particular escape series (sorry, daba!) because of how arbitrary the puzzles are. I'd have given up if I hadn't accidentally solved the most obscure puzzle just by playing around.
(One small correction: two endings, not one.)
4Doors Escape 6
After clicking your way through the fancy title screen and turning on the light switch, you find yourself in a room with... four doors.
Exploration
In this main room, you start off facing the red door. Turn right clockwise, and you'll see that each wall has a different color door, and each door is smaller than the previous: Red, Blue, Yellow, Green. There are also minor differences between the door designs.
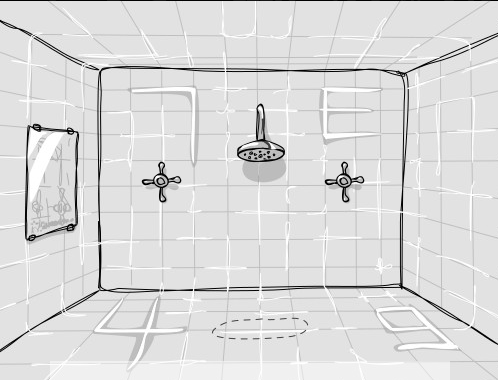
Open the red door, and go through to the shower room. There's a shower right in front with a circular marked area on the ground below. There's two knobs on the sides that don't seem to turn on the water when you spin them. Some gaps between the tiles stand out, which is really odd. On the wall, those gaps form the symbols 7 and E. On the floor, they form the symbols 4 and 9.
Admire your reflection in the mirror on the left, then check its lower-right corner for a code:
TEL=2,4,2,(RBY-BR-YBGGR). Something tells me that's not actually a phone number.Go back to the main room, turn right, and enter the blue door this time. There's a single cupboard with a locked drawer, and two potted plants on the side which flop their leaves thrice regularly. Zoom in on the pot on the right, and take a bead from the soil. It looks like a fruit, but you can examine it to find a hole on the back.
Go back, turn right, enter the yellow door. There's a pipe which runs down the left wall, bends back up, and opens into some sort of holder for something with a flat base. There's also a drain pipe on the right, which you can open the cover for and take a short length of tube from.
Go back, turn right, open the green door. This area is way too narrow to enter, even for a rooster, but you can see a green button on the far end which is too far to reach. (You can click on it with the tube to see a different animation.) There's a colored strip of rectangles on the left wall: Blue Red Blue Green Yellow Red Blue.
The button
Turn the bead over and insert the tube, which somehow makes it rigid. Use this stick to push the green button.
The drawer in the plant room (blue door) flips open so that the front panel is now horizontal. There's something circular at the back, but it's still blocked by the panel. The front panel is now flat, and has four different-sized rectangles attached to a ladder-shaped metal structure. Instead of a rectangular plate, this ladder has a short metal rod attached to its fifth rung.
There's also a caterpillar crawling across the bottom of that panel, which you can safely ignore. (I said ignore! No eating!)
The drawer
The four rectangular panels and the metal rod form a xylophone which you can play with the stick as a makeshift mallet.
Now we just need a code with four different-sized rectangles and a short line.
The four rectangles represent the door colors, corresponding to green, yellow, blue and red.
The short line represents a hyphen.
The code from the mirror represents a sequence of colors (rectangles), with some hyphens thrown in.
Number the rectangles from left to right (small to large) 1,2,3,4. Hit the following with your mallet:
432-34-23114The circular object rises behind the drawer. (Wait, how did it fit in there?) Take the object, which turns out to be a washpan.
The shower
Go back through the red door, and place the washpan on the floor under the shower.
To turn the shower on, we need the correct sequence of knobs, left or right.
Hmmm... left or right... is there anything around that's left or right?
The red and yellow doors open to the right. The green and blue doors open to the left.
The rectangular strip code translates to a sequence of lefts and rights.
B R B G Y R B = L R L L R R L
The shower fills the pan with water, and then turns off. Take the full washpan.
Drainage
Go back through the yellow door, and place the pan on the holder on the left. The water drains into the pipe (somehow), then pours from the ceiling, revealing letters on the wall and a hidden panel on the floor.
The letters on the wall are in alphabetical order, but there seems to be nothing special about their arrangement.
The panel on the floor has four buttons labeled I, II, III, IV. Clicking on the buttons cycles their label through 10 digits, then back to the original label. There's also a yellow button in the middle.
Now that the drainage pipe on the right is filled, you can open the grate again to take a note in a plastic bag. The note has four lines labeled I through IV, and they read MKDYSM AJRKA HNWXQH IGRSI. Then there's a plus sign, and a picture of a shower head.
Symbols to numbers
Four symbols on the wall and floor, four buttons on the panel.
From the mirror, we know that T=2, E=4, L=2.
(Hint: these numbers might be particularly significant to someone designing a font or two.)
That's the number of line segments in each letter.
Since the bathroom cracks make the symbols out of lines, we can count the lines:
7: 2 lines

E: 4 lines

4: 3 lines

9: 5 lines
Gibberish to numbers
Next, we have to translate MKDYSM and such to digits. Perhaps that wall full of letters has something to do with it.
If you connect the dots (letters), you'll see that the four lines on the note trace out a five-pointed star, diamond, pentagon and trapezium.
But you don't even have to do that. The number of line segments is just the number of letters, not counting the last repeated letter: 5, 4, 5, 4.
Four-digit code
Add the two four-digit codes from the shower tiles and note together to get a code for the floor panel.
Note: 5454
Shower: 2435
Total: 7889
Enter 7, 8, 8, 9 on the top-left, top-right, bottom-left and bottom-right buttons, then press the yellow button.
The panel flips over, and now there's a big blue button labeled OPEN. Push it and a spacesuit rises from the ground.
Take the spacesuit, and some of the letters on the wall turn red, shuffle around, and form the word READY?
Ready or not, once you back up from the screen, the yellow door closes and another wall drops down over it, smashing the stair to pieces. There's a large Countdown button on this wall.
Okay, that's it. No more navigation, no more puzzles, you just have to choose between two endings. If you change your mind and decide to go "a little back" in time to view another ending, the game will kindly put you right back at this point.
Bad End
Click the Countdown button. More walls fall in front of the button, making a dramatic countdown to 0.
The whole wall gets sucked out, revealing a lunar landscape outside. You promptly pass out from asphyxiation. Oops!
Good End
Examine your spacesuit, then click on it to put it on.
Then click the Countdown button, which starts a countdown to 0.
The wall gets sucked out, and now you're a space chicken. Congratulations!
thanks for the 4doors walkthrough as usual KK. can't wait for the other 2. :)
When I get to the end of 4 Doors, the ending graphics don't load but the sounds do and I get a message I completed it.
Don't try this in your own lab. It'll just end in pain, tears, and running away from 50-foot mutant pears.
Laboratory
Experiment with everything in the lab to unlock the secret of plant growth.
(You'll need to view the necessary clues before unlocking each safe.)
Exploration
Every screen looks the same to me, so I'm just going to try naming them after objects.
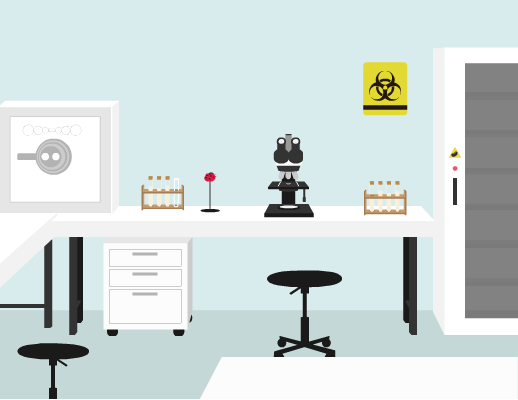
Screen with microscope
First, look at the table with the microscope on it. There's a safe to the left, which opens with a left-right code. It has a clue above it, a necklace of four circles decreasing in size and then four circles increasing in size. There's a book leaning on the left side of the safe, but it's locked, and needs a sequence of four buttons (in a grid) to open.
To the right of that safe, there's a test tube rack. The last test tube is empty and uncorked, and it's the only test tube you can take. There's a ladybug figure which opens up to reveal a number 1. Creepy.
The microscope has no slide on it, and so the view through either lens is just a blank white circle. To the right of it, there's another test tube rack and a radioactivity warning sign, neither of which you can do anything with.
Under this table, there's a filing cabinet. Click on it to move it aside and take a whiteboard eraser. (The black part of the eraser blends in too well with its background, but that's what it is.)
The cabinet to the right is locked, as indicated by the red light over the handle. There's a warning sign with a bean on it, and through the glass you can faintly see a bean growing in a petri dish under blue light.
Click the bottom of the screen to zoom in on the nearest lab table. There's three containers with gray liquid in them, which are pear-shaped, conical and round-bottomed. This last flask is sitting on a kerosene burner which is unlit, and it has a removable stopper as well as an outlet tube which stretches off-screen.
Click the right of the screen. The end of the tube is just hanging in midair not connected to anything. There's an office chair on this screen which you can click to lift up. A toy horse becomes visible, and clicking on it separates its er... hind parts, which have the number 57 written on the inside. Creepy!
(Back out and turn right.)
Screen with sink
There's a lot of containers on and under this sink, and also a generic warning sign, probably about the dangers of hoarding too many containers.
Zoom in on the sink. The handle is a ball-and-stick model of a molecule of water, but it's missing a hydrogen atom. You probably don't want to turn on the sink right now.
Click the containers under the sink to shift them. There's a fish model hidden in there, and the fish splits in two to show you the number 26 on the inside. Creepy.
The lab door has an apple for a handle. No, you can't chew it off because there's no eating allowed in this lab.
(Turn right.)
Screen with cabinet
There's a generic no-something sign above a trash bin on the left, both of which you can safely ignore. You will not be trashing anything today.
The top cupboard is locked, and you need a key for it. Through its glass doors you see loads of flasks, a beaker, and... something with a foot?
The bottom cupboard opens on both sides. On the left, there's a locked box with three displays, two side buttons, and one Open button. The displays each show a single black outline on a colored background. Pressing the left or right buttons shifts the colors right or the outlines left.
The outlines are triangular, round or pear-shaped:
[T R P] R P T P (T R P ...)
The backgrounds are green, pink, yellow or blue:
(... G Y B) G P Y P [G Y B]
Open the right door of the cabinet. There's a chicken figure whose rear feathers come off to show you the number 34. Creepy!
Click on the whiteboard to the right, which has a weird string of letters written on it. (Chemical symbols?) The last three letters are slightly scratched off, as if someone did a very bad job of erasing them. There's also a red circle and a green circle on the whiteboard.
(Turn right.)
Screen with laptop
There's a different warning sign here: a lightning bolt in a red circle. Don't worry, this laptop is perfectly safe. Click on it to view the screensaver, which is just H2O2 CH3COCH3 running across the screen over and over. (The 2 and 3 are ₂ and ₃, of course.) Click the laptop screen to dismiss the screensaver, then click the folder on the desktop, which is locked with a password, a sequence of buttons H, 2, C, O, 3 where the password hint is "-CO2".
If this feels too meta, leave the laptop by zooming out, and push the filing cabinet under the desk. Nothing.
There's a plant pot to the left, placed directly under a window with blinds. Open the blinds. That did nothing. Close them. Nothing. Open them. Close them. Open. Close. Open. Something falls out behind the filing cabinet, or where it used to be. Take the white ball on a stick.
A little wipe
Erase the text on the whiteboard, leaving six corner markers: ⌜⌟ ⌞⌞⌜⌝.
Secret manual
Unlock the book next to the safe by pressing the buttons according to the whiteboard code.
Press the ⌜⌟ ⌞⌞⌜⌝ buttons (which are the upper-left, lower-right, lower-left, lower-left, upper-left, upper-right buttons).
The book says... well we can't read what it says, but the picture shows that you should carefully pour a test tube of orange liquid on a seed buried in soil under sunlight. The next page is blank. Flip. The next two pages are blank. Flip. Blank. Flip. There's a hole in the book with a vial filled with pink liquid.
Secret data
Remove CO2 from the laptop's screensaver text to get the pass sequence for the locked folder.
In fact, remove every C, O and 2, leaving just HH3H3.
Enter that pass sequence. An unlocked padlock says OK! over a warning sign of a bean.
Another locked folder appears on the desktop. This time, it's green and the password hint is -WATER.
Remove every H, 2 and O from the screensaver text, leaving just C3CC3.
Enter that pass sequence to unlock the second folder. A warning sign appears to the left of a red X. Looks like a generic computer error...
Secret spots
The second folder on the computer showed us a clue to a hidden compartment.
Find the warning sign over the sink, and click to the right of it. Open the hidden compartment and take a key.
A stash of flasks
Use the key to unlock the top cupboard. Open the right door and take a glass beaker from inside.
Open the left door and zoom in on that foot. It's an uncannily realistic model mounted on a stick, which is attached to a locked box with four buttons numbered 2, 6, 0, 4.
Creepy?
Use the numbers from the four models hidden around the room to unlock the box.
Chicken (2 feet) = 34
Ladybug (6 feet) = 1
Fish (0 feet) = 26
Horse (4 feet) = 57
Now to put the digits in order...
Click the 6022404 buttons. The foot stomps down, and a drawer opens with a microscope slide inside.
Making the small big
Place the slide on the microscope, and look in the eyepiece(s). One cell has a bunch of C shapes in them, which are arranged concentrically with the openings of the C facing either right or left.
From outside in, the C openings face Right, Right, Left, Right.
(This one particular image reminds me of a lot of things. Endoplasmic reticula, sure, but also eye tests, mazes, Comedy Central, and Super Hexagon.)
The big and small
The view through the microscope gives a clue to unlock the safe.
Press the buttons on the side of the C openings from big to small, then from small to big:
R R L R R L R R
The safe opens. (You didn't even need to turn the handle!) There's a box inside with a large keyhole-shaped space with black triangle and rectangle markings, and a caterpillar chewing on some leaves.
Three flasks
Go to the lab table with the three flasks on it, and use the vial on each of them. (Unstopper the round-bottomed flask first.)
The gray liquids in the flasks turn green, pink and yellow. Now we can open up that one box.
Use the buttons on the sides of the box in the bottom cupboard to adjust the outlines and backgrounds to match the flasks:
Backgrounds: [Green Pink Yellow] (Click the left button four times.)
Outlines: [Pear Triangle Round] (Click the right button six times.)
The box lid opens. Take the matchbox and read the note: place a beaker of water down, a test tube in it, the tube of the distiller in the test tube, and light the fire under the flask.
Distillation
Use the ball-on-stick on the sink handle, then push it down to turn on the water and fill the beaker.
You should now have the necessary items to start distillation:
A beaker of water, taken from the cabinet, and you just filled it.
An empty test tube, taken from the test tube rack next to the microscope.
A matchbox, taken from the boxin the lower cupboard.
Place the full beaker under the end of the tube, then the test tube in the beaker. Go back to the (now) yellow flask, uncap the lamp and light it with the matchbox.
Back up, zoom in again, and take the test tube which now has orange distillate.
Seed planting
Go back to the locker to the right of the microscope, which is now unlocked (from the first computer code). Open the door and take the seed.
Drop the seed in the plant pot, and then drizzle the orange test tube fluid all over it. Open the blinds to let the sunlight in.
(You don't have to water the seed, even though the game lets you do that if you haven't used the beaker.)
Switch views by turning left, then turn back again. The seed has now grown into a small tree with a key hanging off one of its branches. It's actually a fruit shaped like a key, complete with triangular and rectangular notches.
Exit
Use the caterpillar on the apple (door handle), then switch views by turning right and back again. The worm has eaten a keyhole into the apple. Use the key on the apple, then click on the door to escape.
Enjoy your picnic with apple pie and coffee!
There's actually a second ending for Laboratory.
After opening the door with the apple handle,
don't exit but go back to the computer, there's a new file!
It shows a location under the prohibition sign.
There's a new key hole underneath, but where's the key?
After searching through the whole lab, you decide to leaf through that book next to the safe, maybe it has another secret compartment...
Thanks for pointing that out. (I really should stop assuming that yonashi games have 1 end.) You nailed it with the description, but I'm going to post a longer spoiler for completeness:
Laboratory (second end)
So you've decided that perhaps it's not safe to make pie out of the same stuff the worm ate a keyhole from. There's got to be another way! (Save your game.)
Turn around and go back in the lab. The laptop's screensaver has changed.
Click on its screen to find another white folder on its desktop, and click on that to find another clue.
That clue points to a spot right under the prohibition sign (above the trash bin). Nothing in this hidden compartment but a key hole, and we're all out of keys.
Perhaps the book said something about this? Let's see... *flip*, no, *flip*...
(Two flips later) Aha! Another compartment, with a purple fruit key in it this time.
Use the key on the hidden keyhole, which slides the whole storage cupboard aside.
Click the door to escape, and enjoy giant strawberries with giant bees under a giant pear tree next to a giant carrot patch.
Two fetch quests for the price of one?
Relaxation Escape
Two escapes for the price of one!
Game A
Exploration
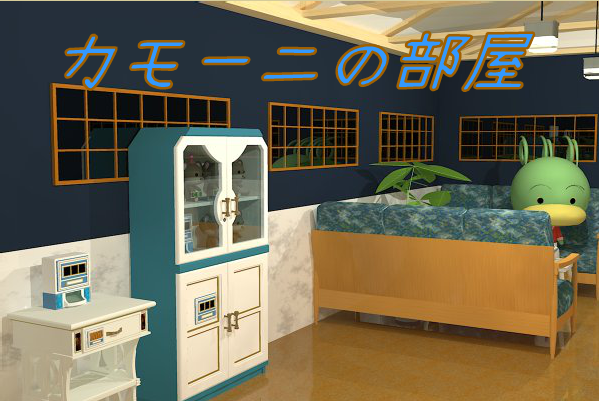
Right away, you can click on the duck in the middle - she wants a book of some sort. Perhaps a fairytale?
The wardrobe on the left has its handles tied together with wire. The middle table has a box on it, which I'd guess is a three-something code. It's not powered on, likely beecause the left octagonal slot is empty. Check under the table to find an octagonal purple gem on an octagonal base. Octagons!
Move to the right side of the room (there's no turning, just left and right. The door's locked, and the grate above it is too high to reach. There's a shelf with a decoration with digits on it: 2, 3, and 5, but the digits are on top of a counterclockwise arrow, so 532 it is.
The table here has a box almost exactly like the last one. Comparing the two, the only difference is in the color of the octagonal slot: green for this one, purple for the other. The cupboard next to it has three empty compartments, with doors in green, blue and red.
Purple code box
Go back to the box on the table that the duck is sitting at. Insert the purple gem in the slot on the box. The box turns on, and you need to enter a three-digit code.
You saw one of those codes just now!
From the shelf top: 532.
Open the box, and take a pair of pliers. The base of the box is decorated like the top, with three black rectangles. There are some teardrop-shaped colored regions in the rectangles: pink bottom, blue top, then both blue top and pink bottom.
Snip!
Cut the wire around the wardrobe handles with the pliers.
Take the ladder inside, then zoom in on the five cards hanging on the pole. Each of the five cards has a colored rectangle on it: Red Green Blue Red Blue. There are red arrows pointing to the right across the top of the hangers.
Three doors
Go to the cupboard on the right, and click the three doors in the order given by the hanging cards.
R G B R B = Bottom Top Middle Bottom Middle
Zoom in closer on the middle drawer and take the green gem.
Green code box
Put the gem in the slot. The buttons on the box light up, displaying white digits with filled interiors. The counters in the 0s are green, those in the 6s are pink, those in the 8s are blue and pink, and those in the 9s are blue.
Those colors look a little familiar...
Pink, Blue, Blue+Pink = 6 9 8
Open the box and take a duck-handled screwdriver.
The climb
Place the ladder under the grate, and remove the two nuts on the sides with the screwdriver. Get the book.
Returning a book
Give the book to the duck in return for a duck key. (Click on her again and she thanks you.) Use the duck key to open the door and escape.
Congratulations! (But your prince is in another room.)
Game B
Exploration
Once again, click on the duck right away. He wants 10 duck tokens. But there's only two screens in this room, so it might be a challenge.
Click the sofa and take a duck token. Examine the box on the table, which has buttons with hearts drawn on them which change color when clicked. There's a gray diamond in the top-left corner of the box.
Back up, and turn left to the other screen. Start on the left, which has a bunch of hearts on skewers. Cute heart-shaped cutouts, that is. The hearts are a bunch of pastel colors, including red, green, yellow, two shades of blue, and gray, and the skewers end in a bunch of polygonal bases on the bottom:
1=Yellow 2=Lightblue 3=Green 4=Red 5=Gray 6=Violet

312546

545_21

13__52

45___3

6____4

_____5

======

708546 sides
Next to the hearts, there's a box with six square buttons (and a large button). On the shelf below that, there's a locked box with a duck token beside it.
There's a bunch of photos on shelves mounted to the wall. A duck token sits between the two top photos. The middle left photo shows a dog(-girl) searching through a cupboard. The door lock reads 663.
The door is locked with a 3-digit code. Next to it, there's a small table with a box on it. The buttons have red outlined numbers over sillhouettes of different hats: flat-top, party hat, wide-brim.
The drawer on that table is locked, and the lock has six gray hearts on sliders, each with six possible positions. There's a shelf below that with a duck token on it.
Next to that, there's a cupboard. The top doors are locked and need a key (you can faintly see bears through the glass), and the bottom doors are locked and need a three-digit code.
Straight from the photo
Enter the three-digit code from the photo on the cupboard lock.
663
Open the doors, take the duck token, and read the clues. There's a bunch of polygonal shapes on the ends of the shelves:
7 8

6 0

4 5 sides
In the middle, there's a clue with a heart and "1~6" written beneath.
Six shapes
Use the clue in the cupboard and the hearts on skewers to determine the order of buttons for the box with six buttons.
123456 = 584076
Press the bottom-right, top-right, bottom-left, middle-right, top-left, middle-left buttons. (Or SE NE SW E NW W, if that's easier to read.)
A duck token drops out of the box.
Six hearts
Position the six hearts on the drawer lock according to the heights of the gray hearts on the skewers.
1, 3, 1, 0, 2, 5 clicks from the top.
Open the drawer, take the key, and then read the clue:
A B C

2 7 4 I

8 1 3 II

5 9 6 III
Top cupboard
The key from the drawer opens the top cupboard.
There's six bears here. They're wearing blue flat-topped hats, red party hats and green wide-brimmed hats: 1, 3, and 2 of them. The first three bears on the top shelf hold signs reading A II, C III, B I.
Take the duck token between the bears on the bottom shelf, then examine the box next to it, which requires a three-digit code.
Polybius square
Use the grid in the drawer to decipher the signs the bears are holding and get the three-digit code for the box in that cupboard.
A II = 8, C III = 6, B I = 7
Enter 867 as the code. A duck token drops out of the box.
Hat code
Use the bears' hats to get the three-digit code for the box on the table next to the cupboard.
1, 3, 2 of each type of hat.
Enter the code, and a duck token drops out.
Duck's box
Go back to the first screen, and unlock the box on the table using the hearts as clues.
The diamond skewer has red, light blue and gray hearts. (4, 2, 5 clicks from violet.)
Take the key from this box.
Plain box
Use the key from the duck's box to unlock the other box. There's a note inside, a black star on a blue background that extends to the top of some beveled rectangular...
Okay I can't describe this one. Just find it!
It's the inside of the top cupboard. Open the cupboard door, then click the blue portion above the C and B bears. There's a hidden compartment with a duck token inside!
Returning tokens
You should now have 10 tokens:
On sofa
Next to plain locked box
Between two top photos
On shelf under drawer
In bottom cupboard
From box with six buttons
Between bears in top cupboard
From box in top cupboard
From box on table
In hidden compartment in top cupboard
Give the 10 tokens to the duck, who gives you the code for the door: 234.
Unlock the door with the code and back up. The door opens, and you're out!
Second End
So maybe you've discovered that you can skip several of the steps. (Find the hidden compartment without being told where it is, and the game helpfully makes the locked box empty so you don't have to search for that same clue.)
To get the second (bad) ending for this part, open the door with the code 234 without returning the tokens.
Thank you, kktkk and Dr4g0nfly, for corrections. I knew about the second ending in daba but completely forgot about it and in Yonashi I didn´t find it. I was not looking for it, actually, assuming there is not any (like kktkk) and didn´t check.
need help on Laboratory
the 3 tubes. i'm supposed to put fluid in them but I canlt interact with them so I don't understand how to put them in. Am I doing something wrong?
@Paul: Leave those alone!
For the test tubes with yellow fluid, you really can't touch them.
The flasks you want are on the other table, with the gray fluid.
I found that out later but I didn't see anything else at first. anyway as always great walkthroughs, kk.
Laboratory was the most fun escape game I've seen for a while.
But I wouldn't have been able to finish it on my own if it hadn't been for the walkthrough hint about
the existence of the lab table at the bottom right of one of the screens.
Just so you know....
The graphic on the main page links to Weekday Escape #133 not #139!
He's a chicken I tell ya, a giant chicken!
(Somebody had to say it)
Update