

![]() Oh! Hey, um, you caught me a little by surprise. I guess I've just been real busy at the moment with... Well, never mind what. All will be explained. When the timing is right. But you don't want me yakking on endlessly about all this sort of stuff. You want some more fun free escape games, and it just so happens that I do have a couple of those...ah, um, yes. Here's one from Yomino Kagura, along the same lines of previous Yomino Kagura escape games, but that's a good thing since it's so enjoyably well put-together. More? What, you really want more already? Okay, fine. Here's also a game by Flash 512; it's the third in a series but you can jump right in mid-swing. It's all good. Or, you can play the other two first. This day, this Weekday Escape? Well it's all about you, babe, so go on ahead and dig in...
Oh! Hey, um, you caught me a little by surprise. I guess I've just been real busy at the moment with... Well, never mind what. All will be explained. When the timing is right. But you don't want me yakking on endlessly about all this sort of stuff. You want some more fun free escape games, and it just so happens that I do have a couple of those...ah, um, yes. Here's one from Yomino Kagura, along the same lines of previous Yomino Kagura escape games, but that's a good thing since it's so enjoyably well put-together. More? What, you really want more already? Okay, fine. Here's also a game by Flash 512; it's the third in a series but you can jump right in mid-swing. It's all good. Or, you can play the other two first. This day, this Weekday Escape? Well it's all about you, babe, so go on ahead and dig in...
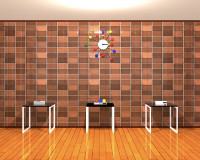 Escape from the Room with Three Pictures 3 - This latest from Yomino Kagura has a good assortment of puzzles, but something is lost with the quite literal labels on the clues. Instead of using inference to put it all together, as you often would in a Tesshi-e game, all your mental power is tested only as you decode the clues to unravel a series of codes. As usual, the secret to getting out lies in collecting three shapes, placing them in the whimsical blue-checked box, and nabbing the door key. Though on the simpler side, the well-implemented puzzles, together with a setting that blends of 60s era mod decor with game world kitsch, keep the experience pleasantly worthwhile. It'll scratch the escape game itch, but it won't satisfy any substantial game playing urges.
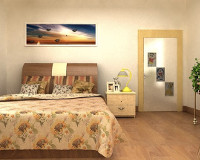 Home Story 3: My Room - Chinese game developer, Flash512, knows how to make great looking escape games. This beautiful room is as interesting to explore as it is to puzzle your way through and escape from. The way isn't completely smooth: some items hide in plain sight because they are too skinny or blend too well with the background; but apart from some difficulties in finding and picking up the required inventory, the Home Story series proves Flash512 as a designer we want to see more from, more often. NOTE: to start the game, scroll down and select one of three "PLAY" links: each will take you to the game in much the same manner, where you'll be asked to sign in with any name you choose.
See more of the house! You can also play Home Story 1 and Home Story 2: Bedroom and share your experience with the JIG community.
We love escape games, and our readers love talking about them and sharing hints! How about you? Let us know what you think, ask for clues, or help out other players in the comments below.


Walkthrough Guide
(Please allow page to fully load for spoiler tags to be functional.)
Escape from the Room with Three Pictures 2
Six codes to freedom. This is an easy one...let's do it.
The box with the "time" code
This code needs to be entered into the box on the rightmost table underneath the clock.
Not too surprisingly, the clues are the clock and the poster that reads "Clock / green = 12."
Use the time displayed by the clock, after rotating so that the green circle represents 12 o'clock.
6:15. Take NOTE #1.
Code 2, Electric Boogaloo: the panel beneath the "Clock / green = 12" poster
This code needs three colors.
The clues are the clock, once again, and NOTE #1.
Green, yellow, blue. (For the colorblind: 3, 2, and 1 clicks.) Lift the poster and take the RED CIRCLE.
Code III, The Quickening: the box with the three colored buttons
This is the box on the leftmost table underneath the clock.
The clue is the poster on the opposite wall with six colored numbers.
Click the buttons in the order specified by the poster: red, blue, red, red, yellow, blue. (For the colorblind: left, middle, left, left, right, middle.) Open the box and take NOTE #2.
Live Free or Solve Codes: the light switches
The upper and lower switches by the door look like they need to be pressed in a certain order.
NOTE #2 is the clue.
Up, up, down, up, up, down, down. Turn off the lights and look around.
Three numbers out of six on the wall poster are now glowing. Make a note of them and turn the lights back on (unless you want to listen to some mood music first).
Code: Resurrection: the panel beneath the poster with six colored numbers
This code can be found on NOTE #2.
From left to right: red 4, blue 2, yellow 5.
Lift the poster and take the YELLOW TRIANGLE.
Episode V: Attack of the Codes: the box right below the clock
Red, blue, and yellow circles as a hint, and a code that requires three shapes.
The other two clues are the shapes on the windows, and the "Window" poster.
Combine the clues to arrive at the correct code: asterisk-style star, asterisk-style star, five-pointed star. Take the KEY CARD.
I Still Know What You Did With All These Codes: the panel beneath the "Window" poster
The clues are the shapes on the windows and the KEY CARD.
Count the shapes on the windows, as indicated by the KEY CARD: 9 asterisk-style stars, 5 five-pointed stars, 2 diamonds.
Insert the key card, enter the code 952, and lift the poster to obtain the BLUE SQUARE.
Code Name: Code: the box by the door
This isn't actually a code for once. Just insert the RED CIRCLE, YELLOW TRIANGLE, and BLUE SQUARE into the traditional box.
Take the YELLOW KEY and do what comes naturally with it, unless what comes naturally is eating it, in which case you may need more help than a walkthrough can offer.
Posted by: abfdrumz |
November 20, 2014 2:33 AM
|
November 20, 2014 2:33 AM
My first walkthrough; let me know if I messed it up.
Home Story 3 Walkthrough
First pass through the room
Open the curtains to let some light in. Ah, that's better. Oh, what's this stuck to the window? Well you can't seem to take it off, but keep it in mind. Look up at the light fixture. There's a hook at the bottom, but you don't have anything to hang from it yet.
Turn right. There's a cabinet that needs handles, some kind of flower that has a secret and a bunch of Greek letters on it.
Turn right towards the bed. There's a picture that's missing a bird, the bed with a helpful arrow pointing left, a blank spot on the wall, a nightstand with a missing knob and a bulb-less lamp. Follow the arrow on the bed and pick up the tweezers (pincers).
Turn right towards the desk.
There's a houseplant on a stand with a pair of scissors tucked into the pot, so grab the scissors.
On the top shelf above the desk, there's another plant. Grab the odd handle from its pot.
On the lower shelf there's a pink box with a bow on top -- it won't open, but there's a keyhole on the right side.
You can check out the printer and the monitor but you can't interact with them yet.
The cactus on the desk will poke you, but you can use the tweezers (pincers?) to take a needle from it.
Underneath the desk there's a set of drawers; you'll need a four letter code.
There's also an empty outlet and a computer. You'll need a power cord to plug the computer in. The computer has the letters "DIDAH" on the front, as well as a USB port.
Next to the desk there's a picture with a girl and a cat and some arrows in the background, take note of the formation.
There's a planter full of grass on top of a cabinet with shapes and a four digit code needed.
The bird picture
Turn towards the bed and zoom in on the nightstand drawers. Put the odd handle on the top drawer and open it. Take the bird.
Zoom in on the picture above the bed and put the missing bird in its place. Notice that when you click on the birds, you can get them to face right or left.
Use the arrows from the girl and cat picture to position the birds.
top: left, left
mid: left, right
bottom: right, right
A bunch of Greek letters will appear.
The secret in the flower
Use the order of the Greek letters from the bird picture to reveal the flower's secret.
I don't know Greek and I don't have a screenshot, but here's the order using North-South descriptions:
SW, NE, SE, E, N, S, W, NW
Take the heart-shaped key.
Pink box with a bow on top
Use the heart-shaped key to open the box. You'll need to zoom in on the keyhole to use the key.
Take the bulb out of the box.
The four-letter code drawer
Go to the lamp on the nightstand and put the bulb in. It will turn on, and you'll be able to get a look at the base of the lamp, which has a four-letter code.
Use this code on the drawer under the desk. The code is:
vron
Take the handles
Big Cabinet
Go to the big cabinet and use the handles to open the doors.
On the left side, there are some vase-like things on the top shelf, a couple of sculptures on the next shelf down, a shelf full of books, and two drawers at the bottom.
Take a closer look at the shelf of books. Anything familiar?
There's a book with the letters "DIDAH" printed on the spine.
Take the USB.
Open the lower drawer and take the power line.
On the right side of the cabinet, there are more vase-like things on the top shelf, a puzzle box, a shelf full of books, and two empty drawers. There's not much you can do right now but take a look.
The computer
Go to the outlet under the desk and connect the power line. It will automatically connect to the computer, and now you can turn the computer on.
The USB won't connect at first. Take a closer look at it:
there's something stuck in the USB. Use the needle to take it out.
Plug in the USB to the computer.
Now the monitor will display a picture puzzle. Solve the puzzle (you're on your own, haha) and it will turn into... well it looks like a CAPTCHA gone wrong to me.
Use the printer button on the monitor and pick up the blueprint from the printer on the desk.
The four-digit shapes code
Go to the cabinet with the shapes and the four-digit code. The clues can be found in the big cabinet.
Hint 1:
The clues on the left door correspond to digits on the right door.
Hint 2:
Notice that the last shape is a white square, not wood-colored like the triangle and the circle.
Hint 3:
There are no square-shaped objects to count in the big cabinet.
Last hint:
Don't forget to include the white tree and the black dolphin for the last two digits.
The code is:
4345
Take the watering can.
Grass box planter
Go to the grass box planter next to the desk. Use the scissors to trim some of the grass.
Use the watering can on the soil in the planter. It will wash away some of the soil, revealing something underneath. Take the chain.
Puzzle box
The puzzle box in the big cabinet seems to use some unusual symbols in its code.
Hang the chain from the hook under the light fixture. It casts an odd shape on the blank spot of wall above the nightstand.
Stick the blueprint to the adhesive paper on the window so the light will shine through. Take another look at the wall above the nightstand. An emoji!?
Yep, that's the code for the puzzle box. Puzzle box code:
(o^~^o)
Enter it in, and voila, there's the door key.
And since I had to try pretty much every door to figure out which one the key would unlock:
go out to the living room -- it's the door next to the piano.
Posted by: exe_cute |
November 21, 2014 6:53 PM
|
November 21, 2014 6:53 PM