

![]() Right, I know you came by to play more escape games, of which Wednesdays have become rather well known here at JIG, and I'm not going to argue with that—there's nothing I love more than a smattering of thinky puzzles and creative clue solving to bridge the week. I also happen to think more places should take on the escape-the-room genre for reals: supermarkets (want that can of beans? then best decipher the bar code first), airports (a genuine step up from the current maze of TSA screenings and bumped flights), and schools (each day, a new series of "puzzles" to solve before that classroom door is unlocked), just to name a few. Then, perhaps, the idea will catch on? Instead of campaigning, debates and elections, politicians will show their mental prowess by escaping a series of issues-themed rooms: first candidate to earn the door key shall be deemed the winner. Wars? Pfft. Escape games. It could work. Until that day, though, try this week's selections: life's a bowl of cherries in FunkyLand's newest fruit kitchen, Amakuchi Game debuts on Weekday Escape with a mariner's dream room, and Sneedle entertains with eerily supernatural occurrences...
Right, I know you came by to play more escape games, of which Wednesdays have become rather well known here at JIG, and I'm not going to argue with that—there's nothing I love more than a smattering of thinky puzzles and creative clue solving to bridge the week. I also happen to think more places should take on the escape-the-room genre for reals: supermarkets (want that can of beans? then best decipher the bar code first), airports (a genuine step up from the current maze of TSA screenings and bumped flights), and schools (each day, a new series of "puzzles" to solve before that classroom door is unlocked), just to name a few. Then, perhaps, the idea will catch on? Instead of campaigning, debates and elections, politicians will show their mental prowess by escaping a series of issues-themed rooms: first candidate to earn the door key shall be deemed the winner. Wars? Pfft. Escape games. It could work. Until that day, though, try this week's selections: life's a bowl of cherries in FunkyLand's newest fruit kitchen, Amakuchi Game debuts on Weekday Escape with a mariner's dream room, and Sneedle entertains with eerily supernatural occurrences...
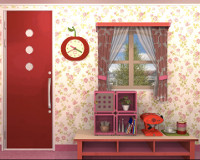 Fruit Kitchens No.13: Cherry Pink - FunkyLand FunkyLand FunkyLand. It is the Marcia Brady of the escape family: its popularity seemingly so effortless, simple yet stylish, unshakably cheerful and even rather flirtatious. Yes, the analogy fits. Because we can't help liking anything that comes from FunkyLand, even if it's a bit predictable. There are times when FunkyLand takes center stage with clever presentation and creatively tricky codes to solve, but this isn't one of those times: just a repetition of tasks and puzzles you've probably seen in other games several times before. Still, Cherry Pink is too pretty to ignore and too whimsical to care much about displaying I.Q. points or stimulating repartee.
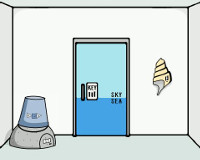 Escape from Umino Room - Or otherwise known as "Ocean Escape" depending on how your browser's translator is set-up. Eschewing the traditional play button, Amakuchi Game ushers you inside this sea-inspired room when you click on the little blue fish swimming across the title screen. As unassumingly cute it may first appear to be, this little creation will do its best trying to stump you with less-than-overt clues and a ghost leg puzzle might prove frustrating to those of us who still haven't worked out the logic behind that particular form of puzzle. The author writes that some clues have been revised, hopefully improving their logic, but it's not always so straight-forward. Even so, there's something pleasantly charming and curiously engaging about the presentation; it's hard to stop once you begin. This should be a good one for our community to work out together, so I'll turn the rest of the commentary over to you: thoughts?
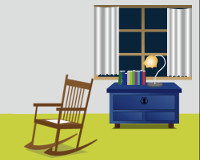 RRU Escape 3 - Sneedle's artistic talent lies in an intriguing ability to communicate so much even without words. It's not fully articulated why this room is so supernaturally-inclined, and the ways in which some clues work can be equally preternatural, but that only adds to the overall mystic aura. That's all part of why the game is entertaining. The biggest hang-up you might run into, though, comes before the game begins—some of you might encounter an unusually long-playing video ad. The way around it is to click the "skip" bar in the bottom right corner of the ad (it's written in Japanese, but you'll notice two right arrows after the lettering). After that, it's pretty smooth sailing, with just a smattering of codes and only a few spooks to deal with.
We love escape games, and our readers love talking about them and sharing hints! How about you? Let us know what you think, ask for clues, or help out other players in the comments below.


Walkthrough Guide
(Please allow page to fully load for spoiler tags to be functional.)
Fruit Kitchens #13 Cherry Pink Walkthrough
The first few cherries, and other handy items
Take a closer look at the kitchen table.
You'll find CHERRY #1 in the bowl of flowers.
Check the low table under the window.
Open the lid and upper compartment of the container on the right end of the table to find CHERRY #2.
There's something useful on the small table to the left of the kitchen counter.
It's the CAN OPENER, next to the basket of bread.
I bet you couldn't have taken that CAN OPENER if there wasn't a can around here somewhere to open with it.
The can is on the kitchen counter. Open it and take CHERRY #3.
The cabinets above the sink contain another useful tool.
A pair of PLIERS can be found in the lower left of the left-hand cabinet.
The frog device
What's that odd-looking gizmo to the right of the stove?
There are two colored dials here, but it looks like one is missing. Can you find it?
There's a pink dial covering a compartment on the kitchen table, but it won't come loose.
Use the PLIERS to take the PINK DIAL, as well as CHERRY #4, which was hidden beneath it.
Insert the PINK DIAL into the frog device.
Looks like each dial can have six possible positions. There must be a clue around here somewhere...
Have a look at the cherry-shaped clock next to the window.
The colors of the hour, minute, and second hands match the colors of the dials!
Move the dials to the positions indicated by the hands: pink at 10 o'clock, green at 4, red at 8.
Click the "OK" button and take CHERRY #5.
The 3-by-3 panels
There's an interesting-looking panel to the left of the kitchen counter.
Nine buttons, numbered 1 through 9. But in what order to press them?
Maybe the clue is right in front of you?
Press the buttons in descending order from 9 to 1, as indicated by the graphic below the panel. Take CHERRY #6 and the PINK KEY.
The panel has changed to a drawing that seems to indicate a different order of button-pressing. Nothing happens when you try it, so it must need to be used someplace else.
There's another 3-by-3 panel in the pink cupboard underneath the window.
Use the PINK KEY to unlock the panel cover.
Press the nine buttons in the order indicated by the other panel, and click to open the door and reveal CHERRY #7. You win!
Posted by: abfdrumz |
November 12, 2014 10:57 AM
|
November 12, 2014 10:57 AM
Escape from Umino Room Walkthrough
The opening scene
After loading, the game opens with a little blue fish swimming back and forth across the scree. Click on it to start the game.
Exploring
You are now in a room with 4 walls.
First wall
From left to right, we see:
Yellow lifesaver - zoom in to the box above it to see an up and down arrow head. We need the right combination.
Orange octopus(?) facing right on a filing cabinet (?) - we need a 3-shape code for it to do something.
Filing cabinet (locked) - we need a 3-image code to open it.
A 3x3 grid of orange dots with all connected to the center dot. The top middle dot looks like the head of the octopus. It is facing left.
A green boat with a box and white flag on it. Clicking on this, we see a similar 3x3 grid, no lines. All the dots are orange except for the bottom middle dot, which is black. This black dot also looks like an octopus head. This head faces right.
There are three clickable grey circles below each column of dots. Clicking these changes the dots of a particular column to blue. We need the code for which dots should be blue.
Second Wall (to the right of the first)
The entire wall shows a picture of a grey semicircular boat-like object apparently in the sea (there are waves). The sky is light blue and the sea is dark blue. There are three letters on this picture - r (sky), j (boat), m (sea).
Third wall (to the right of the second)
From left to right, we see:
Overturned pail with a pic of a fish on it - click on the "180 degree" sign to flip the fish over. It appears to be made of 3 separate shapes. Hmmm.
Pile of sand - click on the sand to show 3 boxes with the symbol of a key to the left of them. We need the colour combination for these boxes.
Door - This is two-toned - the top is light blue and contains the word "SKY". The bottom is darker blue and contains the word "SEA", which makes sense. Also, there's a box with the word KEY on it. Click that to find 3 columns, mainly white, with some blue on the bottom. Clicking on the blue toggles the amount of blue in the column (1 - 5 blocks). We need the code for how much blue in each.
Shell - click on this to find a vertical set of 3 colour boxes. We need the colour combination for these boxes as well.
Fourth wall (to the right of the third)
This is similar to the second wall, except the sky is orange, the boat is a different shape (although it looks like the exact inverse of the other one) and the letters are u (sky) and g & t (boat).
Solving the puzzles
The octopus
Use the shape of the fish from the pail.
left arrow, square, left arrow
The octopus squirts out a blue goo to cover some of the orange dots to the right.
The boat
The blue goo covered 4 dots. These are the dots in the boat puzzle that we need to turn blue. However, we have to picture the dots as rotated 180 degrees so the octopus head is aligned correctly with the boat puzzle dots.
The correct dots to turn blue are:
top centre, centre centre, centre right, bottom left.
There's a click and you're now facing the first wall again.
Click on the boat again and the flag will move in a sequence, left or right. Note the sequence.
The lifesaver
Click on the box connected to the life saver.
Click the up and down arrows in the sequence from the boat flag, then click the button below to open it.
right, left, right, right, right
The filing cabinet
We need a 3-pic combination. Click on the lifesaver - solving the last puzzle gives us the hint we need.
A little white creature is now wearing the lifesaver. Click on the lifesaver again to see the clue. We see the 3 boxes and four vertical lines (with cross lines) pointing down to the 4 available images in the filing cabinet boxes.
Some intuition is involved here ... for each box, we need to trace down to the corresponding image - where we meet a cross line, we need to follow that across to the next vertical line.
The combination is:
jelly fish, fish, seaweed(?)
The shell (vertical colour boxes)
The filing cabinets opened and show 3 vertical drawers with the letters r, m and u going down. I think we've seen these letters somewhere before ... right???
Use the colours corresponding to these letters on the pictures on walls 2 and 4 to solve:
light blue, dark blue, orange
The pile of sand (horizontal colour boxes)
Click on the shell to find a new clue - there's a pic of two pieces that seem to fit together, with one on it's side.
Also, in the background, there are three letters - j, g, t.
This seems to indicate we need the colours for these letters. But they're all ship-coloured, which is grey ... and that's not an option.
This is where the clue of the two pieces fitting together comes in. Recall that the two pics of the ship seem to be the inverse of each other. i.e. if you rotate one and place it on the other, they form a full circle. The "hills" on one fit perfectly in the "valleys" of the other.
If we do this, j would end up in the sky of the fourth wall pic. Similarly, g would end up in the sea of the second wall pic, but t would be in the sky.
So the code we need is:
orange, dark blue, light blue
The door
The pile of sand has now yielded the final clue.
A sheet of paper contains S, E, A and S, K, Y. Each letter is surrounded by a combination of blue squares, green dots and sketched fish.
All that's left to do is count how many blue squares are associated with the letters on the door ...
K - 4
E - 2
Y - 5
Enjoy your day at the beach :)
Posted by: stuckinabasement |
November 12, 2014 3:53 PM
|
November 12, 2014 3:53 PM
RRU Escape 3
Aquarium View
Open left aquarium doors and grab FLASHLIGHT,
Note colored circles on trees,
Turn right
Rocking Chair View
Wait for chair to rock,
Take PAPER on chair,
Turn right
Kitchen View
Click knife,
Use PAPER on knife for ARROW CODE,
Note colored circle on wall,
Turn right
Stage View
Click singer,
Use ARROW CODE on singer's chest,
(Clockwise from top left)Left ⬅︎, Down Left ⬋, Up⬆︎, Up⬆︎, Click center
Collapsed singer reveals COLOR CODE,
Turn right
Aquarium View
Click aquarium,
Use COLOR CODE on aquarium buttons,
Orange x2, Yellow, Orange, Yellow x2
Back out and grab DICE from aquarium,
Turn Left
Stage View
Click left speaker,
Use DICE in the bottom squares on speaker,
Code is from the color circles noted earlier,
Red 4, Yellow 1, Blue 3, Click center button
Back out and click right speaker,
Take KEY1,
Turn right (or left) twice
Rocking Chair View
Use KEY1 on locked drawer,
Take KEY2,
Turn right
Kitchen View
Use KEY2 on locked door,
Go through door
Well View
Click well,
Use FLASHLIGHT in well,
Spooky ghost comes out to give WINDOW CODE,
Back out and turn left
Rocking Chair View
Click window,
Use WINDOW CODE on window,
5132, click red bar
Window opens,
And you're OUT!
Posted by: discopanda |
November 12, 2014 4:41 PM
|
November 12, 2014 4:41 PM